Users Guide
Page 3
... a Video Source for Sound 42 Connecting to Computer Sources 42 Connecting to Go for VGA Video 43 3 Contents Pro L1100U/L1200U/L1300U/L1405U/L1500U/L1505U User's Guide 11 Introduction to Your Projector ...12 Projector Features...12 Product Box Contents...13 Additional ...Components ...15 Additional Projector Software and Manuals 16 Optional Equipment and Replacement Parts 17 Warranty and Registration Information 19 Notations Used...
... a Video Source for Sound 42 Connecting to Computer Sources 42 Connecting to Go for VGA Video 43 3 Contents Pro L1100U/L1200U/L1300U/L1405U/L1500U/L1505U User's Guide 11 Introduction to Your Projector ...12 Projector Features...12 Product Box Contents...13 Additional ...Components ...15 Additional Projector Software and Manuals 16 Optional Equipment and Replacement Parts 17 Warranty and Registration Information 19 Notations Used...

Users Guide
Page 4
... Wired Network Settings 58 Wireless Network Projection ...61 Installing the Wireless LAN Module 61 Using Quick Wireless Connection (Windows Only 64 Selecting Wireless Network Settings Manually 66 Wireless LAN Menu Settings ...69 Selecting Wireless Network Settings in OS X 70 Selecting Wireless Network Settings in Windows 70 Setting Up Projector Network E-Mail...
... Wired Network Settings 58 Wireless Network Projection ...61 Installing the Wireless LAN Module 61 Using Quick Wireless Connection (Windows Only 64 Selecting Wireless Network Settings Manually 66 Wireless LAN Menu Settings ...69 Selecting Wireless Network Settings in OS X 70 Selecting Wireless Network Settings in Windows 70 Setting Up Projector Network E-Mail...
Users Guide
Page 7
... Blending the Image Edges ...173 Adjusting the Black Level ...175 Matching Tint and Brightness (Screen Matching 179 Matching the Screens Automatically 180 Matching the Screens Manually 181 Scaling an Image...183 Enabling Protocol Emulation ...185 Viewing 3D Images ...186 Saving Settings to Memory and Using Saved Settings 186 Saving a Scheduled Event...
... Blending the Image Edges ...173 Adjusting the Black Level ...175 Matching Tint and Brightness (Screen Matching 179 Matching the Screens Automatically 180 Matching the Screens Manually 181 Scaling an Image...183 Enabling Protocol Emulation ...185 Viewing 3D Images ...186 Saving Settings to Memory and Using Saved Settings 186 Saving a Scheduled Event...
Users Guide
Page 12
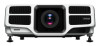
... conditions. white light output measured in the Documentation Where to Go for Additional Information Projector Part Locations Projector Features The Pro L1100U, L1200U, L1300U, L1405U, L1500U, and L1505U projectors include these sections to -use setup and operation features • Interchangeable bayonet lens... or video device including HDMI, BNC, DVI-D, SDI (Pro L1405U/L1500U/L1505U), and HDBaseT • Ports for connecting an external monitor and external speakers Easy-to learn more about your projector and this manual. Projector Features Notations Used in accordance with IDMS 15.4;...
... conditions. white light output measured in the Documentation Where to Go for Additional Information Projector Part Locations Projector Features The Pro L1100U, L1200U, L1300U, L1405U, L1500U, and L1505U projectors include these sections to -use setup and operation features • Interchangeable bayonet lens... or video device including HDMI, BNC, DVI-D, SDI (Pro L1405U/L1500U/L1505U), and HDBaseT • Ports for connecting an external monitor and external speakers Easy-to learn more about your projector and this manual. Projector Features Notations Used in accordance with IDMS 15.4;...

Users Guide
Page 13
• Create one large seamless display when projecting from multiple projectors using Edge Blending • Epson's Instant Off and Direct Power On features for quick setup and shut down • Support for Crestron RoomView ...message broadcast system to project timely messages to all networked projectors (Windows only) Product Box Contents Additional Components Additional Projector Software and Manuals Optional Equipment and Replacement Parts Warranty and Registration Information Parent topic: Introduction to Your Projector Related concepts Projector Part Locations Projector Connections...
• Create one large seamless display when projecting from multiple projectors using Edge Blending • Epson's Instant Off and Direct Power On features for quick setup and shut down • Support for Crestron RoomView ...message broadcast system to project timely messages to all networked projectors (Windows only) Product Box Contents Additional Components Additional Projector Software and Manuals Optional Equipment and Replacement Parts Warranty and Registration Information Parent topic: Introduction to Your Projector Related concepts Projector Part Locations Projector Connections...

Users Guide
Page 16
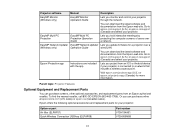
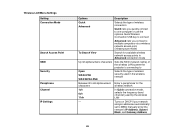
... sources listed here, you can install the projector software programs listed here and view their manuals for purchase from Epson or an authorized Epson reseller. Signal or connection type Additional component necessary Audio from certain ports Commercially available audio ... Compatible DVI-D cable HDBaseT Compatible 100Base-TX LAN cable SDI (Pro Compatible BNC video cable L1405U/L1500U/L1505U) Parent topic: Projector Features Related concepts Projector Connections Additional Projector Software and Manuals After connecting and setting up the projector, install the projector software...
... sources listed here, you can install the projector software programs listed here and view their manuals for purchase from Epson or an authorized Epson reseller. Signal or connection type Additional component necessary Audio from certain ports Commercially available audio ... Compatible DVI-D cable HDBaseT Compatible 100Base-TX LAN cable SDI (Pro Compatible BNC video cable L1405U/L1500U/L1505U) Parent topic: Projector Features Related concepts Projector Connections Additional Projector Software and Manuals After connecting and setting up the projector, install the projector software...
Users Guide
Page 17
... Lets you update firmware for more information. You can download the latest software and documentation from the Epson web site. Visit epson.com/projectorapp (U.S.) or epson.ca/projectorapp (Canada) for a projector over a network. Or you hold interactive meetings by projecting ... through the network. Epson iProjection app Instructions are included with the app Lets you monitor and control your projector. Go to a network that includes a wireless access point. sales) or epson.ca (Canadian sales). Projector software Manual Description EasyMP Monitor (Windows...
... Lets you update firmware for more information. You can download the latest software and documentation from the Epson web site. Visit epson.com/projectorapp (U.S.) or epson.ca/projectorapp (Canada) for a projector over a network. Or you hold interactive meetings by projecting ... through the network. Epson iProjection app Instructions are included with the app Lets you monitor and control your projector. Go to a network that includes a wireless access point. sales) or epson.ca (Canadian sales). Projector software Manual Description EasyMP Monitor (Windows...

Users Guide
Page 20
...part illustrations to learn about the parts on your questions to Epson technical support 24 hours a day. • If you still need help after checking this manual and any other sources listed here, you can use the Epson PrivateLine Support service to get quick solutions to common problems.... • epson.com/support (U.S) or epson.ca/support (Canada) View FAQs (frequently asked questions) and e-mail ...
...part illustrations to learn about the parts on your questions to Epson technical support 24 hours a day. • If you still need help after checking this manual and any other sources listed here, you can use the Epson PrivateLine Support service to get quick solutions to common problems.... • epson.com/support (U.S) or epson.ca/support (Canada) View FAQs (frequently asked questions) and e-mail ...
Users Guide
Page 55
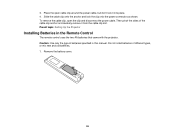
... that came with the projector. Place the open the clip and disconnect the power cable. Parent topic: Setting Up the Projector Installing Batteries in this manual. Do not install batteries of different types, or mix new and old batteries. 1. 3. Slide the cable clip onto the anchor and lock the clip onto...
... that came with the projector. Place the open the clip and disconnect the power cable. Parent topic: Setting Up the Projector Installing Batteries in this manual. Do not install batteries of different types, or mix new and old batteries. 1. 3. Slide the cable clip onto the anchor and lock the clip onto...
Users Guide
Page 57
...Network Follow the instructions in these sections to set up your projector and computer for use on a Network Related references Additional Projector Software and Manuals Connecting to a Wired Network To connect the projector to a wired local area network (LAN), use a Category 5 shielded cable or better.... 1. To do this, you can project through the access point using the Epson network software. Connecting to a Wired Network Selecting Wired Network Settings Parent topic: Using the Projector on a network. After connecting and setting ...
...Network Follow the instructions in these sections to set up your projector and computer for use on a Network Related references Additional Projector Software and Manuals Connecting to a Wired Network To connect the projector to a wired local area network (LAN), use a Category 5 shielded cable or better.... 1. To do this, you can project through the access point using the Epson network software. Connecting to a Wired Network Selecting Wired Network Settings Parent topic: Using the Projector on a network. After connecting and setting ...
Users Guide
Page 60
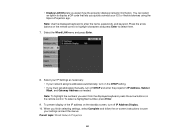
• Display LAN Info lets you must set addresses manually, turn off DHCP and enter the projector's IP Address, Subnet Mask, and Gateway Address as needed. Press the arrow buttons on -screen instructions to select ... on the standby screen, turn off IP Address Display. 10. Select your IP Settings as necessary: • If your iOS or Android devices using the Epson iProjection app. Note: To highlight the numbers you finish selecting settings, select Complete and follow the on the remote control to highlight characters and press...
• Display LAN Info lets you must set addresses manually, turn off DHCP and enter the projector's IP Address, Subnet Mask, and Gateway Address as needed. Press the arrow buttons on -screen instructions to select ... on the standby screen, turn off IP Address Display. 10. Select your IP Settings as necessary: • If your iOS or Android devices using the Epson iProjection app. Note: To highlight the numbers you finish selecting settings, select Complete and follow the on the remote control to highlight characters and press...

Users Guide
Page 61
... Settings in Windows Parent topic: Using the Projector on a Network Related references Additional Projector Software and Manuals Optional Equipment and Replacement Parts Installing the Wireless LAN Module To use additional network software to connect with... projector as described here, install the network software from the included CD or download the software and manuals as necessary. Wireless Network Projection You can connect to the projector wirelessly through the access point using.... 61 To do this option • Configuring the connection manually using the Epson network software.
... Settings in Windows Parent topic: Using the Projector on a Network Related references Additional Projector Software and Manuals Optional Equipment and Replacement Parts Installing the Wireless LAN Module To use additional network software to connect with... projector as described here, install the network software from the included CD or download the software and manuals as necessary. Wireless Network Projection You can connect to the projector wirelessly through the access point using.... 61 To do this option • Configuring the connection manually using the Epson network software.
Users Guide
Page 66
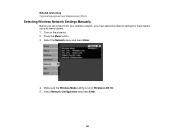
Press the Menu button. 3. Select Network Configuration and press Enter. 66 Related references Optional Equipment and Replacement Parts Selecting Wireless Network Settings Manually Before you can project from your wireless network, you must select the network settings for the projector using its menu system. 1. Turn on the projector. 2. Select the Network menu and press Enter. 4. Make sure the Wireless Mode setting is set to Wireless LAN On. 5.
Press the Menu button. 3. Select Network Configuration and press Enter. 66 Related references Optional Equipment and Replacement Parts Selecting Wireless Network Settings Manually Before you can project from your wireless network, you must select the network settings for the projector using its menu system. 1. Turn on the projector. 2. Select the Network menu and press Enter. 4. Make sure the Wireless Mode setting is set to Wireless LAN On. 5.
Users Guide
Page 69
... system the projector is connecting to Open WPA2-PSK WPA/WPA2-PSK Selects the type of wireless security used in the wireless network Between 8 to manually enter the network's IP Address, Subnet Mask, and Gateway Address 69 set to Off to 63 alphanumeric Enter a paraphrase for the characters wireless network 1ch...
... system the projector is connecting to Open WPA2-PSK WPA/WPA2-PSK Selects the type of wireless security used in the wireless network Between 8 to manually enter the network's IP Address, Subnet Mask, and Gateway Address 69 set to Off to 63 alphanumeric Enter a paraphrase for the characters wireless network 1ch...

Users Guide
Page 70
... the SSID on the network standby screen Selects whether to display the IP address on the network standby screen Parent topic: Selecting Wireless Network Settings Manually Selecting Wireless Network Settings in OS X Before connecting to the projector, select the correct wireless network in Windows Before connecting to the projector, select the...
... the SSID on the network standby screen Selects whether to display the IP address on the network standby screen Parent topic: Selecting Wireless Network Settings Manually Selecting Wireless Network Settings in OS X Before connecting to the projector, select the correct wireless network in Windows Before connecting to the projector, select the...
Users Guide
Page 93
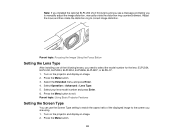
... Setting the Screen Type You can use the Screen Type setting to match the aspect ratio of the following lenses, you need to manually adjust the image distortion, manually rotate the distortion ring counterclockwise. Press the Menu button. 93 Press the Menu button. 3. Select Operation > Advanced > Lens Type. 5. Turn on the projector...
... Setting the Screen Type You can use the Screen Type setting to match the aspect ratio of the following lenses, you need to manually adjust the image distortion, manually rotate the distortion ring counterclockwise. Press the Menu button. 93 Press the Menu button. 3. Select Operation > Advanced > Lens Type. 5. Turn on the projector...
Users Guide
Page 160
.... 5. Select the Select Color setting and choose one of the red, green and blue colors) in focus before you use the Panel Alignment feature to manually adjust the color convergence (the alignment of the following: • R to exit the menus. The projected image size should not be at least 10 to...
.... 5. Select the Select Color setting and choose one of the red, green and blue colors) in focus before you use the Panel Alignment feature to manually adjust the color convergence (the alignment of the following: • R to exit the menus. The projected image size should not be at least 10 to...
Users Guide
Page 162
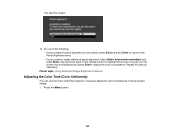
.... Repeat this screen: 14. Parent topic: Using Advanced Image Adjustment Features Adjusting the Color Tone (Color Uniformity) You can use the Color Uniformity feature to manually adjust the color tone balance in the projected image. 1. You see this step as necessary.
.... Repeat this screen: 14. Parent topic: Using Advanced Image Adjustment Features Adjusting the Color Tone (Color Uniformity) You can use the Color Uniformity feature to manually adjust the color tone balance in the projected image. 1. You see this step as necessary.
Users Guide
Page 164
... so they do not turn off during adjustment. 1. Select the color (Red, Green, or Blue) you want to the maximum value for each projector's images manually. Repeat steps 10 and 11 for all the projectors. 2. Follow the instructions in these sections to setup and project from two or more projectors to...
... so they do not turn off during adjustment. 1. Select the color (Red, Green, or Blue) you want to the maximum value for each projector's images manually. Repeat steps 10 and 11 for all the projectors. 2. Follow the instructions in these sections to setup and project from two or more projectors to...
Users Guide
Page 165
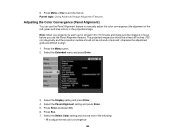
...images using lens shift. 8. Adjust the position of the following : • For automatic adjustment, configure tiling automatically. • For manual adjustment, configure tiling manually. 6. Adjust the brightness and tint of the following : • For automatic adjustment, set an ID for the master projector and the... remote control. • For manual adjustment, set an ID for each projector. 7. Do one of the image for Multiple Projector Control Projector Placement Image Aspect Ratio ...
...images using lens shift. 8. Adjust the position of the following : • For automatic adjustment, configure tiling automatically. • For manual adjustment, configure tiling manually. 6. Adjust the brightness and tint of the following : • For automatic adjustment, set an ID for the master projector and the... remote control. • For manual adjustment, set an ID for each projector. 7. Do one of the image for Multiple Projector Control Projector Placement Image Aspect Ratio ...

