
Technical Brief (Multimedia Projectors)
Page 1
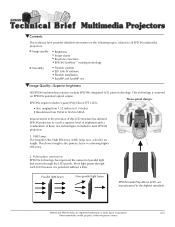
... it is the primary factor in achieving higher efficiency. 2. Three-panel design: EPSON's engine includes 3-panel Poly-Silicon TFT LCD's: LL Size ranging from 1.32 inches to 0.9 inches Resolutions from SVGA to XGA to the highest standards. Improvements in most EPSON projectors: 1. UHE lamp: The long-life Ultra High Efficiency (UHE) lamp uses a shorter arc...
... it is the primary factor in achieving higher efficiency. 2. Three-panel design: EPSON's engine includes 3-panel Poly-Silicon TFT LCD's: LL Size ranging from 1.32 inches to 0.9 inches Resolutions from SVGA to XGA to the highest standards. Improvements in most EPSON projectors: 1. UHE lamp: The long-life Ultra High Efficiency (UHE) lamp uses a shorter arc...
Technical Brief (Multimedia Projectors)
Page 2
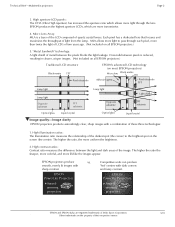
...hot" centers with a combination of their respective owners. High aperture LCD panels: The UHA (Ultra High Aperture) has increased the aperture ...Epson Corporation. 3/01 Other trademarks are more uniform the brightness. 2. EPSON projectors produce vs. Technical Brief-Multimedia projectors Page 2 3. and fuzzy contrast. High illumination ratios: The illumination ratio measures the relationship of quartz crystal lenses. EPSON PowerLite Projectors EPSON Powerlite Projectors ➤ Awardwinning projectors ➤ Awardwinning projectors EPSON Sales Training EPSON and EPSON...
...hot" centers with a combination of their respective owners. High aperture LCD panels: The UHA (Ultra High Aperture) has increased the aperture ...Epson Corporation. 3/01 Other trademarks are more uniform the brightness. 2. EPSON projectors produce vs. Technical Brief-Multimedia projectors Page 2 3. and fuzzy contrast. High illumination ratios: The illumination ratio measures the relationship of quartz crystal lenses. EPSON PowerLite Projectors EPSON Powerlite Projectors ➤ Awardwinning projectors ➤ Awardwinning projectors EPSON Sales Training EPSON and EPSON...
Technical Brief (Multimedia Projectors)
Page 3
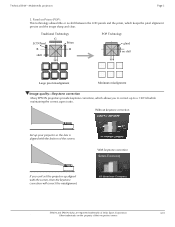
... the lens is a lig n m e n t Image quality-Keystone correction Many EPSON projectors provide keystone correction, which keeps the pixel alignment precise and the image sharp and clear. With keystone correction If you to correct up aligned...POP): This technology allows little or no shift between the LCD panels and the prism, which allows you can't set the projector up to a ±200 tilt while maintaining the correct aspect ratio. EPSON Sales Training EPSON and EPSON Stylus are registered trademarks of Seiko Epson Corporation. 3/01 Other trademarks are the property of the ...
... the lens is a lig n m e n t Image quality-Keystone correction Many EPSON projectors provide keystone correction, which keeps the pixel alignment precise and the image sharp and clear. With keystone correction If you to correct up aligned...POP): This technology allows little or no shift between the LCD panels and the prism, which allows you can't set the projector up to a ±200 tilt while maintaining the correct aspect ratio. EPSON Sales Training EPSON and EPSON Stylus are registered trademarks of Seiko Epson Corporation. 3/01 Other trademarks are the property of the ...
Technical Brief (Multimedia Projectors)
Page 4
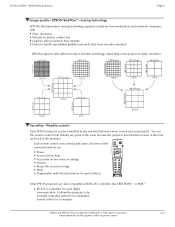
...-screen image Mute Programable multi-function buttons for serial digital communication. Technical Brief-Multimedia projectors Page 4 Image quality-EPSON SizeWise™ resizing technology EPSON's third generation resizing technology supports resolutions from workstations and notebook computers with RS-232 ... VGA 7 6 8 P ix e ls 600 Pixels 8 0 0 P ix e ls XGA 6 4 0 P ix e ls 800 Pixels 4 8 0 P ix e ls 6 0 0 P ix e ls SV G A VG A SVGA Versatility-Flexible controls Each EPSON projector can be remotely controlled either from a dedicated remote control or a computer.
...-screen image Mute Programable multi-function buttons for serial digital communication. Technical Brief-Multimedia projectors Page 4 Image quality-EPSON SizeWise™ resizing technology EPSON's third generation resizing technology supports resolutions from workstations and notebook computers with RS-232 ... VGA 7 6 8 P ix e ls 600 Pixels 8 0 0 P ix e ls XGA 6 4 0 P ix e ls 800 Pixels 4 8 0 P ix e ls 6 0 0 P ix e ls SV G A VG A SVGA Versatility-Flexible controls Each EPSON projector can be remotely controlled either from a dedicated remote control or a computer.

Technical Brief (Multimedia Projectors)
Page 5
... inaccessible to : 1. Volume + Remote Control Infrared Receiver Connecting Block EPSON Projector Typical installation out of presentation room EPSON Sales Training EPSON and EPSON Stylus are registered trademarks of Seiko Epson Corporation. 3/01 Other trademarks are the property of key strokes 2. Customize... system such as Xantech®. Control the following projector features: Change projector settings Change the test pattern Specify an image gamma Create a user logo Versatility-Flexible installation EPSON PowerLite projectors can be installed in a variety of ways: Front...
... inaccessible to : 1. Volume + Remote Control Infrared Receiver Connecting Block EPSON Projector Typical installation out of presentation room EPSON Sales Training EPSON and EPSON Stylus are registered trademarks of Seiko Epson Corporation. 3/01 Other trademarks are the property of key strokes 2. Customize... system such as Xantech®. Control the following projector features: Change projector settings Change the test pattern Specify an image gamma Create a user logo Versatility-Flexible installation EPSON PowerLite projectors can be installed in a variety of ways: Front...
Technical Brief (Multimedia Projectors)
Page 6
...EasyMP and EasyMP.net EasyMP and EasyMP.net are the property of EPSON's multimedia projectors. EPSON's EasyMP allows presenters to hide and rearrange slides. All you have to one printer? F iv e c a b le s 3.T w o n e tw o rk in the projector, you connect two computers to do is in t e r...images EasyReview : Review captured images EasyFile : Transfer slides and captured images to computers on the EPSON PowerLite 8150i) allows presenters to draw or write during a presentation. EPSON's EasyMP.net (currently available only on the network EasyConfiguration : Set up & Control by ...
...EasyMP and EasyMP.net EasyMP and EasyMP.net are the property of EPSON's multimedia projectors. EPSON's EasyMP allows presenters to hide and rearrange slides. All you have to one printer? F iv e c a b le s 3.T w o n e tw o rk in the projector, you connect two computers to do is in t e r...images EasyReview : Review captured images EasyFile : Transfer slides and captured images to computers on the EPSON PowerLite 8150i) allows presenters to draw or write during a presentation. EPSON's EasyMP.net (currently available only on the network EasyConfiguration : Set up & Control by ...

Installation Guide - ELPMBUNI Universal Mount Assembly
Page 2
... ...- 3 Contact Premier Mounts ...- 3 Warning Statements ...- 4 Parts List ...- 5 Installation Tools ...- 5 ELPMBUNI Universal Mount Assembly ...- 6 Projector Preparation ...- 7 Securing the Bracket to the Projector ...- 9 Leveling the Mounting bracket ...- 14 Securing the Upper Assembly Ceiling Plate...- 15 Low-Profile Installation ...- 16 Securing the... Projector to mounts, adapters, display equipment or personal injury. Warranty Limited Lifetime Warranty All Premier Mounts products ...
... ...- 3 Contact Premier Mounts ...- 3 Warning Statements ...- 4 Parts List ...- 5 Installation Tools ...- 5 ELPMBUNI Universal Mount Assembly ...- 6 Projector Preparation ...- 7 Securing the Bracket to the Projector ...- 9 Leveling the Mounting bracket ...- 14 Securing the Upper Assembly Ceiling Plate...- 15 Low-Profile Installation ...- 16 Securing the... Projector to mounts, adapters, display equipment or personal injury. Warranty Limited Lifetime Warranty All Premier Mounts products ...

Installation Guide - ELPMBUNI Universal Mount Assembly
Page 3
... INSTRUCTIONS IN AN EASILY ACCESSIBLE LOCATION FOR FUTURE REFERENCE. A secure structure must be installed on a structure that the power plug is to the projector and could result in damage to be taken at all times. When mounting to a ceiling that contains wooden studs, dead center of fire....BE ADHERED TO. WARNING: THE CEILING STRUCTURE MUST BE CAPABLE OF SUPPORTING A MAX WEIGHT OF 25 LBS., THE WEIGHT OF THE PROJECTOR. THE INSTALLATION INSTRUCTIONS MUST BE READ TO PREVENT PERSONAL INJURY AND PROPERTY DAMAGE. At least two qualified people should perform the installation ...
... INSTRUCTIONS IN AN EASILY ACCESSIBLE LOCATION FOR FUTURE REFERENCE. A secure structure must be installed on a structure that the power plug is to the projector and could result in damage to be taken at all times. When mounting to a ceiling that contains wooden studs, dead center of fire....BE ADHERED TO. WARNING: THE CEILING STRUCTURE MUST BE CAPABLE OF SUPPORTING A MAX WEIGHT OF 25 LBS., THE WEIGHT OF THE PROJECTOR. THE INSTALLATION INSTRUCTIONS MUST BE READ TO PREVENT PERSONAL INJURY AND PROPERTY DAMAGE. At least two qualified people should perform the installation ...

Installation Guide - ELPMBUNI Universal Mount Assembly
Page 4
... (Qty 4) M6 x 12mm Security Head Screws (Qty 4) Portable Drill Pencil Level (Supplied) Stud Finder (Commercially Available) M5 Allen Wrench NOTE: Mounting screws will vary by projector. Make sure that none of these parts are parts missing and/or damaged, please stop the installation and contact Premier Mounts (800-368-9700). ELPMBUNI...
... (Qty 4) M6 x 12mm Security Head Screws (Qty 4) Portable Drill Pencil Level (Supplied) Stud Finder (Commercially Available) M5 Allen Wrench NOTE: Mounting screws will vary by projector. Make sure that none of these parts are parts missing and/or damaged, please stop the installation and contact Premier Mounts (800-368-9700). ELPMBUNI...

Installation Guide - ELPMBUNI Universal Mount Assembly
Page 5
... on the number of mounting points found on the bottom of single and dual legs together as single leg or any combination C of your projector for filter and lamp access. ELPMBUNI A NOTE: The four (2-piece) leg assemblies can be used as shown in Options 1 and 2.... Ceiling Plate D Allen Wrench E Height Adjustment Screws F Tension Knobs G Safety Knob H Security Screws I Leveling Barrels J Universal Mounting Bracket K Leg Assembly L Projector (Not Supplied) M Tri-Lock Opening Option 1 H B D F Combination I Leg Single Leg D Option 2 M NOTE: See the best configuration for your...
... on the number of mounting points found on the bottom of single and dual legs together as single leg or any combination C of your projector for filter and lamp access. ELPMBUNI A NOTE: The four (2-piece) leg assemblies can be used as shown in Options 1 and 2.... Ceiling Plate D Allen Wrench E Height Adjustment Screws F Tension Knobs G Safety Knob H Security Screws I Leveling Barrels J Universal Mounting Bracket K Leg Assembly L Projector (Not Supplied) M Tri-Lock Opening Option 1 H B D F Combination I Leg Single Leg D Option 2 M NOTE: See the best configuration for your...

Installation Guide - ELPMBUNI Universal Mount Assembly
Page 6
... image on a smooth flat surface. 2. Most projectors have either three or four mounting points and are M4 in serious personal injury and possible damage to the projector. CAUTION: THE PROJECTOR IS FRAGILE; Mounting Points Inverted Projector Blanket, soft cloth etc Figure 1 Flat surface ...Installation Manual Page - 7 - HANDLE WITH CARE AT ALL TIMES. NOTE: Review the projectors manufacture's operation manual and refer to...
... image on a smooth flat surface. 2. Most projectors have either three or four mounting points and are M4 in serious personal injury and possible damage to the projector. CAUTION: THE PROJECTOR IS FRAGILE; Mounting Points Inverted Projector Blanket, soft cloth etc Figure 1 Flat surface ...Installation Manual Page - 7 - HANDLE WITH CARE AT ALL TIMES. NOTE: Review the projectors manufacture's operation manual and refer to...

Installation Guide - ELPMBUNI Universal Mount Assembly
Page 7
Installation Manual Next loosen the safety screw knurl knob far enough to allow the two parts to create free play between the bracket tri-lock assembly and the upper section tri-lock assembly points. 5. ELPMBUNI 4. Separate the upper assembly from the projector mounting bracket by slightly loosening the two tension knurl knobs to be rotated 180° apart and separate. Figure 2 Tri-Lock Opening Rotate 180° To Unlock Tension Knobs Upper Assembly Safety Knob Figure 3 Figure 4 Page - 8 -
Installation Manual Next loosen the safety screw knurl knob far enough to allow the two parts to create free play between the bracket tri-lock assembly and the upper section tri-lock assembly points. 5. ELPMBUNI 4. Separate the upper assembly from the projector mounting bracket by slightly loosening the two tension knurl knobs to be rotated 180° apart and separate. Figure 2 Tri-Lock Opening Rotate 180° To Unlock Tension Knobs Upper Assembly Safety Knob Figure 3 Figure 4 Page - 8 -

Installation Guide - ELPMBUNI Universal Mount Assembly
Page 8
... the legs around critical ventilation screens on the bottom of the projector and use the appropriate number of mounting legs. 2. Select the mounting hardware that your projector requires and loosely install the universal mount to your projector requires M3 mounting hardware. Using a Phillips screwdriver, loosely secure ... to the mounting points. You may also reduce the two-piece leg to the projector. 1. NOTE: The levelers and leg assembly screws must be loose in order to adjust the height of the projector as shown for a better overall fit to a one-piece leg as shown. ...
... the legs around critical ventilation screens on the bottom of the projector and use the appropriate number of mounting legs. 2. Select the mounting hardware that your projector requires and loosely install the universal mount to your projector requires M3 mounting hardware. Using a Phillips screwdriver, loosely secure ... to the mounting points. You may also reduce the two-piece leg to the projector. 1. NOTE: The levelers and leg assembly screws must be loose in order to adjust the height of the projector as shown for a better overall fit to a one-piece leg as shown. ...

Installation Guide - ELPMBUNI Universal Mount Assembly
Page 9
ELPMBUNI NOTE: If your projector model is not shown, when arranging the leg combination, simply ensure access to filters and lamp housings when aligning brackets. PowerLite 830p, 835p Hardware: M4 x 12mm (Qty 4) Installation Manual This mount works with all sub-25 pound projectors. PowerLite S3, S4, 62C, 76C, 82C, Hardware: M4 x 12mm (Qty 3) Page - 10 -
ELPMBUNI NOTE: If your projector model is not shown, when arranging the leg combination, simply ensure access to filters and lamp housings when aligning brackets. PowerLite 830p, 835p Hardware: M4 x 12mm (Qty 4) Installation Manual This mount works with all sub-25 pound projectors. PowerLite S3, S4, 62C, 76C, 82C, Hardware: M4 x 12mm (Qty 3) Page - 10 -

Installation Guide - ELPMBUNI Universal Mount Assembly
Page 13
... Allen wrench (supplied) (Figure 8 and Figure 9). Installation Manual CAUTION: Secure but do so will result in damaging the threads in the projector. ELPMBUNI Leveling the Mounting bracket 1. When the position desired is achieved tighten the mounting hardware to level the mounting bracket next, position the ... bracket so that it avoids most, if not all, ventilation points (including lamp & filter access doors). 2. Allen Wrench Level Inverted Projector DOWN UP Adjusting the Mount Figure 8 Leveling Barrels Page - 14 - Failure to do not over-tighten the mounting hardware.
... Allen wrench (supplied) (Figure 8 and Figure 9). Installation Manual CAUTION: Secure but do so will result in damaging the threads in the projector. ELPMBUNI Leveling the Mounting bracket 1. When the position desired is achieved tighten the mounting hardware to level the mounting bracket next, position the ... bracket so that it avoids most, if not all, ventilation points (including lamp & filter access doors). 2. Allen Wrench Level Inverted Projector DOWN UP Adjusting the Mount Figure 8 Leveling Barrels Page - 14 - Failure to do not over-tighten the mounting hardware.

Installation Guide - ELPMBUNI Universal Mount Assembly
Page 14
...recommended from the center of the mounting bracket to the front edge of the lens to a point centered horizontally on your screen and projector, make sure the mounting location will safely support the weight of the screen for best picture ratio. 2. Before you mount your ...installation environment (Figure 9). ELPMBUNI Securing the Upper Assembly Ceiling Plate 1. Page - 15 - Locate the inverted projectors top of the lens point to determine the proper placement of the center of the screen as well. 4. Secure the ceiling assembly into a solid...
...recommended from the center of the mounting bracket to the front edge of the lens to a point centered horizontally on your screen and projector, make sure the mounting location will safely support the weight of the screen for best picture ratio. 2. Before you mount your ...installation environment (Figure 9). ELPMBUNI Securing the Upper Assembly Ceiling Plate 1. Page - 15 - Locate the inverted projectors top of the lens point to determine the proper placement of the center of the screen as well. 4. Secure the ceiling assembly into a solid...

Installation Guide - ELPMBUNI Universal Mount Assembly
Page 17
... of the bracket in the upper assembly. 4. The alignment slot must be in the base of the upper assembly. 2. ELPMBUNI Securing the Projector to the upper assembly. Make sure the three-knurl knobs are loosened to fully expose to the "tri-lock" mounting plate in direct alignment... - 18 - Tighten the remaining two tension knurl knobs until the mount becomes rigid. 5. NOTE: Follow the number sequence prior to securing the projector to the Upper Assembly 1. The safety knob should line up with the safety knob to lock the mounting bracket to the upper assembly Insert universal...
... of the bracket in the upper assembly. 4. The alignment slot must be in the base of the upper assembly. 2. ELPMBUNI Securing the Projector to the upper assembly. Make sure the three-knurl knobs are loosened to fully expose to the "tri-lock" mounting plate in direct alignment... - 18 - Tighten the remaining two tension knurl knobs until the mount becomes rigid. 5. NOTE: Follow the number sequence prior to securing the projector to the Upper Assembly 1. The safety knob should line up with the safety knob to lock the mounting bracket to the upper assembly Insert universal...

Installation Guide - ELPMBUNI Universal Mount Assembly
Page 18
... power on the screen, slightly loosen the front and rear M8 screws and adjust to the projector you can be adjusted by slightly loosening the two 8mm height adjustment screws and raising or lowering the projector (Figure 14). 3. If roll adjustment is achieved tighten the two screws. 4. Once the height... roll and yaw to the screen and firmly tighten the two M8 tilt adjustment screws (Figure 15). 5. To adjust the tilt angle of the projector, slightly loosen the side M8 screws and tilt to the desired angle to optimize the projected image. 2. Wood Stud Ceiling Allen Wrench Height Adjustable ...
... power on the screen, slightly loosen the front and rear M8 screws and adjust to the projector you can be adjusted by slightly loosening the two 8mm height adjustment screws and raising or lowering the projector (Figure 14). 3. If roll adjustment is achieved tighten the two screws. 4. Once the height... roll and yaw to the screen and firmly tighten the two M8 tilt adjustment screws (Figure 15). 5. To adjust the tilt angle of the projector, slightly loosen the side M8 screws and tilt to the desired angle to optimize the projected image. 2. Wood Stud Ceiling Allen Wrench Height Adjustable ...
Product Information Guide
Page 1
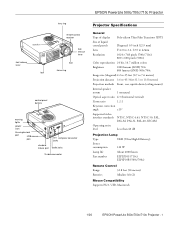
EPSON PowerLite 500c/700c/710c Projector speaker foot release lever foot lens ring remote control receiver foot release lever foot focus ring control panel buttons warning lights power inlet Kensington lock port USB mouse port A/V computer connector jacks standard mouse port audio jacks S-video connector Projector... 120 W Lamp life About 2000 hours Part number ELPLP10S (710c) ELPSP10B (500c/700c) Remote Control Range 32.8 feet (10 meters) Batteries Alkaline AA (2) Mouse Compatibility Supports PS/2, USB, Macintosh 1/00 EPSON PowerLite 500c/700c/710c Projector - 1
EPSON PowerLite 500c/700c/710c Projector speaker foot release lever foot lens ring remote control receiver foot release lever foot focus ring control panel buttons warning lights power inlet Kensington lock port USB mouse port A/V computer connector jacks standard mouse port audio jacks S-video connector Projector... 120 W Lamp life About 2000 hours Part number ELPLP10S (710c) ELPSP10B (500c/700c) Remote Control Range 32.8 feet (10 meters) Batteries Alkaline AA (2) Mouse Compatibility Supports PS/2, USB, Macintosh 1/00 EPSON PowerLite 500c/700c/710c Projector - 1
Product Information Guide
Page 2
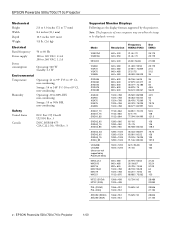
... 157.5 135 162 31.33 30.24 57.28 64 80 100 28.486 20.890 28.846 21.154 28.846 21.154 2 - EPSON PowerLite 500c/700c/710c Projector Mechanical Height Width Depth Weight 2.8 to 3.0 inches (72 to 77 mm) 8.4 inches (213 mm) 10.5 inches (267 mm) 5.8 lb. (2.6 kg) Electrical Rated frequency Power...
... 157.5 135 162 31.33 30.24 57.28 64 80 100 28.486 20.890 28.846 21.154 28.846 21.154 2 - EPSON PowerLite 500c/700c/710c Projector Mechanical Height Width Depth Weight 2.8 to 3.0 inches (72 to 77 mm) 8.4 inches (213 mm) 10.5 inches (267 mm) 5.8 lb. (2.6 kg) Electrical Rated frequency Power...


