
Start Here
Page 1
... them . Camera or USB Device (PowerLite 1220/1260) You can also connect an external monitor to install the Epson USB Display software (EMP_UDSE.EXE; Computer Monitor Port Connect a computer using the VGA cable that came with the PowerLite 1220 and 1260 projectors.) Connect the square end of .... Audio cable (optional) S-Video RCA video cable Component video cable (composite video) to the projector's TypeB (square) USB port. PowerLite® S9/1220/1260 Quick Setup Before using the projector, make sure you are using a notebook, switch it . Connect the flat end of the USB...
... them . Camera or USB Device (PowerLite 1220/1260) You can also connect an external monitor to install the Epson USB Display software (EMP_UDSE.EXE; Computer Monitor Port Connect a computer using the VGA cable that came with the PowerLite 1220 and 1260 projectors.) Connect the square end of .... Audio cable (optional) S-Video RCA video cable Component video cable (composite video) to the projector's TypeB (square) USB port. PowerLite® S9/1220/1260 Quick Setup Before using the projector, make sure you are using a notebook, switch it . Connect the flat end of the USB...
Start Here
Page 2
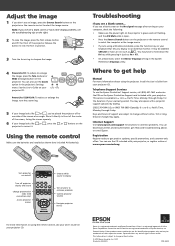
...presentation slides (USB connection only) Access projector menus Choose which source to display Get solutions to one side of the screen at www.epson.com/webreg. PowerLite 1220/1260: To reduce or enlarge the image, turn the zoom ring. 5 If your image looks like or , press the or buttons on...Pacific Time, Monday through Friday. Telephone Support Services To use the Zoom option in position. 3 Turn the focus ring to sharpen the image. 4 PowerLite S9: to reduce or enlarge the image, press the Tele (reduce) or Wide (enlarge) button on the projector or the remote control to get help...
...presentation slides (USB connection only) Access projector menus Choose which source to display Get solutions to one side of the screen at www.epson.com/webreg. PowerLite 1220/1260: To reduce or enlarge the image, turn the zoom ring. 5 If your image looks like or , press the or buttons on...Pacific Time, Monday through Friday. Telephone Support Services To use the Zoom option in position. 3 Turn the focus ring to sharpen the image. 4 PowerLite S9: to reduce or enlarge the image, press the Tele (reduce) or Wide (enlarge) button on the projector or the remote control to get help...

Warranty Statement
Page 1
... parts or labor. Limited Warranty Two-Year Projector Limited Warranty and 90-Day Lamp Limited Warranty What Is Covered: Epson America, Inc. ("Epson") warrants to the following two conditions: (1) this device may not cause harmful interference, and (2) this limited warranty.... Declaration of Product: Projector Model: H376A/H368A/H367A Marketing Name: PowerLite S9/1220/1260 Epson America, Inc. Epson's liability for a period of two (2) years from the date of a part, the item replaced becomes Epson property. Exchange or replacement products or parts assume the remaining warranty period...
... parts or labor. Limited Warranty Two-Year Projector Limited Warranty and 90-Day Lamp Limited Warranty What Is Covered: Epson America, Inc. ("Epson") warrants to the following two conditions: (1) this device may not cause harmful interference, and (2) this limited warranty.... Declaration of Product: Projector Model: H376A/H368A/H367A Marketing Name: PowerLite S9/1220/1260 Epson America, Inc. Epson's liability for a period of two (2) years from the date of a part, the item replaced becomes Epson property. Exchange or replacement products or parts assume the remaining warranty period...

User's Guide
Page 6
Playing Sound Through the Projector 40 Connecting External Speakers (PowerLite S9 Only 41 Connecting a Digital Camera or Other USB Device (PowerLite 1220/PowerLite 1260 Only 42 Turning the Projector On and Off 43 Using the Direct Power On Function 45 Shutting Down the Projector 46 2 Displaying and ... Your Computer With the Remote Control . . . . . 58 Highlighting Your Presentation 60 Using the Pointer Tool 60 Customizing the Pointer Tool 60 Presenting a Slideshow (PowerLite 1220/PowerLite 1260 Only 61 Starting a Slideshow 61 Selecting Slideshow Display Options 63 6 Contents
Playing Sound Through the Projector 40 Connecting External Speakers (PowerLite S9 Only 41 Connecting a Digital Camera or Other USB Device (PowerLite 1220/PowerLite 1260 Only 42 Turning the Projector On and Off 43 Using the Direct Power On Function 45 Shutting Down the Projector 46 2 Displaying and ... Your Computer With the Remote Control . . . . . 58 Highlighting Your Presentation 60 Using the Pointer Tool 60 Customizing the Pointer Tool 60 Presenting a Slideshow (PowerLite 1220/PowerLite 1260 Only 61 Starting a Slideshow 61 Selecting Slideshow Display Options 63 6 Contents
User's Guide
Page 9
It also provides a native SVGA (PowerLite S9), XGA (PowerLite 1220), or WXGA (PowerLite 1260) resolution. Welcome The PowerLite® S9/1220/1260 is an easy-to-use, compact, lightweight projector with optical zoom (PowerLite 1220/PowerLite 1260 only) ■ Security features-password protection, user's logo, projector button lock,...included), and a slot for an optional Kensington® security lock 9 You can connect it to 2500 (PowerLite S9) or 2600 (PowerLite 1220/PowerLite 1260) lumens of computers and video sources. It offers up to a wide range of white and color light output...
It also provides a native SVGA (PowerLite S9), XGA (PowerLite 1220), or WXGA (PowerLite 1260) resolution. Welcome The PowerLite® S9/1220/1260 is an easy-to-use, compact, lightweight projector with optical zoom (PowerLite 1220/PowerLite 1260 only) ■ Security features-password protection, user's logo, projector button lock,...included), and a slot for an optional Kensington® security lock 9 You can connect it to 2500 (PowerLite S9) or 2600 (PowerLite 1220/PowerLite 1260) lumens of computers and video sources. It offers up to a wide range of white and color light output...
User's Guide
Page 12
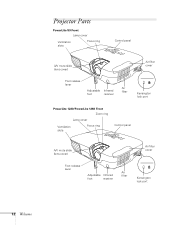
Projector Parts PowerLite S9 Front Lamp cover Ventilation slots Focus ring Control panel A/V mute slide (lens cover) Air filter cover Foot release lever Adjustable Infrared foot receiver Air filter Kensington lock port PowerLite 1220/PowerLite 1260 Front Zoom ring Lamp cover Ventilation slots Focus ring Control panel A/V mute slide (lens cover) Air filter cover Foot release lever Adjustable Infrared foot receiver Air filter Kensington lock port 12 Welcome
Projector Parts PowerLite S9 Front Lamp cover Ventilation slots Focus ring Control panel A/V mute slide (lens cover) Air filter cover Foot release lever Adjustable Infrared foot receiver Air filter Kensington lock port PowerLite 1220/PowerLite 1260 Front Zoom ring Lamp cover Ventilation slots Focus ring Control panel A/V mute slide (lens cover) Air filter cover Foot release lever Adjustable Infrared foot receiver Air filter Kensington lock port 12 Welcome
User's Guide
Page 13
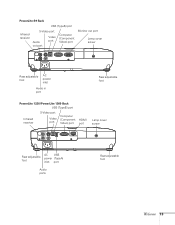
PowerLite S9 Back USB (TypeB) port Infrared receiver S-Video port Audio out port Video port Computer (Component Video) port Monitor out port Lamp cover screw Rear adjustable foot AC power inlet Audio in port Rear adjustable foot PowerLite 1220/PowerLite 1260 Back USB (TypeB) port Infrared receiver S-Video port Video port Computer (Component Video) port HDMI port Lamp cover screw Rear adjustable foot AC USB power (TypeA) inlet port Audio ports Rear adjustable foot Welcome 13
PowerLite S9 Back USB (TypeB) port Infrared receiver S-Video port Audio out port Video port Computer (Component Video) port Monitor out port Lamp cover screw Rear adjustable foot AC power inlet Audio in port Rear adjustable foot PowerLite 1220/PowerLite 1260 Back USB (TypeB) port Infrared receiver S-Video port Video port Computer (Component Video) port HDMI port Lamp cover screw Rear adjustable foot AC USB power (TypeA) inlet port Audio ports Rear adjustable foot Welcome 13
User's Guide
Page 14
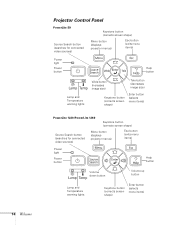
14 Welcome Projector Control Panel PowerLite S9 Source Search button (searches for connected video sources) Keystone button (corrects screen shape) Menu button (displays projector menus) Esc button (exits menu ...and Temperature warning lights Wide button (increases image size) Tele button (decreases image size) Keystone button (corrects screen shape) Enter button (selects menu items) PowerLite 1220/PowerLite 1260 Keystone button (corrects screen shape) Source Search button (searches for connected video sources) Menu button (displays projector menus) Esc button (exits menu items) ...
14 Welcome Projector Control Panel PowerLite S9 Source Search button (searches for connected video sources) Keystone button (corrects screen shape) Menu button (displays projector menus) Esc button (exits menu ...and Temperature warning lights Wide button (increases image size) Tele button (decreases image size) Keystone button (corrects screen shape) Enter button (selects menu items) PowerLite 1220/PowerLite 1260 Keystone button (corrects screen shape) Source Search button (searches for connected video sources) Menu button (displays projector menus) Esc button (exits menu items) ...

User's Guide
Page 19
... or desktop computer or to a digital camera or other USB device (PowerLite 1220/PowerLite 1260 only) ■ Turning the projector on : ■ Unpacking the projector ■ Positioning the projector ■ Connecting to a computer ■ Connecting to video equipment ■ Connecting an external monitor (PowerLite S9 only) ■ Playing sound through the projector ■ Connecting to video...
... or desktop computer or to a digital camera or other USB device (PowerLite 1220/PowerLite 1260 only) ■ Turning the projector on : ■ Unpacking the projector ■ Positioning the projector ■ Connecting to a computer ■ Connecting to video equipment ■ Connecting an external monitor (PowerLite S9 only) ■ Playing sound through the projector ■ Connecting to video...

User's Guide
Page 21
If you need to send the projector to ship the projector. PowerLite 1220/PowerLite 1260 Projector Power cord PDF manuals and Password Protected registration CD-ROM sticker Remote control 2 AA batteries (for transportation instructions. Setting Up the Projector 21 See page 89 for remote control) VGA computer cable Carrying case USB cable Save all packaging in case you are moving the projector by hand, use the original packaging (or the equivalent) when you need to another location. Always use the carrying case.
If you need to send the projector to ship the projector. PowerLite 1220/PowerLite 1260 Projector Power cord PDF manuals and Password Protected registration CD-ROM sticker Remote control 2 AA batteries (for transportation instructions. Setting Up the Projector 21 See page 89 for remote control) VGA computer cable Carrying case USB cable Save all packaging in case you are moving the projector by hand, use the original packaging (or the equivalent) when you need to another location. Always use the carrying case.
User's Guide
Page 22
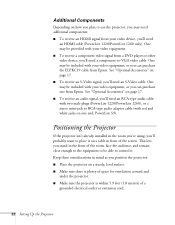
...jacks on one from a DVD player or other video device, you 'll need additional components: ■ To receive an HDMI signal from Epson. PowerLite S9). See "Optional Accessories" on page 17. ■ To receive an S-Video signal, you stand in front of a grounded electrical outlet ... One may be provided with your video equipment. ■ To receive a component video signal from Epson. One may be able to -VGA video cable. One may need an HDMI cable (PowerLite 1220/PowerLite 1260 only). See "Optional Accessories" on a sturdy, level surface. ■ Make sure there is ...
...jacks on one from a DVD player or other video device, you 'll need additional components: ■ To receive an HDMI signal from Epson. PowerLite S9). See "Optional Accessories" on page 17. ■ To receive an S-Video signal, you stand in front of a grounded electrical outlet ... One may be provided with your video equipment. ■ To receive a component video signal from Epson. One may be able to -VGA video cable. One may need an HDMI cable (PowerLite 1220/PowerLite 1260 only). See "Optional Accessories" on a sturdy, level surface. ■ Make sure there is ...

User's Guide
Page 28
The center of the lens should place the projector directly in front of the center of the screen. Projector Placement Options When projecting from Epson; The PowerLite 1220/PowerLite 1260 may be about level with the bottom of the screen, facing the screen squarely. You can correct the distortion (see page 17. see page 49). ...
The center of the lens should place the projector directly in front of the center of the screen. Projector Placement Options When projecting from Epson; The PowerLite 1220/PowerLite 1260 may be about level with the bottom of the screen, facing the screen squarely. You can correct the distortion (see page 17. see page 49). ...

User's Guide
Page 30
... a USB cable to the projector's TypeB (square) USB port and project your computer. 4. Make sure the USB Type B setting on your computer's display. PowerLite S9 USB TypeB port PowerLite 1220/PowerLite 1260 USB TypeB port 5. The first time you connect a computer to the projector's USB port, you want to USB Display (see page 40). 30 Setting...
... a USB cable to the projector's TypeB (square) USB port and project your computer. 4. Make sure the USB Type B setting on your computer's display. PowerLite S9 USB TypeB port PowerLite 1220/PowerLite 1260 USB TypeB port 5. The first time you connect a computer to the projector's USB port, you want to USB Display (see page 40). 30 Setting...

User's Guide
Page 32
... 40). 32 Setting Up the Projector Connect one end of pins. PowerLite S9 Computer (Component Video) port caution Don't try to force a connector to connect. You may need to change the Input Signal setting in the projector's Signal menu to play sound through the projector (see page 70). 3. PowerLite 1220/PowerLite 1260 Computer (Component Video) port 2.
... 40). 32 Setting Up the Projector Connect one end of pins. PowerLite S9 Computer (Component Video) port caution Don't try to force a connector to connect. You may need to change the Input Signal setting in the projector's Signal menu to play sound through the projector (see page 70). 3. PowerLite 1220/PowerLite 1260 Computer (Component Video) port 2.

User's Guide
Page 33
...to connect any additional cables for instructions on the projector and Chapter 2 for audio. If you connect using an HDMI cable (PowerLite 1220/ PowerLite 1260 only), the video and sound are both transferred and you 've finished making connections, see page 40. 4. Before starting, ...cables, you may also be able to determine its available video output connections: ■ PowerLite 1220/PowerLite 1260 only: If your video device has an HDMI connector, see "Connecting an HDMI Video Source (PowerLite 1220/PowerLite 1260 Only)" on page 34. ■ If your video device has a yellow RCA video...
...to connect any additional cables for instructions on the projector and Chapter 2 for audio. If you connect using an HDMI cable (PowerLite 1220/ PowerLite 1260 only), the video and sound are both transferred and you 've finished making connections, see page 40. 4. Before starting, ...cables, you may also be able to determine its available video output connections: ■ PowerLite 1220/PowerLite 1260 only: If your video device has an HDMI connector, see "Connecting an HDMI Video Source (PowerLite 1220/PowerLite 1260 Only)" on page 34. ■ If your video device has a yellow RCA video...

User's Guide
Page 34
... purchase one from an electronics dealer. Connect an HDMI cable to the HDMI (High-Definition Multimedia Interface) port, if possible. Connecting an HDMI Video Source (PowerLite 1220/PowerLite 1260 Only) For the best image and sound quality, connect your video equipment to the HDMI connector on your video equipment, you 've finished making connections...
... purchase one from an electronics dealer. Connect an HDMI cable to the HDMI (High-Definition Multimedia Interface) port, if possible. Connecting an HDMI Video Source (PowerLite 1220/PowerLite 1260 Only) For the best image and sound quality, connect your video equipment to the HDMI connector on your video equipment, you 've finished making connections...

User's Guide
Page 35
... the projector, see page 43 for instructions on turning on the projector and Chapter 2 for instructions on connecting an audio cable. PowerLite 1220/PowerLite 1260 Video port 2. Setting Up the Projector 35 PowerLite S9 Video port note If the video cable was not provided with your device and the yellow Video port on displaying and adjusting...
... the projector, see page 43 for instructions on turning on the projector and Chapter 2 for instructions on connecting an audio cable. PowerLite 1220/PowerLite 1260 Video port 2. Setting Up the Projector 35 PowerLite S9 Video port note If the video cable was not provided with your device and the yellow Video port on displaying and adjusting...

User's Guide
Page 36
... sound through the projector, see page 40 for instructions on displaying and adjusting the image. 36 Setting Up the Projector PowerLite S9 S-Video port PowerLite 1220/PowerLite 1260 S-Video port 2. When you can purchase one from Epson; note If the S-Video cable was not provided with your device and the S-Video port on connecting an audio cable...
... sound through the projector, see page 40 for instructions on displaying and adjusting the image. 36 Setting Up the Projector PowerLite S9 S-Video port PowerLite 1220/PowerLite 1260 S-Video port 2. When you can purchase one from Epson; note If the S-Video cable was not provided with your device and the S-Video port on connecting an audio cable...

User's Guide
Page 37
PowerLite S9 Computer (Component Video) port PowerLite 1220/PowerLite 1260 Computer (Component Video) port 3. You may need to change the Input Signal setting in the projector's Signal menu to -VGA video cable from Epson (see page 70). Connect the component end of the cable (HD15 male) to the Computer (Component Video) port on your projector using an optional...
PowerLite S9 Computer (Component Video) port PowerLite 1220/PowerLite 1260 Computer (Component Video) port 3. You may need to change the Input Signal setting in the projector's Signal menu to -VGA video cable from Epson (see page 70). Connect the component end of the cable (HD15 male) to the Computer (Component Video) port on your projector using an optional...

User's Guide
Page 38
Connect the cable to play sound through the projector, see page 70). 38 Setting Up the Projector PowerLite S9 Computer (Component Video) port PowerLite 1220/PowerLite 1260 Computer (Component Video) port 2. Connecting an RGB Video Source You can connect to RGB (see page 40 for instructions on the projector. 4. When you want ...
Connect the cable to play sound through the projector, see page 70). 38 Setting Up the Projector PowerLite S9 Computer (Component Video) port PowerLite 1220/PowerLite 1260 Computer (Component Video) port 2. Connecting an RGB Video Source You can connect to RGB (see page 40 for instructions on the projector. 4. When you want ...