

Installation Guide - ELPMBUNI Universal Mount Assembly
Page 5
... in Options 1 and 2. ELPMBUNI A NOTE: The four (2-piece) leg assemblies can be used as single leg or any combination C of your projector for filter and lamp access. ELPMBUNI Universal Mount Assembly A Single Wooden Stud Mounting Points B Solid Structure Mounting Points C Ceiling Plate D Allen Wrench E Height Adjustment Screws F Tension Knobs G Safety Knob...
... in Options 1 and 2. ELPMBUNI A NOTE: The four (2-piece) leg assemblies can be used as single leg or any combination C of your projector for filter and lamp access. ELPMBUNI Universal Mount Assembly A Single Wooden Stud Mounting Points B Solid Structure Mounting Points C Ceiling Plate D Allen Wrench E Height Adjustment Screws F Tension Knobs G Safety Knob...

Installation Guide - ELPMBUNI Universal Mount Assembly
Page 9
PowerLite 830p, 835p Hardware: M4 x 12mm (Qty 4) Installation Manual This mount works with all sub-25 pound projectors. ELPMBUNI NOTE: If your projector model is not shown, when arranging the leg combination, simply ensure access to filters and lamp housings when aligning brackets. PowerLite S3, S4, 62C, 76C, 82C, Hardware: M4 x 12mm (Qty 3) Page - 10 -
PowerLite 830p, 835p Hardware: M4 x 12mm (Qty 4) Installation Manual This mount works with all sub-25 pound projectors. ELPMBUNI NOTE: If your projector model is not shown, when arranging the leg combination, simply ensure access to filters and lamp housings when aligning brackets. PowerLite S3, S4, 62C, 76C, 82C, Hardware: M4 x 12mm (Qty 3) Page - 10 -

Installation Guide - ELPMBUNI Universal Mount Assembly
Page 13
... tighten the mounting hardware to level the mounting bracket next, position the mounting bracket so that it avoids most, if not all, ventilation points (including lamp & filter access doors). 2.
... tighten the mounting hardware to level the mounting bracket next, position the mounting bracket so that it avoids most, if not all, ventilation points (including lamp & filter access doors). 2.

Product Brochure
Page 1
... resize) • Seven selectable color modes including: - to watch your life easier • Direct Power On feature - Epson PowerLite® S4 Versatility, value and outstanding performance. use with one system switch • Cable lock feature for security-conscious environments • ... • International warranty in high altitude locations • Kensington®-style locking provision Outstanding Epson service and support (two-year limited warranty) • 90-day lamp warranty for presenters on and -off to view darker images, giving you a better gaming experience...
... resize) • Seven selectable color modes including: - to watch your life easier • Direct Power On feature - Epson PowerLite® S4 Versatility, value and outstanding performance. use with one system switch • Cable lock feature for security-conscious environments • ... • International warranty in high altitude locations • Kensington®-style locking provision Outstanding Epson service and support (two-year limited warranty) • 90-day lamp warranty for presenters on and -off to view darker images, giving you a better gaming experience...

Product Brochure
Page 2
..., CD-ROM, Quick Setup Sheet, PrivateLine support card, password protection sticker Product/Accessory Part Numbers Epson PowerLite S4 projector Replacement lamp Air filter set (2 filters) Universal ceiling mount Suspension adapter False ceiling plate Adjustable ceiling channel (...Kensington-style lock provision Warranty Two-year limited warranty, 90-day lamp warranty, Epson Road Service Program and Epson PrivateLine dedicated toll-free support (U.S. Epson PowerLite S4 Specifications Projection System Epson 3LCD technology Projection Method Front/rear/ceiling mount LCD Driving method Pixel...
..., CD-ROM, Quick Setup Sheet, PrivateLine support card, password protection sticker Product/Accessory Part Numbers Epson PowerLite S4 projector Replacement lamp Air filter set (2 filters) Universal ceiling mount Suspension adapter False ceiling plate Adjustable ceiling channel (...Kensington-style lock provision Warranty Two-year limited warranty, 90-day lamp warranty, Epson Road Service Program and Epson PrivateLine dedicated toll-free support (U.S. Epson PowerLite S4 Specifications Projection System Epson 3LCD technology Projection Method Front/rear/ceiling mount LCD Driving method Pixel...

Product Information Guide
Page 1
Epson PowerLite S4 Projector Parts Lamp cover Control panel Focus ring Ventilation slots Lens cover Infrared receiver Foot release button Adjustable foot (for raising projector) Monitor Out port Computer port ... page 5) Lamp Type UHE (Ultra High Efficiency) Power consumption 170 W Lamp life 2000 to 3000 hours, depending on brightness mode selected Part number V13H010L36 Remote Control Range 20 feet (6 meters) Battery AAA × 2 Dimensions Height Width Depth Weight 3.4 inches (87 mm) 12.9 inches (327 mm) 9.7 inches (247 mm) 5.7 lb (2.6 kg) 6/06 Epson PowerLite S4 - 1
Epson PowerLite S4 Projector Parts Lamp cover Control panel Focus ring Ventilation slots Lens cover Infrared receiver Foot release button Adjustable foot (for raising projector) Monitor Out port Computer port ... page 5) Lamp Type UHE (Ultra High Efficiency) Power consumption 170 W Lamp life 2000 to 3000 hours, depending on brightness mode selected Part number V13H010L36 Remote Control Range 20 feet (6 meters) Battery AAA × 2 Dimensions Height Width Depth Weight 3.4 inches (87 mm) 12.9 inches (327 mm) 9.7 inches (247 mm) 5.7 lb (2.6 kg) 6/06 Epson PowerLite S4 - 1
Product Information Guide
Page 3
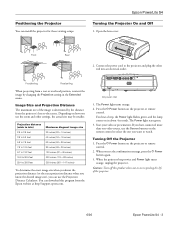
... your video or presentation. AC power inlet 3. The Power light stays green. 5. When you can install the projector for these viewing setups: Epson PowerLite S4 Turning the Projector On and Off 1. Caution: Turn off this program from a rear or overhead position, reorient the image by the distance from... see the confirmation message, press the P Power button again. 3. You hear a beep, the Power light flashes green, and the lamp comes on the projector or remote control. 2. Connect the power cord to the screen. Front/ceiling Rear/ceiling When projecting from the...
... your video or presentation. AC power inlet 3. The Power light stays green. 5. When you can install the projector for these viewing setups: Epson PowerLite S4 Turning the Projector On and Off 1. Caution: Turn off this program from a rear or overhead position, reorient the image by the distance from... see the confirmation message, press the P Power button again. 3. You hear a beep, the Power light flashes green, and the lamp comes on the projector or remote control. 2. Connect the power cord to the screen. Front/ceiling Rear/ceiling When projecting from the...

Product Information Guide
Page 6
...for the warning light to be used for a selected period of the projector. Epson PowerLite S4 6/06 You can also set a password to prevent unauthorized use the remote control. 4. The projector is flashing red The lamp needs to be replaced soon. Wait until you press the Freeze button again. ...closing the lens cover. If you just replaced the lamp, make the blank screen blue, instead of the projector, or to allow the projector to turn off the sound. The projector is connected securely at both ends. Epson PowerLite S4 To change the aspect ratio, press the Resize ...
...for the warning light to be used for a selected period of the projector. Epson PowerLite S4 6/06 You can also set a password to prevent unauthorized use the remote control. 4. The projector is flashing red The lamp needs to be replaced soon. Wait until you press the Freeze button again. ...closing the lens cover. If you just replaced the lamp, make the blank screen blue, instead of the projector, or to allow the projector to turn off the sound. The projector is connected securely at both ends. Epson PowerLite S4 To change the aspect ratio, press the Resize ...
Product Information Guide
Page 7
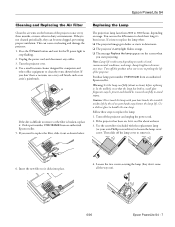
... all the way out). 6/06 Epson PowerLite S4 - 7 Turn the projector over time. Order part number V13H134A08 from an authorized Epson reseller. Warning: Let the lamp cool fully (about an hour. 3. Use a cloth or glove to replace the lamp: 1. Then slide off the lamp cover to remove it . Use ... broken, replace it 's been in use. Lamp brightness decreases over . 4. Turn off the projector and unplug the power cord. 2. the invisible residue left by the oil on mode selected, environmental conditions, and usage. Epson PowerLite S4 Cleaning and Replacing the Air Filter Clean the ...
... all the way out). 6/06 Epson PowerLite S4 - 7 Turn the projector over time. Order part number V13H134A08 from an authorized Epson reseller. Warning: Let the lamp cool fully (about an hour. 3. Use a cloth or glove to replace the lamp: 1. Then slide off the lamp cover to remove it . Use ... broken, replace it 's been in use. Lamp brightness decreases over . 4. Turn off the projector and unplug the power cord. 2. the invisible residue left by the oil on mode selected, environmental conditions, and usage. Epson PowerLite S4 Cleaning and Replacing the Air Filter Clean the ...

Product Information Guide
Page 8
... V12H162020 ELPSL01 You can purchase online at least 10 hours. The lamp usage timer doesn't register until you've used . 1. To find the nearest reseller, call 800-GO-EPSON (800-463-7766). Epson PowerLite S4 6/06 Please consult your state and local regulations regarding disposal or ... cases, or other accessories from an Epson authorized reseller. Or you 're finished, press the Menu button to open or loose.) 8. Grasp the lamp as described in premature lamp failure. 7. Press the Menu button on CD-ROM) Epson Powerlite S4 Quick Setup Epson America, Inc. Caution: Don't touch...
... V12H162020 ELPSL01 You can purchase online at least 10 hours. The lamp usage timer doesn't register until you've used . 1. To find the nearest reseller, call 800-GO-EPSON (800-463-7766). Epson PowerLite S4 6/06 Please consult your state and local regulations regarding disposal or ... cases, or other accessories from an Epson authorized reseller. Or you 're finished, press the Menu button to open or loose.) 8. Grasp the lamp as described in premature lamp failure. 7. Press the Menu button on CD-ROM) Epson Powerlite S4 Quick Setup Epson America, Inc. Caution: Don't touch...
Quick Start
Page 4
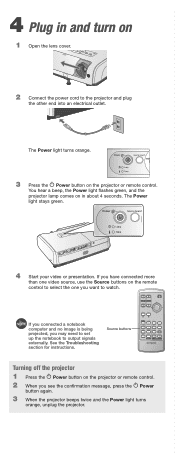
See the Troubleshooting section for instructions. You hear a beep, the Power light flashes green, and the projector lamp comes on in and turn on the projector or remote control. If you have connected more than one video source, use the Source buttons on ...
See the Troubleshooting section for instructions. You hear a beep, the Power light flashes green, and the projector lamp comes on in and turn on the projector or remote control. If you have connected more than one video source, use the Source buttons on ...
User Manual
Page 4
... Replacing Consumables List of ESC/VP21 Commands 62 40 Replacing the Batteries 40 List of Supported Monitor Displays 63 Lamp Replacement Period 40 Specifications 64 Replacing the Lamp 41 Dimensions 66 Resetting the Lamp Operating Time 43 Declaration of Conformity 67 Replacing the Air Filter 44 FCC Compliance Statement 67 Troubleshooting Important Safety...
... Replacing Consumables List of ESC/VP21 Commands 62 40 Replacing the Batteries 40 List of Supported Monitor Displays 63 Lamp Replacement Period 40 Specifications 64 Replacing the Lamp 41 Dimensions 66 Resetting the Lamp Operating Time 43 Declaration of Conformity 67 Replacing the Air Filter 44 FCC Compliance Statement 67 Troubleshooting Important Safety...
User Manual
Page 7
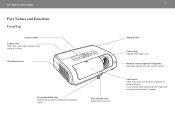
Foot release lever Extends the front foot. 7 Security lock Focus ring Adjusts the image focus. If you close it while projecting, the image and sound are termporarily stopped. Remote control light-receiving area Receives signals from the remote control. Lens cover Slide shut when not using the projector to adjust the projection angle. Part Names and Functions Part Names and Functions Front/Top Control panel Lamp cover Open this cover when replacing the projector's lamp. Air exhaust vent Front adjustable foot Raises the projector to protect the lens.
Foot release lever Extends the front foot. 7 Security lock Focus ring Adjusts the image focus. If you close it while projecting, the image and sound are termporarily stopped. Remote control light-receiving area Receives signals from the remote control. Lens cover Slide shut when not using the projector to adjust the projection angle. Part Names and Functions Part Names and Functions Front/Top Control panel Lamp cover Open this cover when replacing the projector's lamp. Air exhaust vent Front adjustable foot Raises the projector to protect the lens.

User Manual
Page 25
... press the [Enter] button. (3) Press the [Esc] button. (4) Select "Timer" and then press the [Enter] button. (5) While holding down the [Freeze] button for the projector's lamp from the point when the projector's menu is closed. Remote control p • If Password Protect has already been enabled, the "Password" screen will be displayed...
... press the [Enter] button. (3) Press the [Esc] button. (4) Select "Timer" and then press the [Enter] button. (5) While holding down the [Freeze] button for the projector's lamp from the point when the projector's menu is closed. Remote control p • If Password Protect has already been enabled, the "Password" screen will be displayed...

User Manual
Page 34
...on page 38. When "Low" is selected, image brightness is reduced. This also reduces fan noise and electrical consumption while extending the lamp's operating life. "Settings" Menu 34 "Settings" Menu Sub-menu Keystone Zoom Image Shift Operation Lock Pointer Shape Brightness Control Volume Reset ... projected are returned to their default settings, except for the [Power] button will be selected. Adjusts the volume. When set the lamp brightness to "On", the operation of the pointer can be disabled. Adjustment values for the "Settings" menu functions are too bright such...
...on page 38. When "Low" is selected, image brightness is reduced. This also reduces fan noise and electrical consumption while extending the lamp's operating life. "Settings" Menu 34 "Settings" Menu Sub-menu Keystone Zoom Image Shift Operation Lock Pointer Shape Brightness Control Volume Reset ... projected are returned to their default settings, except for the [Power] button will be selected. Adjusts the volume. When set the lamp brightness to "On", the operation of the pointer can be disabled. Adjustment values for the "Settings" menu functions are too bright such...
User Manual
Page 36
When Sleep Mode is "Off" the power and the lamp remain on is enabled ("On") or disabled ("Off"). When you would like to return all menu items to "On". Sleep Mode: Sets whether projection stops ...
When Sleep Mode is "Off" the power and the lamp remain on is enabled ("On") or disabled ("Off"). When you would like to return all menu items to "On". Sleep Mode: Sets whether projection stops ...
User Manual
Page 37
...not appear when the input source is composite video or S-video.) Shows the video signal format. (Not displayed for service from your dealer or from Epson. (Does not appear when the input source is composite video or S-video.) "Info" Menu 37 "Info" Menu Lets you ask for computer, ...appear when the input source is composite video or S-video.) Information from 0 to 10 hours will be in yellow. Info Function Shows the cumulative lamp operating time. From "10H" onwards, the display will be required when you check the type of image signal being projected. Displays the input ...
...not appear when the input source is composite video or S-video.) Shows the video signal format. (Not displayed for service from your dealer or from Epson. (Does not appear when the input source is composite video or S-video.) "Info" Menu 37 "Info" Menu Lets you ask for computer, ...appear when the input source is composite video or S-video.) Information from 0 to 10 hours will be in yellow. Info Function Shows the cumulative lamp operating time. From "10H" onwards, the display will be required when you check the type of image signal being projected. Displays the input ...

User Manual
Page 38
Perform this procedure when you replace the lamp. Clears the cumulative lamp operating time and resets it to "0H". The "Computer1 Input", "Zoom", "Image Shift", "User's Logo", "Lamp Hours" and "Language" settings will not be reset to their default settings. "Reset" Menu 38 "Reset" Menu Sub-menu Reset All Reset Lamp Hours Function Resets all items in all menus to their defaults.
Perform this procedure when you replace the lamp. Clears the cumulative lamp operating time and resets it to "0H". The "Computer1 Input", "Zoom", "Image Shift", "User's Logo", "Lamp Hours" and "Language" settings will not be reset to their default settings. "Reset" Menu 38 "Reset" Menu Sub-menu Reset All Reset Lamp Hours Function Resets all items in all menus to their defaults.

User Manual
Page 40
... of the remote control occur or if it does not operate after it has been used for some time, it clicks into place. Lamp Replacement Period It is flashing orange Flashing orange Check the positions of the battery compartment cover, lift the cover up. Catch 3 Replace ...the battery cover. A message will be displayed. • When the Lamp indicator is time to ensure that the batteries are inserted the correct way. Replacing Consumables 40 Replacing Consumables This section explains how to use when...
... of the remote control occur or if it does not operate after it has been used for some time, it clicks into place. Lamp Replacement Period It is flashing orange Flashing orange Check the positions of the battery compartment cover, lift the cover up. Catch 3 Replace ...the battery cover. A message will be displayed. • When the Lamp indicator is time to ensure that the batteries are inserted the correct way. Replacing Consumables 40 Replacing Consumables This section explains how to use when...
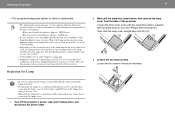
User Manual
Page 41
... as possible, even if it is still working. • Depending on the way it is possible that the glass around the lamp is needed. • Contact Epson for a spare lamp (see page 57). • Lamp life results vary depending on a ceiling-mounted projector, be careful when removing the... lamp cover; broken glass could fall out of the lamp area and get in use the lamp after the following periods of the projected images. ·...
... as possible, even if it is still working. • Depending on the way it is possible that the glass around the lamp is needed. • Contact Epson for a spare lamp (see page 57). • Lamp life results vary depending on a ceiling-mounted projector, be careful when removing the... lamp cover; broken glass could fall out of the lamp area and get in use the lamp after the following periods of the projected images. ·...


