Quick Reference
Page 4
... card. Make sure the external monitor port is set as or CRT/LCD) until you can purchase online at epson.com/support and select your product for details. Where To Get Help Internet Support Visit Epson's support website at www.epsonstore.com (U.S. You may also speak with ... select Mirror Displays. Purchase supplies and accessories You can download utilities and documentation, get FAQs and troubleshooting advice, or e-mail Epson with a projector support specialist by dialing one of the following numbers. (Toll or long distance charges may need to a support representative To use the...
... card. Make sure the external monitor port is set as or CRT/LCD) until you can purchase online at epson.com/support and select your product for details. Where To Get Help Internet Support Visit Epson's support website at www.epsonstore.com (U.S. You may also speak with ... select Mirror Displays. Purchase supplies and accessories You can download utilities and documentation, get FAQs and troubleshooting advice, or e-mail Epson with a projector support specialist by dialing one of the following numbers. (Toll or long distance charges may need to a support representative To use the...
Product Brochure
Page 2
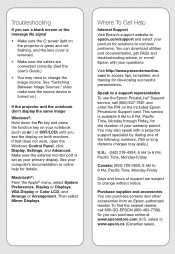
...Epson America, Inc. Copyright 2008 Epson America, Inc. Epson PowerLite Pro G5150NL and G5350NL Specifications Projection System High-aperture Epson 3-chip 3LCD technology Projection Method Front/rear/ceiling mount LCD Driving Method Epson Poly-silicon TFT Active Matrix Pixel Number 786,432 pixel x 3 LCDs... ELPSC07 ELPSC08 ELPSC80 ELPKC19 ELPSV01 ELPDA01 V12H162020 V13H010L47 V13H010L46 Projector Part Numbers PowerLite Pro G5150NL PowerLite Pro G5350NL V11H273920 V11H286920 Replacement Air Filter Dimensions 11.14... ˚F (0 ˚ to 4000 lumens G5350: Light output - color: up to 5000 lumens...
...Epson America, Inc. Copyright 2008 Epson America, Inc. Epson PowerLite Pro G5150NL and G5350NL Specifications Projection System High-aperture Epson 3-chip 3LCD technology Projection Method Front/rear/ceiling mount LCD Driving Method Epson Poly-silicon TFT Active Matrix Pixel Number 786,432 pixel x 3 LCDs... ELPSC07 ELPSC08 ELPSC80 ELPKC19 ELPSV01 ELPDA01 V12H162020 V13H010L47 V13H010L46 Projector Part Numbers PowerLite Pro G5150NL PowerLite Pro G5350NL V11H273920 V11H286920 Replacement Air Filter Dimensions 11.14... ˚F (0 ˚ to 4000 lumens G5350: Light output - color: up to 5000 lumens...
User's Guide
Page 31
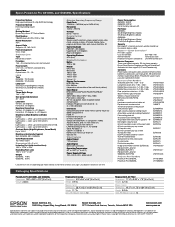
...Connecting an External Monitor If you want to the monitor. Some LCD monitors may not be turned on in order for the Monitor Out port to send a signal to monitor your computer presentation close-up (on a monitor placed beside the projector) as well as shown: note The monitor cannot display component ...video, nor signals connected via the Video1, Video2, S-Video, or HDMI ports. Setting Up the Projector 31 You can connect an external monitor. Then connect your computer's VGA cable is set to the projector's Monitor Out port, as on the screen, you can use it to check on your presentation ...
...Connecting an External Monitor If you want to the monitor. Some LCD monitors may not be turned on in order for the Monitor Out port to send a signal to monitor your computer presentation close-up (on a monitor placed beside the projector) as well as shown: note The monitor cannot display component ...video, nor signals connected via the Video1, Video2, S-Video, or HDMI ports. Setting Up the Projector 31 You can connect an external monitor. Then connect your computer's VGA cable is set to the projector's Monitor Out port, as on the screen, you can use it to check on your presentation ...
User's Guide
Page 43
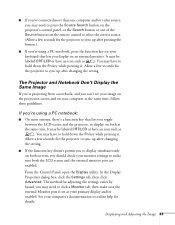
... and on your computer's documentation or online help for adjusting the settings varies by brand; It may be labeled CRT/LCD or have an icon such as . Allow a few seconds for the projector to hold down the Fn key while pressing it . You may have to make sure the external Monitor port... the Fn key while pressing it . If you're using a PC notebook, press the function key on your keyboard that lets you toggle between the LCD screen and the projector, or display on both screens, you should check your primary display and/or enabled. Allow a few seconds for the...
... and on your computer's documentation or online help for adjusting the settings varies by brand; It may be labeled CRT/LCD or have an icon such as . Allow a few seconds for the projector to hold down the Fn key while pressing it . You may have to make sure the external Monitor port... the Fn key while pressing it . If you're using a PC notebook, press the function key on your keyboard that lets you toggle between the LCD screen and the projector, or display on both screens, you should check your primary display and/or enabled. Allow a few seconds for the...
User's Guide
Page 44
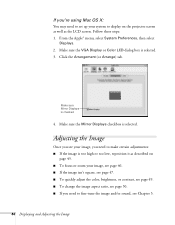
If you need to set up your system to display on the projector screen as well as described on page 45. ■ To focus or zoom your image, see page 46. ■ If the image isn't square, see ... image, you need to make certain adjustments: ■ If the image is too high or too low, reposition it as the LCD screen. Make sure the VGA Display or Color LCD dialog box is checked 4. Follow these steps: 1. Make sure Mirror Displays is selected. 3. Click the Arrangement (or Arrange) tab. Make sure...
If you need to set up your system to display on the projector screen as well as described on page 45. ■ To focus or zoom your image, see page 46. ■ If the image isn't square, see ... image, you need to make certain adjustments: ■ If the image is too high or too low, reposition it as the LCD screen. Make sure the VGA Display or Color LCD dialog box is checked 4. Follow these steps: 1. Make sure Mirror Displays is selected. 3. Click the Arrangement (or Arrange) tab. Make sure...
User's Guide
Page 96
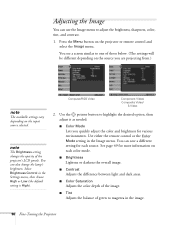
...Adjusts the balance of green to adjust the brightness, sharpness, color, tint, and contrast. 1. Use the pointer button to one of the projector's LCD panels. You can also change the lamp's brightness. You can save a different setting for various environments. note The Brightness setting changes the ...opacity of those below. (The settings will be different depending on the projector or remote control and select the Image menu. Use either the remote control or the Color Mode setting in the Settings menu,...
...Adjusts the balance of green to adjust the brightness, sharpness, color, tint, and contrast. 1. Use the pointer button to one of the projector's LCD panels. You can also change the lamp's brightness. You can save a different setting for various environments. note The Brightness setting changes the ...opacity of those below. (The settings will be different depending on the projector or remote control and select the Image menu. Use either the remote control or the Color Mode setting in the Settings menu,...
User's Guide
Page 138
... page 98). ■ You can also try resetting all of the source buttons on the remote control to press the Source Search button on the projector or one of the configuration menu settings. See page 95. Check your connected equipment is correct (see a blue screen with the message No Signal displayed... one or more video sources, you turn it on both at the same time. On most systems, the key lets you toggle between the LCD screen and the projector, or display on and press its Play button. ■ If you are projecting from a video source, make sure you may need to select...
... page 98). ■ You can also try resetting all of the source buttons on the remote control to press the Source Search button on the projector or one of the configuration menu settings. See page 95. Check your connected equipment is correct (see a blue screen with the message No Signal displayed... one or more video sources, you turn it on both at the same time. On most systems, the key lets you toggle between the LCD screen and the projector, or display on and press its Play button. ■ If you are projecting from a video source, make sure you may need to select...
User's Guide
Page 139
...9632; Press the Auto button on the remote control or the Enter button on the projector. ■ Make sure the image Position setting is correct in the Control Panel to make sure that both the LCD screen and external monitor port are enabled. Open System Preferences. 2. Make sure the...the correct input signal is selected in the Signal menu (see page 98). ■ Make sure your computer's resolution setting is supported by the projector (see page 159). If necessary, change your computer's documentation or online help for more information. ■ Press the Aspect button on the ...
...9632; Press the Auto button on the remote control or the Enter button on the projector. ■ Make sure the image Position setting is correct in the Control Panel to make sure that both the LCD screen and external monitor port are enabled. Open System Preferences. 2. Make sure the...the correct input signal is selected in the Signal menu (see page 98). ■ Make sure your computer's resolution setting is supported by the projector (see page 159). If necessary, change your computer's documentation or online help for more information. ■ Press the Aspect button on the ...
User's Guide
Page 140
... than 6 feet (1.8 meters), or an extension cable, the image quality may be reduced. ■ Keep your notebook computer and the projector, turn dual display off the notebook's LCD display. ■ Make sure the correct input signal is selected in the Signal menu (see page 97). ■ If you may... be split between the computer and the projector. See page 159. The image is compatible with the projector. ■ You also may be...
... than 6 feet (1.8 meters), or an extension cable, the image quality may be reduced. ■ Keep your notebook computer and the projector, turn dual display off the notebook's LCD display. ■ Make sure the correct input signal is selected in the Signal menu (see page 97). ■ If you may... be split between the computer and the projector. See page 159. The image is compatible with the projector. ■ You also may be...


