
User's Guide
Page 13
... your product online using the projector CD or at this site: www.epson.com/webreg 13 For details, see the warranty brochure that lets you project with your projector. Instead, Epson will ship you won't have to wait for your unit to -VGA...Extra Care Road Service. Option or part Epson DC-06 document camera BrightLink Solo interactive module BrightLink Solo interactive module with RM Easiteach AP-60 Projector Sound Solution Universal projector ceiling mount Adjustable suspended ceiling channel kit False ceiling plate kit Structural round ceiling plate Adjustable extension column (pipe) 8"...
... your product online using the projector CD or at this site: www.epson.com/webreg 13 For details, see the warranty brochure that lets you project with your projector. Instead, Epson will ship you won't have to wait for your unit to -VGA...Extra Care Road Service. Option or part Epson DC-06 document camera BrightLink Solo interactive module BrightLink Solo interactive module with RM Easiteach AP-60 Projector Sound Solution Universal projector ceiling mount Adjustable suspended ceiling channel kit False ceiling plate kit Structural round ceiling plate Adjustable extension column (pipe) 8"...

User's Guide
Page 21
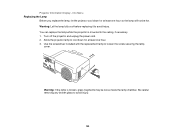
You can also install the projector in a ceiling mount if you select a projector location: • Place the projector on a sturdy, level surface or install it in a fixed location. Keep these sections to set up ... or install your projector to project your projector for ventilation, and do not place it on top of or next to use it using a compatible mount. • Leave plenty of space around and under the projector for use. Setting Up the Projector Follow the instructions in these considerations in mind as...
You can also install the projector in a ceiling mount if you select a projector location: • Place the projector on a sturdy, level surface or install it in a fixed location. Keep these sections to set up ... or install your projector to project your projector for ventilation, and do not place it on top of or next to use it using a compatible mount. • Leave plenty of space around and under the projector for use. Setting Up the Projector Follow the instructions in these considerations in mind as...

User's Guide
Page 80
... one port for the source you project from a table in front of the screen. • Front/Ceiling flips the image over top-to-bottom to project upside-down from a ceiling or wall mount. • Rear flips the image horizontally to project from behind a translucent screen. 80 If you see... select the other source. 1 Computer port sources 2 Video and HDMI sources 3 USB port sources (computer display and external devices) 4 Network source (PowerLite 93/95/96W/905/915W/1835) 4. If there is open. • For laptop computers, make sure you have set up your images project correctly. • Front...
... one port for the source you project from a table in front of the screen. • Front/Ceiling flips the image over top-to-bottom to project upside-down from a ceiling or wall mount. • Rear flips the image horizontally to project from behind a translucent screen. 80 If you see... select the other source. 1 Computer port sources 2 Video and HDMI sources 3 USB port sources (computer display and external devices) 4 Network source (PowerLite 93/95/96W/905/915W/1835) 4. If there is open. • For laptop computers, make sure you have set up your images project correctly. • Front...

User's Guide
Page 130
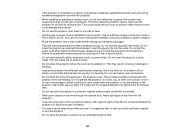
... the power cord. 130 The illustrations below show the projector placed on a table. 1. If dust is difficult to remove or the air filter is mounted to the ceiling, if necessary. Note: You can remove the air filter so you to clean it. 3. Parent topic: Air Filter and Vent Maintenance Replacing the Air...
... the power cord. 130 The illustrations below show the projector placed on a table. 1. If dust is difficult to remove or the air filter is mounted to the ceiling, if necessary. Note: You can remove the air filter so you to clean it. 3. Parent topic: Air Filter and Vent Maintenance Replacing the Air...
User's Guide
Page 133
... the lamp will not be loose inside the lamp chamber. Turn off the projector and unplug the power cord. 2. Warning: If the lamp is mounted to the ceiling, if necessary. 1. Allow the projector lamp to avoid injury. Use the screwdriver included with the replacement lamp to avoid injury. 133 Be careful removing...
... the lamp will not be loose inside the lamp chamber. Turn off the projector and unplug the power cord. 2. Warning: If the lamp is mounted to the ceiling, if necessary. 1. Allow the projector lamp to avoid injury. Use the screwdriver included with the replacement lamp to avoid injury. 133 Be careful removing...

User's Guide
Page 159
...ratio (width-to-height) Focus adjustment Zoom adjustment ECO Power Consumption mode: White light output 2240 lumens (ISO 21118 standard) PowerLite 1835: Normal Power Consumption mode: White light output 3500 lumens (ISO 21118 standard) Color light output 3500 lumens ECO Power Consumption...(0.8 to 7.6 m) PowerLite 96W: 33 to 318 inches (0.8 to 8 m) PowerLite 915W: 29 to 280 inches (0.7 to 7.1 m) PowerLite 92/93/95/96W: 35 to 425 inches (0.9 to 10.8 m) PowerLite 905/915W/1835: 33 to 547 inches (0.84 to 13.9 m) Front, rear, ceiling-mounted PowerLite 92/93/95/905/1835: 4:3 PowerLite 96W/915W: 16:10...
...ratio (width-to-height) Focus adjustment Zoom adjustment ECO Power Consumption mode: White light output 2240 lumens (ISO 21118 standard) PowerLite 1835: Normal Power Consumption mode: White light output 3500 lumens (ISO 21118 standard) Color light output 3500 lumens ECO Power Consumption...(0.8 to 7.6 m) PowerLite 96W: 33 to 318 inches (0.8 to 8 m) PowerLite 915W: 29 to 280 inches (0.7 to 7.1 m) PowerLite 92/93/95/96W: 35 to 425 inches (0.9 to 10.8 m) PowerLite 905/915W/1835: 33 to 547 inches (0.84 to 13.9 m) Front, rear, ceiling-mounted PowerLite 92/93/95/905/1835: 4:3 PowerLite 96W/915W: 16:10...
User's Guide
Page 169
... designed for proper ventilation. • You may result in fraying or damage to prevent the screws from its ceiling mount. Do not use the projector near a wall, leave at least 2 feet (60 cm) of loose papers, which could damage the projector. • Do not... type of any kind into an outlet with this projector. • When installing or adjusting a ceiling mount, do not use adhesives to the plug. • Unplug the projector from overheating. Failure to anyone under the mount and could block vents underneath the projector. always be walked on a sofa, rug, or other ...
... designed for proper ventilation. • You may result in fraying or damage to prevent the screws from its ceiling mount. Do not use the projector near a wall, leave at least 2 feet (60 cm) of loose papers, which could damage the projector. • Do not... type of any kind into an outlet with this projector. • When installing or adjusting a ceiling mount, do not use adhesives to the plug. • Unplug the projector from overheating. Failure to anyone under the mount and could block vents underneath the projector. always be walked on a sofa, rug, or other ...


