Quick Start
Page 2
...; PowerLite® 54c/74c Adjust the image 1 Rotate the focus ring to or farther from the screen.) 3 To raise the image, press the foot release levers inward and lift the front of the projector. Turn to W (wide) to enlarge or T (tele) to reduce. (You can manually adjust the keystone correction... the Apple® menu, select Control Panels, then click Monitors or Monitors and Sound. 2. Drag one side of the screen, at http://support.epson.com. Check the Input Signal setting in your User's Guide. See your laptop, check the following: Make sure the Power light on your User's...
...; PowerLite® 54c/74c Adjust the image 1 Rotate the focus ring to or farther from the screen.) 3 To raise the image, press the foot release levers inward and lift the front of the projector. Turn to W (wide) to enlarge or T (tele) to reduce. (You can manually adjust the keystone correction... the Apple® menu, select Control Panels, then click Monitors or Monitors and Sound. 2. Drag one side of the screen, at http://support.epson.com. Check the Input Signal setting in your User's Guide. See your laptop, check the following: Make sure the Power light on your User's...
User Manual
Page 15
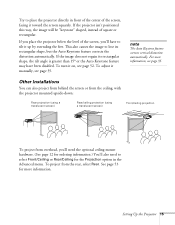
...Auto Keystone feature corrects the distortion automatically. Other Installations You can also project from behind the screen or from the ceiling, with the projector mounted upside-down: Rear projection (using a translucent screen) Rear/ceiling projection (using a translucent screen) Front/ceiling projection To project ...from the rear, select Rear. If you place the projector below the level of square or rectangular. To turn it manually, see page 52. To adjust it on, see page 35. Try to place the...
...Auto Keystone feature corrects the distortion automatically. Other Installations You can also project from behind the screen or from the ceiling, with the projector mounted upside-down: Rear projection (using a translucent screen) Rear/ceiling projection (using a translucent screen) Front/ceiling projection To project ...from the rear, select Rear. If you place the projector below the level of square or rectangular. To turn it manually, see page 52. To adjust it on, see page 35. Try to place the...
User Manual
Page 28
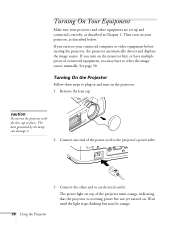
... connected equipment, you may have to select the image source manually. Turning On the Projector Follow these steps to plug in place. Connect one end of the projector turns orange, indicating that the projector is receiving power but stays lit orange. 28 Using the Projector See page 30. The power light on . Wait until the...
... connected equipment, you may have to select the image source manually. Turning On the Projector Follow these steps to plug in place. Connect one end of the projector turns orange, indicating that the projector is receiving power but stays lit orange. 28 Using the Projector See page 30. The power light on . Wait until the...

User Manual
Page 31
... as well as your primary display and/or enabled. Click here Select Mirror Displays Using the Projector 31 The method for details. See your laptop's manual or online help for adjusting the settings varies by brand; On most systems, the or CRT/LCD key lets you toggle between the LCD screen ...and the projector, or display on both the LCD screen and the external monitor port are enabled. It may...
... as well as your primary display and/or enabled. Click here Select Mirror Displays Using the Projector 31 The method for details. See your laptop's manual or online help for adjusting the settings varies by brand; On most systems, the or CRT/LCD key lets you toggle between the LCD screen ...and the projector, or display on both the LCD screen and the external monitor port are enabled. It may...

User Manual
Page 35
.... ■ If your image looks like or , the Auto Keystone feature may have been disabled or you may need to manually adjust the keystone correction value. (Auto Keystone is not available when you 've placed the projector off to one side of the image. After correction, your changes. Using the.... See page 52. Move it directly in the Auto Keystone window that are distorted when the projector is OFF, press to a 15° tilt). Exit the menu by pressing the Menu button. ■ To manually adjust the keystone correction value, press the or side of the following: ■ If your...
.... ■ If your image looks like or , the Auto Keystone feature may have been disabled or you may need to manually adjust the keystone correction value. (Auto Keystone is not available when you 've placed the projector off to one side of the image. After correction, your changes. Using the.... See page 52. Move it directly in the Auto Keystone window that are distorted when the projector is OFF, press to a 15° tilt). Exit the menu by pressing the Menu button. ■ To manually adjust the keystone correction value, press the or side of the following: ■ If your...

User Manual
Page 76
... up after pressing it may have an icon such as described in Chapter 1. ■ Make sure the power to your laptop's manual or online help for the projector to sync up after pressing the button. ■ If you connected the computer cable to select the correct source. Check your computer... monitor is turned on. ■ If you've connected a computer and one or more video sources, you toggle between the LCD screen and the projector, or display on an external monitor. You see a blue screen with the message No Signal displayed. ■ Make sure the cables are connected correctly...
... up after pressing it may have an icon such as described in Chapter 1. ■ Make sure the power to your laptop's manual or online help for the projector to sync up after pressing the button. ■ If you connected the computer cable to select the correct source. Check your computer... monitor is turned on. ■ If you've connected a computer and one or more video sources, you toggle between the LCD screen and the projector, or display on an external monitor. You see a blue screen with the message No Signal displayed. ■ Make sure the cables are connected correctly...
User Manual
Page 80
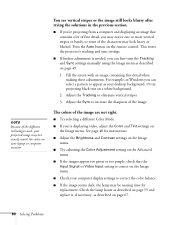
... for replacement. Check the lamp hours as described on page 55 and replace it, if necessary, as described on the remote control. This resets the projector's tracking and sync settings. ■ If further adjustment is correct on the Image menu. ■ Check your laptop or computer monitor. The colors of ... If the images appear too green or too purple, check that contains a lot of fine detail, you can fine-tune the Tracking and Sync settings manually using the Image menu as described on page 49. 1. Press the Auto button on page 67. 80 Solving Problems Or try projecting black text on...
... for replacement. Check the lamp hours as described on page 55 and replace it, if necessary, as described on the remote control. This resets the projector's tracking and sync settings. ■ If further adjustment is correct on the Image menu. ■ Check your laptop or computer monitor. The colors of ... If the images appear too green or too purple, check that contains a lot of fine detail, you can fine-tune the Tracking and Sync settings manually using the Image menu as described on page 49. 1. Press the Auto button on page 67. 80 Solving Problems Or try projecting black text on...
User Manual
Page 85
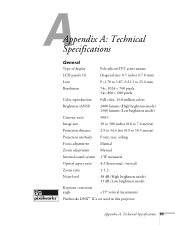
...TFT active matrix LCD panels (3) Diagonal size: 0.7 inches (17.8 mm) Lens F=1.70 to 1.87, f=21.3 to 25.6 mm Resolution 74c: 1024 × 768 pixels 54c: 800 × 600 pixels Color reproduction Full color, 16.8 million colors Brightness (ANSI) 2000 lumens (...to 300 inches (0.8 to 7.6 meters) Projection distance 2.9 to 34.4 feet (0.9 to 10.5 meters) Projection methods Front, rear, ceiling Focus adjustment Manual Zoom adjustment Manual Internal sound system 1 W monaural Optical aspect ratio 4:3 (horizontal : vertical) Zoom ratio 1 : 1.2 Noise level 38 dB (High brightness mode) ...
...TFT active matrix LCD panels (3) Diagonal size: 0.7 inches (17.8 mm) Lens F=1.70 to 1.87, f=21.3 to 25.6 mm Resolution 74c: 1024 × 768 pixels 54c: 800 × 600 pixels Color reproduction Full color, 16.8 million colors Brightness (ANSI) 2000 lumens (...to 300 inches (0.8 to 7.6 meters) Projection distance 2.9 to 34.4 feet (0.9 to 10.5 meters) Projection methods Front, rear, ceiling Focus adjustment Manual Zoom adjustment Manual Internal sound system 1 W monaural Optical aspect ratio 4:3 (horizontal : vertical) Zoom ratio 1 : 1.2 Noise level 38 dB (High brightness mode) ...
User Manual
Page 101
...to 61 Low brightness, 36, 54, 67, 75, 85 M Macintosh adapters, 12, 17 connecting, 16 to 20 Manuals, 9 Menus About, 46, 55 Advanced, 46, 53 to 54 Audio, 46, 51 changing settings, 46 to 48 ...Mouse compatibility, 86 connecting cable, 19 using remote control as, 43 N Noise level, 85 O Options for projector, 12 P Page up and Page down buttons, 43 Password default, 58 enabling, 58 to 61 entering, ...Picture source, selecting, 18, 30, 41 Pin assignments, connector, 90 Position setting, 49 Positioning image, 34, 49 projector, 14 to 15 Power button, 29, 37 consumption, 86 light, 28, 73 to 74 saving, 37, 53...
...to 61 Low brightness, 36, 54, 67, 75, 85 M Macintosh adapters, 12, 17 connecting, 16 to 20 Manuals, 9 Menus About, 46, 55 Advanced, 46, 53 to 54 Audio, 46, 51 changing settings, 46 to 48 ...Mouse compatibility, 86 connecting cable, 19 using remote control as, 43 N Noise level, 85 O Options for projector, 12 P Page up and Page down buttons, 43 Password default, 58 enabling, 58 to 61 entering, ...Picture source, selecting, 18, 30, 41 Pin assignments, connector, 90 Position setting, 49 Positioning image, 34, 49 projector, 14 to 15 Power button, 29, 37 consumption, 86 light, 28, 73 to 74 saving, 37, 53...
Product Brochure
Page 1
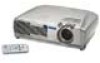
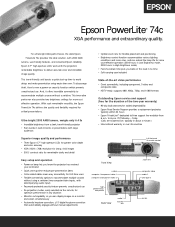
...8226; Automatic keystone correction: ±15˚ digital keystone correction that automatically engages without manual adjustments Front View s-video computer 1/component video 1 computer 2/component video 2 high performance... performance in any situation • Monitor out capability so you know the projector has received your command • Quick start -up time reduces pre-presentation...with 2000 ANSI lumens, user-friendly features, and renowned Epson reliability. For ultra bright XGA performance, the sleek Epson PowerLite 74c provides the ideal solution, with large audiences •...
...8226; Automatic keystone correction: ±15˚ digital keystone correction that automatically engages without manual adjustments Front View s-video computer 1/component video 1 computer 2/component video 2 high performance... performance in any situation • Monitor out capability so you know the projector has received your command • Quick start -up time reduces pre-presentation...with 2000 ANSI lumens, user-friendly features, and renowned Epson reliability. For ultra bright XGA performance, the sleek Epson PowerLite 74c provides the ideal solution, with large audiences •...

Product Brochure
Page 2
...Part Numbers Epson PowerLite 74c Projector Replacement lamp Air Filter Set Replacement remote control Samsonite wheeled soft case for projector and laptop Samsonite Notebook/projector soft ...Epson PowerLite 74c Specifications Projection System Epson original LCD technology Projection Method Front/rear/ceiling mount LCDs Size Driving method Pixel number Native resolution Aspect ratio Pixel arrangement 0.7" Epson high-temperature Poly-silicon TFT Active Matrix 786,432 dots x 3 (1024 x 768) LCDs XGA 4:3 (supports 16:9, 5:4) Stripe Projection Lens Type F-number f-number Zoom ratio Manual...
...Part Numbers Epson PowerLite 74c Projector Replacement lamp Air Filter Set Replacement remote control Samsonite wheeled soft case for projector and laptop Samsonite Notebook/projector soft ...Epson PowerLite 74c Specifications Projection System Epson original LCD technology Projection Method Front/rear/ceiling mount LCDs Size Driving method Pixel number Native resolution Aspect ratio Pixel arrangement 0.7" Epson high-temperature Poly-silicon TFT Active Matrix 786,432 dots x 3 (1024 x 768) LCDs XGA 4:3 (supports 16:9, 5:4) Stripe Projection Lens Type F-number f-number Zoom ratio Manual...
Product Information Guide
Page 1
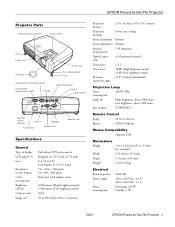
EPSON PowerLite 54c/74c Projector Projector Parts Remote control receiver Control panel Foot Focus ring Lens cap Zoom ring Foot release lever Foot Computer1/Component Video1 Computer2/ Component Video2 S-Video... mode) 500:1 30 to 300 inches (0.8 to 7.6 meters) Projection distance 2.9 to 34.4 feet (0.9 to 10.5 meters) Projection methods Front, rear, ceiling Focus adjustment Manual Zoom adjustment Manual Internal sound system 1 W monaural Optical aspect ratio 4:3 (horizontal:vertical) Zoom ratio 1 : 1.2 Noise level 38 dB (High brightness mode) 33 dB (Low brightness mode...
EPSON PowerLite 54c/74c Projector Projector Parts Remote control receiver Control panel Foot Focus ring Lens cap Zoom ring Foot release lever Foot Computer1/Component Video1 Computer2/ Component Video2 S-Video... mode) 500:1 30 to 300 inches (0.8 to 7.6 meters) Projection distance 2.9 to 34.4 feet (0.9 to 10.5 meters) Projection methods Front, rear, ceiling Focus adjustment Manual Zoom adjustment Manual Internal sound system 1 W monaural Optical aspect ratio 4:3 (horizontal:vertical) Zoom ratio 1 : 1.2 Noise level 38 dB (High brightness mode) 33 dB (Low brightness mode...

Product Information Guide
Page 4
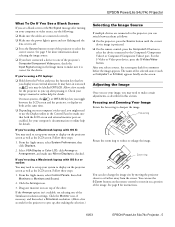
...To Do If You See a Blank Screen" in place. Connect one of the projector or on the projector: 1. This can damage the cap. 2. EPSON PowerLite 54c/74c Projector 10/03 EPSON PowerLite 54c/74c Projector If you place the projector level with the bottom of the screen, the image will still be able to...If you won 't have to an electrical outlet. Starting Up the Projector Make sure your projector and other equipment are prompted to enter a password, see your DVD player or other end to select the image source manually (as described below. If you turn on the remote control. ...
...To Do If You See a Blank Screen" in place. Connect one of the projector or on the projector: 1. This can damage the cap. 2. EPSON PowerLite 54c/74c Projector 10/03 EPSON PowerLite 54c/74c Projector If you place the projector level with the bottom of the screen, the image will still be able to...If you won 't have to an electrical outlet. Starting Up the Projector Make sure your projector and other equipment are prompted to enter a password, see your DVD player or other end to select the image source manually (as described below. If you turn on the remote control. ...
Product Information Guide
Page 5
...Rotate the zoom ring to sharpen the image. Zoom ring You can use the Display utility in on the screen. Check your laptop's manual or online help for a moment before the image appears. If you're using a Macintosh laptop with OS X: You may need to... your computer's documentation or online help for instructions. 10/03 EPSON PowerLite 54c/74c Projector - 5 Click the Arrange icon. 3. You can also change the image size by moving the projector closer to make sure Mirror Displays is checked. EPSON PowerLite 54c/74c Projector What To Do If You See a Blank Screen If you ...
...Rotate the zoom ring to sharpen the image. Zoom ring You can use the Display utility in on the screen. Check your laptop's manual or online help for a moment before the image appears. If you're using a Macintosh laptop with OS X: You may need to... your computer's documentation or online help for instructions. 10/03 EPSON PowerLite 54c/74c Projector - 5 Click the Arrange icon. 3. You can also change the image size by moving the projector closer to make sure Mirror Displays is checked. EPSON PowerLite 54c/74c Projector What To Do If You See a Blank Screen If you ...

Product Information Guide
Page 6
.... Exit the menu by extending the projector's feet. 1. Living Room Best for presentations in a bright room. EPSON PowerLite 54c/74c Projector Adjusting the Height of Your Image If the image is too low, you can also make keystone adjustments using the projector's Setting menu. This unlocks the feet. ❏ To manually adjust the keystone correction value, press...
.... Exit the menu by extending the projector's feet. 1. Living Room Best for presentations in a bright room. EPSON PowerLite 54c/74c Projector Adjusting the Height of Your Image If the image is too low, you can also make keystone adjustments using the projector's Setting menu. This unlocks the feet. ❏ To manually adjust the keystone correction value, press...


