
Technical Brief (Multimedia Projectors)
Page 5
... Specify an image gamma Create a user logo Versatility-Flexible installation EPSON PowerLite projectors can be installed in a variety of ways: Front projection Rear projection Ceiling mount Ceiling mount LL L L LLL Many EPSON projectors can be installed outside of key strokes 2. Freeze A/V ... P Preset - Volume + Remote Control Infrared Receiver Connecting Block EPSON Projector Typical installation out of presentation room EPSON Sales Training EPSON and EPSON Stylus are registered trademarks of Seiko Epson Corporation. 3/01 Other trademarks are the property of their respective ...
... Specify an image gamma Create a user logo Versatility-Flexible installation EPSON PowerLite projectors can be installed in a variety of ways: Front projection Rear projection Ceiling mount Ceiling mount LL L L LLL Many EPSON projectors can be installed outside of key strokes 2. Freeze A/V ... P Preset - Volume + Remote Control Infrared Receiver Connecting Block EPSON Projector Typical installation out of presentation room EPSON Sales Training EPSON and EPSON Stylus are registered trademarks of Seiko Epson Corporation. 3/01 Other trademarks are the property of their respective ...

Installation Guide - ELPMBUNI Universal Mount Assembly
Page 2
...EXPRESS OR IMPLIED, INCLUDING BUT NOT LIMITED TO THE IMPLIED WARRANTIES OF MERCHANTABILITY AND FITNESS FOR A PARTICULAR PURPOSE. techsupport@mounts.com Installation Instructions Page - 3 - ELPMBUNI Table of the installation. Customer Service - (800) 368-9700 Technical Support - Warranty Limited...date against defects in damage to the Upper Assembly ...- 18 Final Adjustments ...- 19 Installing the Plastic Caps...- 20 - Contact Premier Mounts In the event of missing and/or damage equipment, or technical questions, the following information can help in the completion of Contents ...
...EXPRESS OR IMPLIED, INCLUDING BUT NOT LIMITED TO THE IMPLIED WARRANTIES OF MERCHANTABILITY AND FITNESS FOR A PARTICULAR PURPOSE. techsupport@mounts.com Installation Instructions Page - 3 - ELPMBUNI Table of the installation. Customer Service - (800) 368-9700 Technical Support - Warranty Limited...date against defects in damage to the Upper Assembly ...- 18 Final Adjustments ...- 19 Installing the Plastic Caps...- 20 - Contact Premier Mounts In the event of missing and/or damage equipment, or technical questions, the following information can help in the completion of Contents ...

Installation Guide - ELPMBUNI Universal Mount Assembly
Page 3
... must be confirmed prior to installation. Installation Manual KEEP THESE INSTALLATION INSTRUCTIONS IN AN EASILY ACCESSIBLE LOCATION FOR FUTURE REFERENCE. When mounting to the mounting surface. Failure to do so could increase the risk of fire. IF NOT, THE CEILING MUST BE REINFORCED. USE PROPER... AND TOOLS FOR THE INSTALLATION PROCEDURE TO PREVENT PERSONAL INJURY. Indicates that contains wooden studs, dead center of impact. Contact Premier Mounts with any other than wooden studs, use suitable hardware (which is to the projector and could result in damage to be taken...
... must be confirmed prior to installation. Installation Manual KEEP THESE INSTALLATION INSTRUCTIONS IN AN EASILY ACCESSIBLE LOCATION FOR FUTURE REFERENCE. When mounting to the mounting surface. Failure to do so could increase the risk of fire. IF NOT, THE CEILING MUST BE REINFORCED. USE PROPER... AND TOOLS FOR THE INSTALLATION PROCEDURE TO PREVENT PERSONAL INJURY. Indicates that contains wooden studs, dead center of impact. Contact Premier Mounts with any other than wooden studs, use suitable hardware (which is to the projector and could result in damage to be taken...

Installation Guide - ELPMBUNI Universal Mount Assembly
Page 4
... Screws (Qty 4) M6 x 12mm Security Head Screws (Qty 4) Portable Drill Pencil Level (Supplied) Stud Finder (Commercially Available) M5 Allen Wrench NOTE: Mounting screws will vary by projector. Upper Assembly (Qty 1) Mounting Bracket (Qty 1) Plastic Barrel Caps (Qty 4) M3 Flat Washers (Qty 4) Note: Must be used with all proper installation hardware and components...
... Screws (Qty 4) M6 x 12mm Security Head Screws (Qty 4) Portable Drill Pencil Level (Supplied) Stud Finder (Commercially Available) M5 Allen Wrench NOTE: Mounting screws will vary by projector. Upper Assembly (Qty 1) Mounting Bracket (Qty 1) Plastic Barrel Caps (Qty 4) M3 Flat Washers (Qty 4) Note: Must be used with all proper installation hardware and components...

Installation Guide - ELPMBUNI Universal Mount Assembly
Page 5
The number of legs E may vary depending on the number of mounting points found on the bottom of single and dual legs together as single leg or any combination C of your projector for your G projector.... K M J L J L Installation Manual ELPMBUNI A NOTE: The four (2-piece) leg assemblies can be used as shown in Options 1 and 2. ELPMBUNI Universal Mount Assembly A Single Wooden Stud Mounting Points B Solid Structure Mounting Points C Ceiling Plate D Allen Wrench E Height Adjustment Screws F Tension Knobs G Safety Knob H Security Screws I Leveling Barrels J Universal...
The number of legs E may vary depending on the number of mounting points found on the bottom of single and dual legs together as single leg or any combination C of your projector for your G projector.... K M J L J L Installation Manual ELPMBUNI A NOTE: The four (2-piece) leg assemblies can be used as shown in Options 1 and 2. ELPMBUNI Universal Mount Assembly A Single Wooden Stud Mounting Points B Solid Structure Mounting Points C Ceiling Plate D Allen Wrench E Height Adjustment Screws F Tension Knobs G Safety Knob H Security Screws I Leveling Barrels J Universal...

Installation Guide - ELPMBUNI Universal Mount Assembly
Page 6
...WARNING: Proper installation procedure by qualified personnel as (distance from the screen to the lens of the projector, top of mounting points and screw thread (pitch) size. 3. NOTE: Review the projectors manufacture's operation manual and refer to these ... installation will normally find important reference information regarding installation dimensions such as outlined in serious personal injury and possible damage to . Mounting Points Inverted Projector Blanket, soft cloth etc Figure 1 Flat surface Installation Manual Page - 7 - Adherence to the ceiling installation...
...WARNING: Proper installation procedure by qualified personnel as (distance from the screen to the lens of the projector, top of mounting points and screw thread (pitch) size. 3. NOTE: Review the projectors manufacture's operation manual and refer to these ... installation will normally find important reference information regarding installation dimensions such as outlined in serious personal injury and possible damage to . Mounting Points Inverted Projector Blanket, soft cloth etc Figure 1 Flat surface Installation Manual Page - 7 - Adherence to the ceiling installation...

Installation Guide - ELPMBUNI Universal Mount Assembly
Page 7
Next loosen the safety screw knurl knob far enough to allow the two parts to create free play between the bracket tri-lock assembly and the upper section tri-lock assembly points. 5. Installation Manual Figure 2 Tri-Lock Opening Rotate 180° To Unlock Tension Knobs Upper Assembly Safety Knob Figure 3 Figure 4 Page - 8 - Separate the upper assembly from the projector mounting bracket by slightly loosening the two tension knurl knobs to be rotated 180° apart and separate. ELPMBUNI 4.
Next loosen the safety screw knurl knob far enough to allow the two parts to create free play between the bracket tri-lock assembly and the upper section tri-lock assembly points. 5. Installation Manual Figure 2 Tri-Lock Opening Rotate 180° To Unlock Tension Knobs Upper Assembly Safety Knob Figure 3 Figure 4 Page - 8 - Separate the upper assembly from the projector mounting bracket by slightly loosening the two tension knurl knobs to be rotated 180° apart and separate. ELPMBUNI 4.

Installation Guide - ELPMBUNI Universal Mount Assembly
Page 8
... one-piece leg as shown. NOTE: If your projector. Using a Phillips screwdriver, loosely secure the screws to adjust the height of the mounting bracket. NOTE: The levelers and leg assembly screws must be loose in order to the projector (Figure A). Insert the M3 x 16 Phillips... - 9 - FIGURE 6 Two-Piece Leg FIGURE 7 One-Piece Leg Allen Wrench Mounting Hardware Inverted Projector Leveling Barrels FIGURE A Installation Manual Figure 5 Line up the leveling barrels to the mounting points. Locate the mounting points on the base of the projector as shown for a better overall fit to ...
... one-piece leg as shown. NOTE: If your projector. Using a Phillips screwdriver, loosely secure the screws to adjust the height of the mounting bracket. NOTE: The levelers and leg assembly screws must be loose in order to the projector (Figure A). Insert the M3 x 16 Phillips... - 9 - FIGURE 6 Two-Piece Leg FIGURE 7 One-Piece Leg Allen Wrench Mounting Hardware Inverted Projector Leveling Barrels FIGURE A Installation Manual Figure 5 Line up the leveling barrels to the mounting points. Locate the mounting points on the base of the projector as shown for a better overall fit to ...

Installation Guide - ELPMBUNI Universal Mount Assembly
Page 9
PowerLite 830p, 835p Hardware: M4 x 12mm (Qty 4) Installation Manual This mount works with all sub-25 pound projectors. ELPMBUNI NOTE: If your projector model is not shown, when arranging the leg combination, simply ensure access to filters and lamp housings when aligning brackets. PowerLite S3, S4, 62C, 76C, 82C, Hardware: M4 x 12mm (Qty 3) Page - 10 -
PowerLite 830p, 835p Hardware: M4 x 12mm (Qty 4) Installation Manual This mount works with all sub-25 pound projectors. ELPMBUNI NOTE: If your projector model is not shown, when arranging the leg combination, simply ensure access to filters and lamp housings when aligning brackets. PowerLite S3, S4, 62C, 76C, 82C, Hardware: M4 x 12mm (Qty 3) Page - 10 -

Installation Guide - ELPMBUNI Universal Mount Assembly
Page 13
Failure to do not over-tighten the mounting hardware. Allen Wrench Level Inverted Projector DOWN UP Adjusting the Mount Figure 8 Leveling Barrels Page - 14 - Installation Manual Rotate the leveling barrels to the projector then tighten the hex head leg ...screws with the Allen wrench (supplied) (Figure 8 and Figure 9). When the position desired is achieved tighten the mounting hardware to level the mounting bracket next, position the mounting bracket so that it avoids most, if not all, ventilation points (including lamp & filter access doors). 2. ELPMBUNI Leveling...
Failure to do not over-tighten the mounting hardware. Allen Wrench Level Inverted Projector DOWN UP Adjusting the Mount Figure 8 Leveling Barrels Page - 14 - Installation Manual Rotate the leveling barrels to the projector then tighten the hex head leg ...screws with the Allen wrench (supplied) (Figure 8 and Figure 9). When the position desired is achieved tighten the mounting hardware to level the mounting bracket next, position the mounting bracket so that it avoids most, if not all, ventilation points (including lamp & filter access doors). 2. ELPMBUNI Leveling...

Installation Guide - ELPMBUNI Universal Mount Assembly
Page 14
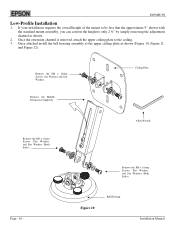
... better to have the top edge of the lens as close to a point centered horizontally on your screen and projector, make sure the mounting location will safely support the weight of the screen for best picture ratio. 2. NOTE: If installing the security kit (ELPMBSEC), please refer... to the security kit installation guide before attaching the ceiling plate to the edge of the projector. Before you mount your installation environment (Figure 9). Ceiling Structure Ceiling Wood Stud Wood Screws Upper Assembly Installation Manual Knurl Knobs (3ea) Figure 9 Secure the ceiling...
... better to have the top edge of the lens as close to a point centered horizontally on your screen and projector, make sure the mounting location will safely support the weight of the screen for best picture ratio. 2. NOTE: If installing the security kit (ELPMBSEC), please refer... to the security kit installation guide before attaching the ceiling plate to the edge of the projector. Before you mount your installation environment (Figure 9). Ceiling Structure Ceiling Wood Stud Wood Screws Upper Assembly Installation Manual Knurl Knobs (3ea) Figure 9 Secure the ceiling...
Installation Guide - ELPMBUNI Universal Mount Assembly
Page 15
If your installation requires the overall height of the mount to be less that the approximate 9" shown with the standard mount assembly, you can convert the height to the upper ceiling plate as shown. 2. Once attached install the bell housing assembly to only 2 ½" by simply ...
If your installation requires the overall height of the mount to be less that the approximate 9" shown with the standard mount assembly, you can convert the height to the upper ceiling plate as shown. 2. Once attached install the bell housing assembly to only 2 ½" by simply ...

Installation Guide - ELPMBUNI Universal Mount Assembly
Page 17
...to securing the projector to the Upper Assembly 1. Tighten the remaining two tension knurl knobs until the mount becomes rigid. 5. Safety Knurl Knob Tension Knurl Knobs Figure 13 Tri-Lock Opening Alignment Slot Projector Mount Installation Manual The safety knob should line up with the safety knob to lock the... mating special tri-lock cutout into the mating portion of the bracket in direct alignment with the alignment slot on the mounting bracket (Figure 13). ELPMBUNI Securing the Projector to the upper assembly. Make sure the three-knurl knobs are loosened to fully expose to...
...to securing the projector to the Upper Assembly 1. Tighten the remaining two tension knurl knobs until the mount becomes rigid. 5. Safety Knurl Knob Tension Knurl Knobs Figure 13 Tri-Lock Opening Alignment Slot Projector Mount Installation Manual The safety knob should line up with the safety knob to lock the... mating special tri-lock cutout into the mating portion of the bracket in direct alignment with the alignment slot on the mounting bracket (Figure 13). ELPMBUNI Securing the Projector to the upper assembly. Make sure the three-knurl knobs are loosened to fully expose to...

Installation Guide - ELPMBUNI Universal Mount Assembly
Page 18
... adjustment screws and raising or lowering the projector (Figure 14). 3. If roll adjustment is achieved tighten the two screws. 4. With the projector secured in the mount and power on the screen, slightly loosen the front and rear M8 screws and adjust to the screen and firmly tighten the two M8 tilt...
... adjustment screws and raising or lowering the projector (Figure 14). 3. If roll adjustment is achieved tighten the two screws. 4. With the projector secured in the mount and power on the screen, slightly loosen the front and rear M8 screws and adjust to the screen and firmly tighten the two M8 tilt...
Product Information Guide
Page 1
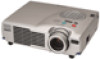
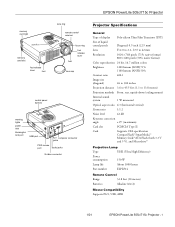
...) Color reproduction 24 bit, 16.7 million colors Brightness 1200 lumens (ANSI) 715c 1100 lumens (ANSI) 505c Contrast ratio 400:1 Image size (diagonal) 26 to 300 inches Projection distance 3.6 to 45.5 feet (1.1 to 13.8 meters) Projection methods Front, rear, upside-down (ceiling mount) Internal sound system 1 W monaural Optical aspect ratio 4:3 (horizontal:vertical) ... W Lamp life About 1000 hours Part number ELPLP14 Remote Control Range 32.8 feet (10 meters) Batteries Alkaline AA (2) Mouse Compatibility Supports PS/2, USB, ADB 1/01 EPSON PowerLite 505c/715c Projector - 1
...) Color reproduction 24 bit, 16.7 million colors Brightness 1200 lumens (ANSI) 715c 1100 lumens (ANSI) 505c Contrast ratio 400:1 Image size (diagonal) 26 to 300 inches Projection distance 3.6 to 45.5 feet (1.1 to 13.8 meters) Projection methods Front, rear, upside-down (ceiling mount) Internal sound system 1 W monaural Optical aspect ratio 4:3 (horizontal:vertical) ... W Lamp life About 1000 hours Part number ELPLP14 Remote Control Range 32.8 feet (10 meters) Batteries Alkaline AA (2) Mouse Compatibility Supports PS/2, USB, ADB 1/01 EPSON PowerLite 505c/715c Projector - 1
Product Information Guide
Page 11
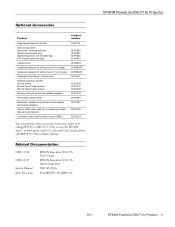
... CPD-11737 Service Manual Parts Price Lists EPSON PowerLite 505c/715c User's Guide EPSON PowerLite 505c/715c Quick Setup sheet TM-505c/715c PL-EMP505c, PL-EMP715c EPSON PowerLite 505c/715c Projector 1/01 EPSON PowerLite 505c/715c Projector - 11 In Canada, please call...epson.com (U.S. Optional Accessories Product Replacement lamp and air filter Soft carrying cases: Samsonite® wheeled soft case Slimline soft shoulder bag Notebook/projector soft shoulder bag ATA molded hard shell case Ceiling mount Suspension adapter for ceiling mount (1-inch pipe) Suspension adapter for ceiling mount...
... CPD-11737 Service Manual Parts Price Lists EPSON PowerLite 505c/715c User's Guide EPSON PowerLite 505c/715c Quick Setup sheet TM-505c/715c PL-EMP505c, PL-EMP715c EPSON PowerLite 505c/715c Projector 1/01 EPSON PowerLite 505c/715c Projector - 11 In Canada, please call...epson.com (U.S. Optional Accessories Product Replacement lamp and air filter Soft carrying cases: Samsonite® wheeled soft case Slimline soft shoulder bag Notebook/projector soft shoulder bag ATA molded hard shell case Ceiling mount Suspension adapter for ceiling mount (1-inch pipe) Suspension adapter for ceiling mount...
User Manual
Page 17
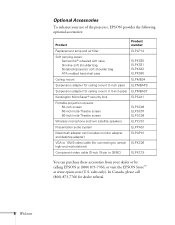
...15-pin to 13W3 video cable (for dealer referral. 8 Welcome Optional Accessories To enhance your use of the projector, EPSON provides the following optional accessories: Product Product number Replacement lamp and air filter ELPLP14 Soft carrying cases: Samsonite® wheeled...projector soft shoulder bag ATA molded hard shell case ELPKS35 ELPKS31 ELPKS32 ELPKS30 Ceiling mount ELPMB34 Suspension adapter for ceiling mount (1-inch pipe) ELPMBAPS Suspension adapter for ceiling mount (1.5-inch pipe) ELPMBAST Kensington MicroSaver® security lock ELPSL01 Portable projection screens...
...15-pin to 13W3 video cable (for dealer referral. 8 Welcome Optional Accessories To enhance your use of the projector, EPSON provides the following optional accessories: Product Product number Replacement lamp and air filter ELPLP14 Soft carrying cases: Samsonite® wheeled...projector soft shoulder bag ATA molded hard shell case ELPKS35 ELPKS31 ELPKS32 ELPKS30 Ceiling mount ELPMB34 Suspension adapter for ceiling mount (1-inch pipe) ELPMBAPS Suspension adapter for ceiling mount (1.5-inch pipe) ELPMBAST Kensington MicroSaver® security lock ELPSL01 Portable projection screens...

User Manual
Page 89
.... : ON OFF Ceiling : ON OFF Reset Execute :Select :Enter 3. s A/V Mute Selects the screen color or image to configure the projector for rear projection or ceiling mounting, and adjust several other features. 1. Normally, the lamp turns off the identifying text that you 're finished, press Esc or Menu. s Prompt Turns off when...
.... : ON OFF Ceiling : ON OFF Reset Execute :Select :Enter 3. s A/V Mute Selects the screen color or image to configure the projector for rear projection or ceiling mounting, and adjust several other features. 1. Normally, the lamp turns off the identifying text that you 're finished, press Esc or Menu. s Prompt Turns off when...

User Manual
Page 90
... of your computer and the number of the projected image. Press the Menu button. You see the main menu. 2. 4. Turn on when the projector is mounted upside-down from nine languages to set a temperature between 5000 and 10000 K. and press Enter to select About. Select Color Temp. When you have captured...
... of your computer and the number of the projected image. Press the Menu button. You see the main menu. 2. 4. Turn on when the projector is mounted upside-down from nine languages to set a temperature between 5000 and 10000 K. and press Enter to select About. Select Color Temp. When you have captured...

User Manual
Page 115
...sound system, you 'll need an RCA-to-3.5 mm stereo audio cable, which may be installed for three different viewing setups: front projection, ceiling mounting, or rear projection onto a semi-transparent screen. To project from overhead, you will be included with the image. Connecting to an External Audio System...top of the screen, the image will need to select Ceiling in the projector's menu system (see page 79). If you're ceiling-mounting the projector and you place it down to fill the whole screen with your installation requires maximum volume and sound quality, you want to ...
...sound system, you 'll need an RCA-to-3.5 mm stereo audio cable, which may be installed for three different viewing setups: front projection, ceiling mounting, or rear projection onto a semi-transparent screen. To project from overhead, you will be included with the image. Connecting to an External Audio System...top of the screen, the image will need to select Ceiling in the projector's menu system (see page 79). If you're ceiling-mounting the projector and you place it down to fill the whole screen with your installation requires maximum volume and sound quality, you want to ...

