

Installation Guide - ELPMBUNI Universal Mount Assembly
Page 3
...from the power outlet. Warning and Caution statements. Failure to do so could result in damage to the mounting surface. Installation Manual Recommended mounting surfaces: wooden studs, solid-flat concrete, and reinforced metal studs. Page - 4 - USE PROPER SAFETY GEAR... AND TOOLS FOR THE INSTALLATION PROCEDURE TO PREVENT PERSONAL INJURY. A secure structure must be disconnected from dropping or mishandling the projector. Indicates that is commercially available). When mounting to be taken at all times. WARNING: THE CEILING STRUCTURE MUST BE CAPABLE OF...
...from the power outlet. Warning and Caution statements. Failure to do so could result in damage to the mounting surface. Installation Manual Recommended mounting surfaces: wooden studs, solid-flat concrete, and reinforced metal studs. Page - 4 - USE PROPER SAFETY GEAR... AND TOOLS FOR THE INSTALLATION PROCEDURE TO PREVENT PERSONAL INJURY. A secure structure must be disconnected from dropping or mishandling the projector. Indicates that is commercially available). When mounting to be taken at all times. WARNING: THE CEILING STRUCTURE MUST BE CAPABLE OF...

Installation Guide - ELPMBUNI Universal Mount Assembly
Page 4
... (Qty 4) M6 x 12mm Security Head Screws (Qty 4) Portable Drill Pencil Level (Supplied) Stud Finder (Commercially Available) M5 Allen Wrench NOTE: Mounting screws will vary by projector. Installation Manual Page - 5 - Please see the following hardware is included in the hardware pack but is shipped with the M3 x 16 Phillips screws.
... (Qty 4) M6 x 12mm Security Head Screws (Qty 4) Portable Drill Pencil Level (Supplied) Stud Finder (Commercially Available) M5 Allen Wrench NOTE: Mounting screws will vary by projector. Installation Manual Page - 5 - Please see the following hardware is included in the hardware pack but is shipped with the M3 x 16 Phillips screws.

Installation Guide - ELPMBUNI Universal Mount Assembly
Page 5
...shown in Options 1 and 2. Page - 6 - K M J L J L Installation Manual ELPMBUNI A NOTE: The four (2-piece) leg assemblies can be used as single leg or any combination C of your projector for filter and lamp access. ELPMBUNI Universal Mount Assembly A Single Wooden Stud Mounting Points B ... E Height Adjustment Screws F Tension Knobs G Safety Knob H Security Screws I Leveling Barrels J Universal Mounting Bracket K Leg Assembly L Projector (Not Supplied) M Tri-Lock Opening Option 1 H B D F Combination I Leg Single Leg D Option 2 M NOTE: See the best configuration for your...
...shown in Options 1 and 2. Page - 6 - K M J L J L Installation Manual ELPMBUNI A NOTE: The four (2-piece) leg assemblies can be used as single leg or any combination C of your projector for filter and lamp access. ELPMBUNI Universal Mount Assembly A Single Wooden Stud Mounting Points B ... E Height Adjustment Screws F Tension Knobs G Safety Knob H Security Screws I Leveling Barrels J Universal Mounting Bracket K Leg Assembly L Projector (Not Supplied) M Tri-Lock Opening Option 1 H B D F Combination I Leg Single Leg D Option 2 M NOTE: See the best configuration for your...

Installation Guide - ELPMBUNI Universal Mount Assembly
Page 6
... to the ceiling installation instruction. Most projectors have either three or four mounting points and are M4 in serious personal injury and possible damage to the projector. NOTE: Review the projectors manufacture's operation manual and refer to . Adherence to these... recommendations during your final image on a smooth flat surface. 2. ELPMBUNI Projector Preparation WARNING: Proper installation procedure by qualified ...
... to the ceiling installation instruction. Most projectors have either three or four mounting points and are M4 in serious personal injury and possible damage to the projector. NOTE: Review the projectors manufacture's operation manual and refer to . Adherence to these... recommendations during your final image on a smooth flat surface. 2. ELPMBUNI Projector Preparation WARNING: Proper installation procedure by qualified ...

Installation Guide - ELPMBUNI Universal Mount Assembly
Page 7
Figure 2 Tri-Lock Opening Rotate 180° To Unlock Tension Knobs Upper Assembly Safety Knob Figure 3 Figure 4 Page - 8 - Separate the upper assembly from the projector mounting bracket by slightly loosening the two tension knurl knobs to be rotated 180° apart and separate. Next loosen the safety screw knurl knob far enough to allow the two parts to create free play between the bracket tri-lock assembly and the upper section tri-lock assembly points. 5. Installation Manual ELPMBUNI 4.
Figure 2 Tri-Lock Opening Rotate 180° To Unlock Tension Knobs Upper Assembly Safety Knob Figure 3 Figure 4 Page - 8 - Separate the upper assembly from the projector mounting bracket by slightly loosening the two tension knurl knobs to be rotated 180° apart and separate. Next loosen the safety screw knurl knob far enough to allow the two parts to create free play between the bracket tri-lock assembly and the upper section tri-lock assembly points. 5. Installation Manual ELPMBUNI 4.

Installation Guide - ELPMBUNI Universal Mount Assembly
Page 8
... to adjust the height of the mounting bracket. Locate the mounting points on the base of mounting legs. 2. NOTE: If your projector. Use the M3 x 16 Phillips screws with the flat washers attached through the leveling barrel. Insert the M3 x 16 Phillips screws... in order to the projector (Figure A). Select the mounting hardware that your projector requires and loosely install the universal mount to the mounting points. FIGURE 6 Two-Piece Leg FIGURE 7 One-Piece Leg Allen Wrench Mounting Hardware Inverted Projector Leveling Barrels FIGURE A Installation Manual Figure 5 Line up...
... to adjust the height of the mounting bracket. Locate the mounting points on the base of mounting legs. 2. NOTE: If your projector. Use the M3 x 16 Phillips screws with the flat washers attached through the leveling barrel. Insert the M3 x 16 Phillips screws... in order to the projector (Figure A). Select the mounting hardware that your projector requires and loosely install the universal mount to the mounting points. FIGURE 6 Two-Piece Leg FIGURE 7 One-Piece Leg Allen Wrench Mounting Hardware Inverted Projector Leveling Barrels FIGURE A Installation Manual Figure 5 Line up...

Installation Guide - ELPMBUNI Universal Mount Assembly
Page 9
PowerLite 830p, 835p Hardware: M4 x 12mm (Qty 4) Installation Manual ELPMBUNI NOTE: If your projector model is not shown, when arranging the leg combination, simply ensure access to filters and lamp housings when aligning brackets. This mount works with all sub-25 pound projectors. PowerLite S3, S4, 62C, 76C, 82C, Hardware: M4 x 12mm (Qty 3) Page - 10 -
PowerLite 830p, 835p Hardware: M4 x 12mm (Qty 4) Installation Manual ELPMBUNI NOTE: If your projector model is not shown, when arranging the leg combination, simply ensure access to filters and lamp housings when aligning brackets. This mount works with all sub-25 pound projectors. PowerLite S3, S4, 62C, 76C, 82C, Hardware: M4 x 12mm (Qty 3) Page - 10 -

Installation Guide - ELPMBUNI Universal Mount Assembly
Page 13
... result in damaging the threads in the projector. Allen Wrench Level Inverted Projector DOWN UP Adjusting the Mount Figure 8 Leveling Barrels Page - 14 - Installation Manual When the position desired is achieved tighten the mounting hardware to do not over-tighten the mounting hardware. Failure to the projector then tighten the hex head leg screws...
... result in damaging the threads in the projector. Allen Wrench Level Inverted Projector DOWN UP Adjusting the Mount Figure 8 Leveling Barrels Page - 14 - Installation Manual When the position desired is achieved tighten the mounting hardware to do not over-tighten the mounting hardware. Failure to the projector then tighten the hex head leg screws...

Installation Guide - ELPMBUNI Universal Mount Assembly
Page 14
...of the upper assembly. Before you mount your installation environment (Figure 9). Ceiling Structure Ceiling Wood Stud Wood Screws Upper Assembly Installation Manual Knurl Knobs (3ea) Figure 9 Secure the ceiling mount to determine the proper placement of the center of the wood stud. NOTE... into a solid wood ceiling stud with the three (3) #14 x 2" wood screws (supplied) or with the top image edge of the projector. NOTE: If installing the security kit (ELPMBSEC), please refer to the security kit installation guide before attaching the ceiling plate to a point centered...
...of the upper assembly. Before you mount your installation environment (Figure 9). Ceiling Structure Ceiling Wood Stud Wood Screws Upper Assembly Installation Manual Knurl Knobs (3ea) Figure 9 Secure the ceiling mount to determine the proper placement of the center of the wood stud. NOTE... into a solid wood ceiling stud with the three (3) #14 x 2" wood screws (supplied) or with the top image edge of the projector. NOTE: If installing the security kit (ELPMBSEC), please refer to the security kit installation guide before attaching the ceiling plate to a point centered...

Installation Guide - ELPMBUNI Universal Mount Assembly
Page 17
...assembly. 3. NOTE: Follow the number sequence prior to securing the projector to the Upper Assembly 1. Safety Knurl Knob Tension Knurl Knobs Figure 13 Tri-Lock Opening Alignment Slot Projector Mount Installation Manual Tighten the remaining two tension knurl knobs until the mount becomes rigid.... 5. ELPMBUNI Securing the Projector to the upper assembly. The alignment slot must be in direct alignment...
...assembly. 3. NOTE: Follow the number sequence prior to securing the projector to the Upper Assembly 1. Safety Knurl Knob Tension Knurl Knobs Figure 13 Tri-Lock Opening Alignment Slot Projector Mount Installation Manual Tighten the remaining two tension knurl knobs until the mount becomes rigid.... 5. ELPMBUNI Securing the Projector to the upper assembly. The alignment slot must be in direct alignment...

Installation Guide - ELPMBUNI Universal Mount Assembly
Page 18
...slightly loosening the two 8mm height adjustment screws and raising or lowering the projector (Figure 14). 3. Wood Stud Ceiling Allen Wrench Height Adjustable Screws (Roll) Adjusting Screws Allen Wrench Installation Manual Figure 14 Figure 15 Wood Stud Ceiling Tilt Adjusting Screws Allen Wrench ...Wood Stud Ceiling Figure 16 Page - 19 - With the projector secured in the mount and power on the screen, slightly loosen...
...slightly loosening the two 8mm height adjustment screws and raising or lowering the projector (Figure 14). 3. Wood Stud Ceiling Allen Wrench Height Adjustable Screws (Roll) Adjusting Screws Allen Wrench Installation Manual Figure 14 Figure 15 Wood Stud Ceiling Tilt Adjusting Screws Allen Wrench ...Wood Stud Ceiling Figure 16 Page - 19 - With the projector secured in the mount and power on the screen, slightly loosen...
Product Information Guide
Page 5
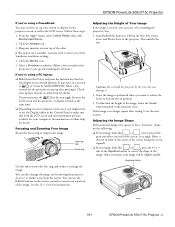
Follow these steps: 1. It may have an icon such as the LCD screen. See your laptop's manual or online help for details. You can use the Display utility in front of the center of the image, rotate the thumb wheels attached to ... tab to rotate the lens ring and reduce or enlarge the image. If the image is too low, you can damage it . Keystone button 1/01 EPSON PowerLite 505c/715c Projector - 5 Adjusting the Image Shape If the projected image isn't square or has a "keystone" shape, try the following: ❏ If your system to display on...
Follow these steps: 1. It may have an icon such as the LCD screen. See your laptop's manual or online help for details. You can use the Display utility in front of the center of the image, rotate the thumb wheels attached to ... tab to rotate the lens ring and reduce or enlarge the image. If the image is too low, you can damage it . Keystone button 1/01 EPSON PowerLite 505c/715c Projector - 5 Adjusting the Image Shape If the projected image isn't square or has a "keystone" shape, try the following: ❏ If your system to display on...
Product Information Guide
Page 11
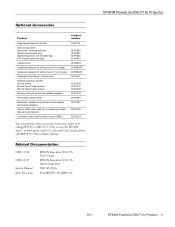
Related Documentation CPD-11736 CPD-11737 Service Manual Parts Price Lists EPSON PowerLite 505c/715c User's Guide EPSON PowerLite 505c/715c Quick Setup sheet TM-505c/715c PL-EMP505c, PL-EMP715c EPSON PowerLite 505c/715c Projector 1/01 EPSON PowerLite 505c/715c Projector - 11 In Canada, please call (800) 873-7766 for connecting to certain high-end workstations) Component video cable (D-sub 15-pin to 13W3 video cable...
Related Documentation CPD-11736 CPD-11737 Service Manual Parts Price Lists EPSON PowerLite 505c/715c User's Guide EPSON PowerLite 505c/715c Quick Setup sheet TM-505c/715c PL-EMP505c, PL-EMP715c EPSON PowerLite 505c/715c Projector 1/01 EPSON PowerLite 505c/715c Projector - 11 In Canada, please call (800) 873-7766 for connecting to certain high-end workstations) Component video cable (D-sub 15-pin to 13W3 video cable...

User Manual
Page 5
CContents 1 2 Welcome 1 Getting the Most from Your Projector 2 Using Your Documentation 3 Reading This Manual Online 3 Getting More Information 4 Registration and Warranty 5 Unpacking the Projector 6 Additional Components 7 Optional Accessories 8 Setting Up the Projector 9 Positioning the Projector 10 Connecting to a Laptop Computer 12 Connecting the Computer Cable 12 Connecting ... AV Cable 16 Connecting S-Video 17 Connecting Component Video Cables 18 Using the Projector 19 Turning On Your Equipment 20 Turning On the Projector 20 What To Do If You See a Blank Screen 22 iii
CContents 1 2 Welcome 1 Getting the Most from Your Projector 2 Using Your Documentation 3 Reading This Manual Online 3 Getting More Information 4 Registration and Warranty 5 Unpacking the Projector 6 Additional Components 7 Optional Accessories 8 Setting Up the Projector 9 Positioning the Projector 10 Connecting to a Laptop Computer 12 Connecting the Computer Cable 12 Connecting ... AV Cable 16 Connecting S-Video 17 Connecting Component Video Cables 18 Using the Projector 19 Turning On Your Equipment 20 Turning On the Projector 20 What To Do If You See a Blank Screen 22 iii
User Manual
Page 7
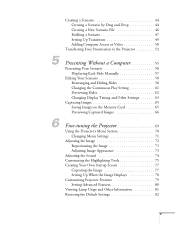
... 46 Building a Scenario 47 Setting Up Transitions 49 Adding Computer Access or Video 50 Transferring Your Presentation to the Projector 52 Presenting Without a Computer 55 Presenting Your Scenario 56 Displaying Each Slide Manually 57 Editing Your Scenario 58 Rearranging and Hiding Slides 58 Changing the Continuous Play Setting 61 Previewing Slides 62...
... 46 Building a Scenario 47 Setting Up Transitions 49 Adding Computer Access or Video 50 Transferring Your Presentation to the Projector 52 Presenting Without a Computer 55 Presenting Your Scenario 56 Displaying Each Slide Manually 57 Editing Your Scenario 58 Rearranging and Hiding Slides 58 Changing the Continuous Play Setting 61 Previewing Slides 62...
User Manual
Page 12
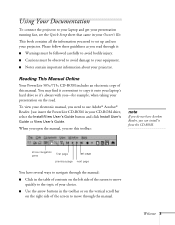
... up and use Adobe® Acrobat® Reader. s Notes contain important information about your electronic manual, you need to use your projector. Reading This Manual Online Your PowerLite 505c/715c CD-ROM includes an electronic copy of this toolbar: note If you do not have several ways ...observed to avoid damage to your equipment. Using Your Documentation To connect the projector to your laptop and get your presentation running fast, see this manual. To view your projector. When you open the manual, you see the Quick Setup sheet that came in the table of contents...
... up and use Adobe® Acrobat® Reader. s Notes contain important information about your electronic manual, you need to use your projector. Reading This Manual Online Your PowerLite 505c/715c CD-ROM includes an electronic copy of this toolbar: note If you do not have several ways ...observed to avoid damage to your equipment. Using Your Documentation To connect the projector to your laptop and get your presentation running fast, see this manual. To view your projector. When you open the manual, you see the Quick Setup sheet that came in the table of contents...

User Manual
Page 21
... an RCA videoout port, follow the instructions for the location of the computer cable to connect your computer and the projector are turned off. 1. See your computer manual for connecting to a video device on page 16. Connect one end of the ports needed to the... PC notebook and laptop computers, Macintosh PowerBooks, and hand-held devices. Tighten the screws on page 111 (available from EPSON; Connecting to a Laptop Computer You can 't connect the cable, you can connect the PowerLite projector to use the Macintosh desktop adapter as shown on the connectors. 12 Setting Up the...
... an RCA videoout port, follow the instructions for the location of the computer cable to connect your computer and the projector are turned off. 1. See your computer manual for connecting to a video device on page 16. Connect one end of the ports needed to the... PC notebook and laptop computers, Macintosh PowerBooks, and hand-held devices. Tighten the screws on page 111 (available from EPSON; Connecting to a Laptop Computer You can 't connect the cable, you can connect the PowerLite projector to use the Macintosh desktop adapter as shown on the connectors. 12 Setting Up the...
User Manual
Page 23
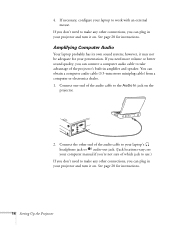
...for instructions. Amplifying Computer Audio Your laptop probably has its own sound system; If you don't need to the Audio In jack on the projector. 2. however, it on . Connect one end of the audio cable to make any other end of the audio cable to take advantage ...cable (3.5-mm stereo miniplug cable) from a computer or electronics dealer. 1. 4. see your computer manual if you're not sure of the projector's built-in your projector and turn it may not be adequate for your projector and turn it on . If necessary, configure your laptop to make any other connections, you ...
...for instructions. Amplifying Computer Audio Your laptop probably has its own sound system; If you don't need to the Audio In jack on the projector. 2. however, it on . Connect one end of the audio cable to make any other end of the audio cable to take advantage ...cable (3.5-mm stereo miniplug cable) from a computer or electronics dealer. 1. 4. see your computer manual if you're not sure of the projector's built-in your projector and turn it may not be adequate for your projector and turn it on . If necessary, configure your laptop to make any other connections, you ...
User Manual
Page 33
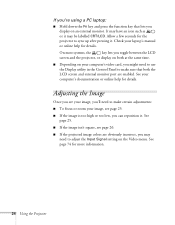
Check your laptop's manual or online help for details. s If the projected image colors are enabled. Adjusting the Image Once you see your computer's documentation or online help for details. On most systems, the key lets you toggle between the LCD screen and the projector, or display on the Video ...to sync up after pressing it . Allow a few seconds for more information. 24 Using the Projector s If the image is too high or too low, you can reposition it . See page 74 for the projector to make certain adjustments: s To focus or zoom your computer's video card, you might ...
Check your laptop's manual or online help for details. s If the projected image colors are enabled. Adjusting the Image Once you see your computer's documentation or online help for details. On most systems, the key lets you toggle between the LCD screen and the projector, or display on the Video ...to sync up after pressing it . Allow a few seconds for more information. 24 Using the Projector s If the image is too high or too low, you can reposition it . See page 74 for the projector to make certain adjustments: s To focus or zoom your computer's video card, you might ...

User Manual
Page 58
The Cell Settings box appears: Click to change slides manually Click to change slides automatically Click to add transition effects Creating Presentations for instructions. Click the cell you set up in the Scenario window. To ... appears: Cell menu 3. When you have finished adding slides and images to your slides to advance manually or automatically after a specified period of transition effects between slides or cells. 1. See the next sections for Your Projector 49 Selected cells turn yellow. 2. To select more than one slide, hold down the Ctrl key...
The Cell Settings box appears: Click to change slides manually Click to change slides automatically Click to add transition effects Creating Presentations for instructions. Click the cell you set up in the Scenario window. To ... appears: Cell menu 3. When you have finished adding slides and images to your slides to advance manually or automatically after a specified period of transition effects between slides or cells. 1. See the next sections for Your Projector 49 Selected cells turn yellow. 2. To select more than one slide, hold down the Ctrl key...


