Quick Reference
Page 2
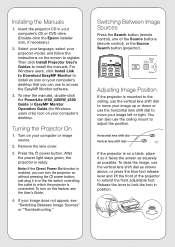
... or the Source Search button (projector). Adjusting Image Position If the projector is mounted to the ceiling, use the vertical lens shift dial to move your computer's desktop that you .... Remove the lens cover. 3. If your computer's CD or DVD drive. (Double-click the Epson installer icon, if necessary.) 2. Press the power button. Installing the Manuals 1. Turning the Projector ...: If the Direct Power On function is ready. To view the manuals, double-click the PowerLite 4100_4200W_4300 Guide or EasyMP Monitor Operation Guide (for Windows users only) icon on your projector model...
... or the Source Search button (projector). Adjusting Image Position If the projector is mounted to the ceiling, use the vertical lens shift dial to move your computer's desktop that you .... Remove the lens cover. 3. If your computer's CD or DVD drive. (Double-click the Epson installer icon, if necessary.) 2. Press the power button. Installing the Manuals 1. Turning the Projector ...: If the Direct Power On function is ready. To view the manuals, double-click the PowerLite 4100_4200W_4300 Guide or EasyMP Monitor Operation Guide (for Windows users only) icon on your projector model...

Quick Reference
Page 4
...System Preferences, Display or Displays, and Detect Displays. If you can purchase screens, ceiling mounts, and other accessories from an Epson authorized reseller. Where To Get Help Internet support Visit epson.com/support (U.S.) or epson.ca/support (Canada) where you 're using Mac OS X 10.6.x, click Show ...the key). The projector and the notebook don't display the same image. Windows® Press the function key on the included Epson PrivateLine Support card. Next, click Change display settings, Display settings, or Settings and Advanced or Advanced Settings. This service is ...
...System Preferences, Display or Displays, and Detect Displays. If you can purchase screens, ceiling mounts, and other accessories from an Epson authorized reseller. Where To Get Help Internet support Visit epson.com/support (U.S.) or epson.ca/support (Canada) where you 're using Mac OS X 10.6.x, click Show ...the key). The projector and the notebook don't display the same image. Windows® Press the function key on the included Epson PrivateLine Support card. Next, click Change display settings, Display settings, or Settings and Advanced or Advanced Settings. This service is ...
User's Guide
Page 10
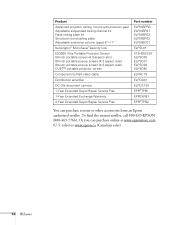
sales) or www.epson.ca (Canadian sales). 10 Welcome Product Advanced projector ceiling mount with precision gear Adjustable suspended ceiling channel kit False ceiling plate kit Structural round ceiling plate Adjustable extension column (pipe) 8"-11" Kensington® MicroSaver®security lock ES3000 Ultra Portable Projector Screen 50-inch portable screen (4:3 aspect ... ELPDA01 ELPDC10S EPPFTPB1 EPPEXPB1 EPPFTPB2 You can purchase online at www.epsonstore.com (U.S. To find the nearest reseller, call 800-GO-EPSON (800-463-7766). Or you can purchase screens or other accessories from an...
sales) or www.epson.ca (Canadian sales). 10 Welcome Product Advanced projector ceiling mount with precision gear Adjustable suspended ceiling channel kit False ceiling plate kit Structural round ceiling plate Adjustable extension column (pipe) 8"-11" Kensington® MicroSaver®security lock ES3000 Ultra Portable Projector Screen 50-inch portable screen (4:3 aspect ... ELPDA01 ELPDC10S EPPFTPB1 EPPEXPB1 EPPFTPB2 You can purchase online at www.epsonstore.com (U.S. To find the nearest reseller, call 800-GO-EPSON (800-463-7766). Or you can purchase screens or other accessories from an...

User's Guide
Page 12
... lens cap PDF manuals and registration CD-ROM Lens theft deterrent screw Remote control and 2 AA batteries Password Protected sticker note If you mount the projector on the ceiling, the interface and button names on how you plan to use the original packaging (or the equivalent) when you need to send the...
... lens cap PDF manuals and registration CD-ROM Lens theft deterrent screw Remote control and 2 AA batteries Password Protected sticker note If you mount the projector on the ceiling, the interface and button names on how you plan to use the original packaging (or the equivalent) when you need to send the...
User's Guide
Page 13
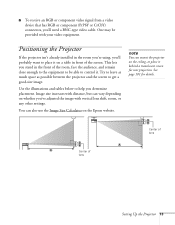
... the projector isn't already installed in the room you're using, you 've adjusted the image with your video equipment. note You can mount the projector on the ceiling, or place it on a table in the front of the room, face the audience, and remain close enough to the equipment to control... use the Image Size Calculator on whether you 'll probably want to place it behind a translucent screen for details. You can vary depending on the Epson website. This lets you 'll need a BNC-type video cable. ■ To receive an RGB or component video signal from a video device that has RGB...
... the projector isn't already installed in the room you're using, you 've adjusted the image with your video equipment. note You can mount the projector on the ceiling, or place it on a table in the front of the room, face the audience, and remain close enough to the equipment to control... use the Image Size Calculator on whether you 'll probably want to place it behind a translucent screen for details. You can vary depending on the Epson website. This lets you 'll need a BNC-type video cable. ■ To receive an RGB or component video signal from a video device that has RGB...
User's Guide
Page 67
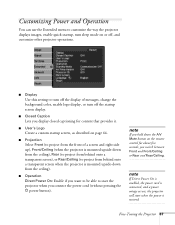
... display of a screen and right side up), Front/Ceiling (when the projector is mounted upside-down from the ceiling), Rear (to project from behind onto a transparent screen), or Rear/Ceiling (to project from behind onto a transparent screen when the projector is mounted upside-down the A/V Mute button on the remote control...when the power is connected, and a power outage occurs, the projector will start the projector when you switch between Front and Front/Ceiling or Rear and Rear/Ceiling. note If Direct Power On is enabled, the power cord is restored. note If you hold down from the...
... display of a screen and right side up), Front/Ceiling (when the projector is mounted upside-down from the ceiling), Rear (to project from behind onto a transparent screen), or Rear/Ceiling (to project from behind onto a transparent screen when the projector is mounted upside-down the A/V Mute button on the remote control...when the power is connected, and a power outage occurs, the projector will start the projector when you switch between Front and Front/Ceiling or Rear and Rear/Ceiling. note If Direct Power On is enabled, the power cord is restored. note If you hold down from the...
User's Guide
Page 68
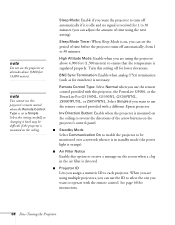
...■ Standby Mode Select Communication On to enable the projector to use the remote control provided with a different Epson projector. BNC Sync Termination: Enable when analog (75Ω) termination (such as changing it back may be ...PowerLite Pro G5150NL, G5350NL, G5200WNL, Z8000WUNL, or Z8050WNL. Select Simple if you use the remote control provided with this setting carefully as for switchers) is orange). ■ Air Filter Notice Enable this setting off for instructions. 68 Fine-Tuning the Projector Inv Direction Button: Enable when the projector is mounted on the ceiling...
...■ Standby Mode Select Communication On to enable the projector to use the remote control provided with a different Epson projector. BNC Sync Termination: Enable when analog (75Ω) termination (such as changing it back may be ...PowerLite Pro G5150NL, G5350NL, G5200WNL, Z8000WUNL, or Z8050WNL. Select Simple if you use the remote control provided with this setting carefully as for switchers) is orange). ■ Air Filter Notice Enable this setting off for instructions. 68 Fine-Tuning the Projector Inv Direction Button: Enable when the projector is mounted on the ceiling...
User's Guide
Page 80
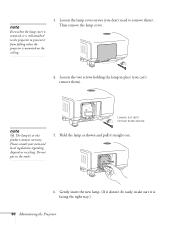
... can't remove them ). Loosen, but don't remove these screws note The lamp(s) in the trash. 5. Hold the lamp as shown and pull it is mounted on the ceiling. 3. Gently insert the new lamp. (If it doesn't fit easily, make sure it straight out. 6. Loosen the two screws holding the lamp in place...
... can't remove them ). Loosen, but don't remove these screws note The lamp(s) in the trash. 5. Hold the lamp as shown and pull it is mounted on the ceiling. 3. Gently insert the new lamp. (If it doesn't fit easily, make sure it straight out. 6. Loosen the two screws holding the lamp in place...
User's Guide
Page 101
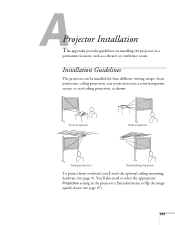
You'll also need the optional ceiling mounting hardware (see page 67). 101 A Projector Installation This appendix provides guidelines on installing the projector in a permanent location, such as shown: Front projection Rear projection Ceiling projection Rear/ceiling projection To project from overhead, you'll need to select ...-down (see page 9). Installation Guidelines The projector can be installed for four different viewing setups: front projection, ceiling projection, rear projection onto a semi-transparent screen, or rear/ceiling projection, as a theater or conference room.
You'll also need the optional ceiling mounting hardware (see page 67). 101 A Projector Installation This appendix provides guidelines on installing the projector in a permanent location, such as shown: Front projection Rear projection Ceiling projection Rear/ceiling projection To project from overhead, you'll need to select ...-down (see page 9). Installation Guidelines The projector can be installed for four different viewing setups: front projection, ceiling projection, rear projection onto a semi-transparent screen, or rear/ceiling projection, as a theater or conference room.

User's Guide
Page 102
... prevent its square shape. You can purchase this lock from Epson (see page 9). 102 Projector Installation The security slot (located above screen level, you'll have to tilt the projector down to a table or ceiling mount. If you're mounting the projector on the ceiling and you place it above the power inlet) is compatible...
... prevent its square shape. You can purchase this lock from Epson (see page 9). 102 Projector Installation The security slot (located above screen level, you'll have to tilt the projector down to a table or ceiling mount. If you're mounting the projector on the ceiling and you place it above the power inlet) is compatible...
User's Guide
Page 106
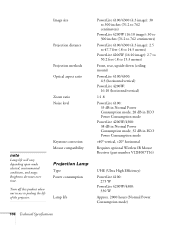
... (16:10 image): 2.7 to 50.2 feet (.8 to 15.3 meters) Front, rear, upside-down (ceiling mount) PowerLite 4100/4300: 4:3 (horizontal:vertical) PowerLite 4200W: 16:10 (horizontal:vertical) 1:1.8 PowerLite 4100: 33 dB in Normal Power Consumption mode, 28 dB in ECO Power Consumption mode PowerLite 4200W/4300: 38 dB in Normal Power Consumption mode, 32 dB in use to prolong...
... (16:10 image): 2.7 to 50.2 feet (.8 to 15.3 meters) Front, rear, upside-down (ceiling mount) PowerLite 4100/4300: 4:3 (horizontal:vertical) PowerLite 4200W: 16:10 (horizontal:vertical) 1:1.8 PowerLite 4100: 33 dB in Normal Power Consumption mode, 28 dB in ECO Power Consumption mode PowerLite 4200W/4300: 38 dB in Normal Power Consumption mode, 32 dB in use to prolong...
User's Guide
Page 113
...that has been wrung dry) for cleaning. This could cause serious injury to anyone under the mount and could damage the projector. ■ If you use a ceiling mount and apply adhesives to the mount to prevent the screws from loosening, or if you use lubricants or oils on it. &#...serious injury to rain, water, or excessive humidity. ■ Unplug the projector from its ceiling mount. This could damage the projector. The bright light can damage your projector. When installing or adjusting a ceiling mount, do not use oils or lubricants. ■ Do not stand on the projector or ...
...that has been wrung dry) for cleaning. This could cause serious injury to anyone under the mount and could damage the projector. ■ If you use a ceiling mount and apply adhesives to the mount to prevent the screws from loosening, or if you use lubricants or oils on it. &#...serious injury to rain, water, or excessive humidity. ■ Unplug the projector from its ceiling mount. This could damage the projector. The bright light can damage your projector. When installing or adjusting a ceiling mount, do not use oils or lubricants. ■ Do not stand on the projector or ...

User's Guide
Page 119
..., 10, 19, 21 composite, 19, 20 Ethernet, 44 illustrations, 12 network, 44 ordering, 9 to 10 security, 102 VGA, 17, 22 Capturing image, 64 to 65 Ceiling mount, 10, 101 to 102 Chalkboard, projecting on, 32 Cleaning air filter, 74 to 77 lens, 74 projector case, 74 Closed captions, 67 Color correcting, 32...
..., 10, 19, 21 composite, 19, 20 Ethernet, 44 illustrations, 12 network, 44 ordering, 9 to 10 security, 102 VGA, 17, 22 Capturing image, 64 to 65 Ceiling mount, 10, 101 to 102 Chalkboard, projecting on, 32 Cleaning air filter, 74 to 77 lens, 74 projector case, 74 Closed captions, 67 Color correcting, 32...


