
User Manual
Page 12
...dealer for purchase information. • To project with audio from certain ports, you can purchase one from an EPSON authorized reseller. PowerLite 1945W/1955/1965) Wireless LAN module (ELPA07; You can purchase online at www.epsonstore.com (U.S. ELPAF41) Quick Wireless... Connection USB key (ELPAP09; PowerLite 1945W/1955/1965) EPSON DC-06 document camera (ELPDC06) EPSON DC-11 document camera Accolade Duet portable projector screen Universal projector ceiling mount Adjustable suspended ceiling channel kit False ceiling plate kit Component-to...
...dealer for purchase information. • To project with audio from certain ports, you can purchase one from an EPSON authorized reseller. PowerLite 1945W/1955/1965) Wireless LAN module (ELPA07; You can purchase online at www.epsonstore.com (U.S. ELPAF41) Quick Wireless... Connection USB key (ELPAP09; PowerLite 1945W/1955/1965) EPSON DC-06 document camera (ELPDC06) EPSON DC-11 document camera Accolade Duet portable projector screen Universal projector ceiling mount Adjustable suspended ceiling channel kit False ceiling plate kit Component-to...

User Manual
Page 19
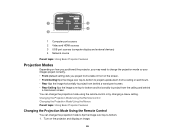
18 HDMI port Parent topic: Projector Part Locations Projector Parts - Control Panel PowerLite 1940W/1950/1960 19 Base 1 Mounting bracket holes 2 Rear feet 3 Front adjustable foot 4 Security cable attachment point Parent topic: Projector Part Locations Projector Parts -
18 HDMI port Parent topic: Projector Part Locations Projector Parts - Control Panel PowerLite 1940W/1950/1960 19 Base 1 Mounting bracket holes 2 Rear feet 3 Front adjustable foot 4 Security cable attachment point Parent topic: Projector Part Locations Projector Parts -

User Manual
Page 24
... following ways: Front 24 Setting Up the Projector Follow the instructions in these considerations in a ceiling mount if you select a projector location: • Place the projector on a sturdy, level surface or install it using a compatible mount. • Leave plenty of a grounded electrical outlet or extension cord. You can also install the projector...
... following ways: Front 24 Setting Up the Projector Follow the instructions in these considerations in a ceiling mount if you select a projector location: • Place the projector on a sturdy, level surface or install it using a compatible mount. • Leave plenty of a grounded electrical outlet or extension cord. You can also install the projector...

User Manual
Page 35
... • USB hard drive • Multimedia storage viewer • USB memory card reader Note: Digital cameras or camera phones must be USB-mounted devices, not TWAIN-compliant devices. 4. You can project images and other content without using a computer or video device by connecting any of the... cable to the projector. You can project slide shows from a connected USB device or memory card reader (PowerLite 1945W/1955/1965). Connect the stereo mini-jack end of these sections to connect external USB devices to your own slide shows containing converted...
... • USB hard drive • Multimedia storage viewer • USB memory card reader Note: Digital cameras or camera phones must be USB-mounted devices, not TWAIN-compliant devices. 4. You can project images and other content without using a computer or video device by connecting any of the... cable to the projector. You can project slide shows from a connected USB device or memory card reader (PowerLite 1945W/1955/1965). Connect the stereo mini-jack end of these sections to connect external USB devices to your own slide shows containing converted...

User Manual
Page 76
...message in some way 1. Zoom into the image until its yellow frame extends beyond the edges of images to fit on your screen (PowerLite 1945W/1955/1965). Two displays flash briefly, then this message appears: 76 Parent topic: Using Basic Projector Features Automatically Correcting Image Shape... With Screen Fit You can detect the screen size and shape in these conditions: • Projector is not mounted on the ceiling • Screen size is 100 inches (254 cm) or less • Projection distance is about 3 feet (1 m) to 11.5 feet...
...message in some way 1. Zoom into the image until its yellow frame extends beyond the edges of images to fit on your screen (PowerLite 1945W/1955/1965). Two displays flash briefly, then this message appears: 76 Parent topic: Using Basic Projector Features Automatically Correcting Image Shape... With Screen Fit You can detect the screen size and shape in these conditions: • Projector is not mounted on the ceiling • Screen size is 100 inches (254 cm) or less • Projection distance is about 3 feet (1 m) to 11.5 feet...
User Manual
Page 86
... top-to project from behind a translucent screen. • Rear/Ceiling flips the image over top-to-bottom to project upside-down from a ceiling or wall mount. • Rear flips the image horizontally to project from the ceiling and behind a translucent screen. 1 Computer port sources 2 Video and HDMI sources 3 USB port sources...
... top-to project from behind a translucent screen. • Rear/Ceiling flips the image over top-to-bottom to project upside-down from a ceiling or wall mount. • Rear flips the image horizontally to project from the ceiling and behind a translucent screen. 1 Computer port sources 2 Video and HDMI sources 3 USB port sources...

User Manual
Page 141
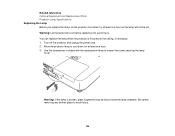
... dust using a small vacuum designed for computers or a very soft brush (such as a paintbrush). If dust is difficult to remove or the air filter is mounted to the ceiling, if necessary. The illustrations here show the projector placed on a table. 1. Do not rinse the air filter in the following situations: •...
... dust using a small vacuum designed for computers or a very soft brush (such as a paintbrush). If dust is difficult to remove or the air filter is mounted to the ceiling, if necessary. The illustrations here show the projector placed on a table. 1. Do not rinse the air filter in the following situations: •...
User Manual
Page 144
... to loosen the screw securing the lamp cover. Allow the projector lamp to cool down for at least one hour. 3. Warning: If the lamp is mounted to avoid injury. Turn off the projector and unplug the power cord. 2. Related references Optional Equipment and Replacement Parts Projector Lamp Specifications Replacing the Lamp...
... to loosen the screw securing the lamp cover. Allow the projector lamp to cool down for at least one hour. 3. Warning: If the lamp is mounted to avoid injury. Turn off the projector and unplug the power cord. 2. Related references Optional Equipment and Replacement Parts Projector Lamp Specifications Replacing the Lamp...
User Manual
Page 166
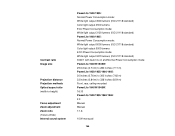
...(ISO 21118 standard) Color light output 4500 lumens ECO Power Consumption mode: White light output 3120 lumens (ISO 21118 standard) PowerLite 1960/1965: Normal Power Consumption mode: White light output 5000 lumens (ISO 21118 standard) Color light output 5000 lumens ECO Power ... Normal Power Consumption mode PowerLite 1940W/1945W: 29 inches (0.74 m) to 280 inches (7.11 m) PowerLite 1950/1955/1960/1965: 30 inches (0.76 m) to 300 inches (7.62 m) 33 inches (0.84 m) to 336 inches (8.54 m) Front, rear, ceiling-mounted PowerLite 1940W/1945W: 16:10 PowerLite 1950/1955/1960/1965: 4:3 Manual Manual...
...(ISO 21118 standard) Color light output 4500 lumens ECO Power Consumption mode: White light output 3120 lumens (ISO 21118 standard) PowerLite 1960/1965: Normal Power Consumption mode: White light output 5000 lumens (ISO 21118 standard) Color light output 5000 lumens ECO Power ... Normal Power Consumption mode PowerLite 1940W/1945W: 29 inches (0.74 m) to 280 inches (7.11 m) PowerLite 1950/1955/1960/1965: 30 inches (0.76 m) to 300 inches (7.62 m) 33 inches (0.84 m) to 336 inches (8.54 m) Front, rear, ceiling-mounted PowerLite 1940W/1945W: 16:10 PowerLite 1950/1955/1960/1965: 4:3 Manual Manual...

User Manual
Page 175
... Take the following precautions when handling the plug: Do not hold the plug when disconnecting it on . If you are setting up and using mounting hardware designed for cleaning. always be walked on top of a different power source may result in fraying or damage to prevent the screws from ...dirt or stains, a moist cloth that has been wrung dry) for use with this projector. • When installing or adjusting a ceiling or wall mount, do not use adhesives to the plug. • Unplug the projector from its side, or while tilted to comply with wet hands. The bright ...
... Take the following precautions when handling the plug: Do not hold the plug when disconnecting it on . If you are setting up and using mounting hardware designed for cleaning. always be walked on top of a different power source may result in fraying or damage to prevent the screws from ...dirt or stains, a moist cloth that has been wrung dry) for use with this projector. • When installing or adjusting a ceiling or wall mount, do not use adhesives to the plug. • Unplug the projector from its side, or while tilted to comply with wet hands. The bright ...

User Manual
Page 177
... regulations regarding disposal or recycling. Health & Safety Code § 25249.5 and following.) Restriction of Use Parent topic: Notices Restriction of Use When this product is mounted overhead and the lamp breaks, be extremely hot. Do not place heavy objects on this product contain mercury. Do not put in this product's suitability...
... regulations regarding disposal or recycling. Health & Safety Code § 25249.5 and following.) Restriction of Use Parent topic: Notices Restriction of Use When this product is mounted overhead and the lamp breaks, be extremely hot. Do not place heavy objects on this product contain mercury. Do not put in this product's suitability...

