
User Manual
Page 12
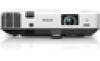
... computer or electronics dealer for purchase information. • To project with your device. PowerLite 1945W/1955/1965) EPSON DC-06 document camera (ELPDC06) EPSON DC-11 document camera Accolade Duet portable projector screen Universal projector ceiling mount Adjustable suspended ceiling channel kit False ceiling plate kit Component-to-VGA video cable (ELPKC19) Part number V13H010L75 V13H134A41 V12H005M08 V12H418P13...
... computer or electronics dealer for purchase information. • To project with your device. PowerLite 1945W/1955/1965) EPSON DC-06 document camera (ELPDC06) EPSON DC-11 document camera Accolade Duet portable projector screen Universal projector ceiling mount Adjustable suspended ceiling channel kit False ceiling plate kit Component-to-VGA video cable (ELPKC19) Part number V13H010L75 V13H134A41 V12H005M08 V12H418P13...

User Manual
Page 24
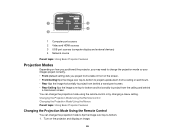
You can also install the projector in a ceiling mount if you select a projector location: • Place the projector on a sturdy, level surface or install it in a fixed location. Setting Up the Projector Follow the ... to anything that could block the vents. • Position the projector within reach of space around and under the projector for use it using a compatible mount. • Leave plenty of a grounded electrical outlet or extension cord. Keep these sections to set up your projector for ventilation, and do not place it...
You can also install the projector in a ceiling mount if you select a projector location: • Place the projector on a sturdy, level surface or install it in a fixed location. Setting Up the Projector Follow the ... to anything that could block the vents. • Position the projector within reach of space around and under the projector for use it using a compatible mount. • Leave plenty of a grounded electrical outlet or extension cord. Keep these sections to set up your projector for ventilation, and do not place it...

User Manual
Page 76
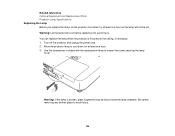
You see a message on your screen (PowerLite 1945W/1955/1965). Two displays flash briefly, then this message appears: 76 Move ... beyond the edges of the screen. 3. Press the Screen Fit button again. Press the Screen Fit button on the ceiling • Screen size is 100 inches (254 cm) or less • Projection distance is about 3 feet (1 ...m) to display the message in these conditions: • Projector is not mounted on the projector or remote control. The projector's sensor can use the projector's Screen Fit feature to automatically correct...
You see a message on your screen (PowerLite 1945W/1955/1965). Two displays flash briefly, then this message appears: 76 Move ... beyond the edges of the screen. 3. Press the Screen Fit button again. Press the Screen Fit button on the ceiling • Screen size is 100 inches (254 cm) or less • Projection distance is about 3 feet (1 ...m) to display the message in these conditions: • Projector is not mounted on the projector or remote control. The projector's sensor can use the projector's Screen Fit feature to automatically correct...
User Manual
Page 86
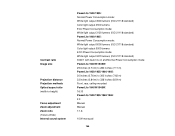
... top-to project from behind a translucent screen. • Rear/Ceiling flips the image over top-to-bottom to project upside-down from a ceiling or wall mount. • Rear flips the image horizontally to project from the ceiling and behind a translucent screen. Changing the Projection Mode Using the ...mode so your images project correctly. • Front (default setting) lets you project from a table in front of the screen. • Front/Ceiling flips the image over top-to-bottom and horizontally to -bottom. 1. 1 Computer port sources 2 Video and HDMI sources 3 USB port sources (computer...
... top-to project from behind a translucent screen. • Rear/Ceiling flips the image over top-to-bottom to project upside-down from a ceiling or wall mount. • Rear flips the image horizontally to project from the ceiling and behind a translucent screen. Changing the Projection Mode Using the ...mode so your images project correctly. • Front (default setting) lets you project from a table in front of the screen. • Front/Ceiling flips the image over top-to-bottom and horizontally to -bottom. 1. 1 Computer port sources 2 Video and HDMI sources 3 USB port sources (computer...

User Manual
Page 141
... air filter so you to clean or replace it • The air filter is damaged, replace the air filter. 2. If dust is difficult to the ceiling, if necessary. Gently remove the dust using a small vacuum designed for computers or a very soft brush (such as a paintbrush). Turn off the projector and ... in the following situations: • After cleaning the air filter, you see a message telling you can replace the air filter while the projector is mounted to remove or the air filter is torn or damaged You can clean both sides of it . The illustrations here show the projector placed on...
... air filter so you to clean or replace it • The air filter is damaged, replace the air filter. 2. If dust is difficult to the ceiling, if necessary. Gently remove the dust using a small vacuum designed for computers or a very soft brush (such as a paintbrush). Turn off the projector and ... in the following situations: • After cleaning the air filter, you see a message telling you can replace the air filter while the projector is mounted to remove or the air filter is torn or damaged You can clean both sides of it . The illustrations here show the projector placed on...
User Manual
Page 144
..., glass fragments may be hot. Turn off the projector and unplug the power cord. 2. Be careful removing any broken glass to the ceiling, if necessary. 1. Allow the projector lamp to loosen the screw securing the lamp cover. Use the screwdriver included with the replacement lamp ...to cool down for at least one hour. 3. Warning: If the lamp is mounted to avoid injury. 144 Related references Optional Equipment and Replacement Parts Projector Lamp Specifications Replacing the Lamp Before you replace the lamp, let...
..., glass fragments may be hot. Turn off the projector and unplug the power cord. 2. Be careful removing any broken glass to the ceiling, if necessary. 1. Allow the projector lamp to loosen the screw securing the lamp cover. Use the screwdriver included with the replacement lamp ...to cool down for at least one hour. 3. Warning: If the lamp is mounted to avoid injury. 144 Related references Optional Equipment and Replacement Parts Projector Lamp Specifications Replacing the Lamp Before you replace the lamp, let...
User Manual
Page 166
...Projection methods Optical aspect ratio (width-to-height) Focus adjustment Zoom adjustment Zoom ratio (Tele-to-Wide) Internal sound system PowerLite 1950/1955: Normal Power Consumption mode: White light output 4500 lumens (ISO 21118 standard) Color light output 4500 lumens ECO... on and Normal Power Consumption mode PowerLite 1940W/1945W: 29 inches (0.74 m) to 280 inches (7.11 m) PowerLite 1950/1955/1960/1965: 30 inches (0.76 m) to 300 inches (7.62 m) 33 inches (0.84 m) to 336 inches (8.54 m) Front, rear, ceiling-mounted PowerLite 1940W/1945W: 16:10 PowerLite 1950/1955/1960/1965: 4:3 Manual...
...Projection methods Optical aspect ratio (width-to-height) Focus adjustment Zoom adjustment Zoom ratio (Tele-to-Wide) Internal sound system PowerLite 1950/1955: Normal Power Consumption mode: White light output 4500 lumens (ISO 21118 standard) Color light output 4500 lumens ECO... on and Normal Power Consumption mode PowerLite 1940W/1945W: 29 inches (0.74 m) to 280 inches (7.11 m) PowerLite 1950/1955/1960/1965: 30 inches (0.76 m) to 300 inches (7.62 m) 33 inches (0.84 m) to 336 inches (8.54 m) Front, rear, ceiling-mounted PowerLite 1940W/1945W: 16:10 PowerLite 1950/1955/1960/1965: 4:3 Manual...

User Manual
Page 175
... not place the projector on an unstable cart, stand, or table. • Do not operate the projector on its ceiling mount. Insert the plug firmly into the lens when the projector is mounted on . always be installed by qualified technicians using the projector: • Do not look into the outlet. Use ... Do not use oils or lubricants. Do not insert the plug into an outlet with this projector. • When installing or adjusting a ceiling or wall mount, do not use adhesives to prevent the screws from loosening and do not use liquid or aerosol cleaners. • Do not block the ...
... not place the projector on an unstable cart, stand, or table. • Do not operate the projector on its ceiling mount. Insert the plug firmly into the lens when the projector is mounted on . always be installed by qualified technicians using the projector: • Do not look into the outlet. Use ... Do not use oils or lubricants. Do not insert the plug into an outlet with this projector. • When installing or adjusting a ceiling or wall mount, do not use adhesives to prevent the screws from loosening and do not use liquid or aerosol cleaners. • Do not block the ...


