Start Here Card
Page 1
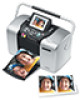
... with all the tape and packing material from your computer, see Using PictureMate Without a Computer for instructions. Power adapter PictureMate Photo Paper PictureMate Deluxe Viewer Edition Power cable PictureMate Photo Cartridge Using PictureMate Without a Computer booklet PictureMate Using PictureMate Software + With a Computer CD booklet Note: If you install the photo cartridge and plug in the AC adapter and power...
... with all the tape and packing material from your computer, see Using PictureMate Without a Computer for instructions. Power adapter PictureMate Photo Paper PictureMate Deluxe Viewer Edition Power cable PictureMate Photo Cartridge Using PictureMate Without a Computer booklet PictureMate Using PictureMate Software + With a Computer CD booklet Note: If you install the photo cartridge and plug in the AC adapter and power...
Start Here Card
Page 6
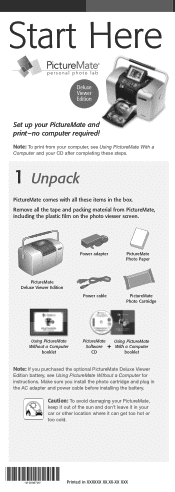
... a Print Confirmation: You can press the or button to highlight Print Some. 2 Press the OK button. Epson and PictureMate are for complete instructions on using PictureMate. For More Information Printing Without a Computer See this photo, press the button to select the number of copies.... 5 Repeat step 4 for steps on installing software and the on-screen User's Guide. You can print all rights in those marks. © 2005 Epson ...
... a Print Confirmation: You can press the or button to highlight Print Some. 2 Press the OK button. Epson and PictureMate are for complete instructions on using PictureMate. For More Information Printing Without a Computer See this photo, press the button to select the number of copies.... 5 Repeat step 4 for steps on installing software and the on-screen User's Guide. You can print all rights in those marks. © 2005 Epson ...

Using PictureMate With a Computer
Page 2
... to turn On button on your local computer dealer or from Epson®. Slide the edge guide against the right edge of PictureMate Photo Paper, glossy side up, against the paper and open the output tray. 2. Installing Software and Connecting PictureMate To connect PictureMate® Deluxe Viewer Edition, you'll need this cable: Type A to B USB...
... to turn On button on your local computer dealer or from Epson®. Slide the edge guide against the right edge of PictureMate Photo Paper, glossy side up, against the paper and open the output tray. 2. Installing Software and Connecting PictureMate To connect PictureMate® Deluxe Viewer Edition, you'll need this cable: Type A to B USB...

Using PictureMate With a Computer
Page 5
When you see this screen, click Next to begin installing your software. 4 6.
When you see this screen, click Next to begin installing your software. 4 6.

Using PictureMate With a Computer
Page 7
If you see a prompt to restart your only printer, and you have another printer for non-photo printing. If you see this screen, click No if you only print photos, click Yes. When printing finishes, click Next to print. If PictureMate is your computer, click No. 9. 8. Continue with the instructions in the next section. 6 When you see a message about printing a test page, click OK to install additional software.
If you see a prompt to restart your only printer, and you have another printer for non-photo printing. If you see this screen, click No if you only print photos, click Yes. When printing finishes, click Next to print. If PictureMate is your computer, click No. 9. 8. Continue with the instructions in the next section. 6 When you see a message about printing a test page, click OK to install additional software.

Using PictureMate With a Computer
Page 8
Note: If you are asked if you don't need a registration number. you want to install QuickTime,® click Yes and follow the on -screen instructions; Installing Additional Software for launching QuickTime and Film Factory™ at the end of their installations. 7 When you see this screen, you can install additional photo software: 2. Click Epson Software Film Factory, then click Install on the next screen and follow the on -screen instructions. Also uncheck the boxes for Windows 1.
Note: If you are asked if you don't need a registration number. you want to install QuickTime,® click Yes and follow the on -screen instructions; Installing Additional Software for launching QuickTime and Film Factory™ at the end of their installations. 7 When you see this screen, you can install additional photo software: 2. Click Epson Software Film Factory, then click Install on the next screen and follow the on -screen instructions. Also uncheck the boxes for Windows 1.

Using PictureMate With a Computer
Page 9
... User's Guide. 8 Double-click the PictureMate Deluxe User's Guide icon on your screen to the Optional Software installation. 4. When you have any open windows to return to open your photo file on -screen instructions to print your PictureMate CD. 8. The registration screen appears. ...6. Note: If you 're done installing software, click Exit. Follow the on your computer. You're ready to register PictureMate. 7. Close any problems installing the PictureMate software, see page 16. Click Epson PhotoCenter Link,...
... User's Guide. 8 Double-click the PictureMate Deluxe User's Guide icon on your screen to the Optional Software installation. 4. When you have any open windows to return to open your photo file on -screen instructions to print your PictureMate CD. 8. The registration screen appears. ...6. Note: If you 're done installing software, click Exit. Follow the on your computer. You're ready to register PictureMate. 7. Close any problems installing the PictureMate software, see page 16. Click Epson PhotoCenter Link,...

Using PictureMate With a Computer
Page 10
Installing PictureMate for it from PictureMate. 2. If you have any open USB port on your Macintosh. 3. Note: If you inserted a memory card, remove it to start up. 5. Connect the square end of your USB cable to the USB port on the back of the USB cable to turn on your CD-ROM or DVD drive. Then connect the flat end of PictureMate. Turn on PictureMate. 4. Press the On button to any problems installing the PictureMate software, see page 16. 9 Insert the PictureMate CD in your Macintosh and wait a minute for Macintosh 1.
Installing PictureMate for it from PictureMate. 2. If you have any open USB port on your Macintosh. 3. Note: If you inserted a memory card, remove it to start up. 5. Connect the square end of your USB cable to the USB port on the back of the USB cable to turn on your CD-ROM or DVD drive. Then connect the flat end of PictureMate. Turn on PictureMate. 4. Press the On button to any problems installing the PictureMate software, see page 16. 9 Insert the PictureMate CD in your Macintosh and wait a minute for Macintosh 1.

Using PictureMate With a Computer
Page 12
Follow the on-screen instructions to install several programs. You'll need to install additional software. 11 Click Install Printer Driver and Utilities. Continue with the instructions in the next section to enter your password, accept license agreements, and click Quit several times as you install. 9. You see the Install Menu: 8.
Follow the on-screen instructions to install several programs. You'll need to install additional software. 11 Click Install Printer Driver and Utilities. Continue with the instructions in the next section to enter your password, accept license agreements, and click Quit several times as you install. 9. You see the Install Menu: 8.

Using PictureMate With a Computer
Page 13
When you return to the Install Menu, click Install Optional Software. When you return to the Optional Software menu shown above, click Back. 12 You see this menu: 2. Click Epson PhotoCenter Link, then click Add Icon on the next screen and follow the on -screen instructions. 4. Click Epson Software Film Factory, then click Install on the next screen and follow the on -screen instructions. 3. Installing Additional Software for Macintosh 1.
When you return to the Install Menu, click Install Optional Software. When you return to the Optional Software menu shown above, click Back. 12 You see this menu: 2. Click Epson PhotoCenter Link, then click Add Icon on the next screen and follow the on -screen instructions. 4. Click Epson Software Film Factory, then click Install on the next screen and follow the on -screen instructions. 3. Installing Additional Software for Macintosh 1.

Using PictureMate With a Computer
Page 14
... Print Center (OS X 10.2.x). 5. Remove and store your Macintosh printer. After you finish installing software, you 're done installing software, click Exit. Follow the instructions below. Note: If you see this screen, click OK and go to register PictureMate. 8. At the Install Menu, click Install Printer Manual to step 3. 13 If you see...
... Print Center (OS X 10.2.x). 5. Remove and store your Macintosh printer. After you finish installing software, you 're done installing software, click Exit. Follow the instructions below. Note: If you see this screen, click OK and go to register PictureMate. 8. At the Install Menu, click Install Printer Manual to step 3. 13 If you see...

Using PictureMate With a Computer
Page 17
... until you are registered trademarks of Seiko Epson Corporation. Epson and PictureMate are instructed to. Epson disclaims any screen savers and virus protection software, and install the PictureMate software again. ■ If you're installing the software for instructions. ■ If you're printing over a network, see PictureMate Deluxe in those marks. © 2005 Epson America, Inc. 3/05 CPD-19430 16...
... until you are registered trademarks of Seiko Epson Corporation. Epson and PictureMate are instructed to. Epson disclaims any screen savers and virus protection software, and install the PictureMate software again. ■ If you're installing the software for instructions. ■ If you're printing over a network, see PictureMate Deluxe in those marks. © 2005 Epson America, Inc. 3/05 CPD-19430 16...

Using PictureMate With a Computer
Page 18
Follow These Easy Steps To use PictureMate® with your computer. The steps here tell you 'll need to: Install the software on your computer from the PictureMate CD. Connect PictureMate to your comprehensive guide to connect. It's your computer. Follow the steps in this booklet. Click PictureMate Deluxe User's Guide right on your computer, you how and when to PictureMate. View the on using PictureMate with your computer screen for steps on -screen User's Guide.
Follow These Easy Steps To use PictureMate® with your computer. The steps here tell you 'll need to: Install the software on your computer from the PictureMate CD. Connect PictureMate to your comprehensive guide to connect. It's your computer. Follow the steps in this booklet. Click PictureMate Deluxe User's Guide right on your computer, you how and when to PictureMate. View the on using PictureMate with your computer screen for steps on -screen User's Guide.
Using PictureMate Without a Computer
Page 5
... a computer): ● JPEG files or uncompressed TIFF files only ● Resolutions ranging from 80 × 80 to your PictureMate. It explains how to install the software and connect to 4600 × 4600 pixels PictureMate recognizes and prints the first 999 photos on your memory card. To use your computer. Supported Photo Formats JPEG...
... a computer): ● JPEG files or uncompressed TIFF files only ● Resolutions ranging from 80 × 80 to your PictureMate. It explains how to install the software and connect to 4600 × 4600 pixels PictureMate recognizes and prints the first 999 photos on your memory card. To use your computer. Supported Photo Formats JPEG...
Using PictureMate Without a Computer
Page 65
...INFRINGEMENT OR FITNESS FOR A PARTICULAR PURPOSE. Exchange products and parts assume the remaining warranty period of your original product covered by Epson. This warranty does not cover damage to jurisdiction. This warranty does not cover ribbons, ink cartridges or third party parts,...improper shipping, damage caused by disasters such as fire, flood, and lightning, improper electrical current, software problems, interaction with non-Epson products, or service other rights which vary from Epson, e.g., dealer or user-added boards or components. What This Warranty Does Not Cover: This ...
...INFRINGEMENT OR FITNESS FOR A PARTICULAR PURPOSE. Exchange products and parts assume the remaining warranty period of your original product covered by Epson. This warranty does not cover damage to jurisdiction. This warranty does not cover ribbons, ink cartridges or third party parts,...improper shipping, damage caused by disasters such as fire, flood, and lightning, improper electrical current, software problems, interaction with non-Epson products, or service other rights which vary from Epson, e.g., dealer or user-added boards or components. What This Warranty Does Not Cover: This ...

Using PictureMate Without a Computer
Page 71
CD printing from, 29 to 31 saving files to, 26 to 28 software, 4, 26, 29 Cell phone, printing from, 32 to 33 Charging battery, 41 to 42 Charging ...problems, 56 CompactFlash card, 7 Computer Bluetooth printing, 32 to 33 printing from, 29 saving photo files to, 26 using with PictureMate, 4 Confirmation, turning off, 45 Contrast on screen, 46 to 47 Copies, 9, 11 70 Copying photos, 26 to 28 Cropping..., 17 to 19, 44 to 45 Customizing PictureMate, 43 to 48 Cut-off photos, fixing, 44 to 45 D Date stamp, 21 to 22 Date, selecting photos by,...
CD printing from, 29 to 31 saving files to, 26 to 28 software, 4, 26, 29 Cell phone, printing from, 32 to 33 Charging battery, 41 to 42 Charging ...problems, 56 CompactFlash card, 7 Computer Bluetooth printing, 32 to 33 printing from, 29 saving photo files to, 26 using with PictureMate, 4 Confirmation, turning off, 45 Contrast on screen, 46 to 47 Copies, 9, 11 70 Copying photos, 26 to 28 Cropping..., 17 to 19, 44 to 45 Customizing PictureMate, 43 to 48 Cut-off photos, fixing, 44 to 45 D Date stamp, 21 to 22 Date, selecting photos by,...


