
Basics
Page 60
... Safety Instructions Warning: There is a risk of explosion if the battery is swallowed, seek medical treatment immediately. ◗ Use only an Epson lithium-ion battery for the P-6000/P-7000 according to the instructions in the on installing and viewing the guide. See page 13 for instructions... on -screen User's Guide. Appendix Important Safety Instructions Additional safety information for the P-6000/P-7000 can be found in this manual. ◗ Use only AC adapter model A351H and the P-6000/P-7000 (model G971A/G971B) to charge batteries. ◗ Do not use the...
... Safety Instructions Warning: There is a risk of explosion if the battery is swallowed, seek medical treatment immediately. ◗ Use only an Epson lithium-ion battery for the P-6000/P-7000 according to the instructions in the on installing and viewing the guide. See page 13 for instructions... on -screen User's Guide. Appendix Important Safety Instructions Additional safety information for the P-6000/P-7000 can be found in this manual. ◗ Use only AC adapter model A351H and the P-6000/P-7000 (model G971A/G971B) to charge batteries. ◗ Do not use the...

Manual - Tethering
Page 1
... larger than 512 MB. c) Select [USB Device] and press Right key. Follow instructions on the DSLR and P-6000 / 7000. Epson P-6000/7000 Tethering feature manual B 11/10/2009 Rev. 1. Tethering Tethering is a list of creating backup files and evaluating images in studio or on location. ... to transfer captured image in this document support tethering, we cannot guarantee the successful results when transferring files from camera to the viewer as the 2 devices maintain an active USB connection proper file transfer should occur. Tethering allows photographers to instantly view and save ...
... larger than 512 MB. c) Select [USB Device] and press Right key. Follow instructions on the DSLR and P-6000 / 7000. Epson P-6000/7000 Tethering feature manual B 11/10/2009 Rev. 1. Tethering Tethering is a list of creating backup files and evaluating images in studio or on location. ... to transfer captured image in this document support tethering, we cannot guarantee the successful results when transferring files from camera to the viewer as the 2 devices maintain an active USB connection proper file transfer should occur. Tethering allows photographers to instantly view and save ...

User's Guide
Page 31
...End the slide show and return to the Home screen. Then select Right or Left and press OK. Viewing Photos and Videos 31 5 Select one of the following, then press OK and adjust the settings as noted. ...Menu, select Edit, then select Rotate and press OK. You can also rotate an image manually in Backup Files and My Photos. 1 Select the image in the folder, press right or left on the 4-way ...; clockwise, or Rotate Left to adjust the volume while the slide show options by selecting Settings on the viewer. See "Backup Settings" on page 72 for details. See "Slide Show" on page 72 for details....
...End the slide show and return to the Home screen. Then select Right or Left and press OK. Viewing Photos and Videos 31 5 Select one of the following, then press OK and adjust the settings as noted. ...Menu, select Edit, then select Rotate and press OK. You can also rotate an image manually in Backup Files and My Photos. 1 Select the image in the folder, press right or left on the 4-way ...; clockwise, or Rotate Left to adjust the volume while the slide show options by selecting Settings on the viewer. See "Backup Settings" on page 72 for details. See "Slide Show" on page 72 for details....

User's Guide
Page 45
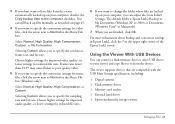
...to Your Computer You can also select individual video or photo files to your computer. First, make sure you connect the viewer as described on page 44. 1 Double-click the Epson Link2 icon on your computer, or the viewer may become unusable. Do not change the location or turn... off the automatic backup feature, see a message that haven't already been copied will be transferred. 3 To transfer files manually, click the Backup icon on the viewer from the viewer to ...
...to Your Computer You can also select individual video or photo files to your computer. First, make sure you connect the viewer as described on page 44. 1 Double-click the Epson Link2 icon on your computer, or the viewer may become unusable. Do not change the location or turn... off the automatic backup feature, see a message that haven't already been copied will be transferred. 3 To transfer files manually, click the Backup icon on the viewer from the viewer to ...
User's Guide
Page 48
...manually, as described on your computer, you can adjust the Store Folder Settings. 3 If you don't want to change the folder where files are compatible with the USB Mass Storage specification, including: ❍ Digital cameras ❍ Flash memory drives ❍ Memory card readers ❍ External hard drives ❍ Epson multimedia storage viewers... Managing Files 48 The default folder is Epson Link2 Backup in the Movie File box.
...manually, as described on your computer, you can adjust the Store Folder Settings. 3 If you don't want to change the folder where files are compatible with the USB Mass Storage specification, including: ❍ Digital cameras ❍ Flash memory drives ❍ Memory card readers ❍ External hard drives ❍ Epson multimedia storage viewers... Managing Files 48 The default folder is Epson Link2 Backup in the Movie File box.

User's Guide
Page 60
...manual to get the latest information on the printer, which may be labeled or EXT. Check the Epson website to locate the external device USB connector on supported printers. I/F. 1 Connect the AC adapter to the viewer, then connect the small end of paper. ❍ Epson Ultra Premium Photo Paper Glossy ❍ Epson Premium Photo Paper Glossy ❍ Epson... Premium Photo Paper Semigloss ❍ Epson Photo Paper Glossy For...
...manual to get the latest information on the printer, which may be labeled or EXT. Check the Epson website to locate the external device USB connector on supported printers. I/F. 1 Connect the AC adapter to the viewer, then connect the small end of paper. ❍ Epson Ultra Premium Photo Paper Glossy ❍ Epson Premium Photo Paper Glossy ❍ Epson... Premium Photo Paper Semigloss ❍ Epson Photo Paper Glossy For...

User's Guide
Page 62
... Select Manual Settings to adjust individual settings, then press OK. 2 Select the settings you want to crop your photos. Continue with the results, press OK. 4 You see the Retouch Settings menu. After a moment, you selected is not supported by the viewer, see "Printing Multiple Photos" on... page 63 to adjust using the 4-way ring, then press OK. Adjustment settings Retouching a Photo You can retouch a photo before printing without retouching your photo before printing, select Yes, then press OK. ...
... Select Manual Settings to adjust individual settings, then press OK. 2 Select the settings you want to crop your photos. Continue with the results, press OK. 4 You see the Retouch Settings menu. After a moment, you selected is not supported by the viewer, see "Printing Multiple Photos" on... page 63 to adjust using the 4-way ring, then press OK. Adjustment settings Retouching a Photo You can retouch a photo before printing without retouching your photo before printing, select Yes, then press OK. ...

User's Guide
Page 63
Continue with the steps on the viewer. Cropping a Photo 1 Select one of the retouching effects. Note: To set the Retouch Additions settings to their original values, select Return to Default, then press OK. 4 When you 're finished retouching your photo. The retouched photo is automatically saved in a folder ...press OK to return to crop your photo, you see the results of the following cropping methods using the 4-way ring or jog dial, then press OK: ❍ Fixed Aspect to select a 1:1, 3:2, or 4:3 aspect ratio ❍ Free Aspect to manually adjust the aspect ratio ❍ No...
Continue with the steps on the viewer. Cropping a Photo 1 Select one of the retouching effects. Note: To set the Retouch Additions settings to their original values, select Return to Default, then press OK. 4 When you 're finished retouching your photo. The retouched photo is automatically saved in a folder ...press OK to return to crop your photo, you see the results of the following cropping methods using the 4-way ring or jog dial, then press OK: ❍ Fixed Aspect to select a 1:1, 3:2, or 4:3 aspect ratio ❍ Free Aspect to manually adjust the aspect ratio ❍ No...
User's Guide
Page 75
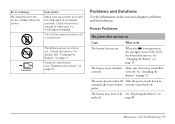
...No response from the printer. Check the printer's manual to make sure it cools down to automatically to do The battery has run out. For details, see "Charging the Battery" on page 11. Power Problems The power does not turn the viewer back on. Cause What to save battery turn...Make sure your printer is connected correctly. The battery power is installed correctly. The battery may have shut off the viewer and wait until it 's PictBridge-compatible. See "Resetting the Viewer" on and the USB cable is on page 79. page 80. The battery is not installed Make sure the...
...No response from the printer. Check the printer's manual to make sure it cools down to automatically to do The battery has run out. For details, see "Charging the Battery" on page 11. Power Problems The power does not turn the viewer back on. Cause What to save battery turn...Make sure your printer is connected correctly. The battery power is installed correctly. The battery may have shut off the viewer and wait until it 's PictBridge-compatible. See "Resetting the Viewer" on and the USB cable is on page 79. page 80. The battery is not installed Make sure the...

User's Guide
Page 83
...stored. If a battery is swallowed, seek medical treatment immediately. ❍ Use only an Epson lithium-ion battery for the viewer according to the instructions in those places. ❍ Do not use the viewer where flammable or volatile gas is limited, such as they may touch dangerous voltage points or... or other covering that are leaking or damaged in any openings as in airplanes or hospitals, follow all instructions in this manual. ❍ Use only AC adapter model A351H and the viewer (Model G961A/G961B) to charge batteries. ❍ Do not use the battery that comes with the...
...stored. If a battery is swallowed, seek medical treatment immediately. ❍ Use only an Epson lithium-ion battery for the viewer according to the instructions in those places. ❍ Do not use the viewer where flammable or volatile gas is limited, such as they may touch dangerous voltage points or... or other covering that are leaking or damaged in any openings as in airplanes or hospitals, follow all instructions in this manual. ❍ Use only AC adapter model A351H and the viewer (Model G961A/G961B) to charge batteries. ❍ Do not use the battery that comes with the...