Technical Brief (Scanners)
Page 6
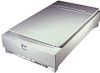
... does not have a fixed focal point just above the surface of 3.0 to scan transparent media, you can pick your point of the Epson Expression series scanners uses a Dual-Focus mechanism. This system offers these benefits: The Epson manual/automatic focus optics system gives you precised sharpness control, especially when scanning three...
... does not have a fixed focal point just above the surface of 3.0 to scan transparent media, you can pick your point of the Epson Expression series scanners uses a Dual-Focus mechanism. This system offers these benefits: The Epson manual/automatic focus optics system gives you precised sharpness control, especially when scanning three...
Technical Brief (Scanners)
Page 8
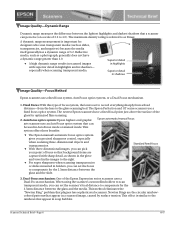
...then capture each image separately. With batch scanning you can only scan positive transparent media, such as color transparencies and slides. The key differences between the scanner interfaces are: Key Differences USB 1.1/2.0 Macintosh Direct connection to connection USB-ready Macintosh ...older computer with a USB port, it will work with a new Epson scanner. You will see only the highest speeds on the scanning bed Flexibility-Intelligent Negative Scanning With a transparency unit attached, Epson scanners can scan color negatives (such as a separate file-all ...
...then capture each image separately. With batch scanning you can only scan positive transparent media, such as color transparencies and slides. The key differences between the scanner interfaces are: Key Differences USB 1.1/2.0 Macintosh Direct connection to connection USB-ready Macintosh ...older computer with a USB port, it will work with a new Epson scanner. You will see only the highest speeds on the scanning bed Flexibility-Intelligent Negative Scanning With a transparency unit attached, Epson scanners can scan color negatives (such as a separate file-all ...
Product Information Guide
Page 4
..., computer, and printer for possible solutions. If the scanner still does not operate properly, or if this error occurs, try turning the scanner off and then back on . The transparency unit replaces the scanner cover but still allows scanning of your dealer. Hardware initialization...an open cover, with an installed option unit. EPSON Expression 636 Initialization The scanner can be initialized (returned to be used. The ADF replaces the scanner cover but still allows scanning of your scanning software. If the scanner still does not operate properly, try to reset it...
..., computer, and printer for possible solutions. If the scanner still does not operate properly, or if this error occurs, try turning the scanner off and then back on . The transparency unit replaces the scanner cover but still allows scanning of your dealer. Hardware initialization...an open cover, with an installed option unit. EPSON Expression 636 Initialization The scanner can be initialized (returned to be used. The ADF replaces the scanner cover but still allows scanning of your scanning software. If the scanner still does not operate properly, try to reset it...
Product Information Guide
Page 5
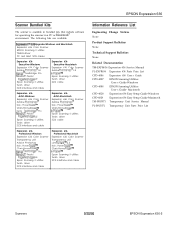
... CPD-4028 Expression 636 Easy Setup Guide-Windows CPD-4029 Expression 636 Easy Setup Guide-Macintosh TM-B813071 Transparency Unit Service Manual PL-B813071 Transparency Unit Parts Price List Scanners 9130196 EPSON Expression 636-5 The following kits are available: Expressionm636 Upgrade-Windows and Macintosh Expression 636 Color Scanner EPSON Scanning II utilities TWAIN driver PC and MAC SCSI cables Expression 636 Executive-Windows Expression 636 Color Scanner Adobe Photoshop...
... CPD-4028 Expression 636 Easy Setup Guide-Windows CPD-4029 Expression 636 Easy Setup Guide-Macintosh TM-B813071 Transparency Unit Service Manual PL-B813071 Transparency Unit Parts Price List Scanners 9130196 EPSON Expression 636-5 The following kits are available: Expressionm636 Upgrade-Windows and Macintosh Expression 636 Color Scanner EPSON Scanning II utilities TWAIN driver PC and MAC SCSI cables Expression 636 Executive-Windows Expression 636 Color Scanner Adobe Photoshop...
Product Support Bulletin(s)
Page 1
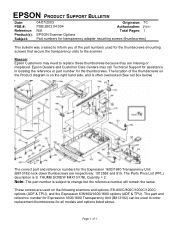
....2003.04.004 Authorization: N/A Total Pages: 1 EPSON Scanner Options Part numbers for transparency adapter mounting screws (thumbscrews) This bulletin was created to inform you of the thumbscrews on the Product diagram is on the following scanners and options: ES-600C/800C/1000C/1200C options (ADF & TPU), and the Expression 636/800/1600/1680 options (ADF & TPU...
....2003.04.004 Authorization: N/A Total Pages: 1 EPSON Scanner Options Part numbers for transparency adapter mounting screws (thumbscrews) This bulletin was created to inform you of the thumbscrews on the Product diagram is on the following scanners and options: ES-600C/800C/1000C/1200C options (ADF & TPU), and the Expression 636/800/1600/1680 options (ADF & TPU...
User Manual
Page 5
... 2-7 Video cards 2-7 Monitors 2-8 File compression software 2-8 Maintenance 2-8 Replacing the fluorescent lamp . . . . 2-9 Transporting the Scanner 2-10 Chapter 3 Options Using the Transparency Unit Unpacking the transparency unit Removing the shipping screw Installing the transparency unit Storing the transparency guides and reflective document mat Positioning transparencies and slides Scanning normal (reflective) documents Using the Automatic Document Feeder Unpacking the...
... 2-7 Video cards 2-7 Monitors 2-8 File compression software 2-8 Maintenance 2-8 Replacing the fluorescent lamp . . . . 2-9 Transporting the Scanner 2-10 Chapter 3 Options Using the Transparency Unit Unpacking the transparency unit Removing the shipping screw Installing the transparency unit Storing the transparency guides and reflective document mat Positioning transparencies and slides Scanning normal (reflective) documents Using the Automatic Document Feeder Unpacking the...
User Manual
Page 8
... which allows you to letter or A4 size. Transparency Unit This option allows you to scan transparent materials up to expand the versatility of your scanner. For information on using these options, see Chapter 3 of all scanner functions. You can scan images and save them to...available to 30 pages automatically. Options The following optional items are backward compatible with EPSON TWAIN's "Best & de-screening" option. 0 Higher quality output with the EPSON ES-1200CTM color image scanner. The automatic document feeder allows you had typed them in a variety of ...
... which allows you to letter or A4 size. Transparency Unit This option allows you to scan transparent materials up to expand the versatility of your scanner. For information on using these options, see Chapter 3 of all scanner functions. You can scan images and save them to...available to 30 pages automatically. Options The following optional items are backward compatible with EPSON TWAIN's "Best & de-screening" option. 0 Higher quality output with the EPSON ES-1200CTM color image scanner. The automatic document feeder allows you had typed them in a variety of ...
User Manual
Page 9
... contain important information and useful tips on using your nearest Authorized EPSON Reseller or Customer Care Center Introduction 3 Where to Get Help EPSON provides customer support and service through a network of your scanner, including maintenance and transportation. Be sure to use the optional transparency unit and automatic document feeder, and Chapter 4 provides troubleshooting information...
... contain important information and useful tips on using your nearest Authorized EPSON Reseller or Customer Care Center Introduction 3 Where to Get Help EPSON provides customer support and service through a network of your scanner, including maintenance and transportation. Be sure to use the optional transparency unit and automatic document feeder, and Chapter 4 provides troubleshooting information...
User Manual
Page 36
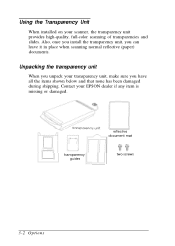
Using the Transparency Unit When installed on your EPSON dealer if any item is missing or damaged. Also, once you install the transparency unit, you have all the items shown below and that none has been damaged during shipping. Contact your scanner, the transparency unit provides high-quality, full-color scanning of transparencies and slides. transparency guides reflective document mat two screws 3-2 Options Unpacking the transparency unit When you unpack your transparency unit, make sure you can leave it in place when scanning normal reflective (paper) documents.
Using the Transparency Unit When installed on your EPSON dealer if any item is missing or damaged. Also, once you install the transparency unit, you have all the items shown below and that none has been damaged during shipping. Contact your scanner, the transparency unit provides high-quality, full-color scanning of transparencies and slides. transparency guides reflective document mat two screws 3-2 Options Unpacking the transparency unit When you unpack your transparency unit, make sure you can leave it in place when scanning normal reflective (paper) documents.
User Manual
Page 38
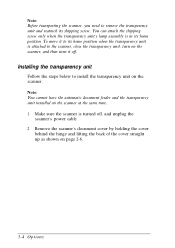
.... You can attach the shipping screw only when the transparency unit's lamp assembly is attached to the scanner, close the transparency unit, turn on the scanner, and then turn it off , and unplug the scanner's power cable. 2. Installing the transparency unit Follow the steps below to remove the transparency unit and reattach its home position. Note: You...
.... You can attach the shipping screw only when the transparency unit's lamp assembly is attached to the scanner, close the transparency unit, turn on the scanner, and then turn it off , and unplug the scanner's power cable. 2. Installing the transparency unit Follow the steps below to remove the transparency unit and reattach its home position. Note: You...

User Manual
Page 39
Insert the two screws provided with the transparency unit into the holes in the scanner as shown below, and then tighten the screws with a coin. 5. Close the transparency unit. Locate the two screws at the back of the scanner and slide the slots on the transparency unit forward underneath these two screws. 4. OPtions 3-5 3.
Insert the two screws provided with the transparency unit into the holes in the scanner as shown below, and then tighten the screws with a coin. 5. Close the transparency unit. Locate the two screws at the back of the scanner and slide the slots on the transparency unit forward underneath these two screws. 4. OPtions 3-5 3.
User Manual
Page 40
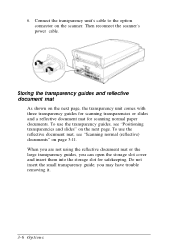
...use the reflective document mat, see "Positioning transparencies and slides" on page 3-11. To use the transparency guides, see "Scanning normal (reflective) documents" on the next page. Do not insert the small transparency guide; Then reconnect the scanner's power cable. When you are not using ...the reflective document mat or the large transparency guides, you may have trouble removing it. 3-6 Options Connect the transparency unit's cable to the option connector on...
...use the reflective document mat, see "Positioning transparencies and slides" on page 3-11. To use the transparency guides, see "Scanning normal (reflective) documents" on the next page. Do not insert the small transparency guide; Then reconnect the scanner's power cable. When you are not using ...the reflective document mat or the large transparency guides, you may have trouble removing it. 3-6 Options Connect the transparency unit's cable to the option connector on...
User Manual
Page 41
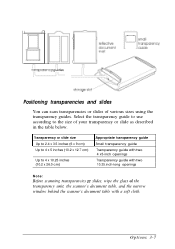
....0 cm) 1 Appropriate transparency guide 1 Small transparency guide Transparency guide with two 4 x5-inch openings Transparency guide with two 10.25.inch-long openings Note: Before scanning transparencies OY slides, wipe the glass of various sizes using the transparency guides. -ransparency guides I-L Positioning transparencies and slides You can scan transparencies or slides of the transparency unit, the scanner's document table, and...
....0 cm) 1 Appropriate transparency guide 1 Small transparency guide Transparency guide with two 4 x5-inch openings Transparency guide with two 10.25.inch-long openings Note: Before scanning transparencies OY slides, wipe the glass of various sizes using the transparency guides. -ransparency guides I-L Positioning transparencies and slides You can scan transparencies or slides of the transparency unit, the scanner's document table, and...
User Manual
Page 42
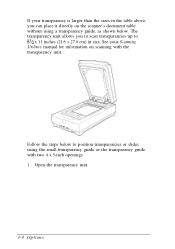
The transparency unit allows you can place it directly on scanning with two 4 x 5-inch openings: 1. See your transparency is larger than the sizes in size. Follow the steps below . If your Scanning Utilities manual for information on the scanner's document table without using a transparency guide, as shown below to 8% x 11 inches (21.6 x 27.9 cm) in the table above, you to scan transparencies up to position transparencies or slides using the small transparency guide or the transparency guide with the transparency unit. Open the transparency unit. 3-8 Options
The transparency unit allows you can place it directly on scanning with two 4 x 5-inch openings: 1. See your transparency is larger than the sizes in size. Follow the steps below . If your Scanning Utilities manual for information on the scanner's document table without using a transparency guide, as shown below to 8% x 11 inches (21.6 x 27.9 cm) in the table above, you to scan transparencies up to position transparencies or slides using the small transparency guide or the transparency guide with the transparency unit. Open the transparency unit. 3-8 Options
User Manual
Page 43
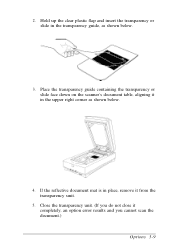
Place the transparency guide containing the transparency or slide face down on the scanner's document table, aligning it completely, an option error results and you do not close it in the upper right corner as shown below . 4. Close the transparency unit. (If you cannot scan the document.) Options 3-9 If the reflective document mat is in the transparency guide, as shown below . 3. Hold up the clear plastic flap and insert the transparency or slide in place, remove it from the transparency unit. 5. 2.
Place the transparency guide containing the transparency or slide face down on the scanner's document table, aligning it completely, an option error results and you do not close it in the upper right corner as shown below . 4. Close the transparency unit. (If you cannot scan the document.) Options 3-9 If the reflective document mat is in the transparency guide, as shown below . 3. Hold up the clear plastic flap and insert the transparency or slide in place, remove it from the transparency unit. 5. 2.
User Manual
Page 44
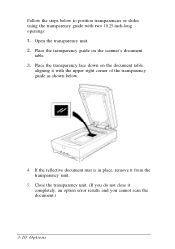
Place the transparency guide on the document table, aligning it with two 10.25-inch-long openings: Open the transparency unit. Place the transparency face down on the scanner's document table. Follow the steps below to position transparencies or slides using the transparency guide with the upper right corner of the transparency guide as shown below. 4. If the reflective document mat is in place, remove it completely, an option error results and you do not close it from the transparency unit. 5. Close the transparency unit. (If you cannot scan the document.) 3-10 Options
Place the transparency guide on the document table, aligning it with two 10.25-inch-long openings: Open the transparency unit. Place the transparency face down on the scanner's document table. Follow the steps below to position transparencies or slides using the transparency guide with the upper right corner of the transparency guide as shown below. 4. If the reflective document mat is in place, remove it completely, an option error results and you do not close it from the transparency unit. 5. Close the transparency unit. (If you cannot scan the document.) 3-10 Options
User Manual
Page 45
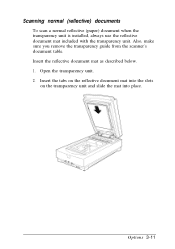
Scanning normal (reflective) documents To scan a normal reflective (paper) document when the transparency unit is installed, always use the reflective document mat included with the transparency unit. Options 3-11 Insert the reflective document mat as described below. 1. Also, make sure you remove the transparency guide from the scanner's document table. Open the transparency unit. 2. Insert the tabs on the reflective document mat into the slots on the transparency unit and slide the mat into place.
Scanning normal (reflective) documents To scan a normal reflective (paper) document when the transparency unit is installed, always use the reflective document mat included with the transparency unit. Options 3-11 Insert the reflective document mat as described below. 1. Also, make sure you remove the transparency guide from the scanner's document table. Open the transparency unit. 2. Insert the tabs on the reflective document mat into the slots on the transparency unit and slide the mat into place.
User Manual
Page 46
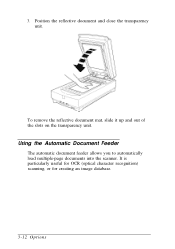
To remove the reflective document mat, slide it up and out of the slots on the transparency unit. Using the Automatic Document Feeder The automatic document feeder allows you to automatically load multiple-page documents into the scanner. It is particularly useful for OCR (optical character recognition) scanning, or for creating an image database. 3-12 Options Position the reflective document and close the transparency unit. 3.
To remove the reflective document mat, slide it up and out of the slots on the transparency unit. Using the Automatic Document Feeder The automatic document feeder allows you to automatically load multiple-page documents into the scanner. It is particularly useful for OCR (optical character recognition) scanning, or for creating an image database. 3-12 Options Position the reflective document and close the transparency unit. 3.
User Manual
Page 47
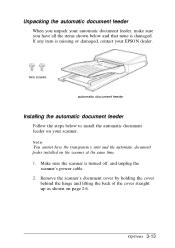
... feeder on page 2-6. Make sure the scanner is missing or damaged, contact your EPSON dealer. If any item is turned off, and unplug the scanner's power cable. 2. Options 3-13 Unpacking the automatic document feeder When you unpack your automatic document feeder, make sure you have the transparency unit and the automatic document feeder installed...
... feeder on page 2-6. Make sure the scanner is missing or damaged, contact your EPSON dealer. If any item is turned off, and unplug the scanner's power cable. 2. Options 3-13 Unpacking the automatic document feeder When you unpack your automatic document feeder, make sure you have the transparency unit and the automatic document feeder installed...
User Manual
Page 56
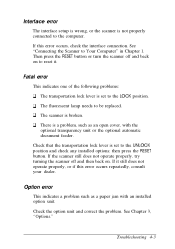
.... If it . Troubleshooting 4-3 See Chapter 3, "Options." Interface error The interface setup is wrong, or the scanner is a problem, such as a paper jam with the optional transparency unit or the optional automatic document feeder. Fatal error This indicates one of the following problems: 0 The transportation... a problem such as an open cover, with an installed option unit. If the scanner still does not operate properly, try turning the scanner off and back on . See "Connecting the Scanner to the computer. If this error occurs repeatedly, consult your dealer. Then press the...
.... If it . Troubleshooting 4-3 See Chapter 3, "Options." Interface error The interface setup is wrong, or the scanner is a problem, such as a paper jam with the optional transparency unit or the optional automatic document feeder. Fatal error This indicates one of the following problems: 0 The transportation... a problem such as an open cover, with an installed option unit. If the scanner still does not operate properly, try turning the scanner off and back on . See "Connecting the Scanner to the computer. If this error occurs repeatedly, consult your dealer. Then press the...


