
User Manual
Page 26
... the Remote Control Opening the Lens Cover Projector Placement You can also install the projector in a ceiling mount if you select a projector location: • Place the projector on a sturdy, level surface or install it using a compatible mount. • Leave plenty of space around and under the projector for use it on almost any...
... the Remote Control Opening the Lens Cover Projector Placement You can also install the projector in a ceiling mount if you select a projector location: • Place the projector on a sturdy, level surface or install it using a compatible mount. • Leave plenty of space around and under the projector for use it on almost any...

User Manual
Page 93
... Projector Features Projection Modes Depending on how you positioned the projector, you project from a table in front of the screen. • Front/Ceiling flips the image over top-to-bottom to project upside-down the A/V Mute button on the projector and display an image. 2. Changing the...may need to change the projection mode to flip the image over top-to-bottom and horizontally to project from the ceiling and behind a translucent screen. • Rear/Ceiling flips the image over top-to project from a ceiling or wall mount. • Rear flips the image horizontally to -bottom. 1.
... Projector Features Projection Modes Depending on how you positioned the projector, you project from a table in front of the screen. • Front/Ceiling flips the image over top-to-bottom to project upside-down the A/V Mute button on the projector and display an image. 2. Changing the...may need to change the projection mode to flip the image over top-to-bottom and horizontally to project from the ceiling and behind a translucent screen. • Rear/Ceiling flips the image over top-to project from a ceiling or wall mount. • Rear flips the image horizontally to -bottom. 1.

User Manual
Page 117
... operate multiple projectors using one remote control for more elaborate presentations. Note: Do not pass drop-prevention cables through the security cable attachment point when mounting the projector on the projector to attach a wire cable and secure it to prevent them from overheating. 117 Caution: Leave at once or individually. To... Features Related references Projector Parts - See your local computer or electronics dealer for purchase information. • Use the security cable attachment point on a wall or ceiling.
... operate multiple projectors using one remote control for more elaborate presentations. Note: Do not pass drop-prevention cables through the security cable attachment point when mounting the projector on the projector to attach a wire cable and secure it to prevent them from overheating. 117 Caution: Leave at once or individually. To... Features Related references Projector Parts - See your local computer or electronics dealer for purchase information. • Use the security cable attachment point on a wall or ceiling.

User Manual
Page 154
Carefully open the air filter cover. 154 You can replace the air filter while the projector is mounted to the ceiling or placed on a table. 1. Turn off the projector and unplug the power cord. 2.
Carefully open the air filter cover. 154 You can replace the air filter while the projector is mounted to the ceiling or placed on a table. 1. Turn off the projector and unplug the power cord. 2.
User Manual
Page 156
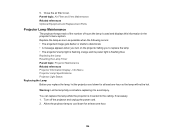
...the projector and unplug the power cord. 2. 5. Info Menu Projector Lamp Specifications Projector Light Status Replacing the Lamp Before you to the ceiling, if necessary. 1. Close the air filter cover. Parent topic: Air Filter and Vent Maintenance Related references Optional Equipment and Replacement Parts ...Projector Lamp Maintenance The projector keeps track of the number of hours the lamp is mounted to replace the lamp • The projector's lamp light is flashing orange and its power light is flashing blue Replacing the...
...the projector and unplug the power cord. 2. 5. Info Menu Projector Lamp Specifications Projector Light Status Replacing the Lamp Before you to the ceiling, if necessary. 1. Close the air filter cover. Parent topic: Air Filter and Vent Maintenance Related references Optional Equipment and Replacement Parts ...Projector Lamp Maintenance The projector keeps track of the number of hours the lamp is mounted to replace the lamp • The projector's lamp light is flashing orange and its power light is flashing blue Replacing the...

User Manual
Page 184
...21118. 13000:1 with IDMS 15.4; Contrast ratio Image size (in native aspect ratio) Projection distance (in native aspect ratio) Projection methods EX5250 Pro: Normal Power Consumption mode: White light output 3600 lumens (ISO 21118 standard) Color light output 3600 lumens ECO Power Consumption mode... 411.0 inches (10.44 m) EX9200 Pro: 34.3 inches (0.87 m) to 432.3 inches (10.98 m) EX5250 Pro: 33.1 inches (0.84 m) to 410.2 inches (10.42 m) Front, rear, ceiling-mounted 184 Color light output measured in accordance with Dynamic color mode, Normal Power Consumption mode, Wide Zoom mode, and ...
...21118. 13000:1 with IDMS 15.4; Contrast ratio Image size (in native aspect ratio) Projection distance (in native aspect ratio) Projection methods EX5250 Pro: Normal Power Consumption mode: White light output 3600 lumens (ISO 21118 standard) Color light output 3600 lumens ECO Power Consumption mode... 411.0 inches (10.44 m) EX9200 Pro: 34.3 inches (0.87 m) to 432.3 inches (10.98 m) EX5250 Pro: 33.1 inches (0.84 m) to 410.2 inches (10.42 m) Front, rear, ceiling-mounted 184 Color light output measured in accordance with Dynamic color mode, Normal Power Consumption mode, Wide Zoom mode, and ...

User Manual
Page 195
... side. Insert the plug firmly into a dusty outlet. Do not overload wall outlets, extension cords, or power strips. The bright light can be walked on a ceiling or wall, it . Do not insert the plug into the outlet. Important Safety Instructions Follow these precautions could damage the projector. • Do not use...; Do not operate the projector on . Do not tilt the projector more than 30° forward or back. • If the projector is on its ceiling mount. Use of loose papers. Do not cover the projector with this projector. • When installing or adjusting...
... side. Insert the plug firmly into a dusty outlet. Do not overload wall outlets, extension cords, or power strips. The bright light can be walked on a ceiling or wall, it . Do not insert the plug into the outlet. Important Safety Instructions Follow these precautions could damage the projector. • Do not use...; Do not operate the projector on . Do not tilt the projector more than 30° forward or back. • If the projector is on its ceiling mount. Use of loose papers. Do not cover the projector with this projector. • When installing or adjusting...


