
User Manual
Page 3
...owners. General Notice: Other product names used herein are trademarks or registered trademarks of Epson America, Inc. This information is a service mark of HDMI Licensing, LLC. HDMI, the HDMI logo, and High-Definition Multimedia Interface are for identification purposes only and may be ...trademarks of Seiko Epson Corporation. Epson disclaims any and all rights in those marks. PrivateLine and ...
...owners. General Notice: Other product names used herein are trademarks or registered trademarks of Epson America, Inc. This information is a service mark of HDMI Licensing, LLC. HDMI, the HDMI logo, and High-Definition Multimedia Interface are for identification purposes only and may be ...trademarks of Seiko Epson Corporation. Epson disclaims any and all rights in those marks. PrivateLine and ...
User Manual
Page 5
... a Computer 31 Connecting to the USB Port 31 Installing Software 33 Connecting to the VGA Computer Port 34 Connecting to Video Equipment 35 Connecting an HDMI Video Source (EX5200/EX7200 Only 36 Connecting a Composite Video Source 37 Connecting an S-Video Source 38 Connecting a Component Video Source 39 Connecting an RGB Video...
... a Computer 31 Connecting to the USB Port 31 Installing Software 33 Connecting to the VGA Computer Port 34 Connecting to Video Equipment 35 Connecting an HDMI Video Source (EX5200/EX7200 Only 36 Connecting a Composite Video Source 37 Connecting an S-Video Source 38 Connecting a Component Video Source 39 Connecting an RGB Video...
User Manual
Page 9
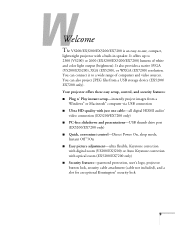
...attachment (cable not included), and a slot for an optional Kensington® security lock 9 You can connect it to 2300 (VS200) or 2600 (EX3200/EX5200/EX7200) lumens of computers and video sources. Your projector offers these easy setup, control, and security features: ■ Plug n' Play instant... JPEG files from a Windows® or Macintosh® computer via USB connection ■ Ultra HD-quality with just one cable-all digital HDMI audio/ video connection (EX5200/EX7200 only) ■ PC-free slideshows and presentations-USB thumb drive port (EX5200/EX7200 only) ■ Quick...
...attachment (cable not included), and a slot for an optional Kensington® security lock 9 You can connect it to 2300 (VS200) or 2600 (EX3200/EX5200/EX7200) lumens of computers and video sources. Your projector offers these easy setup, control, and security features: ■ Plug n' Play instant... JPEG files from a Windows® or Macintosh® computer via USB connection ■ Ultra HD-quality with just one cable-all digital HDMI audio/ video connection (EX5200/EX7200 only) ■ PC-free slideshows and presentations-USB thumb drive port (EX5200/EX7200 only) ■ Quick...

User Manual
Page 13
VS200/EX3200 Back USB (TypeB) port Infrared receiver S-Video port Audio out port Video port Computer (Component Video) port Lamp cover screw Rear adjustable foot AC power inlet Audio in port Rear adjustable foot EX5200/EX7200 Back USB (TypeB) port Infrared receiver S-Video port Video port Computer (Component Video) port HDMI port Lamp cover screw Rear adjustable foot AC USB power (TypeA) inlet port Audio ports Rear adjustable foot Welcome 13
VS200/EX3200 Back USB (TypeB) port Infrared receiver S-Video port Audio out port Video port Computer (Component Video) port Lamp cover screw Rear adjustable foot AC power inlet Audio in port Rear adjustable foot EX5200/EX7200 Back USB (TypeB) port Infrared receiver S-Video port Video port Computer (Component Video) port HDMI port Lamp cover screw Rear adjustable foot AC USB power (TypeA) inlet port Audio ports Rear adjustable foot Welcome 13

User Manual
Page 23
...you are moving the projector by hand, use the projector, you may be provided with the EX3200/EX5200/EX7200 only). See page 91 for transportation instructions. Additional Components Depending on one from Epson. See "Optional Accessories" on page 18. ■ To receive an audio signal, you'll... video cable. Setting Up the Projector 23 One may need additional components: ■ To receive an HDMI signal from your video equipment. ■ To receive a component video signal from Epson. One may be included with your video equipment, or you can purchase the ELPKC19 cable from a ...
...you are moving the projector by hand, use the projector, you may be provided with the EX3200/EX5200/EX7200 only). See page 91 for transportation instructions. Additional Components Depending on one from Epson. See "Optional Accessories" on page 18. ■ To receive an audio signal, you'll... video cable. Setting Up the Projector 23 One may need additional components: ■ To receive an HDMI signal from your video equipment. ■ To receive a component video signal from Epson. One may be included with your video equipment, or you can purchase the ELPKC19 cable from a ...
User Manual
Page 35
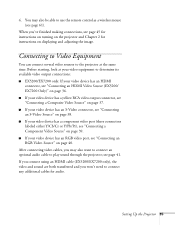
...Connecting an RGB Video Source" on displaying and adjusting the image. Before starting, look at the same time. If you connect using an HDMI cable (EX5200/EX7200 only), the video and sound are both transferred and you may also be able to connect any additional cables for instructions...to connect an optional audio cable to determine its available video output connections: ■ EX5200/EX7200 only: If your video device has an HDMI connector, see "Connecting an HDMI Video Source (EX5200/ EX7200 Only)" on page 36. ■ If your video device has a yellow RCA video output connector, see ...
...Connecting an RGB Video Source" on displaying and adjusting the image. Before starting, look at the same time. If you connect using an HDMI cable (EX5200/EX7200 only), the video and sound are both transferred and you may also be able to connect any additional cables for instructions...to connect an optional audio cable to determine its available video output connections: ■ EX5200/EX7200 only: If your video device has an HDMI connector, see "Connecting an HDMI Video Source (EX5200/ EX7200 Only)" on page 36. ■ If your video device has a yellow RCA video output connector, see ...

User Manual
Page 36
... Source (EX5200/ EX7200 Only) For the best image and sound quality, connect your video equipment and the HDMI connector on the projector. note If an HDMI cable was not provided with your video equipment, you 've finished making connections, see page 45 for instructions on turning on the projector and Chapter 2 ...
... Source (EX5200/ EX7200 Only) For the best image and sound quality, connect your video equipment and the HDMI connector on the projector. note If an HDMI cable was not provided with your video equipment, you 've finished making connections, see page 45 for instructions on turning on the projector and Chapter 2 ...

User Manual
Page 55
...displaying from a computer using the USB TypeB port or from one of these Aspect options: VS200/EX3200/EX5200 ■ Normal (for images sent through the available options. Choose this setting to project an HDMI image in a bright room with black-and white text and graphics. Displaying and Adjusting the ...aspect ratio of the image. Choose this setting to automatically resize the image and make the best use of the display area. ■ Auto (HDMI images on the EX5200/ EX7200. Press the Aspect button repeatedly to height) ratio (depending on your images by changing the aspect (width to ...
...displaying from a computer using the USB TypeB port or from one of these Aspect options: VS200/EX3200/EX5200 ■ Normal (for images sent through the available options. Choose this setting to project an HDMI image in a bright room with black-and white text and graphics. Displaying and Adjusting the ...aspect ratio of the image. Choose this setting to automatically resize the image and make the best use of the display area. ■ Auto (HDMI images on the EX5200/ EX7200. Press the Aspect button repeatedly to height) ratio (depending on your images by changing the aspect (width to ...

User Manual
Page 56
Choose this setting to automatically resize the image and make the best use of the display area. ■ Auto (HDMI images only): Automatically sets the aspect ratio according to fit. ■ Full: Displays images using the full projection area and maintains the aspect ratio of ... using the full width of the projection area, but does not retain the aspect ratio. 4:3 ratio images are maintained). Choose this setting to project an HDMI image in the best aspect ratio. ■ 16:9: Converts the aspect ratio of the image to 16:9. 4:3 ratio images are elongated horizontally to the input...
Choose this setting to automatically resize the image and make the best use of the display area. ■ Auto (HDMI images only): Automatically sets the aspect ratio according to fit. ■ Full: Displays images using the full projection area and maintains the aspect ratio of ... using the full width of the projection area, but does not retain the aspect ratio. 4:3 ratio images are maintained). Choose this setting to project an HDMI image in the best aspect ratio. ■ 16:9: Converts the aspect ratio of the image to 16:9. 4:3 ratio images are elongated horizontally to the input...
User Manual
Page 61
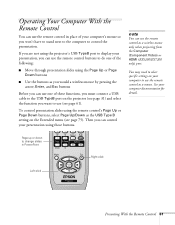
... the remote control's Page Up or Page Down buttons, select Page Up/Down as a wireless mouse only when projecting from the Computer (Component Video) or HDMI (EX5200/EX7200 only) port. note You can use the remote control as the USB Type B setting on the projector (see page 61). To control presentation...
... the remote control's Page Up or Page Down buttons, select Page Up/Down as a wireless mouse only when projecting from the Computer (Component Video) or HDMI (EX5200/EX7200 only) port. note You can use the remote control as the USB Type B setting on the projector (see page 61). To control presentation...
User Manual
Page 69
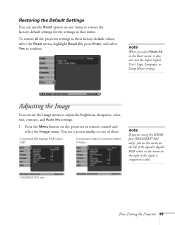
... you see a screen similar to one of these: Computer/USB display/ RGB video/ USB* Component video/ Composite video/ S-Video note If you are using the HDMI port (EX5200/EX7200 only), you select Reset All in that menu.
... you see a screen similar to one of these: Computer/USB display/ RGB video/ USB* Component video/ Composite video/ S-Video note If you are using the HDMI port (EX5200/EX7200 only), you select Reset All in that menu.
User Manual
Page 71
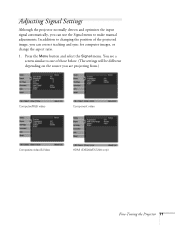
... position of those below. (The settings will be different depending on the source you are projecting from.) Computer/RGB video Component video Composite video/S-Video HDMI (EX5200/EX7200 only) Fine-Tuning the Projector 71 Press the Menu button and select the Signal menu. In addition to make manual adjustments. Adjusting Signal...
... position of those below. (The settings will be different depending on the source you are projecting from.) Computer/RGB video Component video Composite video/S-Video HDMI (EX5200/EX7200 only) Fine-Tuning the Projector 71 Press the Menu button and select the Signal menu. In addition to make manual adjustments. Adjusting Signal...
User Manual
Page 72
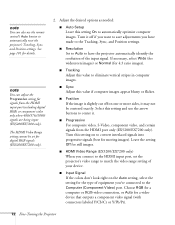
... this setting and use the remote control's Auto button to the Computer (Component Video) port. Leave the setting Off for still images. ■ HDMI Video Range (EX5200/EX7200 only) When you have made to the Tracking, Sync, and Position settings. ■ Resolution Set to Auto to have ... you've connected to automatically reset the projector's Tracking, Sync, and Position settings. note You can adjust the Progressive setting for signals from the HDMI port only (EX5200/EX7200 only). See page 101 for a video device that outputs a component video signal (with connectors labeled Y/Cb/Cr or ...
... this setting and use the remote control's Auto button to the Computer (Component Video) port. Leave the setting Off for still images. ■ HDMI Video Range (EX5200/EX7200 only) When you have made to the Tracking, Sync, and Position settings. ■ Resolution Set to Auto to have ... you've connected to automatically reset the projector's Tracking, Sync, and Position settings. note You can adjust the Progressive setting for signals from the HDMI port only (EX5200/EX7200 only). See page 101 for a video device that outputs a component video signal (with connectors labeled Y/Cb/Cr or ...

User Manual
Page 116
...; 576 720 × 480 720 × 576 1280 × 720 1920 × 1080 * Native Resolution ** Available only when you select Wide as the Resolution setting HDMI signals Mode VGA SVGA XGA WXGA SXGA SXGA SXGA+ UXGA SDTV (480i) SDTV (576i) SDTV (480p) SDTV (576p) HDTV (720p) HDTV (1080i) HDTV (1080p) Refresh...
...; 576 720 × 480 720 × 576 1280 × 720 1920 × 1080 * Native Resolution ** Available only when you select Wide as the Resolution setting HDMI signals Mode VGA SVGA XGA WXGA SXGA SXGA SXGA+ UXGA SDTV (480i) SDTV (576i) SDTV (480p) SDTV (576p) HDTV (720p) HDTV (1080i) HDTV (1080p) Refresh...
User Manual
Page 121
... 91 Blackboard color mode, 55 Blurry image, 101 Brightness, 107 Brightness setting, 70 C Cables audio, 41 component-to-VGA, 19, 35, 39 composite, 35, 37 HDMI, 36 illustrations, 23 ordering, 18 to 19 security, 82 S-Video, 19, 38 USB, 22, 31 to 32, 43 to 44 VGA, 34, 40 Capturing image...
... 91 Blackboard color mode, 55 Blurry image, 101 Brightness, 107 Brightness setting, 70 C Cables audio, 41 component-to-VGA, 19, 35, 39 composite, 35, 37 HDMI, 36 illustrations, 23 ordering, 18 to 19 security, 82 S-Video, 19, 38 USB, 22, 31 to 32, 43 to 44 VGA, 34, 40 Capturing image...
User Manual
Page 122
..., 24 to 29, 108 Documentation, 10 to 11 DVD player, connecting, 35 to 41 Dynamic color mode, 55 E Electrical specifications, 110 Environmental specifications, 110 Epson accessories, 18 to 19 PrivateLine Support, 11 technical support, 11, 104 to 105 warranty, 18 Error status lights, 96 Extended menu, 75 to 76 E-Zoom..., 36 HDMI Video Range setting, 72 HDTV images, video formats, 114, 116 Height of image, adjusting, 51 122 Index Help system, using, 94 Help, Epson, 10, 104 to 105 High Altitude mode, 76, 96, 110 I Image adjusting, 50 to 56, 69 to 70 blurry, 101 capturing and saving in projector,...
..., 24 to 29, 108 Documentation, 10 to 11 DVD player, connecting, 35 to 41 Dynamic color mode, 55 E Electrical specifications, 110 Environmental specifications, 110 Epson accessories, 18 to 19 PrivateLine Support, 11 technical support, 11, 104 to 105 warranty, 18 Error status lights, 96 Extended menu, 75 to 76 E-Zoom..., 36 HDMI Video Range setting, 72 HDTV images, video formats, 114, 116 Height of image, adjusting, 51 122 Index Help system, using, 94 Help, Epson, 10, 104 to 105 High Altitude mode, 76, 96, 110 I Image adjusting, 50 to 56, 69 to 70 blurry, 101 capturing and saving in projector,...

Start Here
Page 1
...My Computer or Computer, then double-click EPSON_PJ_UD. S-Video RCA video cable Component video HDMI Audio cable cable (composite video) to install the Epson USB Display software (only on your computer's monitor port. EX3200/EX5200/EX7200 VS200 4 Press the power button on . Power light Power button *...projector to cool down the projector, press the power button twice, then unplug it to switch between them . Video Device (VS200/EX3200) Connect up to 4 video devices and use the remote control to external display (see "Troubleshooting"). Macintosh®: After turning on ...
...My Computer or Computer, then double-click EPSON_PJ_UD. S-Video RCA video cable Component video HDMI Audio cable cable (composite video) to install the Epson USB Display software (only on your computer's monitor port. EX3200/EX5200/EX7200 VS200 4 Press the power button on . Power light Power button *...projector to cool down the projector, press the power button twice, then unplug it to switch between them . Video Device (VS200/EX3200) Connect up to 4 video devices and use the remote control to external display (see "Troubleshooting"). Macintosh®: After turning on ...


