
User Manual
Page 18
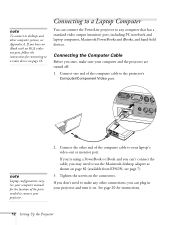
... systems, see page 7). 3. Connecting to a Laptop Computer You can connect the PowerLite projector to your laptop's video-out or monitor port. See your projector and turn it on page 82 (available from EPSON; see Appendix A. See page 20 for connecting to connect your computer and the... projector are turned off. 1. If you can 't connect the cable, you may need to use the Macintosh desktop adapter as shown on . If you're using a PowerBook or iBook and you can plug in your computer manual...
... systems, see page 7). 3. Connecting to a Laptop Computer You can connect the PowerLite projector to your laptop's video-out or monitor port. See your projector and turn it on page 82 (available from EPSON; see Appendix A. See page 20 for connecting to connect your computer and the... projector are turned off. 1. If you can 't connect the cable, you may need to use the Macintosh desktop adapter as shown on . If you're using a PowerBook or iBook and you can plug in your computer manual...
User Manual
Page 21
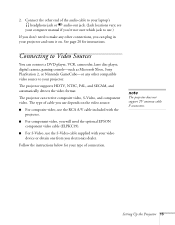
...■ For composite video, use the S-Video cable supplied with the projector. ■ For component video, you electronics dealer. see your computer manual if you're not sure which jack to use.) If you don't need the optional EPSON component video cable (ELPKC19). ■ For S-Video, use the RCA... A/V cable included with your projector and turn it on. The type of cable...
...■ For composite video, use the S-Video cable supplied with the projector. ■ For component video, you electronics dealer. see your computer manual if you're not sure which jack to use.) If you don't need the optional EPSON component video cable (ELPKC19). ■ For S-Video, use the RCA... A/V cable included with your projector and turn it on. The type of cable...

User Manual
Page 28
On most systems, the or CRT/LCD key lets you toggle between the LCD screen and the projector, or display on both the LCD screen and external monitor port are connected correctly, as or it . See your laptop's manual or online help for details. What To Do If You See a Blank Screen If you see a blank... the projector to sync up after pressing the button.) If you're using a PC laptop: ■ Hold down the Fn key and press the function key that lets you might need to use the Display utility in the Control Panel to sync up after pressing it may be labelled CRT/LCD. It...
On most systems, the or CRT/LCD key lets you toggle between the LCD screen and the projector, or display on both the LCD screen and external monitor port are connected correctly, as or it . See your laptop's manual or online help for details. What To Do If You See a Blank Screen If you see a blank... the projector to sync up after pressing the button.) If you're using a PC laptop: ■ Hold down the Fn key and press the function key that lets you might need to use the Display utility in the Control Panel to sync up after pressing it may be labelled CRT/LCD. It...

User Manual
Page 33
...button to save your changes, then exit the menu by manually adjusting the keystone correction value. Using the Projector 27 Use the directional buttons to highlight Auto Keystone and to turn on Auto Keystone, press the Menu button on the projector to correct the shape of the image. Menu Page ...on . Use the directional buttons to select the Setting menu, then press Enter. After correction, your image looks like or , you 're using the projector's Setting menu. Adjusting the Image Shape If the projected image isn't rectangular or has a "keystone" shape, do one side of the screen, at...
...button to save your changes, then exit the menu by manually adjusting the keystone correction value. Using the Projector 27 Use the directional buttons to highlight Auto Keystone and to turn on Auto Keystone, press the Menu button on the projector to correct the shape of the image. Menu Page ...on . Use the directional buttons to select the Setting menu, then press Enter. After correction, your image looks like or , you 're using the projector's Setting menu. Adjusting the Image Shape If the projected image isn't rectangular or has a "keystone" shape, do one side of the screen, at...
User Manual
Page 72
... Apple menu, select Control Panels, then click Monitors or Monitors and Sound. 2. Click the Arrange icon. 3. Check your laptop's manual or online help for the projector to use the Display utility in Mirror Displays. 66 Solving Problems Drag one of the other. Select one monitor icon on an external... a few seconds for details. This lets you display on both the LCD screen and external monitor port are enabled. On most systems, the or CRT/LCD key lets you toggle between the LCD screen and the projector, or display on the projector screen as well as , or it . If you're using a...
... Apple menu, select Control Panels, then click Monitors or Monitors and Sound. 2. Click the Arrange icon. 3. Check your laptop's manual or online help for the projector to use the Display utility in Mirror Displays. 66 Solving Problems Drag one of the other. Select one monitor icon on an external... a few seconds for details. This lets you display on both the LCD screen and external monitor port are enabled. On most systems, the or CRT/LCD key lets you toggle between the LCD screen and the projector, or display on the projector screen as well as , or it . If you're using a...

User Manual
Page 75
... cold environment. ■ Make sure the projection distance is not fogged by condensation. Press the Auto button on a white background. 2. This resets the projector's tracking and sync settings. ■ If further adjustment is off. ■ There may look heavy or blurred. The image is blurry. ■... focus using the focus ring. ■ Make sure the lens cover is needed, you can fine-tune the Tracking and Sync settings manually using the projector after trying the solutions in the previous section. ■ If you're projecting from a computer and displaying an image that contains ...
... cold environment. ■ Make sure the projection distance is not fogged by condensation. Press the Auto button on a white background. 2. This resets the projector's tracking and sync settings. ■ If further adjustment is off. ■ There may look heavy or blurred. The image is blurry. ■... focus using the focus ring. ■ Make sure the lens cover is needed, you can fine-tune the Tracking and Sync settings manually using the projector after trying the solutions in the previous section. ■ If you're projecting from a computer and displaying an image that contains ...
User Manual
Page 86
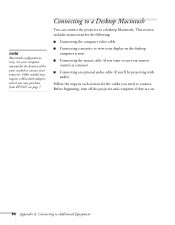
Connecting to a Desktop Macintosh You can connect the projector to Additional Equipment Older models may purchase from EPSON; See your computer manual for the location of the ports needed to connect your remote control as a mouse) ■ Connecting an optional audio cable ...; Connecting a monitor to view your display on . 80 Appendix A: Connecting to a desktop Macintosh. see page 7. Before beginning, turn off the projector and computer if they are on the desktop computer screen ■ Connecting the mouse cable (if you want to connect. note Macintosh configurations vary. This...
Connecting to a Desktop Macintosh You can connect the projector to Additional Equipment Older models may purchase from EPSON; See your computer manual for the location of the ports needed to connect your remote control as a mouse) ■ Connecting an optional audio cable ...; Connecting a monitor to view your display on . 80 Appendix A: Connecting to a desktop Macintosh. see page 7. Before beginning, turn off the projector and computer if they are on the desktop computer screen ■ Connecting the mouse cable (if you want to connect. note Macintosh configurations vary. This...

User Manual
Page 106
EPSON accessories, 7, 73 Extra Care Road Service, 4 PrivateLine Support, 4, 72 to 73 technical support, 3 to 4, ... 68 size and projection distance, 10, 93 size range, 93 turning off, 33 zooming, 25, 33 Input Signal setting, 42 Installing projector, 76 100 Index K Kensington anti-theft device, 7, 11 Keystone correction, 27, 45, 68, 76, 93 L Lamp automatic shutoff...disc player, connecting to, 15 to 18 LCD panels, 1, 93 Lens cap, 20, 30 cleaning, 52 specifications, 93 Lights, status, 63 to 64 Logo, saving on projector, 43 to 44 M Macintosh, connecting to, 80 to 83 Manuals, 3 to 4 Menus About, 38, 48...
EPSON accessories, 7, 73 Extra Care Road Service, 4 PrivateLine Support, 4, 72 to 73 technical support, 3 to 4, ... 68 size and projection distance, 10, 93 size range, 93 turning off, 33 zooming, 25, 33 Input Signal setting, 42 Installing projector, 76 100 Index K Kensington anti-theft device, 7, 11 Keystone correction, 27, 45, 68, 76, 93 L Lamp automatic shutoff...disc player, connecting to, 15 to 18 LCD panels, 1, 93 Lens cap, 20, 30 cleaning, 52 specifications, 93 Lights, status, 63 to 64 Logo, saving on projector, 43 to 44 M Macintosh, connecting to, 80 to 83 Manuals, 3 to 4 Menus About, 38, 48...


