
User Manual
Page 2
...occur. Environmental Precautions Warning Do not leave the document camera or the remote control with batteries inside a vehicle with correct operation. Do not use or store the document camera outdoors for future reference. Caution Do not set up the document camera near humidifiers), or where there is accessible to ...humidity, or steam (such as cooking areas or near high-voltage electrical wires or sources of magnetic fields. Do not use the document camera in other places that may become extremely hot. This may interfere with the windows closed, in places where they will be...
...occur. Environmental Precautions Warning Do not leave the document camera or the remote control with batteries inside a vehicle with correct operation. Do not use or store the document camera outdoors for future reference. Caution Do not set up the document camera near humidifiers), or where there is accessible to ...humidity, or steam (such as cooking areas or near high-voltage electrical wires or sources of magnetic fields. Do not use the document camera in other places that may become extremely hot. This may interfere with the windows closed, in places where they will be...

User Manual
Page 3
.... Never attempt to hold the plug when disconnecting it. If the AC adapter, power cord, or document camera is damaged. Using the damaged device may cause damage, overheating, fire, or electric shock. Use of the power cable. • Do not bend, twist or pull the power cable excessively. &#... has been damaged Continuing to use any covers on top of a different power source may result in fire or electric shock. always be sure to disassemble or modify the document camera. Unplug the document camera from the outlet and refer all repairs to use the AC adapter with wet hands...
.... Never attempt to hold the plug when disconnecting it. If the AC adapter, power cord, or document camera is damaged. Using the damaged device may cause damage, overheating, fire, or electric shock. Use of the power cable. • Do not bend, twist or pull the power cable excessively. &#... has been damaged Continuing to use any covers on top of a different power source may result in fire or electric shock. always be sure to disassemble or modify the document camera. Unplug the document camera from the outlet and refer all repairs to use the AC adapter with wet hands...
User Manual
Page 4
..., for stubborn stains, a moist cloth that has been wrung dry) for cleaning. Do not insert or drop metal, flammable, or foreign objects into the document camera. Do not use . If you spilled liquid, turn the power off , the plug is disconnected from the electrical outlet, and contact your local distributor. Liquids entering the...
..., for stubborn stains, a moist cloth that has been wrung dry) for cleaning. Do not insert or drop metal, flammable, or foreign objects into the document camera. Do not use . If you spilled liquid, turn the power off , the plug is disconnected from the electrical outlet, and contact your local distributor. Liquids entering the...

User Manual
Page 5
... control. If liquid from a battery gets in your eyes, do not rub your eyes. Do not use excessive force when adjusting the document camera. If a discharged battery is on document camera, or it out of the remote control immediately. Do not heat batteries or put them well with clean... water and contact a doctor immediately. The bright light can damage your eyes. Do not use any other kinds of...
... control. If liquid from a battery gets in your eyes, do not rub your eyes. Do not use excessive force when adjusting the document camera. If a discharged battery is on document camera, or it out of the remote control immediately. Do not heat batteries or put them well with clean... water and contact a doctor immediately. The bright light can damage your eyes. Do not use any other kinds of...

User Manual
Page 6
...or exporting data • If the SD card or USB drive is removed from the document camera while recording or exporting data • If it is subjected to static electricity or electrical noise • If it is used incorrectly • If a malfunction occurs or if the device needs to be repaired &#...8226; If damage occurs due to a natural disaster In addition to the situations mentioned above, Epson shall not be responsible for the loss of any data ...
...or exporting data • If the SD card or USB drive is removed from the document camera while recording or exporting data • If it is subjected to static electricity or electrical noise • If it is used incorrectly • If a malfunction occurs or if the device needs to be repaired &#...8226; If damage occurs due to a natural disaster In addition to the situations mentioned above, Epson shall not be responsible for the loss of any data ...

User Manual
Page 7
... 13 Base 14 Remote Control Buttons 15 Remote Control 15 Projector operations 15 Document camera operation 15 Storing the Document Camera 17 Securing the Document Camera 18 Connecting Connecting to a Projector 20 Connecting to a Computer 22 Connect for Use with the Document Camera Software 22 Connect for Use Without the Document Camera Software 23 Projecting Plugging In and Turning On 25 Displaying...
... 13 Base 14 Remote Control Buttons 15 Remote Control 15 Projector operations 15 Document camera operation 15 Storing the Document Camera 17 Securing the Document Camera 18 Connecting Connecting to a Projector 20 Connecting to a Computer 22 Connect for Use with the Document Camera Software 22 Connect for Use Without the Document Camera Software 23 Projecting Plugging In and Turning On 25 Displaying...

User Manual
Page 8
... On-screen Menu 48 On-screen Menu List 49 Image Menu 49 Function Menu 50 Memory Menu 52 Info Menu 53 Using the Included Software Installing the Software 55 Uninstalling the Software 55 Windows 8 55 Windows 7/Windows Vista/Windows XP 55 Mac OS X 55 Starting ... Your Videos 64 Solving Problems Problems and Solutions 66 Operation Problems 66 Image Quality Problems 66 Problems Using an SD Card 67 Problems Using a USB Drive 67 Problems Connecting a Laptop 67 Problems Using the Document Camera Software 67 Where to Get Help 69 Europe 69 Africa 74 Middle East 74 North and Central ...
... On-screen Menu 48 On-screen Menu List 49 Image Menu 49 Function Menu 50 Memory Menu 52 Info Menu 53 Using the Included Software Installing the Software 55 Uninstalling the Software 55 Windows 8 55 Windows 7/Windows Vista/Windows XP 55 Mac OS X 55 Starting ... Your Videos 64 Solving Problems Problems and Solutions 66 Operation Problems 66 Image Quality Problems 66 Problems Using an SD Card 67 Problems Using a USB Drive 67 Problems Connecting a Laptop 67 Problems Using the Document Camera Software 67 Where to Get Help 69 Europe 69 Africa 74 Middle East 74 North and Central ...

User Manual
Page 9
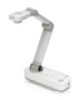
Introduction You can create time-lapse photos and annotate images produced by the document camera. With the included software, you can use the Epson ELPDC12 document camera to capture and project pages from books or other documents, and even three-dimensional objects.
Introduction You can create time-lapse photos and annotate images produced by the document camera. With the included software, you can use the Epson ELPDC12 document camera to capture and project pages from books or other documents, and even three-dimensional objects.

User Manual
Page 12
Use a soft cloth to adjust the height of the camera head. Changes the LED lamp status in three steps: bright, dim, and off . [ ] Projects images from the document camera. [ ] Projects images from a computer. Name A [t] button B [Source] button [ ][ ] C [Menu] button Function Turns the document camera power on your document... ] Lamp switch C LED lamp D Image rotation dial E Camera lens Function Captures sound when you record a video. Document Camera Parts Camera Head 12 Name F Camera arm Function Extends or retracts the camera arm to gently wipe the lens. Attention Do not rub the ...
Use a soft cloth to adjust the height of the camera head. Changes the LED lamp status in three steps: bright, dim, and off . [ ] Projects images from the document camera. [ ] Projects images from a computer. Name A [t] button B [Source] button [ ][ ] C [Menu] button Function Turns the document camera power on your document... ] Lamp switch C LED lamp D Image rotation dial E Camera lens Function Captures sound when you record a video. Document Camera Parts Camera Head 12 Name F Camera arm Function Extends or retracts the camera arm to gently wipe the lens. Attention Do not rub the ...

User Manual
Page 13
... and release the button, the image is saved. Connects the document camera to automatically focus the image. s p.27 Press the [Focus] button to a computer via the supplied USB cable when using the included software. The unit cannot focus on a USB drive...TypeB) port H Mic In port Function Outputs composite video signals to a projector. Connects a commercially available microphone when recording audio and video. Document Camera Parts 13 D[ [ Name Function button When the menu screen is displayed, pressing these buttons selects menu items and setting values. ] [ ...
... and release the button, the image is saved. Connects the document camera to automatically focus the image. s p.27 Press the [Focus] button to a computer via the supplied USB cable when using the included software. The unit cannot focus on a USB drive...TypeB) port H Mic In port Function Outputs composite video signals to a projector. Connects a commercially available microphone when recording audio and video. Document Camera Parts 13 D[ [ Name Function button When the menu screen is displayed, pressing these buttons selects menu items and setting values. ] [ ...
User Manual
Page 15
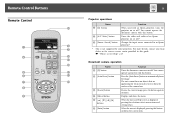
...Remote Control 15 Projector operations Name A [t] button B [A/V Mute] button C [Source Search] button Function When used with an Epson projector, turns the projector on or off.* Changes the input source connected to continue. Displays and closes the menu....Press the [Auto Focus] button to Get Help" p.69 Document camera operation Name D [t] button E [Auto Focus] button F [Freeze] button G [Menu] button H buttons I [Enter] button Function Turns the document camera on or off .* You cannot operate the document camera with this guide. Freezes the current image; When the menu...
...Remote Control 15 Projector operations Name A [t] button B [A/V Mute] button C [Source Search] button Function When used with an Epson projector, turns the projector on or off.* Changes the input source connected to continue. Displays and closes the menu....Press the [Auto Focus] button to Get Help" p.69 Document camera operation Name D [t] button E [Auto Focus] button F [Freeze] button G [Menu] button H buttons I [Enter] button Function Turns the document camera on or off .* You cannot operate the document camera with this guide. Freezes the current image; When the menu...
User Manual
Page 17
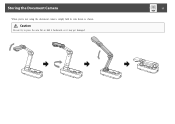
Caution Do not try to press the arm flat or fold it backwards, or it may get damaged. Storing the Document Camera 17 When you're not using the document camera, simply fold its arm down as shown.
Caution Do not try to press the arm flat or fold it backwards, or it may get damaged. Storing the Document Camera 17 When you're not using the document camera, simply fold its arm down as shown.

User Manual
Page 18
In addition, you can thread them . Do not use adhesives. Use M4 bolts; you can attach the document camera to a maximum depth of 9 mm (0.35 inch). A Mounting points Attention Fasten the bolts securely but do not overtighten them into the Kensington security port. Securing the Document Camera 18 You can secure the document camera by fastening a cable to the security bar, shown below, or by inserting a Kensington anti-theft cable into the document camera case to a table, cart, or stand at the mounting points indicated below.
In addition, you can thread them . Do not use adhesives. Use M4 bolts; you can attach the document camera to a maximum depth of 9 mm (0.35 inch). A Mounting points Attention Fasten the bolts securely but do not overtighten them into the Kensington security port. Securing the Document Camera 18 You can secure the document camera by fastening a cable to the security bar, shown below, or by inserting a Kensington anti-theft cable into the document camera case to a table, cart, or stand at the mounting points indicated below.

User Manual
Page 20
... port B VGA cable Composite video connection HDMI port HDMI cable A Composite port a You can connect the document camera to a projector using a standard VGA cable, composite video cable, or HDMI cable, or to a Projector 20 You can also use , based on the type of port that's available on your projector or other video equipment such...
... port B VGA cable Composite video connection HDMI port HDMI cable A Composite port a You can connect the document camera to a projector using a standard VGA cable, composite video cable, or HDMI cable, or to a Projector 20 You can also use , based on the type of port that's available on your projector or other video equipment such...
User Manual
Page 22
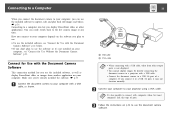
..." p.23. s p.54 Connecting to a computer also lets you can easily switch back to the live camera image at any time. Make sure you don't plan to use the document camera software. s p.55 a Connect the document camera to your computer with a USB cable, as display PowerPoint slides or images from other applications. Connecting to a Computer 22 When...
..." p.23. s p.54 Connecting to a computer also lets you can easily switch back to the live camera image at any time. Make sure you don't plan to use the document camera software. s p.55 a Connect the document camera to your computer with a USB cable, as display PowerPoint slides or images from other applications. Connecting to a Computer 22 When...

User Manual
Page 23
...to change the setting. b Connect a VGA cable from the document camera's Display Out port to your computer's monitor-out port to the document camera's Computer In port. s p.67 • A video signal from the Computer In port can 't use the included software. If you display PowerPoint slides or images ...from another application on your computer, but the image doesn't appear on the screen, the document camera's USB Mode may be output from a Display Out port. B ...
...to change the setting. b Connect a VGA cable from the document camera's Display Out port to your computer's monitor-out port to the document camera's Computer In port. s p.67 • A video signal from the Computer In port can 't use the included software. If you display PowerPoint slides or images ...from another application on your computer, but the image doesn't appear on the screen, the document camera's USB Mode may be output from a Display Out port. B ...

User Manual
Page 25
It takes about 20 seconds for the document camera to turn on your projector. a When you connected. c Turn on the document camera. d Select the appropriate "source" on the projector depending on the port to turn it off, disconnect any cables, and fold down the camera arm. s p.17 b Press the [t] power button to which you 're done using the document camera, press the [t] power button twice to output an image. Plugging In and Turning On 25 a Connect the power adapter as shown and plug the adapter into a wall outlet.
It takes about 20 seconds for the document camera to turn on your projector. a When you connected. c Turn on the document camera. d Select the appropriate "source" on the projector depending on the port to turn it off, disconnect any cables, and fold down the camera arm. s p.17 b Press the [t] power button to which you 're done using the document camera, press the [t] power button twice to output an image. Plugging In and Turning On 25 a Connect the power adapter as shown and plug the adapter into a wall outlet.

User Manual
Page 27
... adjust the focus. Align the center of your document on the table under the camera head. Use the [ ] and [ ] arrow buttons to rotate the image on the remote control. Displaying a Document or Other Materials 27 Projecting a Place your document with the guides on the side of the document camera. • The maximum paper size that can be...
... adjust the focus. Align the center of your document on the table under the camera head. Use the [ ] and [ ] arrow buttons to rotate the image on the remote control. Displaying a Document or Other Materials 27 Projecting a Place your document with the guides on the side of the document camera. • The maximum paper size that can be...

User Manual
Page 28
... Zoom Area Window is On: When Zoom Area Window is Off: • Depending on the document camera or remote control. To enable the Zoom Area Window function, press the [Menu] button and... ] arrow buttons. • When the Zoom Area Window function is On, the entire image is enlarged. When using the digital zoom, you increase the zoom ratio more than twice. When it is Off, a box is displayed... that indicates the enlarged part when you can zoom up to 16x. Displaying a Document or Other Materials e To zoom in on part of the image, press the [Zoom] - [z] button on ...
... Zoom Area Window is On: When Zoom Area Window is Off: • Depending on the document camera or remote control. To enable the Zoom Area Window function, press the [Menu] button and... ] arrow buttons. • When the Zoom Area Window function is On, the entire image is enlarged. When using the digital zoom, you increase the zoom ratio more than twice. When it is Off, a box is displayed... that indicates the enlarged part when you can zoom up to 16x. Displaying a Document or Other Materials e To zoom in on part of the image, press the [Zoom] - [z] button on ...

User Manual
Page 30
... remote control. b Press the [Focus] button on the document camera or the [Auto Focus] button on an inserted SD card, or with a connected USB drive or computer. a Raise and rotate the camera head to face the front of a whiteboard or chalkboard. a You can use the document camera to display a lecture or presentation at the front of...
... remote control. b Press the [Focus] button on the document camera or the [Auto Focus] button on an inserted SD card, or with a connected USB drive or computer. a Raise and rotate the camera head to face the front of a whiteboard or chalkboard. a You can use the document camera to display a lecture or presentation at the front of...

