
User Manual
Page 2
EPSON and PowerLite are for damages resulting from the use of any options or any form or by purchaser or third parties as Original EPSON Products or EPSON Approved Products by Epson America, Inc. SoundAdvice is a service mark and FaxAdvice is assumed with SEIKO EPSON CORPORATION's operating and maintenance instructions. General Notice: Other product names used herein are...
EPSON and PowerLite are for damages resulting from the use of any options or any form or by purchaser or third parties as Original EPSON Products or EPSON Approved Products by Epson America, Inc. SoundAdvice is a service mark and FaxAdvice is assumed with SEIKO EPSON CORPORATION's operating and maintenance instructions. General Notice: Other product names used herein are...

User Manual
Page 4
These limits are designed to provide reasonable protection against harmful interference in accordance with the instructions, may cause interference levels which exceed the limits established by the manufacturer could void the user's authority to operate the equipment. If this equipment does ...
These limits are designed to provide reasonable protection against harmful interference in accordance with the instructions, may cause interference levels which exceed the limits established by the manufacturer could void the user's authority to operate the equipment. If this equipment does ...
User Manual
Page 5
Contents Introduction 1 Getting the Most Out of Your Projector 3 Remote Control 3 Sleep Mode 3 Control Panel 3 Optional Accessories 4 About This Manual 5 Safety Instructions 6 Where to Get Help 8 Electronic Support Services 8 Automated Telephone Services 9 1 Installation 11 Unpacking the Projector 12 Additional Components 14 Attaching the Hand Strap 15 v
Contents Introduction 1 Getting the Most Out of Your Projector 3 Remote Control 3 Sleep Mode 3 Control Panel 3 Optional Accessories 4 About This Manual 5 Safety Instructions 6 Where to Get Help 8 Electronic Support Services 8 Automated Telephone Services 9 1 Installation 11 Unpacking the Projector 12 Additional Components 14 Attaching the Hand Strap 15 v
User Manual
Page 13
...," describes how to interpret your projector and perform limited maintenance. Chapter 6, "Troubleshooting," describes how to clean your projector's warning lights and gives helpful information for avoiding errors, optimizing image quality, and solving problems. About This Manual 5 Except where noted, the instructions apply to install and use the EPSON PowerLite 5500C and PowerLite 7500C projectors. About This Manual This...
...," describes how to interpret your projector and perform limited maintenance. Chapter 6, "Troubleshooting," describes how to clean your projector's warning lights and gives helpful information for avoiding errors, optimizing image quality, and solving problems. About This Manual 5 Except where noted, the instructions apply to install and use the EPSON PowerLite 5500C and PowerLite 7500C projectors. About This Manual This...

User Manual
Page 15
...-wire grounding-type plug into the outlet. 8. Safety Instructions Follow these precautions could result in sparks or fire. Use the type of power source indicated on an unstable cart, stand, or table. 2. Place the projector near water or sources of the power available, consult your dealer or ... a wall outlet where the plug can cause fire or electric shock. Do not hold the plug with these safety instructions when setting up and using the projector: 1. Failure to replace it. q Insert the plug firmly into a properly grounded outlet. If you have a two-prong outlet, contact...
...-wire grounding-type plug into the outlet. 8. Safety Instructions Follow these precautions could result in sparks or fire. Use the type of power source indicated on an unstable cart, stand, or table. 2. Place the projector near water or sources of the power available, consult your dealer or ... a wall outlet where the plug can cause fire or electric shock. Do not hold the plug with these safety instructions when setting up and using the projector: 1. Failure to replace it. q Insert the plug firmly into a properly grounded outlet. If you have a two-prong outlet, contact...

User Manual
Page 17
... with the user name anonymous and your projector, see the Help menu on the projector or read Chapter 6, "Troubleshooting." If you can reach EPSON's Home Page at http://www.epson.com. If you have Internet FTP capability, use your Web browser (or other software for service q If it exhibits a distinct change in the following... e-mail address as listed in performance, indicating a need for FTP downloading) to Get Help 9 q If it does not operate normally when you follow the operating instructions, or if it has been dropped or the housing has been damaged.
... with the user name anonymous and your projector, see the Help menu on the projector or read Chapter 6, "Troubleshooting." If you can reach EPSON's Home Page at http://www.epson.com. If you have Internet FTP capability, use your Web browser (or other software for service q If it exhibits a distinct change in the following... e-mail address as listed in performance, indicating a need for FTP downloading) to Get Help 9 q If it does not operate normally when you follow the operating instructions, or if it has been dropped or the housing has been damaged.
User Manual
Page 18
...a return fax number to commonly asked questions about EPSON products 24 hours a day, seven days a week, call (800) 922-8911. Technical support is required, follow the calling instructions on CompuServe® Access Members of your nearest Authorized EPSON Reseller or Customer Care Center, call (800) 922... to use this service. EPSON Referral Service For the location of CompuServe can type GO EPSON at the menu prompt to reach the Epson America Forum. Service EPSON Forum on the back of the EPSON Private Line Technical Support card included with the projector. When support is also ...
...a return fax number to commonly asked questions about EPSON products 24 hours a day, seven days a week, call (800) 922-8911. Technical support is required, follow the calling instructions on CompuServe® Access Members of your nearest Authorized EPSON Reseller or Customer Care Center, call (800) 922... to use this service. EPSON Referral Service For the location of CompuServe can type GO EPSON at the menu prompt to reach the Epson America Forum. Service EPSON Forum on the back of the EPSON Private Line Technical Support card included with the projector. When support is also ...

User Manual
Page 23
...from-Apple for instructions.) Additional Components Depending on how you plan to program enhanced special effects on the remote control, you may need the optional ELP Link III set from your equipment, you need these components. sales only). Depending on the configuration of the projector from your ...components: q For complete control of your computer or to use a carrying case if you need all packaging in case you are carrying the projector by calling EPSON Accessories at (800) 873-7766 (U.S. q To receive an S-Video signal, you will need an S-Video cable. (One is usually ...
...from-Apple for instructions.) Additional Components Depending on how you plan to program enhanced special effects on the remote control, you may need the optional ELP Link III set from your equipment, you need these components. sales only). Depending on the configuration of the projector from your ...components: q For complete control of your computer or to use a carrying case if you need all packaging in case you are carrying the projector by calling EPSON Accessories at (800) 873-7766 (U.S. q To receive an S-Video signal, you will need an S-Video cable. (One is usually ...

User Manual
Page 31
Follow the instructions on the computer monitor, connect the monitor cable to connect the mouse cable. Mouse/Com port PS/2 mouse cable a. To also view the video on page 78 to the projector's Computer Out port. Note: If you'll be using the optional ELP Link III software, skip step 2, as a mouse... your computer and replace it with the small end of the PS/2 mouse cable included with the projector. 22 1 • Installation If you want to connect the mouse cable included in the ELP Link III set instead. Disconnect the computer's PS/2 mouse cable from the mouse port on all ...
Follow the instructions on the computer monitor, connect the monitor cable to connect the mouse cable. Mouse/Com port PS/2 mouse cable a. To also view the video on page 78 to the projector's Computer Out port. Note: If you'll be using the optional ELP Link III software, skip step 2, as a mouse... your computer and replace it with the small end of the PS/2 mouse cable included with the projector. 22 1 • Installation If you want to connect the mouse cable included in the ELP Link III set instead. Disconnect the computer's PS/2 mouse cable from the mouse port on all ...
User Manual
Page 32
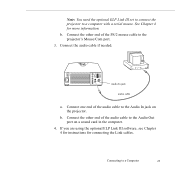
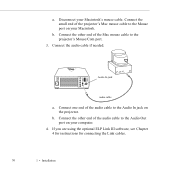
... the computer. 4. Audio In jack audio cable a. Note: You need the optional ELP Link III set to connect the projector to the Audio Out port on the projector. See Chapter 4 for connecting the Link cables. If you are using the optional ELP Link III software, see Chapter 4 for instructions for more information. b. b. Connecting to the...
... the computer. 4. Audio In jack audio cable a. Note: You need the optional ELP Link III set to connect the projector to the Audio Out port on the projector. See Chapter 4 for connecting the Link cables. If you are using the optional ELP Link III software, see Chapter 4 for instructions for more information. b. b. Connecting to the...
User Manual
Page 34
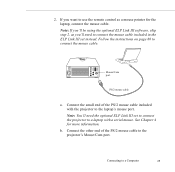
... Note: You'll need to connect the mouse cable included in the ELP Link III set to connect the projector to a laptop with the projector to the projector's Mouse/Com port. If you 'll need the optional ELP Link III set instead. b. 2. Connect the other end of the... PS/2 mouse cable included with a serial mouse. Connect the small end of the PS/2 mouse cable to the laptop's mouse port. Follow the instructions...
... Note: You'll need to connect the mouse cable included in the ELP Link III set to connect the projector to a laptop with the projector to the projector's Mouse/Com port. If you 'll need the optional ELP Link III set instead. b. 2. Connect the other end of the... PS/2 mouse cable included with a serial mouse. Connect the small end of the PS/2 mouse cable to the laptop's mouse port. Follow the instructions...
User Manual
Page 35
b. Connect the audio cable if needed (and if your laptop. 4. Connect the other end of the audio cable to the Audio Out jack on the projector. Connect one end of the audio cable to the Audio In jack on your laptop has an Audio Out jack). If you are using the optional ELP Link III software, see Chapter 4 for instructions for connecting the Link cables. 26 1 • Installation Audio In jack audio cable a. 3.
b. Connect the audio cable if needed (and if your laptop. 4. Connect the other end of the audio cable to the Audio Out jack on the projector. Connect one end of the audio cable to the Audio In jack on your laptop has an Audio Out jack). If you are using the optional ELP Link III software, see Chapter 4 for instructions for connecting the Link cables. 26 1 • Installation Audio In jack audio cable a. 3.

User Manual
Page 37
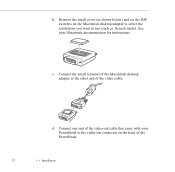
Remove the small cover (as shown below) and set the DIP switches on the back of the projector video cable and connect the projector video cable (with Macintosh desktop adapter attached) to use (such as 16-inch mode). Connect the small terminal of the Macintosh desktop adapter to the other end of the Macintosh. See your Macintosh documentation for instructions. d. c. Disconnect the monitor cable from the video port on the Macintosh desktop adapter to select the resolutions you want to the video port. 28 1 • Installation b.
Remove the small cover (as shown below) and set the DIP switches on the back of the projector video cable and connect the projector video cable (with Macintosh desktop adapter attached) to use (such as 16-inch mode). Connect the small terminal of the Macintosh desktop adapter to the other end of the Macintosh. See your Macintosh documentation for instructions. d. c. Disconnect the monitor cable from the video port on the Macintosh desktop adapter to select the resolutions you want to the video port. 28 1 • Installation b.
User Manual
Page 38
...the mouse cable. Note: If you'll be using the optional ELP Link III software, skip step 2, as you want to use the remote control as a mouse pointer for the computer, connect the mouse cable. If you 'll need to the projector's Computer Out port. f. Tighten the screws on the computer's... monitor, attach the large end of the Macintosh monitor adapter to the monitor cable and connect the monitor to connect the mouse cable included in the ELP Link III set instead. Follow the instructions on page 82 to a...
...the mouse cable. Note: If you'll be using the optional ELP Link III software, skip step 2, as you want to use the remote control as a mouse pointer for the computer, connect the mouse cable. If you 'll need to the projector's Computer Out port. f. Tighten the screws on the computer's... monitor, attach the large end of the Macintosh monitor adapter to the monitor cable and connect the monitor to connect the mouse cable included in the ELP Link III set instead. Follow the instructions on page 82 to a...
User Manual
Page 39
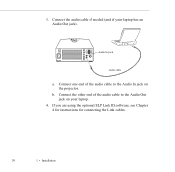
... the optional ELP Link III software, see Chapter 4 for instructions for connecting the Link cables. 30 1 • Installation b. Connect the other end of the Mac mouse cable to the Audio Out port on your computer. 4. Audio In jack audio cable a. Connect the other end of the audio cable to the projector's Mouse/Com...
... the optional ELP Link III software, see Chapter 4 for instructions for connecting the Link cables. 30 1 • Installation b. Connect the other end of the Mac mouse cable to the Audio Out port on your computer. 4. Audio In jack audio cable a. Connect the other end of the audio cable to the projector's Mouse/Com...
User Manual
Page 41
c. d. Connect the small terminal of the Macintosh desktop adapter to use (such as shown below) and set the DIP switches on the back of the video cable. Connect one end of the video-out cable that came with your Macintosh documentation for instructions. Remove the small cover (as 16-inch mode). b. See your PowerBook to the video-out connector on the Macintosh desktop adapter to select the resolutions you want to the other end of the PowerBook. 32 1 • Installation
c. d. Connect the small terminal of the Macintosh desktop adapter to use (such as shown below) and set the DIP switches on the back of the video cable. Connect one end of the video-out cable that came with your Macintosh documentation for instructions. Remove the small cover (as 16-inch mode). b. See your PowerBook to the video-out connector on the Macintosh desktop adapter to select the resolutions you want to the other end of the PowerBook. 32 1 • Installation

User Manual
Page 42
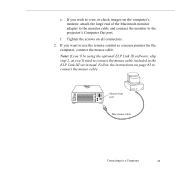
... of the PowerBook video-out cable to connect the mouse cable included in the ELP Link III set instead. Connect the other end of the projector's Mac mouse cable to the Mouse port on your laptop. Connecting to the projector's Mouse/Com port. Mouse/Com port Mac mouse cable a. b. Tighten the screws on... page 84 to use the remote control as you want to connect the mouse cable. Note: If you'll be using the optional ELP Link III software, skip step 2, as a mouse pointer for the laptop, connect the mouse cable. e. f. Follow the instructions on all the connectors. 2.
... of the PowerBook video-out cable to connect the mouse cable included in the ELP Link III set instead. Connect the other end of the projector's Mac mouse cable to the Mouse port on your laptop. Connecting to the projector's Mouse/Com port. Mouse/Com port Mac mouse cable a. b. Tighten the screws on... page 84 to use the remote control as you want to connect the mouse cable. Note: If you'll be using the optional ELP Link III software, skip step 2, as a mouse pointer for the laptop, connect the mouse cable. e. f. Follow the instructions on all the connectors. 2.

User Manual
Page 43
... video signal.) 34 1 • Installation Note: After you turn on the projector and computer, you are using the optional ELP Link III software, see Chapter 4 for instructions for details. (This step is not necessary on the LCD screen as well as the projector screen. 3. Connect the audio cable, if needed. If you may need to...
... video signal.) 34 1 • Installation Note: After you turn on the projector and computer, you are using the optional ELP Link III software, see Chapter 4 for instructions for details. (This step is not necessary on the LCD screen as well as the projector screen. 3. Connect the audio cable, if needed. If you may need to...
User Manual
Page 50
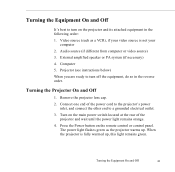
... to turn on the remote control or control panel. Press the Power button on the projector and its attached equipment in the reverse order. When the projector is not your computer 2. Projector (see instructions below) When you are ready to a grounded electrical outlet. 3. The power light flashes... green as a VCR), if your video source is fully warmed up . Connect one end of the projector and wait until the...
... to turn on the remote control or control panel. Press the Power button on the projector and its attached equipment in the reverse order. When the projector is not your computer 2. Projector (see instructions below) When you are ready to a grounded electrical outlet. 3. The power light flashes... green as a VCR), if your video source is fully warmed up . Connect one end of the projector and wait until the...

User Manual
Page 61
To use the remote control up to the projector and your computer. (See Chapter 1 for instructions.) You can use the remote control, point it towards the infrared receiver located at the front of -sight infrared signal. Note: To be able to ...use the remote control as a wireless mouse, make sure you have connected the mouse cable to 32.8 feet (10 meters) from the projector. (This...
To use the remote control up to the projector and your computer. (See Chapter 1 for instructions.) You can use the remote control, point it towards the infrared receiver located at the front of -sight infrared signal. Note: To be able to ...use the remote control as a wireless mouse, make sure you have connected the mouse cable to 32.8 feet (10 meters) from the projector. (This...

