Setup Guide
Page 6
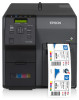
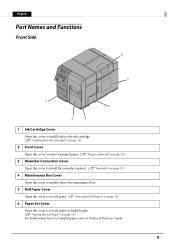
... Ink Cartridge" on page 13) 2 Front Cover Open this cover to remove jammed paper. (U "Paper is jammed" on page 25) 3 Rewinder Connection Cover Open this cover to install the rewinder (option). (U "Rewinder" on page 31) 4 Maintenance Box Cover Open this cover to install/replace the maintenance box. 5 Roll Paper Cover Open this cover...
... Ink Cartridge" on page 13) 2 Front Cover Open this cover to remove jammed paper. (U "Paper is jammed" on page 25) 3 Rewinder Connection Cover Open this cover to install the rewinder (option). (U "Rewinder" on page 31) 4 Maintenance Box Cover Open this cover to install/replace the maintenance box. 5 Roll Paper Cover Open this cover...
Setup Guide
Page 31
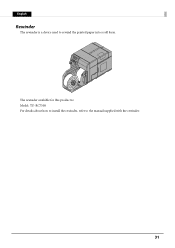
English Rewinder The rewinder is : Model: TU-RC7508 For details about how to install the rewinder, refer to rewind the printed paper into a roll form. The rewinder available for this product is a device used to the manual supplied with the rewinder. 31
English Rewinder The rewinder is : Model: TU-RC7508 For details about how to install the rewinder, refer to rewind the printed paper into a roll form. The rewinder available for this product is a device used to the manual supplied with the rewinder. 31
ESC/label Command List TM-C7500 Series
Page 26
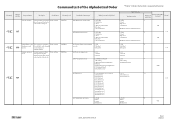
s = F/N/S F: Feed N: No feed S: Calibration *TM-C7500 performs calibration with priority. Printer setting ^MUu,i,o Feed to home position Feed to adjust the Media position of... calibration m: Print mode m = T/P/R/A/C T: No cutting P: Manual peeling and application R: Rewind A: Automatic peeling and application C: Cutting performed TM-C7500 series Definition range -48 ≤ d ≤ 48 e = Y/N Y: Set N: Cancel o = F/N/S F: Feed N: No feed S: Calibration *TM-C7500 performs calibration with "S". configuration ^MNs Enable/disable button Enables/disables buttons. Printer setting ^MFo...
s = F/N/S F: Feed N: No feed S: Calibration *TM-C7500 performs calibration with priority. Printer setting ^MUu,i,o Feed to home position Feed to adjust the Media position of... calibration m: Print mode m = T/P/R/A/C T: No cutting P: Manual peeling and application R: Rewind A: Automatic peeling and application C: Cutting performed TM-C7500 series Definition range -48 ≤ d ≤ 48 e = Y/N Y: Set N: Cancel o = F/N/S F: Feed N: No feed S: Calibration *TM-C7500 performs calibration with "S". configuration ^MNs Enable/disable button Enables/disables buttons. Printer setting ^MFo...
ESC/label Command List TM-C7500 Series
Page 29
...= T/P/R/A/C/D/F/L/U/K T: No cutting P: Manual peeling and application R: Rewind A: Automatic peeling and application C: Cutting performed D/F/L/U/K: Reserved TM-C7500 series Definition range c = F/N/S F: Feed N: No feed S: Calibration *TM-C7500 performs calibration with "S". Set print operation mode Sets print operations...Alphabetical Order 1"Priority" indicates the function is enabled/disabled. c = F/N/S F: Feed N: No feed S: Calibration *TM-C7500 performs calibration with "S". Printer setting ^S(CMN,b,c ^S(CMP,b,c b=H: Operation at change media c = C/F/L/N/S C: Calibration F: ...
...= T/P/R/A/C/D/F/L/U/K T: No cutting P: Manual peeling and application R: Rewind A: Automatic peeling and application C: Cutting performed D/F/L/U/K: Reserved TM-C7500 series Definition range c = F/N/S F: Feed N: No feed S: Calibration *TM-C7500 performs calibration with "S". Set print operation mode Sets print operations...Alphabetical Order 1"Priority" indicates the function is enabled/disabled. c = F/N/S F: Feed N: No feed S: Calibration *TM-C7500 performs calibration with "S". Printer setting ^S(CMN,b,c ^S(CMP,b,c b=H: Operation at change media c = C/F/L/N/S C: Calibration F: ...
ESC/label Command Reference Guide
Page 152
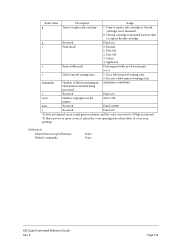
... ink cartridge is an opening state when either of cover is mounted and not time to replace the ink cartridge. q Reserved Fixed at 0 r Print mode 0: Rewind 1: Peel-Off 2: Tear-Off 3: Cutter 4: Applicator s Print width mode Print region width in the printer 000 to 999 xxxx Reserved Fixed at 0000 y Reserved Fixed...
... ink cartridge is an opening state when either of cover is mounted and not time to replace the ink cartridge. q Reserved Fixed at 0 r Print mode 0: Rewind 1: Peel-Off 2: Tear-Off 3: Cutter 4: Applicator s Print width mode Print region width in the printer 000 to 999 xxxx Reserved Fixed at 0000 y Reserved Fixed...
ESC/label Command Reference Guide
Page 179
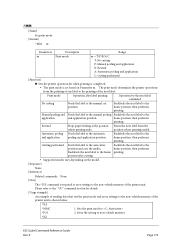
... ^MM [Name] Set print mode [Format] ^MM m Parameters Description Range m Print mode m = T/P/R/A/C T: No cutting P: Manual peeling and application R: Rewind A: Automatic peeling and application C: Cutting performed [Function] Sets the printer operation for details. [Usage example] An example of sending data that sets the...ends. home position, then performs printing. Sets the print mode to the printing of one label to . ^JUS 2. Rewind Stops paper feeding at the position Prints the next label from the printing of the next label. Automatic peeling Feeds the ...
... ^MM [Name] Set print mode [Format] ^MM m Parameters Description Range m Print mode m = T/P/R/A/C T: No cutting P: Manual peeling and application R: Rewind A: Automatic peeling and application C: Cutting performed [Function] Sets the printer operation for details. [Usage example] An example of sending data that sets the...ends. home position, then performs printing. Sets the print mode to the printing of one label to . ^JUS 2. Rewind Stops paper feeding at the position Prints the next label from the printing of the next label. Automatic peeling Feeds the ...
Technical Reference Guide
Page 11
... ...41 Turning Off...41 ■ Installing the Ink Cartridge 42 ■ Installing the Maintenance box 46 ■ REWINDER...49 How to install the REWINDER ...49 Removing the rewinder...50 Attaching the paper leading edge to the rewinder 50 ■ Setting the Paper...52 Setting the Roll Paper ...52 Setting the Fanfold Paper ...60 How...
... ...41 Turning Off...41 ■ Installing the Ink Cartridge 42 ■ Installing the Maintenance box 46 ■ REWINDER...49 How to install the REWINDER ...49 Removing the rewinder...50 Attaching the paper leading edge to the rewinder 50 ■ Setting the Paper...52 Setting the Roll Paper ...52 Setting the Fanfold Paper ...60 How...
Technical Reference Guide
Page 14
... Characteristics ...217 Reliability ...218 Environmental Conditions ...219 External Dimensions...220 ■ Consumable Product Specifications 223 Ink Cartridge...223 Maintenance Box ...223 ■ Option Specifications ...224 Rewinder (TU-RC7508) ...224 ■ LCD Display Specifications for the Number of Printed Copies 225 Display While Printing...225 Error Display While Printing ...225 Display When...
... Characteristics ...217 Reliability ...218 Environmental Conditions ...219 External Dimensions...220 ■ Consumable Product Specifications 223 Ink Cartridge...223 Maintenance Box ...223 ■ Option Specifications ...224 Rewinder (TU-RC7508) ...224 ■ LCD Display Specifications for the Number of Printed Copies 225 Display While Printing...225 Error Display While Printing ...225 Display When...
Technical Reference Guide
Page 15
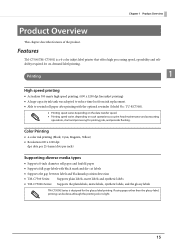
... after printing with black mark and die-cut labels Supports the gap between labels and blackmark position detection TM-C7500 Series: Supports plain labels, matte labels and synthetic labels TM-C7500G Series: Supports the plain labels, matte labels, synthetic...inch) Supporting diverse media types Supports 8-inch diameter roll paper and fanfold paper Supports full-page labels with the optional rewinder (Model No.: TU-RC7508). Printing speed varies depending on the data transfer speed. Printing speed varies depending on -demand label...
... after printing with black mark and die-cut labels Supports the gap between labels and blackmark position detection TM-C7500 Series: Supports plain labels, matte labels and synthetic labels TM-C7500G Series: Supports the plain labels, matte labels, synthetic...inch) Supporting diverse media types Supports 8-inch diameter roll paper and fanfold paper Supports full-page labels with the optional rewinder (Model No.: TU-RC7508). Printing speed varies depending on the data transfer speed. Printing speed varies depending on -demand label...
Technical Reference Guide
Page 18
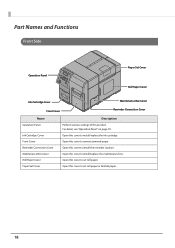
...Open this cover to remove jammed paper. Open this cover to install/replace the ink cartridge. Open this cover to install the rewinder (option). Open this product. Part Names and Functions Front Side Operation Panel Paper Set Cover Roll Paper Cover Ink Cartridge Cover ...Maintenance Box Cover Front Cover Rewinder Connection Cover Name Operation Panel Ink Cartridge Cover Front Cover Rewinder Connection Cover Maintenance Box Cover Roll Paper Cover Paper Set Cover Description Perform various settings of...
...Open this cover to remove jammed paper. Open this cover to install/replace the ink cartridge. Open this cover to install the rewinder (option). Open this product. Part Names and Functions Front Side Operation Panel Paper Set Cover Roll Paper Cover Ink Cartridge Cover ...Maintenance Box Cover Front Cover Rewinder Connection Cover Name Operation Panel Ink Cartridge Cover Front Cover Rewinder Connection Cover Maintenance Box Cover Roll Paper Cover Paper Set Cover Description Perform various settings of...
Technical Reference Guide
Page 20
... Pause button. When separating perforations of paper. After cutting the printed paper using the Cut button, hold down the Back Feed button to the rewinder, do so after pausing printer operations temporarily by pushing the Pause button or cutting the fanfold paper with the Cut button. 20 Name (Power) Button...
... Pause button. When separating perforations of paper. After cutting the printed paper using the Cut button, hold down the Back Feed button to the rewinder, do so after pausing printer operations temporarily by pushing the Pause button or cutting the fanfold paper with the Cut button. 20 Name (Power) Button...
Technical Reference Guide
Page 34
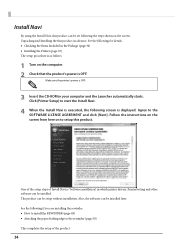
.... Click [Printer Setup] to setup this product can be setup without installation. See the following if you are installing the rewinder. How to install the REWINDER (page 49) Attaching the paper leading edge to the SOFTWARE LICENSE AGREEMENT and click [Next]. Make sure the printer...'s power is OFF. Agree to the rewinder (page 50) This completes the setup of Install Navi is displayed. Also, the software can be installed. Install Navi By using the Install ...
.... Click [Printer Setup] to setup this product can be setup without installation. See the following if you are installing the rewinder. How to install the REWINDER (page 49) Attaching the paper leading edge to the SOFTWARE LICENSE AGREEMENT and click [Next]. Make sure the printer...'s power is OFF. Agree to the rewinder (page 50) This completes the setup of Install Navi is displayed. Also, the software can be installed. Install Navi By using the Install ...
Technical Reference Guide
Page 35
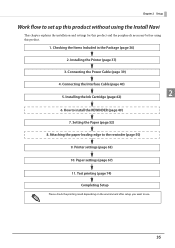
... settings (page 63) 10. Test printing (page 74) Completing Setup Please check the printing result depending on the environment after setup, you want to the rewinder (page 50) 9. Attaching the paper leading edge to use. 35 Paper settings (page 67) 11. Installing the Printer (page 37) 3. Connecting the Interface Cable (page... This chapter explains the installation and settings for this product and the peripherals necessary before using this product. 1. Chapter 2 Setup Work flow to install the REWINDER (page 49) 7. Connecting the Power Cable (page 39) 4.
... settings (page 63) 10. Test printing (page 74) Completing Setup Please check the printing result depending on the environment after setup, you want to the rewinder (page 50) 9. Attaching the paper leading edge to use. 35 Paper settings (page 67) 11. Installing the Printer (page 37) 3. Connecting the Interface Cable (page... This chapter explains the installation and settings for this product and the peripherals necessary before using this product. 1. Chapter 2 Setup Work flow to install the REWINDER (page 49) 7. Connecting the Power Cable (page 39) 4.
Technical Reference Guide
Page 49
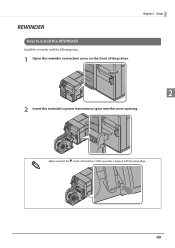
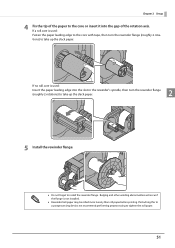
REWINDER How to install the REWINDER Install the rewinder with the following steps. 1 Open the rewinder connection cover on the front of the rewinder is aligned with the plate edge. 49 Make sure that the mark at the bottom of the printer. Chapter 2 Setup 2 2 Insert the rewinder's power transmission gear into the cover opening.
REWINDER How to install the REWINDER Install the rewinder with the following steps. 1 Open the rewinder connection cover on the front of the rewinder is aligned with the plate edge. 49 Make sure that the mark at the bottom of the printer. Chapter 2 Setup 2 2 Insert the rewinder's power transmission gear into the cover opening.
Technical Reference Guide
Page 50
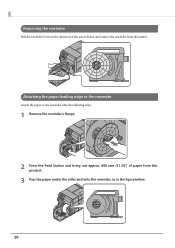
Removing the rewinder Pull the rewinder's lever in the direction of paper from this product. 3 Pass the paper under the roller and onto the rewinder, as in the figure below , and remove the rewinder from the printer. Attaching the paper leading edge to the rewinder Attach the paper to the rewinder with the following steps. 1 Remove the rewinder's flange. 2 Press the Feed button and bring out approx. 800 mm {31.50"} of the arrow below . 50
Removing the rewinder Pull the rewinder's lever in the direction of paper from this product. 3 Pass the paper under the roller and onto the rewinder, as in the figure below , and remove the rewinder from the printer. Attaching the paper leading edge to the rewinder Attach the paper to the rewinder with the following steps. 1 Remove the rewinder's flange. 2 Press the Feed button and bring out approx. 800 mm {31.50"} of the arrow below . 50
Technical Reference Guide
Page 51
... paper. 51 If no roll core is used : Fasten the paper leading edge to the core with tape, then turn the rewinder flange (roughly 2 rotations) to take up the slack paper. 2 5 Install the rewinder flange. Do not forget to take up the slack paper. If a roll core is not installed. ...; Rewinded roll paper may be rolled more loosely than roll paper before printing. Chapter 2 Setup 4 Fix the tip of the rotation axis. If attaching this to a ...
... paper. 51 If no roll core is used : Fasten the paper leading edge to the core with tape, then turn the rewinder flange (roughly 2 rotations) to take up the slack paper. 2 5 Install the rewinder flange. Do not forget to take up the slack paper. If a roll core is not installed. ...; Rewinded roll paper may be rolled more loosely than roll paper before printing. Chapter 2 Setup 4 Fix the tip of the rotation axis. If attaching this to a ...
Technical Reference Guide
Page 62
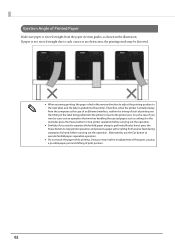
... shifting of print position. 62 Ejection Angle of Printed Paper Make sure paper is ejected straight from the paper ejection guides, as shown in the rewinder, press the Pause button to stop printer operation before carrying out the operation. Similarly, if you want to carry out an operation that involves...
... shifting of print position. 62 Ejection Angle of Printed Paper Make sure paper is ejected straight from the paper ejection guides, as shown in the rewinder, press the Pause button to stop printer operation before carrying out the operation. Similarly, if you want to carry out an operation that involves...
Technical Reference Guide
Page 165
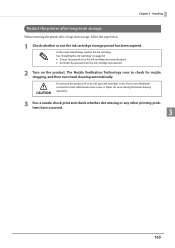
CAUTION Do not turn the product off or do not open Ink cartridge cover, Front cover, Rewinder connection cover, Maintenance box cover, or Paper set cover during the head cleaning operation. 3 Run a nozzle check print and check whether dot missing or any ...
CAUTION Do not turn the product off or do not open Ink cartridge cover, Front cover, Rewinder connection cover, Maintenance box cover, or Paper set cover during the head cleaning operation. 3 Run a nozzle check print and check whether dot missing or any ...
Technical Reference Guide
Page 191
... the Maintenance box. CD-ROM Web 4 191 Describes all information necessary for the first time and charging ink. rewinder TM-C7500 Series / TM-C7500G Series Technical Reference Guide This document. Maintenance box with the rewinder TU-RC7508 User's manual Describes cautionary items and the installation procedure Included with the product Setup Guide Explains...
... the Maintenance box. CD-ROM Web 4 191 Describes all information necessary for the first time and charging ink. rewinder TM-C7500 Series / TM-C7500G Series Technical Reference Guide This document. Maintenance box with the rewinder TU-RC7508 User's manual Describes cautionary items and the installation procedure Included with the product Setup Guide Explains...
Technical Reference Guide
Page 222
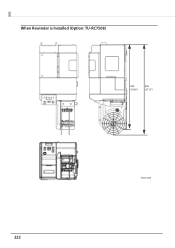
When Rewinder is Installed (Option: TU-RC7508) 900 {35.43"} 958 {37.72"} 222 [Unit: mm]
When Rewinder is Installed (Option: TU-RC7508) 900 {35.43"} 958 {37.72"} 222 [Unit: mm]
