
User Manual
Page 5
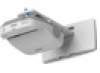
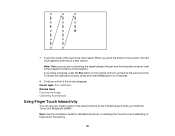
... Keystone Buttons 81 Correcting Image Shape with Quick Corner 84 Resizing the Image with the Wide and Tele Buttons 85 Adjusting the Image Position ...86 Focusing the Image...87 Remote Control Operation ...88 Using the Remote Control as a Wireless Mouse 90 Using the Remote Control as a Pointer 91 Selecting an Image...
... Keystone Buttons 81 Correcting Image Shape with Quick Corner 84 Resizing the Image with the Wide and Tele Buttons 85 Adjusting the Image Position ...86 Focusing the Image...87 Remote Control Operation ...88 Using the Remote Control as a Wireless Mouse 90 Using the Remote Control as a Pointer 91 Selecting an Image...
User Manual
Page 21
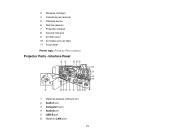
Interface Panel 1 Optional wireless LAN unit slot 2 Audio1 port 3 Computer1 port 4 Audio2 port 5 USB-B port 6 Network (LAN) port 21 3 Wireless LAN light 4 Interactive pen receiver 5 Obstacle sensor 6 Remote receiver 7 Projection window 8 Security lock port 9 Air filter cover 10 Air intake vent (air filter) 11 Focus lever Parent topic: Projector Part Locations Projector Parts -
Interface Panel 1 Optional wireless LAN unit slot 2 Audio1 port 3 Computer1 port 4 Audio2 port 5 USB-B port 6 Network (LAN) port 21 3 Wireless LAN light 4 Interactive pen receiver 5 Obstacle sensor 6 Remote receiver 7 Projection window 8 Security lock port 9 Air filter cover 10 Air intake vent (air filter) 11 Focus lever Parent topic: Projector Part Locations Projector Parts -

User Manual
Page 77
... Off the Projector Selecting the Language for the Projector Menus Image Shape Resizing the Image with the Wide and Tele Buttons Adjusting the Image Position Focusing the Image Remote Control Operation Selecting an Image Source Projection Modes Image Aspect Ratio Color Mode Controlling the Volume with the Volume Buttons Projecting a PC...
... Off the Projector Selecting the Language for the Projector Menus Image Shape Resizing the Image with the Wide and Tele Buttons Adjusting the Image Position Focusing the Image Remote Control Operation Selecting an Image Source Projection Modes Image Aspect Ratio Color Mode Controlling the Volume with the Volume Buttons Projecting a PC...

User Manual
Page 87
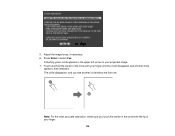
3. Note: You can display a pattern to aid in adjusting the projected image using the Settings menu. 2. Turn on the side of the projector. 3. Note: You can also use the Settings menu to open the air filter cover on the projector and display an image. Slide the switch to adjust the Image Shift setting. Parent topic: Using Basic Projector Features Related references Projector Feature Settings - Use the arrow buttons on the projector or remote control to sharpen the image. 87 Settings Menu Focusing the Image 1. Raise or lower the focus lever to adjust the image position.
3. Note: You can display a pattern to aid in adjusting the projected image using the Settings menu. 2. Turn on the side of the projector. 3. Note: You can also use the Settings menu to open the air filter cover on the projector and display an image. Slide the switch to adjust the Image Shift setting. Parent topic: Using Basic Projector Features Related references Projector Feature Settings - Use the arrow buttons on the projector or remote control to sharpen the image. 87 Settings Menu Focusing the Image 1. Raise or lower the focus lever to adjust the image position.
User Manual
Page 127
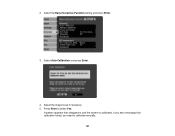
Adjust the image focus if necessary. 5. Press Enter to calibrate manually. 127 Select the Easy Interactive Function setting and press Enter. 3. A pattern appears then disappears, and the system is calibrated. 2. Select Auto Calibration and press Enter. 4. If you see a message that calibration failed, you need to select Yes.
Adjust the image focus if necessary. 5. Press Enter to calibrate manually. 127 Select the Easy Interactive Function setting and press Enter. 3. A pattern appears then disappears, and the system is calibrated. 2. Select Auto Calibration and press Enter. 4. If you see a message that calibration failed, you need to select Yes.
User Manual
Page 128
The cursor location and pen position should match after auto calibration, you may need to calibrate manually. If not, you can calibrate manually. 1. Parent topic: Pen Calibration Related tasks Calibrating Manually Focusing the Image Calibrating Manually If the cursor location and pen position do not match after calibration. Press the Menu button, select the Extended menu, and press Enter. 128
The cursor location and pen position should match after auto calibration, you may need to calibrate manually. If not, you can calibrate manually. 1. Parent topic: Pen Calibration Related tasks Calibrating Manually Focusing the Image Calibrating Manually If the cursor location and pen position do not match after calibration. Press the Menu button, select the Extended menu, and press Enter. 128

User Manual
Page 129
Select Manual Calibration and press Enter. 4. Touch the center of the circle with the tip of your projected image. 6. 2. Press Enter to select Yes. Adjust the image focus if necessary. 5. A flashing green circle appears in the upper left corner of the pen. 129 Select the Easy Interactive Function setting and press Enter. 3.
Select Manual Calibration and press Enter. 4. Touch the center of the circle with the tip of your projected image. 6. 2. Press Enter to select Yes. Adjust the image focus if necessary. 5. A flashing green circle appears in the upper left corner of the pen. 129 Select the Easy Interactive Function setting and press Enter. 3.
User Manual
Page 131
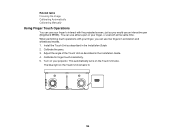
... installing the Touch Unit and calibrating for 2 seconds. 8. 7. If you make a mistake, press the Esc button on the projector). Parent topic: Pen Calibration Related tasks Focusing the Image Calibrating Automatically Using Finger Touch Interactivity You can use your finger to the previous circle. Continue until all of the next circle, then... (next to the bottom of the column, the next circle appears at the top of a new column. Note: Make sure you install the Touch Unit (BrightLink 595Wi).
... installing the Touch Unit and calibrating for 2 seconds. 8. 7. If you make a mistake, press the Esc button on the projector). Parent topic: Pen Calibration Related tasks Focusing the Image Calibrating Automatically Using Finger Touch Interactivity You can use your finger to the previous circle. Continue until all of the next circle, then... (next to the bottom of the column, the next circle appears at the top of a new column. Note: Make sure you install the Touch Unit (BrightLink 595Wi).
User Manual
Page 136
A flashing green circle appears in the upper left corner of your finger until the circle disappears and another circle below the first one. Touch and hold the center of the circle with the tip of the circle with your projected image. 7. 5. Note: For the most accurate calibration, make sure you see another circle appears, then release it. The circle disappears, and you touch the center of your finger. 136 Press Enter to select Yes. Adjust the image focus, if necessary. 6.
A flashing green circle appears in the upper left corner of your finger until the circle disappears and another circle below the first one. Touch and hold the center of the circle with the tip of the circle with your projected image. 7. 5. Note: For the most accurate calibration, make sure you see another circle appears, then release it. The circle disappears, and you touch the center of your finger. 136 Press Enter to select Yes. Adjust the image focus, if necessary. 6.
User Manual
Page 138
... you can use either a pen or your projector. When performing touch operations with the projected screen, just as described in the Installation Guide. 4. Related tasks Focusing the Image Calibrating Automatically Calibrating Manually Using Finger Touch Operations You can use your finger to interact with your finger, you would use an interactive...
... you can use either a pen or your projector. When performing touch operations with the projected screen, just as described in the Installation Guide. 4. Related tasks Focusing the Image Calibrating Automatically Calibrating Manually Using Finger Touch Operations You can use your finger to interact with your finger, you would use an interactive...

User Manual
Page 163
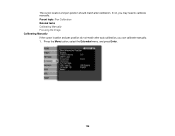
... or line pattern to display User Pattern: captures a projected screen and saves it as a pattern for display Test Pattern: displays a test pattern to assist in focusing and zooming the image and correcting image shape Parent topic: Adjusting the Menu Settings Projector Setup Settings - Setting User Button Pattern Options Power Consumption Info...
... or line pattern to display User Pattern: captures a projected screen and saves it as a pattern for display Test Pattern: displays a test pattern to assist in focusing and zooming the image and correcting image shape Parent topic: Adjusting the Menu Settings Projector Setup Settings - Setting User Button Pattern Options Power Consumption Info...

User Manual
Page 208
... contain electronic interference (noise) or static, try decreasing the Sharpness setting to improve image quality. 208 Note: Adjusting Quick Corner and Keystone settings may affect focus and pen calibration.
... contain electronic interference (noise) or static, try decreasing the Sharpness setting to improve image quality. 208 Note: Adjusting Quick Corner and Keystone settings may affect focus and pen calibration.

User Manual
Page 209
...or Blurry If the projected image is too dark or light, or the colors are incorrect, try the following solutions: • Adjust the image focus. • Check the projector lens cover glass for the image and environment. 209 Note: To avoid condensation on the lens after bringing the projector... that it caused interference in the signal. • If you are using the USB Display function, turn off the Transfer layered window setting in the Epson USB Display Settings program on the screen and manually adjust the Tracking and Sync settings. • If you are projecting from a computer, use a...
...or Blurry If the projected image is too dark or light, or the colors are incorrect, try the following solutions: • Adjust the image focus. • Check the projector lens cover glass for the image and environment. 209 Note: To avoid condensation on the lens after bringing the projector... that it caused interference in the signal. • If you are using the USB Display function, turn off the Transfer layered window setting in the Epson USB Display Settings program on the screen and manually adjust the Tracking and Sync settings. • If you are projecting from a computer, use a...
User Manual
Page 221
... ratio Image size Projection distance Projection methods Optical aspect ratio (width-to-height) Focus adjustment Zoom adjustment Zoom ratio (Tele-to-Wide) Internal sound system Noise level Keystone correction angle USB-B port compatibility USB-A port compatibility BrightLink 585Wi/595Wi: Normal Power Consumption mode: White light output 3300 lumens (ISO 21118 standard... compliant port for USB display, external mouse, or firmware update One USB 1.1 and 2.0 compliant port for USB device input, wireless LAN unit, or Epson document camera display Parent topic: Technical Specifications 221
... ratio Image size Projection distance Projection methods Optical aspect ratio (width-to-height) Focus adjustment Zoom adjustment Zoom ratio (Tele-to-Wide) Internal sound system Noise level Keystone correction angle USB-B port compatibility USB-A port compatibility BrightLink 585Wi/595Wi: Normal Power Consumption mode: White light output 3300 lumens (ISO 21118 standard... compliant port for USB display, external mouse, or firmware update One USB 1.1 and 2.0 compliant port for USB device input, wireless LAN unit, or Epson document camera display Parent topic: Technical Specifications 221
Installation Guide
Page 4
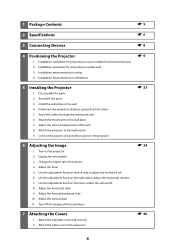
... aspect ratio if necessary 4. Attach the wall plate cover and end cap 2. 1 Package Contents s5 2 Specifications s6 3 Connecting Devices s8 4 Positioning the Projector 1. Adjust the focus 5. Attach the cable cover to adjust the vertical tilt 8. Attach the mount arm to the wall plate 7. Turn on a plain wall 3.
... aspect ratio if necessary 4. Attach the wall plate cover and end cap 2. 1 Package Contents s5 2 Specifications s6 3 Connecting Devices s8 4 Positioning the Projector 1. Adjust the focus 5. Attach the cable cover to adjust the vertical tilt 8. Attach the mount arm to the wall plate 7. Turn on a plain wall 3.
Installation Guide
Page 36
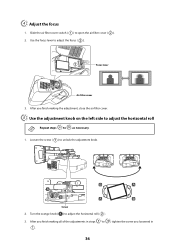
... E Use the adjustment knob on the left side to adjust the horizontal roll E J Repeat steps to adjust the focus ( ). After you loosened in steps to adjust the horizontal roll ( ). Focus lever Air filter cover 3. E J 3. Slide the air filter cover switch ( ) to unlock the adjustment knob.... Loosen the screw ( ) to open the air filter cover ( ). 2. Screw 2. D Adjust the focus 1. Turn the orange knob ( ) to , tighten...
... E Use the adjustment knob on the left side to adjust the horizontal roll E J Repeat steps to adjust the focus ( ). After you loosened in steps to adjust the horizontal roll ( ). Focus lever Air filter cover 3. E J 3. Slide the air filter cover switch ( ) to unlock the adjustment knob.... Loosen the screw ( ) to open the air filter cover ( ). 2. Screw 2. D Adjust the focus 1. Turn the orange knob ( ) to , tighten...