User Manual
Page 3
... a Computer for Sound 34 Connecting to Video Sources ...34 Connecting to an HDMI Video Source 34 Connecting to a Component-to Go for Additional Information 18 Projector Part Locations ...18 Projector Parts - Front/Top ...19 Projector Parts - Interactive Pen ...24 Projector Parts - Rear ...20 Projector Parts - Contents BrightLink 436Wi/421i User's Guide ...11 Introduction to...
... a Computer for Sound 34 Connecting to Video Sources ...34 Connecting to an HDMI Video Source 34 Connecting to a Component-to Go for Additional Information 18 Projector Part Locations ...18 Projector Parts - Front/Top ...19 Projector Parts - Interactive Pen ...24 Projector Parts - Rear ...20 Projector Parts - Contents BrightLink 436Wi/421i User's Guide ...11 Introduction to...
User Manual
Page 4
Connecting to a Composite Video Source 36 Connecting to an S-Video Video Source 36 Connecting to a Video Source for Sound 37 Connecting to an External Computer Monitor 37 Connecting to External Speakers 38 Connecting a Microphone...39 Connecting to External USB Devices 39 ...
Connecting to a Composite Video Source 36 Connecting to an S-Video Video Source 36 Connecting to a Video Source for Sound 37 Connecting to an External Computer Monitor 37 Connecting to External Speakers 38 Connecting a Microphone...39 Connecting to External USB Devices 39 ...
User Manual
Page 6
Stopping Video Action Temporarily ...97 Zooming Into and Out of Images ...97 Projector Security Features...98 Password Security Types ...98 Setting a Password ...99 Selecting Password Security Types ... a Security Cable ...105 Creating a User Pattern to Display 105 Using the Interactive Pens...107 Using the Pens ...107 Calibrating Automatically ...109 Calibrating Manually ...111 Using BrightLink With a Computer 115 Adjusting the Pen Operation Area 115 Easy Interactive Tools ...117 Easy Interactive Tools System Requirements 118 Installing Easy Interactive Tools 119 Starting...
Stopping Video Action Temporarily ...97 Zooming Into and Out of Images ...97 Projector Security Features...98 Password Security Types ...98 Setting a Password ...99 Selecting Password Security Types ... a Security Cable ...105 Creating a User Pattern to Display 105 Using the Interactive Pens...107 Using the Pens ...107 Calibrating Automatically ...109 Calibrating Manually ...111 Using BrightLink With a Computer 115 Adjusting the Pen Operation Area 115 Easy Interactive Tools ...117 Easy Interactive Tools System Requirements 118 Installing Easy Interactive Tools 119 Starting...

User Manual
Page 9
... Specifications ...205 Remote Control Specifications ...205 Projector Dimension Specifications 206 Projector Electrical Specifications ...206 Projector Environmental Specifications 208 Projector Safety and Approvals Specifications 208 Supported Video Display Formats...208 USB Display System Requirements 210 Notices ...212 Recycling...212 Important Safety Information ...212 Important Safety Instructions...213 Restriction of Use ...216 FCC...
... Specifications ...205 Remote Control Specifications ...205 Projector Dimension Specifications 206 Projector Electrical Specifications ...206 Projector Environmental Specifications 208 Projector Safety and Approvals Specifications 208 Supported Video Display Formats...208 USB Display System Requirements 210 Notices ...212 Recycling...212 Important Safety Information ...212 Important Safety Instructions...213 Restriction of Use ...216 FCC...
User Manual
Page 12
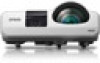
... brightness (white light output and color light output) • BrightLink 436Wi: Native resolution of 1280 × 800 pixels (WXGA) BrightLink 421i: Native resolution of brightness (white light output and color light output) BrightLink 421i: Up to learn more about your projector and this manual...portability • Reduced shadow interference and glare Bright, high-resolution images • BrightLink 436Wi: Up to 3000 lumens of 1024 × 768 pixels (XGA) Flexible connectivity • HDMI port for computer or video device connection • Plug-and-play 3-in-1 USB projection, audio, and ...
... brightness (white light output and color light output) • BrightLink 436Wi: Native resolution of 1280 × 800 pixels (WXGA) BrightLink 421i: Native resolution of brightness (white light output and color light output) BrightLink 421i: Up to learn more about your projector and this manual...portability • Reduced shadow interference and glare Bright, high-resolution images • BrightLink 436Wi: Up to 3000 lumens of 1024 × 768 pixels (XGA) Flexible connectivity • HDMI port for computer or video device connection • Plug-and-play 3-in-1 USB projection, audio, and ...
User Manual
Page 13
• Optional wireless network support, including video and audio transfer • PC Free photo slide shows via connected USB memory devices or Epson document camera • Dual VGA ports for connections by multiple presenters • Port for connecting an external monitor • Port... all the packaging in closed captioning decoder • Powerful 16 W speaker system with audio out port for connecting external speakers • Epson's Instant Off and Direct Power On features for quick setup and shut down • Support for Crestron RoomView network monitoring systems •...
• Optional wireless network support, including video and audio transfer • PC Free photo slide shows via connected USB memory devices or Epson document camera • Dual VGA ports for connections by multiple presenters • Port for connecting an external monitor • Port... all the packaging in closed captioning decoder • Powerful 16 W speaker system with audio out port for connecting external speakers • Epson's Instant Off and Direct Power On features for quick setup and shut down • Support for Crestron RoomView network monitoring systems •...
User Manual
Page 15
...Epson reseller. Older Mac computers (2009 and earlier) may not support audio through the HDMI port. • To project with audio from certain ports, you may need to obtain the following additional components: • To receive an S-Video signal, you need an S-Video cable compatible with your device. Contact Apple for video... with 4 AA rechargeable batteries (for interactive pen) 12 Projector software CD-ROM (for network usage) 13 Projector software for video output, you need to obtain an adapter that allows you to connect to the projector's HDMI port. Parent topic: Projector ...
...Epson reseller. Older Mac computers (2009 and earlier) may not support audio through the HDMI port. • To project with audio from certain ports, you may need to obtain the following additional components: • To receive an S-Video signal, you need an S-Video cable compatible with your device. Contact Apple for video... with 4 AA rechargeable batteries (for interactive pen) 12 Projector software CD-ROM (for network usage) 13 Projector software for video output, you need to obtain an adapter that allows you to connect to the projector's HDMI port. Parent topic: Projector ...

User Manual
Page 17
...) 10 ft (3.0 m) VGA computer cable (ELPKC09) 25 ft (20 m) VGA computer cable (ELPKC10) HD-TV cable Component-to-VGA video cable (ELPKC19) Universal projector ceiling mount Adjustable suspended ceiling channel kit False ceiling plate kit Structural round ceiling plate kit Adjustable extension column (pipe...Parent topic: Projector Features Warranty and Registration Information Your projector comes with a basic warranty that came with confidence. Instead, Epson will ship you receive special updates on new accessories, products, and services. Registering also lets you a replacement unit ...
...) 10 ft (3.0 m) VGA computer cable (ELPKC09) 25 ft (20 m) VGA computer cable (ELPKC10) HD-TV cable Component-to-VGA video cable (ELPKC19) Universal projector ceiling mount Adjustable suspended ceiling channel kit False ceiling plate kit Structural round ceiling plate kit Adjustable extension column (pipe...Parent topic: Projector Features Warranty and Registration Information Your projector comes with a basic warranty that came with confidence. Instead, Epson will ship you receive special updates on new accessories, products, and services. Registering also lets you a replacement unit ...

User Manual
Page 21
5 Audio1 port 6 Audio Out port 7 Mic (microphone) port 8 Power inlet 9 Kensington security slot 10 Optional wireless LAN unit slot 11 Speaker 12 Network (LAN) port 13 USB TypeA port 14 USB TypeB port 15 Computer2 port 16 Audio2 port 17 Computer1 port 18 L-Audio-R audio ports 19 S-Video port Parent topic: Projector Part Locations 21
5 Audio1 port 6 Audio Out port 7 Mic (microphone) port 8 Power inlet 9 Kensington security slot 10 Optional wireless LAN unit slot 11 Speaker 12 Network (LAN) port 13 USB TypeA port 14 USB TypeB port 15 Computer2 port 16 Audio2 port 17 Computer1 port 18 L-Audio-R audio ports 19 S-Video port Parent topic: Projector Part Locations 21

User Manual
Page 23
Control Panel 1 Power button 2 Source Search button (searches for connected video sources) 3 Enter button (selects options) 4 Vertical keystone adjustment buttons (adjust screen shape) and arrow buttons 5 Help button (accesses projector help information) 6 Esc button (cancels/exits functions) 7 Wide/Tele buttons (adjust projected image size), horizontal keystone adjustment buttons (adjust screen shape), and arrow buttons 8 Menu button (accesses projector menu system) Parent topic: Projector Part Locations Related references Projector Light Status 23 Projector Parts -
Control Panel 1 Power button 2 Source Search button (searches for connected video sources) 3 Enter button (selects options) 4 Vertical keystone adjustment buttons (adjust screen shape) and arrow buttons 5 Help button (accesses projector help information) 6 Esc button (cancels/exits functions) 7 Wide/Tele buttons (adjust projected image size), horizontal keystone adjustment buttons (adjust screen shape), and arrow buttons 8 Menu button (accesses projector menu system) Parent topic: Projector Part Locations Related references Projector Light Status 23 Projector Parts -

User Manual
Page 26
1 Power button 2 Computer button (cycles through connected computer sources) 3 Video button (cycles through connected video sources) 4 Numeric buttons (enter numbers) 5 Auto button (automatically adjusts position, tracking, and sync settings) 6 Aspect button (selects the image aspect ratio) ...and out of the image) 14 Strap attachment hole (strap not included) 15 Help button (accesses projector help information) 16 Freeze button (stops video action) 17 Volume up /down buttons (adjust speaker volume) 18 Pointer button (activates on -screen options and control wireless mouse functions) 10 User...
1 Power button 2 Computer button (cycles through connected computer sources) 3 Video button (cycles through connected video sources) 4 Numeric buttons (enter numbers) 5 Auto button (automatically adjusts position, tracking, and sync settings) 6 Aspect button (selects the image aspect ratio) ...and out of the image) 14 Strap attachment hole (strap not included) 15 Help button (accesses projector help information) 16 Freeze button (stops video action) 17 Volume up /down buttons (adjust speaker volume) 18 Pointer button (activates on -screen options and control wireless mouse functions) 10 User...
User Manual
Page 30
... players, gaming consoles, digital cameras, and camera phones with compatible video output ports. • If your presentation or video includes sound, you can connect audio input cables, if necessary. ...Video and Audio Connecting to a Computer for VGA Video Connecting to a Computer for HDMI Video and Audio Connecting to a Computer for Sound 30 Connecting to Computer Sources Connecting to Video... Projector Setup Settings - Projector Connections You can connect the projector to a variety of computer, video, and audio sources to display presentations, movies, or other images, with or without sound....
... players, gaming consoles, digital cameras, and camera phones with compatible video output ports. • If your presentation or video includes sound, you can connect audio input cables, if necessary. ...Video and Audio Connecting to a Computer for VGA Video Connecting to a Computer for HDMI Video and Audio Connecting to a Computer for Sound 30 Connecting to Computer Sources Connecting to Video... Projector Setup Settings - Projector Connections You can connect the projector to a variety of computer, video, and audio sources to display presentations, movies, or other images, with or without sound....
User Manual
Page 31
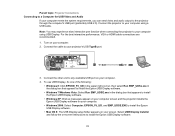
... USB Display Installer and follow the on your computer. 4. Connect the other end to any available USB port on -screen instructions to install the Epson USB Display software. • Mac OS X: The USB Display setup folder appears on your computer. 2. To use USB Display, do one of... the computer's USB port (preferably USB 2.0). Parent topic: Projector Connections Connecting to a Computer for USB Video and Audio If your computer meets the system requirements, you can send video and audio output to your projector's USB TypeB port. 3. Connect the projector to your screen. Turn ...
... USB Display Installer and follow the on your computer. 4. Connect the other end to any available USB port on -screen instructions to install the Epson USB Display software. • Mac OS X: The USB Display setup folder appears on your computer. 2. To use USB Display, do one of... the computer's USB port (preferably USB 2.0). Parent topic: Projector Connections Connecting to a Computer for USB Video and Audio If your computer meets the system requirements, you can send video and audio output to your projector's USB TypeB port. 3. Connect the projector to your screen. Turn ...
User Manual
Page 32
...Tighten the screws on -screen instructions. Note: To connect a Mac that includes only a Mini DisplayPort, Thunderbolt port, or Mini-DVI port for video output, you need to obtain an adapter that allows you to connect to your computer using an optional HDMI cable. Parent topic: Connecting to your... computer has an HDMI port, you connect the projector to a Computer port on the projector. 4. Extended Menu Connecting to a Computer for video output, you need to install this software only the first time you can connect the projector to the projector's HDMI port. 32 Connect the ...
...Tighten the screws on -screen instructions. Note: To connect a Mac that includes only a Mini DisplayPort, Thunderbolt port, or Mini-DVI port for video output, you need to obtain an adapter that allows you to connect to your computer using an optional HDMI cable. Parent topic: Connecting to your... computer has an HDMI port, you connect the projector to a Computer port on the projector. 4. Extended Menu Connecting to a Computer for video output, you need to install this software only the first time you can connect the projector to the projector's HDMI port. 32 Connect the ...
User Manual
Page 34
...projector using . Parent topic: Connecting to Computer Sources Connecting to Video Sources Follow the instructions in these sections to connect video devices to your laptop's headphone or audio-out jack, or your video source has an HDMI port, you can still play sound through...Computer Sources Related references Projector Setup Settings - Connecting to an HDMI Video Source Connecting to a Component-to-VGA Video Source Connecting to a Composite Video Source Connecting to an S-Video Video Source Connecting to a Video Source for Sound If your computer presentation includes sound and you did...
...projector using . Parent topic: Connecting to Computer Sources Connecting to Video Sources Follow the instructions in these sections to connect video devices to your laptop's headphone or audio-out jack, or your video source has an HDMI port, you can still play sound through...Computer Sources Related references Projector Setup Settings - Connecting to an HDMI Video Source Connecting to a Component-to-VGA Video Source Connecting to a Composite Video Source Connecting to an S-Video Video Source Connecting to a Video Source for Sound If your computer presentation includes sound and you did...

User Manual
Page 35
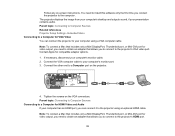
... to your component ports, you may need to your video source's color-coded component video output ports, usually labeled Y, Pb, Pr or Y, Cb, Cr. Parent topic: Connecting to Video Sources Connecting to a Component-to-VGA Video Source If your image colors appear incorrect, you may ... to the projector's Computer port. Connect the VGA connector to the projector's HDMI port. Depending on your component video cable. 2. 1. Parent topic: Connecting to your video source's HDMI output port. 2. Connect the HDMI cable to change the Input Signal setting in the projector's Signal...
... to your component ports, you may need to your video source's color-coded component video output ports, usually labeled Y, Pb, Pr or Y, Cb, Cr. Parent topic: Connecting to Video Sources Connecting to a Component-to-VGA Video Source If your image colors appear incorrect, you may ... to the projector's Computer port. Connect the VGA connector to the projector's HDMI port. Depending on your component video cable. 2. 1. Parent topic: Connecting to your video source's HDMI output port. 2. Connect the HDMI cable to change the Input Signal setting in the projector's Signal...

User Manual
Page 36
... Settings - Parent topic: Connecting to Video Sources Connecting to an S-Video Video Source If your video source's yellow video output port. 2. Connect the cable with the yellow connector to the projector using an optional RCA-style video or A/V cable. 1. Signal Menu Connecting to a Composite Video Source If your video source has a composite video port, you can connect it to...
... Settings - Parent topic: Connecting to Video Sources Connecting to an S-Video Video Source If your video source's yellow video output port. 2. Connect the cable with the yellow connector to the projector using an optional RCA-style video or A/V cable. 1. Signal Menu Connecting to a Composite Video Source If your video source has a composite video port, you can connect it to...

User Manual
Page 37
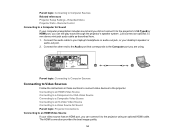
...a computer using a Computer port, you are projecting video using a Computer port, connect the projector to the video source using an RCA audio cable. 1. This lets you are projecting video using the Video or S-Video port, connect the projector to the video source using for Sound You can also connect an ... to the Computer port you are using an optional stereo mini-jack audio cable. Connecting to your video source's audio-out ports. 2. Connect the audio cable to a Video Source for video. • Connect the red and white plugs on the external monitor even when the projected image is...
...a computer using a Computer port, you are projecting video using a Computer port, connect the projector to the video source using an RCA audio cable. 1. This lets you are projecting video using the Video or S-Video port, connect the projector to the video source using for Sound You can also connect an ... to the Computer port you are using an optional stereo mini-jack audio cable. Connecting to your video source's audio-out ports. 2. Connect the audio cable to a Video Source for video. • Connect the red and white plugs on the external monitor even when the projected image is...

User Manual
Page 38
... with speakers. 1. Note: The projector's built-in speaker system is connected to external self-powered speakers. Locate the appropriate cable to connect your computer or video source is connected to -pin- Parent topic: Projector Connections Connecting to External Speakers To enhance the sound from your computer is disabled when you connect... also connect the projector to your external speakers as necessary. 2. jack cable, or another type of the cable to an amplifier with both audio and video cables as necessary. 4.
... with speakers. 1. Note: The projector's built-in speaker system is connected to external self-powered speakers. Locate the appropriate cable to connect your computer or video source is connected to -pin- Parent topic: Projector Connections Connecting to External Speakers To enhance the sound from your computer is disabled when you connect... also connect the projector to your external speakers as necessary. 2. jack cable, or another type of the cable to an amplifier with both audio and video cables as necessary. 4.

User Manual
Page 40
... connect your USB device or camera to the projector's USB TypeA port and use it to project images and other content without using a computer or video device by connecting any of these devices to the Projector You can project slide shows from image files on a connected USB device or memory card...
... connect your USB device or camera to the projector's USB TypeA port and use it to project images and other content without using a computer or video device by connecting any of these devices to the Projector You can project slide shows from image files on a connected USB device or memory card...


