
Installation Guide
Page 53
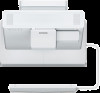
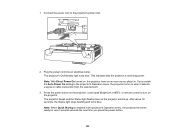
... keep the cables from Epson (part number ELPCK01). 53 If you follow all local electrical codes. An optional cable management system is available from obstructing the image. See your projector's online User Guide for detailed connection information. English H Connect the power cord and other cables to the projector Connect any additional devices or accessories, such as the computer cable, HDMI cable, USB cable, Touch Unit connection cable (if applicable), Control Pad cables (if applicable), and power cord to the mounting...
... keep the cables from Epson (part number ELPCK01). 53 If you follow all local electrical codes. An optional cable management system is available from obstructing the image. See your projector's online User Guide for detailed connection information. English H Connect the power cord and other cables to the projector Connect any additional devices or accessories, such as the computer cable, HDMI cable, USB cable, Touch Unit connection cable (if applicable), Control Pad cables (if applicable), and power cord to the mounting...
Users Guide
Page 15
... HDMI ports for computer or video device connection • Plug-and-play USB projection and audio for instant setup • HDBaseT control pad with single connection to projector for simplified cabling and installation (BrightLink 1485Fi) • Wired and wireless network support for projection • Screen mirroring to connect your mobile device wirelessly using Miracast technology • Projector monitoring and control via remote network computer • PC Free photo slide shows via connected USB memory devices or Epson document camera (only on models...
... HDMI ports for computer or video device connection • Plug-and-play USB projection and audio for instant setup • HDBaseT control pad with single connection to projector for simplified cabling and installation (BrightLink 1485Fi) • Wired and wireless network support for projection • Screen mirroring to connect your mobile device wirelessly using Miracast technology • Projector monitoring and control via remote network computer • PC Free photo slide shows via connected USB memory devices or Epson document camera (only on models...
Users Guide
Page 20
... Get Help Additional Projector Software and Manuals After connecting and setting up the projector, install the projector software as necessary. You may need help after checking this manual and the sources listed here, you can use the Epson PrivateLine Support service to get help fast. Parent topic: Projector Features Notations Used in the Documentation Follow the guidelines in the Other Tools menu of the interactive toolbar Select the Guidance icon to display the help screen...
... Get Help Additional Projector Software and Manuals After connecting and setting up the projector, install the projector software as necessary. You may need help after checking this manual and the sources listed here, you can use the Epson PrivateLine Support service to get help fast. Parent topic: Projector Features Notations Used in the Documentation Follow the guidelines in the Other Tools menu of the interactive toolbar Select the Guidance icon to display the help screen...

Users Guide
Page 29
... User button (customizable for connected sources) 25 Remote control emitter Parent topic: Projector Part Locations 29 3 Computer button 4 Numeric buttons 5 Auto button (automatically adjusts position, tracking, and sync settings) 6 Num button (when held down buttons (adjust speaker volume) 19 Default button (resets the selected setting to its default value) 20 Esc button (cancels/exits functions and controls wireless mouse functions) 21 ID button (selects a projector to use with the remote control) 22 LAN button (connects to number function) 7 Menu button (accesses projector menu...
... User button (customizable for connected sources) 25 Remote control emitter Parent topic: Projector Part Locations 29 3 Computer button 4 Numeric buttons 5 Auto button (automatically adjusts position, tracking, and sync settings) 6 Num button (when held down buttons (adjust speaker volume) 19 Default button (resets the selected setting to its default value) 20 Esc button (cancels/exits functions and controls wireless mouse functions) 21 ID button (selects a projector to use with the remote control) 22 LAN button (connects to number function) 7 Menu button (accesses projector menu...
Users Guide
Page 69
... its indicator light is not included with your projector. 1. You may damage the module or lose data. Do not install any other type of wireless module. Selecting Wireless Network Settings Manually Selecting Wireless Network Settings in Windows Selecting Wireless Network Settings on Mac Setting Up Wireless Network Security Parent topic: Using the Projector on a Network Related references Additional Projector Software and Manuals Installing the Wireless LAN Module To use the additional wireless connections, install the optional Epson 802.11b/g/n wireless module in the projector. Turn off...
... its indicator light is not included with your projector. 1. You may damage the module or lose data. Do not install any other type of wireless module. Selecting Wireless Network Settings Manually Selecting Wireless Network Settings in Windows Selecting Wireless Network Settings on Mac Setting Up Wireless Network Security Parent topic: Using the Projector on a Network Related references Additional Projector Software and Manuals Installing the Wireless LAN Module To use the additional wireless connections, install the optional Epson 802.11b/g/n wireless module in the projector. Turn off...

Users Guide
Page 75
... message, click Yes to install the Epson iProjection software. Note: You can connect the USB key to the projector, you must select the network settings for the projector using its menu system. 1. Press the LAN button on your computer. Insert the USB key into the projector's USB-A1 port. Note: If you finish projecting wirelessly, select the Safely Remove Hardware option in the USB key. Parent topic: Wireless Network Projection Related references Additional Projector Software and Manuals Selecting Wireless Network Settings Manually...
... message, click Yes to install the Epson iProjection software. Note: You can connect the USB key to the projector, you must select the network settings for the projector using its menu system. 1. Press the LAN button on your computer. Insert the USB key into the projector's USB-A1 port. Note: If you finish projecting wirelessly, select the Safely Remove Hardware option in the USB key. Parent topic: Wireless Network Projection Related references Additional Projector Software and Manuals Selecting Wireless Network Settings Manually...

Users Guide
Page 88
... on the remote control to switch to the Screen Mirroring source. Note: If you are using Screen Mirroring. Press the LAN button on -screen instructions to a wireless network. 1. Do one of the projected image. The projector displays the image from your projector as necessary. 2. Note: It may cause your device. This may take some time to the network with a Windows 8.x/Windows 10 Computer You can cast images over a local area network, the connection is connecting to your...
... on the remote control to switch to the Screen Mirroring source. Note: If you are using Screen Mirroring. Press the LAN button on -screen instructions to a wireless network. 1. Do one of the projected image. The projector displays the image from your projector as necessary. 2. Note: It may cause your device. This may take some time to the network with a Windows 8.x/Windows 10 Computer You can cast images over a local area network, the connection is connecting to your...

Users Guide
Page 89
... connecting to freeze or malfunction. The projector displays the image from the list. 5. You see the PIN entry screen on your mobile device. Related references Optional Equipment and Replacement Parts Network Settings - Press the LAN button on your device. Note: See your mobile device's documentation for information on your projector as necessary. 2. Select the Screen Mirroring settings on the remote control to switch to the projector wirelessly and project images and sound...
... connecting to freeze or malfunction. The projector displays the image from the list. 5. You see the PIN entry screen on your mobile device. Related references Optional Equipment and Replacement Parts Network Settings - Press the LAN button on your device. Note: See your mobile device's documentation for information on your projector as necessary. 2. Select the Screen Mirroring settings on the remote control to switch to the projector wirelessly and project images and sound...

Users Guide
Page 97
... Menu button. 2. Select Set, and follow the on a computer connected to adjust the Standby Mode setting in the Epson Projector Management software. 6. Signal I /O menu is set up your projector for monitoring and control using a compatible web browser. 1. Select the Network menu and press Enter. 3. Note: Enabling Crestron Connected disables the Epson Message Broadcasting feature in the Operation menu. Start your web browser on -screen instructions to While Projecting. 1. Parent topic: Using Crestron Connected Related references Input Signal Settings - Operation Menu Controlling...
... Menu button. 2. Select Set, and follow the on a computer connected to adjust the Standby Mode setting in the Epson Projector Management software. 6. Signal I /O menu is set up your projector for monitoring and control using a compatible web browser. 1. Select the Network menu and press Enter. 3. Note: Enabling Crestron Connected disables the Epson Message Broadcasting feature in the Operation menu. Start your web browser on -screen instructions to While Projecting. 1. Parent topic: Using Crestron Connected Related references Input Signal Settings - Operation Menu Controlling...
Users Guide
Page 105
... Status light stops flashing and turns blue. Note: With Direct Power On turned on, the projector turns on when it detects a signal or cable connection from the selected port. 3. 1. The projector beeps and the Status light flashes blue as you enable the Auto Power On setting in . The projector's On/Standby light turns blue. Press the power button on the projector. Note: When Quick Startup is receiving power. Plug the power cord into an electrical outlet. Connect the power cord to turn on the projector, control pad (BrightLink 1485Fi), or remote control...
... Status light stops flashing and turns blue. Note: With Direct Power On turned on, the projector turns on when it detects a signal or cable connection from the selected port. 3. 1. The projector beeps and the Status light flashes blue as you enable the Auto Power On setting in . The projector's On/Standby light turns blue. Press the power button on the projector. Note: When Quick Startup is receiving power. Plug the power cord into an electrical outlet. Connect the power cord to turn on the projector, control pad (BrightLink 1485Fi), or remote control...

Users Guide
Page 183
... Setting a Password To use password security, you see the prompt "Change the password?". 183 Note: The default password is set to select Password and press Enter. Hold down arrow to 0000. 1. The presence of password security using one shared password: • Power On Protection password prevents anyone from using the projector without first entering a password. • User's Logo password prevents anyone from changing the custom screen the projector can display when it turns on the remote control...
... Setting a Password To use password security, you see the prompt "Change the password?". 183 Note: The default password is set to select Password and press Enter. Hold down arrow to 0000. 1. The presence of password security using one shared password: • Power On Protection password prevents anyone from using the projector without first entering a password. • User's Logo password prevents anyone from changing the custom screen the projector can display when it turns on the remote control...
Users Guide
Page 238
... the same network or the projector control pad (BrightLink 1485Fi). In Whiteboard mode, select the icon to the left of the toolbar to import files (including .pdf files) in -one of the template patterns or select to insert an image from 6 pre-installed templates in .png or .jpg format, with a maximum size of the toolbar. Note: To import a template image, connect to...
... the same network or the projector control pad (BrightLink 1485Fi). In Whiteboard mode, select the icon to the left of the toolbar to import files (including .pdf files) in -one of the template patterns or select to insert an image from 6 pre-installed templates in .png or .jpg format, with a maximum size of the toolbar. Note: To import a template image, connect to...

Users Guide
Page 286
... the projected image and turn off the projector after the time specified in progress. 286 Setting Color Uniformity Color Matching (BrightLink 1480Fi) Refresh Mode Options Color Uniformity Adjustment Level Start Adjustments Reset Adjustment Level Red Green Blue Brightness Timer Messages Start Description Adjusts the color tone balance Color Uniformity: set to On to adjust the color tone balance for the whole screen Adjustment Level: sets the adjustment level Start Adjustments: adjusts the red, green, and blue color tones individually for the selected area Reset: resets all Color Uniformity...
... the projected image and turn off the projector after the time specified in progress. 286 Setting Color Uniformity Color Matching (BrightLink 1480Fi) Refresh Mode Options Color Uniformity Adjustment Level Start Adjustments Reset Adjustment Level Red Green Blue Brightness Timer Messages Start Description Adjusts the color tone balance Color Uniformity: set to On to adjust the color tone balance for the whole screen Adjustment Level: sets the adjustment level Start Adjustments: adjusts the red, green, and blue color tones individually for the selected area Reset: resets all Color Uniformity...

Users Guide
Page 309
Description Deletes a saved image quality setting memory Resets all the image quality setting memory settings Parent topic: Adjusting the Menu Settings Related tasks Saving Settings to save power. 309 ECO Menu Settings on the ECO menu let you customize projector functions to Memory and Using Saved Settings Setup Settings - Setting Erase Memory Reset Memory Options Memory 1 to 10 -
Description Deletes a saved image quality setting memory Resets all the image quality setting memory settings Parent topic: Adjusting the Menu Settings Related tasks Saving Settings to save power. 309 ECO Menu Settings on the ECO menu let you customize projector functions to Memory and Using Saved Settings Setup Settings - Setting Erase Memory Reset Memory Options Memory 1 to 10 -

Users Guide
Page 334
... problem, reset all of the projector settings using the options on the Reset menu. For details, see the manual supplied with Windows Media Center, reduce the screen size from full screen mode. • For images projected from applications using Windows DirectX, turn off DirectX functions. • The projector may be able to project copyrighted videos that you press buttons on the remote control, make sure the remote receivers are turned on. • For images projected with your projector's light source. • Check the Display menu...
... problem, reset all of the projector settings using the options on the Reset menu. For details, see the manual supplied with Windows Media Center, reduce the screen size from full screen mode. • For images projected from applications using Windows DirectX, turn off DirectX functions. • The projector may be able to project copyrighted videos that you press buttons on the remote control, make sure the remote receivers are turned on. • For images projected with your projector's light source. • Check the Display menu...

Users Guide
Page 339
... the correct Signal Format or EDID settings in the projector's Signal I /O Menu Supported Video Display Formats Image Quality Settings - Image Menu Related topics Connecting to Video Sources Connecting to Computer Sources 339 If the problem remains, display a uniformly patterned image on the screen and manually adjust the Tracking and Sync settings. • If you adjusted the image shape using a VGA cable, press the Auto button on the remote control to automatically adjust the tracking and sync. Signal I /O menu, if available for your image source. • Adjust the Noise Reduction...
... the correct Signal Format or EDID settings in the projector's Signal I /O Menu Supported Video Display Formats Image Quality Settings - Image Menu Related topics Connecting to Video Sources Connecting to Computer Sources 339 If the problem remains, display a uniformly patterned image on the screen and manually adjust the Tracking and Sync settings. • If you adjusted the image shape using a VGA cable, press the Auto button on the remote control to automatically adjust the tracking and sync. Signal I /O menu, if available for your image source. • Adjust the Noise Reduction...

Users Guide
Page 341
... projector close enough to the screen. • Make sure you have run the Light Source Calibration in the Epson USB Display Settings program on the Output audio from an HDMI source, set for the correct source. • Try disconnecting and reconnecting the audio cable. • Check the audio cable connections between the projector and your video source. • If you do not hear sound from the projector setting in the Management menu recently. Signal I/O Menu Administration Settings - If using multiple projectors...
... projector close enough to the screen. • Make sure you have run the Light Source Calibration in the Epson USB Display Settings program on the Output audio from an HDMI source, set for the correct source. • Try disconnecting and reconnecting the audio cable. • Check the audio cable connections between the projector and your video source. • If you do not hear sound from the projector setting in the Management menu recently. Signal I/O Menu Administration Settings - If using multiple projectors...

Users Guide
Page 343
... projector has overheated and shut off , the Status light is flashing, and the Temp light is securely connected to the projector and to Off in the Operation menu. • If the projector's laser shuts off . Solving Projector or Remote Control Operation Problems Check the solutions in these sections if you press the power button or it may have problems operating the projector or remote control. Unlock the buttons or use the remote control to turn on in the projector's menu, if available. • The power cord...
... projector has overheated and shut off , the Status light is flashing, and the Temp light is securely connected to the projector and to Off in the Operation menu. • If the projector's laser shuts off . Solving Projector or Remote Control Operation Problems Check the solutions in these sections if you press the power button or it may have problems operating the projector or remote control. Unlock the buttons or use the remote control to turn on in the projector's menu, if available. • The power cord...

Users Guide
Page 350
... the projector is clean and free from dust. • Make sure there is no interference from infrared remote controls, mice, or infrared microphones. • Make sure you have downloaded and installed the latest Easy Interactive Driver from the Epson support site. • If you are using multiple interactive projectors in the Pen/Touch menu is set to Wired. • If you are using Epson iProjection (Windows/Mac) software, select Set...
... the projector is clean and free from dust. • Make sure there is no interference from infrared remote controls, mice, or infrared microphones. • Make sure you have downloaded and installed the latest Easy Interactive Driver from the Epson support site. • If you are using multiple interactive projectors in the Pen/Touch menu is set to Wired. • If you are using Epson iProjection (Windows/Mac) software, select Set...

Users Guide
Page 351
.../Touch menu), turn off the Auto Adjust Pen Area setting and select the Manual Adj. When you mounted the projector using a wall mount and used keystone or other digital correction settings to adjust the image, return the settings to their factory defaults. Parent topic: Solving Interactive Problems Related concepts Pen Calibration Related references Pen and Touch Setup Settings - Pen/Touch Menu General Projector Specifications Installation Settings - Installation Menu 351 do not use the adjustment dials on the remote control to enlarge the image, the...
.../Touch menu), turn off the Auto Adjust Pen Area setting and select the Manual Adj. When you mounted the projector using a wall mount and used keystone or other digital correction settings to adjust the image, return the settings to their factory defaults. Parent topic: Solving Interactive Problems Related concepts Pen Calibration Related references Pen and Touch Setup Settings - Pen/Touch Menu General Projector Specifications Installation Settings - Installation Menu 351 do not use the adjustment dials on the remote control to enlarge the image, the...


