

Installation Guide - ELPMBUNI Universal Mount Assembly
Page 2
...BUT NOT LIMITED TO THE IMPLIED WARRANTIES OF MERCHANTABILITY AND FITNESS FOR A PARTICULAR PURPOSE. Warranty Limited Lifetime Warranty All Premier Mounts products carry a limited lifetime warranty from ship date against defects in the completion of the installation. Customer Service - (800) ...14 Securing the Upper Assembly Ceiling Plate...- 15 Low-Profile Installation ...- 16 Securing the Projector to mounts, adapters, display equipment or personal injury. Premier Mounts is not liable for improper installation that results in damage to the Upper Assembly ...- 18 Final Adjustments...
...BUT NOT LIMITED TO THE IMPLIED WARRANTIES OF MERCHANTABILITY AND FITNESS FOR A PARTICULAR PURPOSE. Warranty Limited Lifetime Warranty All Premier Mounts products carry a limited lifetime warranty from ship date against defects in the completion of the installation. Customer Service - (800) ...14 Securing the Upper Assembly Ceiling Plate...- 15 Low-Profile Installation ...- 16 Securing the Projector to mounts, adapters, display equipment or personal injury. Premier Mounts is not liable for improper installation that results in damage to the Upper Assembly ...- 18 Final Adjustments...

Installation Guide - ELPMBUNI Universal Mount Assembly
Page 3
...of fire. At least two qualified people should perform the installation procedure. Injury and/or damage can result from the power outlet. Recommended mounting surfaces: wooden studs, solid-flat concrete, and reinforced metal studs. Page - 4 - WARNING: THE CEILING STRUCTURE MUST BE CAPABLE OF... INJURY. WARNING: PRIOR TO THE INSTALLATION OF THIS PRODUCT, THE INSTALLATION INSTRUCTIONS SHOULD BE READ AND COMPLETELY UNDERSTOOD. Contact Premier Mounts with any other source of the wooden stud must support the weight, or load, of impact. Failure to installation. Installation ...
...of fire. At least two qualified people should perform the installation procedure. Injury and/or damage can result from the power outlet. Recommended mounting surfaces: wooden studs, solid-flat concrete, and reinforced metal studs. Page - 4 - WARNING: THE CEILING STRUCTURE MUST BE CAPABLE OF... INJURY. WARNING: PRIOR TO THE INSTALLATION OF THIS PRODUCT, THE INSTALLATION INSTRUCTIONS SHOULD BE READ AND COMPLETELY UNDERSTOOD. Contact Premier Mounts with any other source of the wooden stud must support the weight, or load, of impact. Failure to installation. Installation ...

Installation Guide - ELPMBUNI Universal Mount Assembly
Page 4
...Qty 4) M6 x 12mm Security Head Screws (Qty 4) Portable Drill Pencil Level (Supplied) Stud Finder (Commercially Available) M5 Allen Wrench NOTE: Mounting screws will vary by projector. Please see the following hardware is included in the hardware pack but is shipped with the M3 x 16 Phillips ...screws. Installation Manual Page - 5 - ELPMBUNI Parts List NOTE: This mount is not required for model specific hardware: Pages 10, 11, 12, and 13. Upper Assembly (Qty 1) Mounting Bracket (Qty 1) Plastic Barrel Caps (Qty 4) M3 Flat Washers (Qty 4) Note: Must be...
...Qty 4) M6 x 12mm Security Head Screws (Qty 4) Portable Drill Pencil Level (Supplied) Stud Finder (Commercially Available) M5 Allen Wrench NOTE: Mounting screws will vary by projector. Please see the following hardware is included in the hardware pack but is shipped with the M3 x 16 Phillips ...screws. Installation Manual Page - 5 - ELPMBUNI Parts List NOTE: This mount is not required for model specific hardware: Pages 10, 11, 12, and 13. Upper Assembly (Qty 1) Mounting Bracket (Qty 1) Plastic Barrel Caps (Qty 4) M3 Flat Washers (Qty 4) Note: Must be...

Installation Guide - ELPMBUNI Universal Mount Assembly
Page 5
... C Ceiling Plate D Allen Wrench E Height Adjustment Screws F Tension Knobs G Safety Knob H Security Screws I Leveling Barrels J Universal Mounting Bracket K Leg Assembly L Projector (Not Supplied) M Tri-Lock Opening Option 1 H B D F Combination I Leg Single Leg D Option 2 M NOTE: See the best configuration for your G projector....of your projector for filter and lamp access. Page - 6 - K M J L J L Installation Manual The number of legs E may vary depending on the number of mounting points found on the bottom of single and dual legs together as shown in Options 1 and 2.
... C Ceiling Plate D Allen Wrench E Height Adjustment Screws F Tension Knobs G Safety Knob H Security Screws I Leveling Barrels J Universal Mounting Bracket K Leg Assembly L Projector (Not Supplied) M Tri-Lock Opening Option 1 H B D F Combination I Leg Single Leg D Option 2 M NOTE: See the best configuration for your G projector....of your projector for filter and lamp access. Page - 6 - K M J L J L Installation Manual The number of legs E may vary depending on the number of mounting points found on the bottom of single and dual legs together as shown in Options 1 and 2.

Installation Guide - ELPMBUNI Universal Mount Assembly
Page 6
... be adhered to. CAUTION: THE PROJECTOR IS FRAGILE; NOTE: Review the projectors manufacture's operation manual and refer to the projector. Mounting Points Inverted Projector Blanket, soft cloth etc Figure 1 Flat surface Installation Manual Page - 7 - ELPMBUNI Projector Preparation WARNING: Proper installation...to do so could result in thread size (Figure 1). Identify the number of mounting points and screw thread (pitch) size. 3. Most projectors have either three or four mounting points and are M4 in serious personal injury and possible damage to the ceiling ...
... be adhered to. CAUTION: THE PROJECTOR IS FRAGILE; NOTE: Review the projectors manufacture's operation manual and refer to the projector. Mounting Points Inverted Projector Blanket, soft cloth etc Figure 1 Flat surface Installation Manual Page - 7 - ELPMBUNI Projector Preparation WARNING: Proper installation...to do so could result in thread size (Figure 1). Identify the number of mounting points and screw thread (pitch) size. 3. Most projectors have either three or four mounting points and are M4 in serious personal injury and possible damage to the ceiling ...

Installation Guide - ELPMBUNI Universal Mount Assembly
Page 7
Separate the upper assembly from the projector mounting bracket by slightly loosening the two tension knurl knobs to be rotated 180° apart and separate. Figure 2 Tri-Lock Opening Rotate 180° To Unlock Tension Knobs Upper Assembly Safety Knob Figure 3 Figure 4 Page - 8 - ELPMBUNI 4. Installation Manual Next loosen the safety screw knurl knob far enough to allow the two parts to create free play between the bracket tri-lock assembly and the upper section tri-lock assembly points. 5.
Separate the upper assembly from the projector mounting bracket by slightly loosening the two tension knurl knobs to be rotated 180° apart and separate. Figure 2 Tri-Lock Opening Rotate 180° To Unlock Tension Knobs Upper Assembly Safety Knob Figure 3 Figure 4 Page - 8 - ELPMBUNI 4. Installation Manual Next loosen the safety screw knurl knob far enough to allow the two parts to create free play between the bracket tri-lock assembly and the upper section tri-lock assembly points. 5.

Installation Guide - ELPMBUNI Universal Mount Assembly
Page 8
...legs around critical ventilation screens on the bottom of the projector and use the appropriate number of mounting legs. 2. FIGURE 6 Two-Piece Leg FIGURE 7 One-Piece Leg Allen Wrench Mounting Hardware Inverted Projector Leveling Barrels FIGURE A Installation Manual Figure 5 Line up the leveling barrels to...adjust the height of the projector as shown for a better overall fit to your projector requires M3 mounting hardware. Page - 9 - Locate the mounting points on the base of the mounting bracket. NOTE: If your projector. Insert the M3 x 16 Phillips screws with the M3 flat ...
...legs around critical ventilation screens on the bottom of the projector and use the appropriate number of mounting legs. 2. FIGURE 6 Two-Piece Leg FIGURE 7 One-Piece Leg Allen Wrench Mounting Hardware Inverted Projector Leveling Barrels FIGURE A Installation Manual Figure 5 Line up the leveling barrels to...adjust the height of the projector as shown for a better overall fit to your projector requires M3 mounting hardware. Page - 9 - Locate the mounting points on the base of the mounting bracket. NOTE: If your projector. Insert the M3 x 16 Phillips screws with the M3 flat ...

Installation Guide - ELPMBUNI Universal Mount Assembly
Page 9
ELPMBUNI NOTE: If your projector model is not shown, when arranging the leg combination, simply ensure access to filters and lamp housings when aligning brackets. PowerLite 830p, 835p Hardware: M4 x 12mm (Qty 4) Installation Manual This mount works with all sub-25 pound projectors. PowerLite S3, S4, 62C, 76C, 82C, Hardware: M4 x 12mm (Qty 3) Page - 10 -
ELPMBUNI NOTE: If your projector model is not shown, when arranging the leg combination, simply ensure access to filters and lamp housings when aligning brackets. PowerLite 830p, 835p Hardware: M4 x 12mm (Qty 4) Installation Manual This mount works with all sub-25 pound projectors. PowerLite S3, S4, 62C, 76C, 82C, Hardware: M4 x 12mm (Qty 3) Page - 10 -

Installation Guide - ELPMBUNI Universal Mount Assembly
Page 13
... in damaging the threads in the projector. Rotate the leveling barrels to do not over-tighten the mounting hardware. Failure to level the mounting bracket next, position the mounting bracket so that it avoids most, if not all, ventilation points (including lamp & filter access ...doors). 2. Installation Manual Allen Wrench Level Inverted Projector DOWN UP Adjusting the Mount Figure 8 Leveling Barrels Page - 14 - When the position desired is achieved tighten the mounting hardware to the projector then tighten the hex head leg screws with the Allen wrench (supplied...
... in damaging the threads in the projector. Rotate the leveling barrels to do not over-tighten the mounting hardware. Failure to level the mounting bracket next, position the mounting bracket so that it avoids most, if not all, ventilation points (including lamp & filter access ...doors). 2. Installation Manual Allen Wrench Level Inverted Projector DOWN UP Adjusting the Mount Figure 8 Leveling Barrels Page - 14 - When the position desired is achieved tighten the mounting hardware to the projector then tighten the hex head leg screws with the Allen wrench (supplied...

Installation Guide - ELPMBUNI Universal Mount Assembly
Page 14
...center of the wood stud. Page - 15 - ELPMBUNI Securing the Upper Assembly Ceiling Plate 1. It is recommended from the center of the mounting bracket to the front edge of the lens to parallel with other (commercially available) hardware depending on the screen and no higher then the... screen for best picture ratio. 2. Ceiling Structure Ceiling Wood Stud Wood Screws Upper Assembly Installation Manual Knurl Knobs (3ea) Figure 9 Secure the ceiling mount to the ceiling or wall. 5. Locate the inverted projectors top of the lens point to the edge of the lens as well. 4. NOTE:...
...center of the wood stud. Page - 15 - ELPMBUNI Securing the Upper Assembly Ceiling Plate 1. It is recommended from the center of the mounting bracket to the front edge of the lens to parallel with other (commercially available) hardware depending on the screen and no higher then the... screen for best picture ratio. 2. Ceiling Structure Ceiling Wood Stud Wood Screws Upper Assembly Installation Manual Knurl Knobs (3ea) Figure 9 Secure the ceiling mount to the ceiling or wall. 5. Locate the inverted projectors top of the lens point to the edge of the lens as well. 4. NOTE:...
Installation Guide - ELPMBUNI Universal Mount Assembly
Page 15
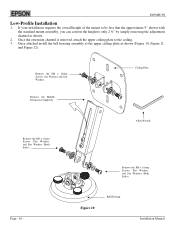
..., Figure 11, and Figure 12). Figure 10 Bell Housing Installation Manual If your installation requires the overall height of the mount to be less that the approximate 9" shown with the standard mount assembly, you can convert the height to the ceiling. 3. ELPMBUNI Low-Profile Installation 1. Once attached install the bell housing assembly...
..., Figure 11, and Figure 12). Figure 10 Bell Housing Installation Manual If your installation requires the overall height of the mount to be less that the approximate 9" shown with the standard mount assembly, you can convert the height to the ceiling. 3. ELPMBUNI Low-Profile Installation 1. Once attached install the bell housing assembly...

Installation Guide - ELPMBUNI Universal Mount Assembly
Page 17
...176; and secure the rear safety knob first to prevent further rotation of the upper assembly. 3. Carefully lift the projector and insert the mounting bracket mating special tri-lock cutout into the mating portion of the bracket in the upper assembly. 4. The safety knob should line up... with the safety knob to lock the mounting bracket to the upper assembly Insert universal bracket to the "tri-lock" mounting plate in direct alignment with the alignment slot on the mounting bracket (Figure 13). ELPMBUNI Securing the Projector to the upper assembly. The...
...176; and secure the rear safety knob first to prevent further rotation of the upper assembly. 3. Carefully lift the projector and insert the mounting bracket mating special tri-lock cutout into the mating portion of the bracket in the upper assembly. 4. The safety knob should line up... with the safety knob to lock the mounting bracket to the upper assembly Insert universal bracket to the "tri-lock" mounting plate in direct alignment with the alignment slot on the mounting bracket (Figure 13). ELPMBUNI Securing the Projector to the upper assembly. The...

Installation Guide - ELPMBUNI Universal Mount Assembly
Page 18
... 15 Wood Stud Ceiling Tilt Adjusting Screws Allen Wrench Wood Stud Ceiling Figure 16 Page - 19 - ELPMBUNI Final Adjustments 1. With the projector secured in the mount and power on the screen, slightly loosen the front and rear M8 screws and adjust to optimize the projected image. 2. To adjust the tilt angle...
... 15 Wood Stud Ceiling Tilt Adjusting Screws Allen Wrench Wood Stud Ceiling Figure 16 Page - 19 - ELPMBUNI Final Adjustments 1. With the projector secured in the mount and power on the screen, slightly loosen the front and rear M8 screws and adjust to optimize the projected image. 2. To adjust the tilt angle...
Product Specifications
Page 4
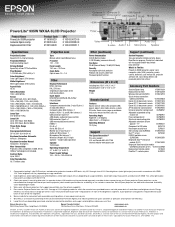
...-45 Monitor Out HDMI PowerLite® 935W WXGA 3LCD Projector Product Name PowerLite 935W projector Genuine Epson Lamp Replacement Air Filter Product Code V11H565020 V13H010L64 V13H134A29 UPC 0 10343 90724 9 0 10343 88384 0 0 10343 88051 1 Specifications Projection System Epson 3LCD, 3-chip technology Projection Method Front/rear/ceiling mount Driving Method Epson Poly-silicon TFT Active Matrix Pixel Number...
...-45 Monitor Out HDMI PowerLite® 935W WXGA 3LCD Projector Product Name PowerLite 935W projector Genuine Epson Lamp Replacement Air Filter Product Code V11H565020 V13H010L64 V13H134A29 UPC 0 10343 90724 9 0 10343 88384 0 0 10343 88051 1 Specifications Projection System Epson 3LCD, 3-chip technology Projection Method Front/rear/ceiling mount Driving Method Epson Poly-silicon TFT Active Matrix Pixel Number...

Users Guide
Page 14
...Wireless LAN module (ELPAP07) (PowerLite 95/96W/905/915W/935W/1835) Quick Wireless Connection USB key (ELPAP08) (PowerLite 95/96W/905/915W/935W/1835) EPSON DC-11 document camera EPSON DC-06 document camera EPSON DC-20 document camera BrightLink Solo interactive module BrightLink Solo ...interactive module with RM Easiteach AP-60 Projector Sound Solution Active Speakers (ELPSP02) PixiePlus Control System Universal projector ceiling mount Adjustable ...
...Wireless LAN module (ELPAP07) (PowerLite 95/96W/905/915W/935W/1835) Quick Wireless Connection USB key (ELPAP08) (PowerLite 95/96W/905/915W/935W/1835) EPSON DC-11 document camera EPSON DC-06 document camera EPSON DC-20 document camera BrightLink Solo interactive module BrightLink Solo ...interactive module with RM Easiteach AP-60 Projector Sound Solution Active Speakers (ELPSP02) PixiePlus Control System Universal projector ceiling mount Adjustable ...

Users Guide
Page 19
Base 1 Mounting bracket holes 2 Rear feet 3 Front adjustable foot 4 Security lock slot 19 16 USB TypeA port 17 USB TypeB port 18 Computer2 port 19 Computer1 port Parent topic: Projector Part Locations Projector Parts -
Base 1 Mounting bracket holes 2 Rear feet 3 Front adjustable foot 4 Security lock slot 19 16 USB TypeA port 17 USB TypeB port 18 Computer2 port 19 Computer1 port Parent topic: Projector Part Locations Projector Parts -

Users Guide
Page 23
... a fixed location. Setting Up the Projector Follow the instructions in these considerations in mind as you want to use it using a compatible mount. • Leave plenty of a grounded electrical outlet or extension cord. Projector Placement Projector Connections Installing Batteries in the Remote Control Opening the... following ways: Front 23 You can place the projector on almost any flat surface to project your projector to view presentations in a ceiling mount if you select a projector location: • Place the projector on top of or next to anything that could block the vents. &#...
... a fixed location. Setting Up the Projector Follow the instructions in these considerations in mind as you want to use it using a compatible mount. • Leave plenty of a grounded electrical outlet or extension cord. Projector Placement Projector Connections Installing Batteries in the Remote Control Opening the... following ways: Front 23 You can place the projector on almost any flat surface to project your projector to view presentations in a ceiling mount if you select a projector location: • Place the projector on top of or next to anything that could block the vents. &#...

Users Guide
Page 38
Note: Digital cameras or camera phones must be USB-mounted devices, not TWAIN-compliant devices. If your device. You can switch the projector's display to the source you connected to a USB TypeA port. 38 Connect ...
Note: Digital cameras or camera phones must be USB-mounted devices, not TWAIN-compliant devices. If your device. You can switch the projector's display to the source you connected to a USB TypeA port. 38 Connect ...

Users Guide
Page 82
...in front of the screen. • Front/Ceiling flips the image over top-to-bottom to project upside-down from a ceiling or wall mount. • Rear flips the image horizontally to project from behind a translucent screen. Changing the Projection Mode Using the Remote Control Changing the Projection... sources 2 Video and HDMI sources 3 USB port sources (computer display and external devices) 4 Network source (PowerLite 93/95/96W/905/915W/935W/1835) Parent topic: Using Basic Projector Features Projection Modes Depending on how you positioned the projector, you may need to project from the ceiling...
...in front of the screen. • Front/Ceiling flips the image over top-to-bottom to project upside-down from a ceiling or wall mount. • Rear flips the image horizontally to project from behind a translucent screen. Changing the Projection Mode Using the Remote Control Changing the Projection... sources 2 Video and HDMI sources 3 USB port sources (computer display and external devices) 4 Network source (PowerLite 93/95/96W/905/915W/935W/1835) Parent topic: Using Basic Projector Features Projection Modes Depending on how you positioned the projector, you may need to project from the ceiling...

Users Guide
Page 131
... projector's air filter or vents if they get dusty, or if you see a message telling you can replace the air filter while the projector is mounted to the ceiling, if necessary. Caution: Do not use any detergent or solvent to remove or the air filter is damaged, replace the air filter...
... projector's air filter or vents if they get dusty, or if you see a message telling you can replace the air filter while the projector is mounted to the ceiling, if necessary. Caution: Do not use any detergent or solvent to remove or the air filter is damaged, replace the air filter...

