Users Guide
Page 14
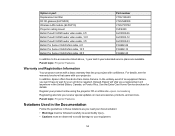
... for your unit to be observed to avoid damage to the accessories listed above, 1-year and 2-year extended service plans are available. In addition, Epson offers free Extra Care Home Service. Option or part Replacement air filter RF 3D glasses (ELPGS03) Wireless LAN module (ELPAP10) Projector ceiling... mount Belkin PureAV HDMI audio video cable, 6 ft Belkin PureAV HDMI audio video cable, 12 ft Belkin PureAV HDMI audio video cable, 3 ft Belkin Pro ...
... for your unit to be observed to avoid damage to the accessories listed above, 1-year and 2-year extended service plans are available. In addition, Epson offers free Extra Care Home Service. Option or part Replacement air filter RF 3D glasses (ELPGS03) Wireless LAN module (ELPAP10) Projector ceiling... mount Belkin PureAV HDMI audio video cable, 6 ft Belkin PureAV HDMI audio video cable, 12 ft Belkin PureAV HDMI audio video cable, 3 ft Belkin Pro ...
Users Guide
Page 19
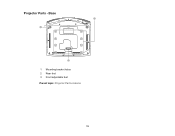
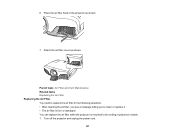
Base 1 Mounting bracket holes 2 Rear foot 3 Front adjustable feet Parent topic: Projector Part Locations 19 Projector Parts -
Base 1 Mounting bracket holes 2 Rear foot 3 Front adjustable feet Parent topic: Projector Part Locations 19 Projector Parts -
Users Guide
Page 24
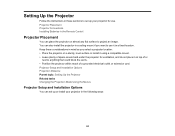
... Installing Batteries in the Remote Control Projector Placement You can also install the projector in a ceiling mount if you select a projector location: • Place the projector on a sturdy, level surface or install it using a compatible mount. • Leave plenty of space around and under the projector for use it on top of...
... Installing Batteries in the Remote Control Projector Placement You can also install the projector in a ceiling mount if you select a projector location: • Place the projector on a sturdy, level surface or install it using a compatible mount. • Leave plenty of space around and under the projector for use it on top of...
Users Guide
Page 70
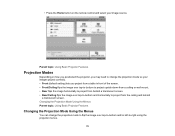
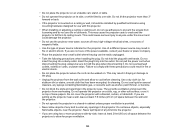
... from a table in front of the screen. • Front/Ceiling flips the image over top-to-bottom to project upside-down from a ceiling or wall mount. • Rear flips the image horizontally to project from the ceiling and behind a translucent screen. • Rear/Ceiling flips the image over top-to-bottom...
... from a table in front of the screen. • Front/Ceiling flips the image over top-to-bottom to project upside-down from a ceiling or wall mount. • Rear flips the image horizontally to project from the ceiling and behind a translucent screen. • Rear/Ceiling flips the image over top-to-bottom...
Users Guide
Page 127
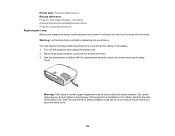
Turn off the projector and unplug the power cord. 127 Attach the air filter cover as shown. 7. Place the air filter back in the following situations: • After cleaning the air filter, you see a message telling you to clean or replace it • The air filter is torn or damaged You can replace the air filter while the projector is mounted to the ceiling or placed on a table. 1. Parent topic: Air Filter and Vent Maintenance Related tasks Replacing the Air Filter Replacing the Air Filter You need to replace the air filter in the projector as shown. 6.
Turn off the projector and unplug the power cord. 127 Attach the air filter cover as shown. 7. Place the air filter back in the following situations: • After cleaning the air filter, you see a message telling you to clean or replace it • The air filter is torn or damaged You can replace the air filter while the projector is mounted to the ceiling or placed on a table. 1. Parent topic: Air Filter and Vent Maintenance Related tasks Replacing the Air Filter Replacing the Air Filter You need to replace the air filter in the projector as shown. 6.
Users Guide
Page 130
... removing any broken glass to loosen the screw securing the lamp cover. Allow the projector lamp to the ceiling, if necessary. 1. If the projector is mounted to cool down for at least one hour. 3. Warning: Let the lamp fully cool before replacing it ; Info Menu Optional Equipment and Replacement Parts Projector...
... removing any broken glass to loosen the screw securing the lamp cover. Allow the projector lamp to the ceiling, if necessary. 1. If the projector is mounted to cool down for at least one hour. 3. Warning: Let the lamp fully cool before replacing it ; Info Menu Optional Equipment and Replacement Parts Projector...
Users Guide
Page 156
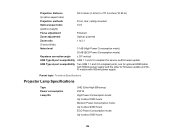
Projection distance 58.3 inches (1.48 m) to 747.6 inches (18.99 m) (in native aspect ratio) Projection methods Front, rear, ceiling-mounted Optical aspect ratio 16:9 (width-to-height) Focus adjustment Powered Zoom adjustment Optical, powered Zoom ratio 1 to 2.1 (Tele-to about 4000 hours ECO Power Consumption ...
Projection distance 58.3 inches (1.48 m) to 747.6 inches (18.99 m) (in native aspect ratio) Projection methods Front, rear, ceiling-mounted Optical aspect ratio 16:9 (width-to-height) Focus adjustment Powered Zoom adjustment Optical, powered Zoom ratio 1 to 2.1 (Tele-to about 4000 hours ECO Power Consumption ...
Users Guide
Page 163
... on an unstable cart, stand, or table. • Do not operate the projector on its side, or while tilted to fall from its ceiling mount. Failure to cool before cleaning. Insert the plug firmly into a dusty outlet. Do not overload wall outlets, extension cords, or power strips. This ... not insert the plug into the outlet. Do not cover the projector with this projector. • When installing or adjusting a ceiling or wall mount, do not use oils or lubricants. Do not tilt the projector more projectors side-by qualified technicians using two or more than 3° forward ...
... on an unstable cart, stand, or table. • Do not operate the projector on its side, or while tilted to fall from its ceiling mount. Failure to cool before cleaning. Insert the plug firmly into a dusty outlet. Do not overload wall outlets, extension cords, or power strips. This ... not insert the plug into the outlet. Do not cover the projector with this projector. • When installing or adjusting a ceiling or wall mount, do not use oils or lubricants. Do not tilt the projector more projectors side-by qualified technicians using two or more than 3° forward ...
Users Guide
Page 165
..., you should use this product is used for use . • Before you move the projector, make sure its power is turned off, the plug is mounted overhead and the lamp breaks, be careful to prevent pieces of glass from the outlet, and all cables are disconnected. • Do not disassemble the...
..., you should use this product is used for use . • Before you move the projector, make sure its power is turned off, the plug is mounted overhead and the lamp breaks, be careful to prevent pieces of glass from the outlet, and all cables are disconnected. • Do not disassemble the...

