Product Brochure
Page 1
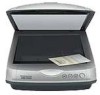
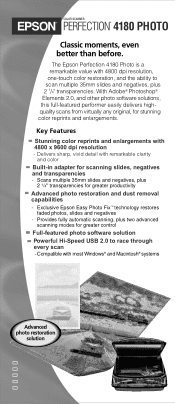
... race through every scan - The Epson Perfection 4180 Photo is a remarkable value with most Windows® and Macintosh® systems Advanced photo restoration solution Key Features Stunning color reprints and enlargements with remarkable clarity and color Built-in adapter for greater productivity Advanced photo restoration and dust removal capabilities - COLOR SCANNER PERFECTION® 4180 PHOTO Classic moments, even better than before...
... race through every scan - The Epson Perfection 4180 Photo is a remarkable value with most Windows® and Macintosh® systems Advanced photo restoration solution Key Features Stunning color reprints and enlargements with remarkable clarity and color Built-in adapter for greater productivity Advanced photo restoration and dust removal capabilities - COLOR SCANNER PERFECTION® 4180 PHOTO Classic moments, even better than before...
Product Brochure
Page 2
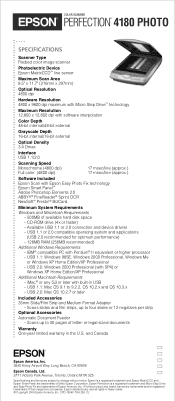
... any G3 or later with built-in the U.S. Available USB 1.1 or 2.0 connection and device drivers - USB 2.0: Windows 2000 Professional (with Pentium® II equivalent or higher processor - COLOR SCANNER PERFECTION® 4180 PHOTO SPECIFICATIONS Scanner Type Flatbed color image scanner Photoelectric Device Epson MatrixCCD™ line sensor Maximum Scan Area 8.5" x 11.7" (216mm x 297mm) Optical Resolution 4800 dpi Hardware...
... any G3 or later with built-in the U.S. Available USB 1.1 or 2.0 connection and device drivers - USB 2.0: Windows 2000 Professional (with Pentium® II equivalent or higher processor - COLOR SCANNER PERFECTION® 4180 PHOTO SPECIFICATIONS Scanner Type Flatbed color image scanner Photoelectric Device Epson MatrixCCD™ line sensor Maximum Scan Area 8.5" x 11.7" (216mm x 297mm) Optical Resolution 4800 dpi Hardware...
Product Information Guide
Page 3
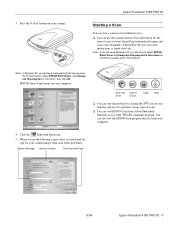
...file type Select a location Click Scan and Save 6/04 Epson Perfection 4180 PHOTO - 3 Note: In Windows XP, you will have to select EPSON Smart Panel and Always use it to perform various types of the buttons. Smart Panel automatically opens and scans your scanner. Click the Scan and Save icon. 5. Press the.... 3. Note: If you are using Windows XP, you will see a message the first time you see the following screen, select a location and file type for this program for your scanned image, then click Scan and Save. Epson Perfection 4180 PHOTO Starting a Scan You can use this action...
...file type Select a location Click Scan and Save 6/04 Epson Perfection 4180 PHOTO - 3 Note: In Windows XP, you will have to select EPSON Smart Panel and Always use it to perform various types of the buttons. Smart Panel automatically opens and scans your scanner. Click the Scan and Save icon. 5. Press the.... 3. Note: If you are using Windows XP, you will see a message the first time you see the following screen, select a location and file type for this program for your scanned image, then click Scan and Save. Epson Perfection 4180 PHOTO Starting a Scan You can use this action...
Product Information Guide
Page 4
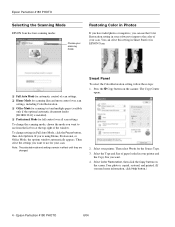
...you 're using Home, Professional, or Office Mode, the options window automatically appears. If you want. 4. Select your scan. Select Color Restoration, then click the Copy button on the scanner. Epson Perfection 4180 PHOTO 6/04 To change the scanning mode, choose the mode you want... to use from the list box at the top right of the window. Smart Panel To select the Color Restoration setting, follow these steps: 1. Epson Perfection 4180 PHOTO Selecting the Scanning Mode EPSON Scan...
...you 're using Home, Professional, or Office Mode, the options window automatically appears. If you want. 4. Select your scan. Select Color Restoration, then click the Copy button on the scanner. Epson Perfection 4180 PHOTO 6/04 To change the scanning mode, choose the mode you want... to use from the list box at the top right of the window. Smart Panel To select the Color Restoration setting, follow these steps: 1. Epson Perfection 4180 PHOTO Selecting the Scanning Mode EPSON Scan...
Product Information Guide
Page 6
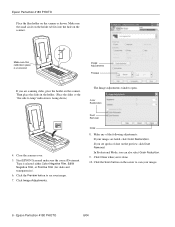
..., click Dust Removal. Click Close when you can also select Grain Reduction. 9. Epson Perfection 4180 PHOTO 6/04 Click Image Adjustments. Make sure the small circle on the holder tab fits into the hole on the scanner as shown. Make sure this side to lamp" indication is selected: either Color Negative...In Professional Mode, you 're done. 10. Click the Preview button to scan your images. 6 - Click the Scan button on the scanner. If you are faded, click Color Restoration. Start EPSON Scan and make sure the correct Document Type is facing down.) The Image Adjustments...
..., click Dust Removal. Click Close when you can also select Grain Reduction. 9. Epson Perfection 4180 PHOTO 6/04 Click Image Adjustments. Make sure the small circle on the holder tab fits into the hole on the scanner as shown. Make sure this side to lamp" indication is selected: either Color Negative...In Professional Mode, you 're done. 10. Click the Preview button to scan your images. 6 - Click the Scan button on the scanner. If you are faded, click Color Restoration. Start EPSON Scan and make sure the correct Document Type is facing down.) The Image Adjustments...
Start Here Card
Page 1
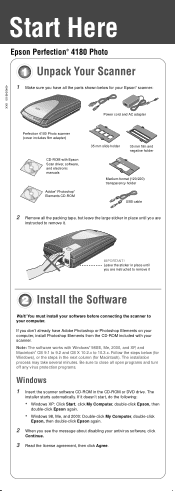
... Computer, double-click Epson, then double-click Epson again. • Windows 98, Me, and 2000: Double-click My Computer, double-click Epson, then double-click Epson again. 2 When you don't already have all the parts shown below (for Windows), or the steps in the next column (for your Epson® scanner: Power cord and AC adapter Perfection 4180 Photo scanner (cover includes...
... Computer, double-click Epson, then double-click Epson again. • Windows 98, Me, and 2000: Double-click My Computer, double-click Epson, then double-click Epson again. 2 When you don't already have all the parts shown below (for Windows), or the steps in the next column (for your Epson® scanner: Power cord and AC adapter Perfection 4180 Photo scanner (cover includes...
Start Here Card
Page 4
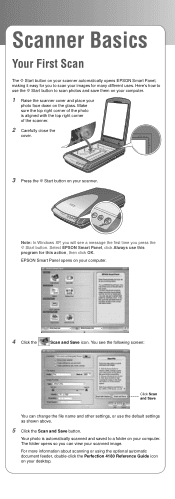
...your computer. 1 Raise the scanner cover and place your computer. The folder opens so you press the ] Start button. Make sure the top right corner of the photo is automatically scanned and saved to use this action, then click OK. Note: In Windows XP, you will see the...or using the optional automatic document feeder, double-click the Perfection 4180 Reference Guide icon on your images for this program for many different uses. EPSON Smart Panel opens on the glass. Your photo is aligned with the top right corner of the scanner. 2 Carefully close the cover. 3 Press the ] ...
...your computer. 1 Raise the scanner cover and place your computer. The folder opens so you press the ] Start button. Make sure the top right corner of the photo is automatically scanned and saved to use this action, then click OK. Note: In Windows XP, you will see the...or using the optional automatic document feeder, double-click the Perfection 4180 Reference Guide icon on your images for this program for many different uses. EPSON Smart Panel opens on the glass. Your photo is aligned with the top right corner of the scanner. 2 Carefully close the cover. 3 Press the ] ...
Start Here Card
Page 7
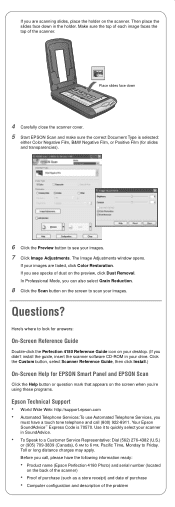
...The Image Adjustments window opens. Click the Custom button, select Scanner Reference Guide, then click Install.) On-Screen Help for slides and transparencies). 6 Click the Preview button to look for answers: On-Screen Reference Guide Double-click the Perfection 4180 Reference Guide icon... following information ready: • Product name (Epson Perfection 4180 Photo) and serial number (located on your images. 7 Click Image Adjustments. In Professional Mode, you didn't install the guide, insert the scanner software CD-ROM in your scanner in the holder. Place slides face down in...
...The Image Adjustments window opens. Click the Custom button, select Scanner Reference Guide, then click Install.) On-Screen Help for slides and transparencies). 6 Click the Preview button to look for answers: On-Screen Reference Guide Double-click the Perfection 4180 Reference Guide icon... following information ready: • Product name (Epson Perfection 4180 Photo) and serial number (located on your images. 7 Click Image Adjustments. In Professional Mode, you didn't install the guide, insert the scanner software CD-ROM in your scanner in the holder. Place slides face down in...


