
Operation Guide - Easy Interactive Tools V3.0
Page 16
... the images from the device connec‐ ted to the computer port. • [ ]: Changes to the images from the device connec‐ ted to the video port. • [ ]: Changes to the images from the device connec‐ ted over a network, set the network information for the projector on the Projector Settings...
... the images from the device connec‐ ted to the computer port. • [ ]: Changes to the images from the device connec‐ ted to the video port. • [ ]: Changes to the images from the device connec‐ ted over a network, set the network information for the projector on the Projector Settings...

Operation Guide - Easy Interactive Tools V3.0
Page 25
...if fonts for some of the drawings may affect other applications. (Windows XP only) After closing Easy Interactive Tools, return the video accelerator settings to play movies recorded on Media Player images flicker. (3) Move the Hardware acceleration to restore the default settings. s...some DVDs/BluRays may have been corrupted. Troubleshooting 25 Problem Solution Characters become garbled after saving a screen that Change the video accelerator settings manually. Characters become transparent. Display - Open the EIT file on the Settings screen to the position second ...
...if fonts for some of the drawings may affect other applications. (Windows XP only) After closing Easy Interactive Tools, return the video accelerator settings to play movies recorded on Media Player images flicker. (3) Move the Hardware acceleration to restore the default settings. s...some DVDs/BluRays may have been corrupted. Troubleshooting 25 Problem Solution Characters become garbled after saving a screen that Change the video accelerator settings manually. Characters become transparent. Display - Open the EIT file on the Settings screen to the position second ...

Operation Guide - EasyMP Network Projection
Page 43
... are connected to multiple projectors, click the projector you can change the input source from the toolbar. 43 button on the toolbar The audio and video turn off. A black screen is displayed. The logo set for the projector is being input to the projector while projecting over a network, you want to...
... are connected to multiple projectors, click the projector you can change the input source from the toolbar. 43 button on the toolbar The audio and video turn off. A black screen is displayed. The logo set for the projector is being input to the projector while projecting over a network, you want to...
Operation Guide - EasyMP Network Projection
Page 44
... toolbar display is displayed in EasyMP Network Projection software. The computer and the projector are connected to multiple projectors, click the projector you want to a video source: Click the button. 1. Click the button on the toolbar and select the 3.
... toolbar display is displayed in EasyMP Network Projection software. The computer and the projector are connected to multiple projectors, click the projector you want to a video source: Click the button. 1. Click the button on the toolbar and select the 3.

Operation Guide - EasyMP Network Projection
Page 90
... is displayed when EasyMP Network Projection starts. If the projector does not support movie sending, this setting turns off Windows Aero.) 90 Use full-screen video transfer Encrypt communications Display Connection Mode Selection window on a regular startup method.
... is displayed when EasyMP Network Projection starts. If the projector does not support movie sending, this setting turns off Windows Aero.) 90 Use full-screen video transfer Encrypt communications Display Connection Mode Selection window on a regular startup method.
Operation Guide - EasyMP Network Projection
Page 95
... the Projector control toolbar. Displays the Set options screen. Starts Movie Sending Mode. (Supported models only) Movie Sending Mode Disconnects the connection to turn the video and audio on or off, or switch the input source. Click to the projector. Disconnect 95
... the Projector control toolbar. Displays the Set options screen. Starts Movie Sending Mode. (Supported models only) Movie Sending Mode Disconnects the connection to turn the video and audio on or off, or switch the input source. Click to the projector. Disconnect 95

Operation Guide - EasyMP Network Projection
Page 98
A/V Mute Switch PC source Changes to images from the input port to images from the video input port. Switch video source Parent topic: Toolbar Related tasks Hiding Computer Operations 98 Related references Search and Connect Screen Related tasks Hiding Computer Operations Projecting Only a PowerPoint Slide Show Related topics Projecting Movies Projector control When you click the button on the toolbar, the following toolbar is displayed. Hides and mutes the video and audio. Changes to which the computer or USB device are connected.
A/V Mute Switch PC source Changes to images from the input port to images from the video input port. Switch video source Parent topic: Toolbar Related tasks Hiding Computer Operations 98 Related references Search and Connect Screen Related tasks Hiding Computer Operations Projecting Only a PowerPoint Slide Show Related topics Projecting Movies Projector control When you click the button on the toolbar, the following toolbar is displayed. Hides and mutes the video and audio. Changes to which the computer or USB device are connected.
User Manual
Page 3
Side...22 Projector Parts - Contents BrightLink Pro 1420Wi/1430Wi User's Guide 13 Introduction to Your Projector ...14 Projector Features...14 Product Box Contents...16 Additional Components ...17 Optional Equipment and Replacement Parts 18 ... Touch Unit 39 Installing the Projector Feet...59 Projector Connections...60 Connecting to Computer Sources 61 Connecting to a Computer for USB Video and Audio 61 Connecting to Go for VGA Video 62 3 Remote Control 29 Projector Parts - Front/Top ...21 Projector Parts - Control Panel ...26 Projector Parts - Interface Panel...23 Projector ...
Side...22 Projector Parts - Contents BrightLink Pro 1420Wi/1430Wi User's Guide 13 Introduction to Your Projector ...14 Projector Features...14 Product Box Contents...16 Additional Components ...17 Optional Equipment and Replacement Parts 18 ... Touch Unit 39 Installing the Projector Feet...59 Projector Connections...60 Connecting to Computer Sources 61 Connecting to a Computer for USB Video and Audio 61 Connecting to Go for VGA Video 62 3 Remote Control 29 Projector Parts - Front/Top ...21 Projector Parts - Control Panel ...26 Projector Parts - Interface Panel...23 Projector ...

User Manual
Page 4
... to a Computer for HDMI Video and Audio 63 Connecting to a Computer for Pen Use or USB Mouse Control 64 Connecting to a Computer for Sound 65 Connecting a Computer to the Control Pad 65 Connecting to Video Sources ...67 Connecting to an HDMI Video Source 67 Connecting to an MHL...-Compatible Device 68 Connecting to a Component-to-VGA Video Source 68 Connecting to a Composite Video Source 69 Connecting to a Video Source for Sound 70 Connecting to an External ...
... to a Computer for HDMI Video and Audio 63 Connecting to a Computer for Pen Use or USB Mouse Control 64 Connecting to a Computer for Sound 65 Connecting a Computer to the Control Pad 65 Connecting to Video Sources ...67 Connecting to an HDMI Video Source 67 Connecting to an MHL...-Compatible Device 68 Connecting to a Component-to-VGA Video Source 68 Connecting to a Composite Video Source 69 Connecting to a Video Source for Sound 70 Connecting to an External ...

User Manual
Page 6
... 139 Starting a PC Free PDF File Presentation 140 Slideshow Display Options ...142 Adjusting Projector Features ...144 Shutting Off the Picture and Sound Temporarily 144 Stopping Video Action Temporarily 145 Zooming Into and Out of Images ...145 Scheduling Projector Events ...146 Saving a Scheduled Event...147 Viewing Scheduled Events ...147 Editing Scheduled Events...
... 139 Starting a PC Free PDF File Presentation 140 Slideshow Display Options ...142 Adjusting Projector Features ...144 Shutting Off the Picture and Sound Temporarily 144 Stopping Video Action Temporarily 145 Zooming Into and Out of Images ...145 Scheduling Projector Events ...146 Saving a Scheduled Event...147 Viewing Scheduled Events ...147 Editing Scheduled Events...

User Manual
Page 10
... Specifications ...301 Touch Unit Specifications ...301 Projector Dimension Specifications 302 Projector Electrical Specifications ...302 Projector Environmental Specifications 303 Projector Safety and Approvals Specifications 303 Supported Video Display Formats...303 USB Display System Requirements 306 10
... Specifications ...301 Touch Unit Specifications ...301 Projector Dimension Specifications 302 Projector Electrical Specifications ...302 Projector Environmental Specifications 303 Projector Safety and Approvals Specifications 303 Supported Video Display Formats...303 USB Display System Requirements 306 10
User Manual
Page 15
... for projection • Projector monitoring and control via remote network computer • Optional wireless network support, including video and audio transfer • PC Free photo slide shows via connected USB memory devices or Epson document camera • Dual VGA ports for connections by multiple presenters • Port for Crestron RoomView network monitoring...
... for projection • Projector monitoring and control via remote network computer • Optional wireless network support, including video and audio transfer • PC Free photo slide shows via connected USB memory devices or Epson document camera • Dual VGA ports for connections by multiple presenters • Port for Crestron RoomView network monitoring...
User Manual
Page 17
...Interactive Function CD 13 Touch Unit and markers (inside the unit) (BrightLink Pro 1430Wi) 14 Labels (4) (BrightLink Pro 1430Wi) 15 Tape for securing markers (BrightLink Pro 1430Wi) 16 Infrared deflectors (8) (BrightLink Pro 1430Wi) 17 Wireless LAN unit 18 Control Pad (with batteries) Parent topic: Projector...or Mini-DVI port for purchase information. • To receive a component video signal, you need a D-sub, 15-pin, component-to the projector's HDMI port. 17 You can purchase one from Epson or an authorized Epson reseller. • To receive an HDMI signal, you need a compatible ...
...Interactive Function CD 13 Touch Unit and markers (inside the unit) (BrightLink Pro 1430Wi) 14 Labels (4) (BrightLink Pro 1430Wi) 15 Tape for securing markers (BrightLink Pro 1430Wi) 16 Infrared deflectors (8) (BrightLink Pro 1430Wi) 17 Wireless LAN unit 18 Control Pad (with batteries) Parent topic: Projector...or Mini-DVI port for purchase information. • To receive a component video signal, you need a D-sub, 15-pin, component-to the projector's HDMI port. 17 You can purchase one from Epson or an authorized Epson reseller. • To receive an HDMI signal, you need a compatible ...
User Manual
Page 19
...Kensington security lock Touch Unit attachment mount (BrightLink Pro 1430Wi) 90-inch whiteboard 96-inch whiteboard 6 ft. (1.8 m) VGA computer cable 10 ft. (3.0 m) VGA computer cable 10 ft. (3.0 m) Component-to-VGA video cable Part number V12H594020 V12H500020 V12H614020 V12H467020 V12H666010 V12H667010 V12H668010...accessories listed above, 1-year and 2-year extended service plans are available. Instead, Epson will ship you won't have to wait for details. 19 Option or part Epson DC-12 document camera (ELPDC12) Epson DC-20 document camera (ELPDC20) PowerLite Pilot 2 (ELPCB02) Active speakers (...
...Kensington security lock Touch Unit attachment mount (BrightLink Pro 1430Wi) 90-inch whiteboard 96-inch whiteboard 6 ft. (1.8 m) VGA computer cable 10 ft. (3.0 m) VGA computer cable 10 ft. (3.0 m) Component-to-VGA video cable Part number V12H594020 V12H500020 V12H614020 V12H467020 V12H666010 V12H667010 V12H668010...accessories listed above, 1-year and 2-year extended service plans are available. Instead, Epson will ship you won't have to wait for details. 19 Option or part Epson DC-12 document camera (ELPDC12) Epson DC-20 document camera (ELPDC20) PowerLite Pilot 2 (ELPCB02) Active speakers (...
User Manual
Page 24
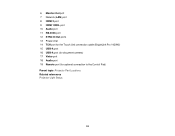
6 Monitor Out port 7 Network (LAN) port 8 HDMI 2 port 9 HDMI 1/MHL port 10 Audio port 11 RS-232C port 12 SYNC In/Out ports 13 Power inlet 14 TCH port for the Touch Unit connection cable (BrightLink Pro 1430Wi) 15 USB-A port 16 USB-A port (for document camera) 17 Video port 18 Audio port 19 Remote port (for optional connection to the Control Pad) Parent topic: Projector Part Locations Related references Projector Light Status 24
6 Monitor Out port 7 Network (LAN) port 8 HDMI 2 port 9 HDMI 1/MHL port 10 Audio port 11 RS-232C port 12 SYNC In/Out ports 13 Power inlet 14 TCH port for the Touch Unit connection cable (BrightLink Pro 1430Wi) 15 USB-A port 16 USB-A port (for document camera) 17 Video port 18 Audio port 19 Remote port (for optional connection to the Control Pad) Parent topic: Projector Part Locations Related references Projector Light Status 24

User Manual
Page 26
Control Panel 1 Projector status lights 2 Source Search button (searches for connected video sources) 3 Enter button (selects options) 4 Horizontal/Vertical keystone adjustment buttons (display the adjustment screen and adjust screen shape) and arrow buttons 5 Help button (accesses projector ...
Control Panel 1 Projector status lights 2 Source Search button (searches for connected video sources) 3 Enter button (selects options) 4 Horizontal/Vertical keystone adjustment buttons (display the adjustment screen and adjust screen shape) and arrow buttons 5 Help button (accesses projector ...

User Manual
Page 30
... picture and sound) 15 Split button (toggles split screen mode) 16 Strap attachment point 17 Help button (accesses projector help information) 18 Freeze button (stops video action) 19 Volume up/down buttons (adjust speaker volume) 20 Pointer button (activates on-screen pointer) 21 Esc button (cancels/exits functions and controls wireless...
... picture and sound) 15 Split button (toggles split screen mode) 16 Strap attachment point 17 Help button (accesses projector help information) 18 Freeze button (stops video action) 19 Volume up/down buttons (adjust speaker volume) 20 Pointer button (activates on-screen pointer) 21 Esc button (cancels/exits functions and controls wireless...

User Manual
Page 60
... or camera) or an optional Epson document camera. Insert the larger front foot into the holes at altitudes above 4921 feet (1500 m), turn on High Altitude Mode to display presentations, movies, or other images, with or without a computer, you can connect the projector to a variety of computer, video, and audio sources to...
... or camera) or an optional Epson document camera. Insert the larger front foot into the holes at altitudes above 4921 feet (1500 m), turn on High Altitude Mode to display presentations, movies, or other images, with or without a computer, you can connect the projector to a variety of computer, video, and audio sources to...

User Manual
Page 61
...control pad. Note that using a USB cable. Note: You can project through the computer's USB port (preferably USB 2.0). You can send video and audio output to the projector through the USB port. Note: This also lets you can also connect your computer. Connecting to Computer ...Sources Connecting to Video Sources Connecting to an External Computer Monitor Connecting to External Speakers Connecting to External USB Devices Connecting a Printer to the Control Pad ...
...control pad. Note that using a USB cable. Note: You can project through the computer's USB port (preferably USB 2.0). You can send video and audio output to the projector through the USB port. Note: This also lets you can also connect your computer. Connecting to Computer ...Sources Connecting to Video Sources Connecting to an External Computer Monitor Connecting to External Speakers Connecting to External USB Devices Connecting a Printer to the Control Pad ...

User Manual
Page 62
...; Windows 8.x: Click EPSON_PJ_UD in the upper right-corner, then select Run EMP_UDSE.exe in the dialog box that appears to install the Epson USB Display software. • Windows 7/Windows Vista: Select Run EMP_UDSE.exe in the dialog box that appears to install the... Display software on your screen. Parent topic: Connecting to Computer Sources Connecting to a Computer for VGA Video You can connect the projector to install the Epson USB Display software. Turn on -screen instructions to your computer. • Windows 2000: Select Computer, EPSON_PJ_UD, and EMP_UDSE.EXE to the computer....
...; Windows 8.x: Click EPSON_PJ_UD in the upper right-corner, then select Run EMP_UDSE.exe in the dialog box that appears to install the Epson USB Display software. • Windows 7/Windows Vista: Select Run EMP_UDSE.exe in the dialog box that appears to install the... Display software on your screen. Parent topic: Connecting to Computer Sources Connecting to a Computer for VGA Video You can connect the projector to install the Epson USB Display software. Turn on -screen instructions to your computer. • Windows 2000: Select Computer, EPSON_PJ_UD, and EMP_UDSE.EXE to the computer....


