Operation Guide - EasyMP Multi PC Projection
Page 15
... a network connection, if necessary, see the documentation supplied with the projector for the access point, such as the SSID and security settings. 2. Install the wireless LAN unit in Advanced Connection Mode (Wireless) To connect a computer to the projector over a wireless LAN, you need to a wireless... or wired LAN. See the User's Guide supplied with your network administrator and write down the settings for more details. 4. Press the Menu button on -screen instructions to set up a...
... a network connection, if necessary, see the documentation supplied with the projector for the access point, such as the SSID and security settings. 2. Install the wireless LAN unit in Advanced Connection Mode (Wireless) To connect a computer to the projector over a wireless LAN, you need to a wireless... or wired LAN. See the User's Guide supplied with your network administrator and write down the settings for more details. 4. Press the Menu button on -screen instructions to set up a...
Operation Guide - EasyMP Multi PC Projection
Page 18
...of your meeting. Make sure you selected, the connection procedure differs. Connection Methods Selecting the Projector Search Method Controlling the Projected Display Disconnecting Related topics Installing the Software Setting Up the Projector Connection Methods You can select a suitable method to project images from the Software over a network depending on your.... (Holding discussions and interacting with the projector for Various Meeting Styles You can choose a connection method to hold your meeting. See the User's Guide supplied with other users in a business environment.) 18
...of your meeting. Make sure you selected, the connection procedure differs. Connection Methods Selecting the Projector Search Method Controlling the Projected Display Disconnecting Related topics Installing the Software Setting Up the Projector Connection Methods You can select a suitable method to project images from the Software over a network depending on your.... (Holding discussions and interacting with the projector for Various Meeting Styles You can choose a connection method to hold your meeting. See the User's Guide supplied with other users in a business environment.) 18
Operation Guide - EasyMP Multi PC Projection
Page 61
...projector. 61 The built-in storage could not be detected correctly. 0BFF An error has occurred in your projector User's Guide. Go to see if it is installed correctly. Event ID Cause 0898 Failed to acquire DHCP. 0899 Other communication errors 089A 089B 089C 089D 0B01 The EAP ... client authentication failed. If you are correct. If restarting the projector or the network software does not solve the problem, contact Epson as described in your projector User's Guide. Parent topic: Solving Problems Remedy Check the DHCP server to see if it is not deleted correctly, contact...
...projector. 61 The built-in storage could not be detected correctly. 0BFF An error has occurred in your projector User's Guide. Go to see if it is installed correctly. Event ID Cause 0898 Failed to acquire DHCP. 0899 Other communication errors 089A 089B 089C 089D 0B01 The EAP ... client authentication failed. If you are correct. If restarting the projector or the network software does not solve the problem, contact Epson as described in your projector User's Guide. Parent topic: Solving Problems Remedy Check the DHCP server to see if it is not deleted correctly, contact...
Operation Guide - Easy Interactive Tools V3.0
Page 5
... automatically. If the installer does not start the installation. c Double-click the Install Navi icon in the CDROM drive. Select Easy Install and install Easy Interactive Driver. s Projector's User's Guide When using EB-465i/EB-460i/EB-455Wi/EB-450Wi/BrightLink 455Wi/BrightLink 450Wi, use Easy Interactive ...and then search for Easy Interactive Function CD-ROM into your computer. a You need to install. b Insert the EPSON Projector Software for Easy Interactive Tools Ver.X.XX. http://www.epson.com Uninstalling Windows XP a Click Start, and then Control Panel. b Double-click Add/...
... automatically. If the installer does not start the installation. c Double-click the Install Navi icon in the CDROM drive. Select Easy Install and install Easy Interactive Driver. s Projector's User's Guide When using EB-465i/EB-460i/EB-455Wi/EB-450Wi/BrightLink 455Wi/BrightLink 450Wi, use Easy Interactive ...and then search for Easy Interactive Function CD-ROM into your computer. a You need to install. b Insert the EPSON Projector Software for Easy Interactive Tools Ver.X.XX. http://www.epson.com Uninstalling Windows XP a Click Start, and then Control Panel. b Double-click Add/...
Operation Guide - Easy Interactive Tools V3.0
Page 7
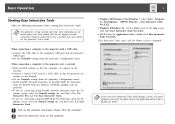
... Guide. When connecting a computer to the projector over a network • Make network settings so that the computer can connect to the computer's USB port and the projector's USB-B port. • Set the Extended settings from the projector's Configuration menu. Programs (or All Programs) - EPSON Projector... • Connect the USB cable to the network. • Set the Network settings from the projector's Configuration menu. • Install EasyMP Network Projection or EasyMP Multi PC Projection from the computer. a If you are connecting using EasyMP Multi PC Projection, open the...
... Guide. When connecting a computer to the projector over a network • Make network settings so that the computer can connect to the computer's USB port and the projector's USB-B port. • Set the Extended settings from the projector's Configuration menu. Programs (or All Programs) - EPSON Projector... • Connect the USB cable to the network. • Set the Network settings from the projector's Configuration menu. • Install EasyMP Network Projection or EasyMP Multi PC Projection from the computer. a If you are connecting using EasyMP Multi PC Projection, open the...
Operation Guide - EasyMP Network Projection
Page 17
...control panel, select the Network menu, and select Network Configuration. 5. Press the Menu button on the projector. 4. See the User's Guide supplied with your computer to Connect in the projector, if necessary. Select Wireless LAN. Parent topic: Setting Up the Projector Related tasks ...necessary settings to select network settings on the computer and the projector. 1. A screen like one of the following is displayed. 17 Install the wireless LAN unit in Quick Connection Mode To connect a computer directly to the projector using wireless communication, you need to connect ...
...control panel, select the Network menu, and select Network Configuration. 5. Press the Menu button on the projector. 4. See the User's Guide supplied with your computer to Connect in the projector, if necessary. Select Wireless LAN. Parent topic: Setting Up the Projector Related tasks ...necessary settings to select network settings on the computer and the projector. 1. A screen like one of the following is displayed. 17 Install the wireless LAN unit in Quick Connection Mode To connect a computer directly to the projector using wireless communication, you need to connect ...

User Manual
Page 35
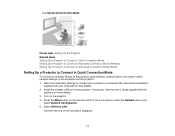
...projection mount (V12H516020) is required. Projector Setup and Installation Options Projection Distance Parent topic: Setting Up the Projector Projector Setup and Installation Options You can set up or install your mounting hardware to install the projector using the included mounting equipment. • ...wall mount) or vertically on a wall, the wall mount (V12H675020) is required. • If installing on a table (with your projector in the Installation Guide provided with a table mount) to create an interactive tabletop workspace. Projector Placement Removing and Attaching the Cable...
...projection mount (V12H516020) is required. Projector Setup and Installation Options Projection Distance Parent topic: Setting Up the Projector Projector Setup and Installation Options You can set up or install your mounting hardware to install the projector using the included mounting equipment. • ...wall mount) or vertically on a wall, the wall mount (V12H675020) is required. • If installing on a table (with your projector in the Installation Guide provided with a table mount) to create an interactive tabletop workspace. Projector Placement Removing and Attaching the Cable...
User Manual
Page 36
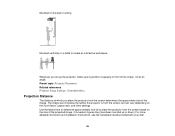
... far to position it squarely in front of the screen, not at which you set up or down.) For more detailed information and installation instructions, see the Installation Guide provided with your wall 36 The image size increases the farther the projector is from the screen based on the zoom factor, aspect ratio...
... far to position it squarely in front of the screen, not at which you set up or down.) For more detailed information and installation instructions, see the Installation Guide provided with your wall 36 The image size increases the farther the projector is from the screen based on the zoom factor, aspect ratio...
User Manual
Page 40
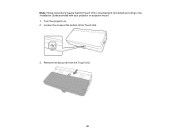
Note: These instructions require that the Touch Unit is mounted and connected according to the Installation Guide provided with your projector or projector mount. 1. Loosen the screw at the bottom of the Touch Unit. 3. Turn the projector on. 2. Remove the dial cover from the Touch Unit. 40
Note: These instructions require that the Touch Unit is mounted and connected according to the Installation Guide provided with your projector or projector mount. 1. Loosen the screw at the bottom of the Touch Unit. 3. Turn the projector on. 2. Remove the dial cover from the Touch Unit. 40
User Manual
Page 169
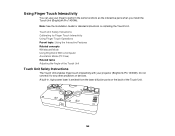
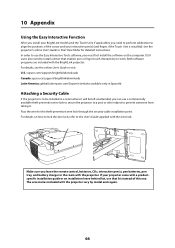
... Safety Instructions The Touch Unit enables finger touch interactivity with your finger to any other projectors or devices. Note: See the Installation Guide for Finger Touch Interactivity Using Finger Touch Operations Parent topic: Using the Interactive Features Related concepts Whiteboard Mode Using BrightLink With a... A built-in, high-power laser is emitted from the laser diffusion ports on installing the Touch Unit. Using Finger Touch Interactivity You can use your projector (BrightLink Pro 1430Wi). Do not connect it to perform the same functions as the interactive pens when you...
... Safety Instructions The Touch Unit enables finger touch interactivity with your finger to any other projectors or devices. Note: See the Installation Guide for Finger Touch Interactivity Using Finger Touch Operations Parent topic: Using the Interactive Features Related concepts Whiteboard Mode Using BrightLink With a... A built-in, high-power laser is emitted from the laser diffusion ports on installing the Touch Unit. Using Finger Touch Interactivity You can use your projector (BrightLink Pro 1430Wi). Do not connect it to perform the same functions as the interactive pens when you...

User Manual
Page 175
... touch operations with the projected screen, just as described in annotation and whiteboard modes. 1. Turn on your finger, or use two fingers in your mount's Installation Guide. 3. You can use your finger to interact with your finger, you would use either a pen or your projector. Calibrate the pens. 2. Calibrate for finger touch...
... touch operations with the projected screen, just as described in annotation and whiteboard modes. 1. Turn on your finger, or use two fingers in your mount's Installation Guide. 3. You can use your finger to interact with your finger, you would use either a pen or your projector. Calibrate the pens. 2. Calibrate for finger touch...
User Manual
Page 294
...or resized. • If you are having trouble printing or scanning, make sure the Power setting is properly connected. See your mount's Installation Guide for Problems With Capturing, Printing, Saving, or Scanning If you are having trouble capturing and pasting, or printing, saving, or scanning, try...Menu Solutions When Finger Touch Interactivity Does Not Work If finger touch interactivity does not work (BrightLink Pro 1430Wi), try the following solutions: • Make sure the Touch Unit is installed correctly and the power cable is set to On. • Adjust the angle on the Touch Unit....
...or resized. • If you are having trouble printing or scanning, make sure the Power setting is properly connected. See your mount's Installation Guide for Problems With Capturing, Printing, Saving, or Scanning If you are having trouble capturing and pasting, or printing, saving, or scanning, try...Menu Solutions When Finger Touch Interactivity Does Not Work If finger touch interactivity does not work (BrightLink Pro 1430Wi), try the following solutions: • Make sure the Touch Unit is installed correctly and the power cable is set to On. • Adjust the angle on the Touch Unit....
Installation Guide - Control Pad and Touch Unit with the ELPMB28 wall mount
Page 2
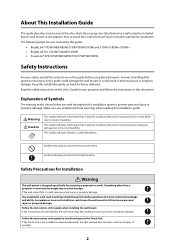
...Installation Guide This guide describes how to incorrect handling. Read the safety instructions in personal injury or physical damage due to install the Control Pad and Touch Unit (BrightLink® Pro 1430Wi) when using the wall mount. This symbol indicates information that, if ignored, could possibly result in the online User's Guide...ignores instructions in this guide before installation. Explanation of the wall. If the Touch Unit is not strong enough, reinforce the wall before using the ELPMB28 wall mount with the BrightLink Pro 1420Wi/1430Wi ultra-short-throw projectors...
...Installation Guide This guide describes how to incorrect handling. Read the safety instructions in personal injury or physical damage due to install the Control Pad and Touch Unit (BrightLink® Pro 1430Wi) when using the wall mount. This symbol indicates information that, if ignored, could possibly result in the online User's Guide...ignores instructions in this guide before installation. Explanation of the wall. If the Touch Unit is not strong enough, reinforce the wall before using the ELPMB28 wall mount with the BrightLink Pro 1420Wi/1430Wi ultra-short-throw projectors...

Installation Guide - Control Pad and Touch Unit with the ELPMB28 wall mount
Page 10
...; There are the same. Some menus may not be performed correctly. 4 Installing the Touch Unit (BrightLink Pro 1430Wi) The following procedures must be completed before installing the Touch Unit: • Installing the projector (see the ELPMB28 Installation Guide) • Adjusting the projected image (see the ELPMB28 Installation Guide) • Calibrating the interactive pen(s) s Refer to your fingers may...
...; There are the same. Some menus may not be performed correctly. 4 Installing the Touch Unit (BrightLink Pro 1430Wi) The following procedures must be completed before installing the Touch Unit: • Installing the projector (see the ELPMB28 Installation Guide) • Adjusting the projected image (see the ELPMB28 Installation Guide) • Calibrating the interactive pen(s) s Refer to your fingers may...
Installation Guide - Control Pad and Touch Unit with the ELPMB28 wall mount
Page 23
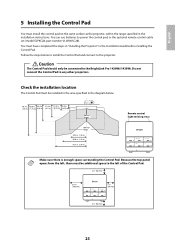
...to the left , there must have completed the steps in "Installing the Projector" in the Installation Guide before installing the Control Pad. English 5 Installing the Control Pad You must be installed in the area specified in the diagram below to install the Control Pad and connect to power the control pad, ... Pad to the BrightLink Pro 1420Wi/1430Wi. Because the top panel opens from the left of the Control Pad. 2 in. (50 mm) 3.9 in (100 mm) 2 in (50 mm) 2 in the installation instructions. Check the installation location The Control Pad must install the control pad on the same ...
...to the left , there must have completed the steps in "Installing the Projector" in the Installation Guide before installing the Control Pad. English 5 Installing the Control Pad You must be installed in the area specified in the diagram below to install the Control Pad and connect to power the control pad, ... Pad to the BrightLink Pro 1420Wi/1430Wi. Because the top panel opens from the left of the Control Pad. 2 in. (50 mm) 3.9 in (100 mm) 2 in (50 mm) 2 in the installation instructions. Check the installation location The Control Pad must install the control pad on the same ...
Installation Guide - Ultra-Short Throw Wall Mount (ELPMB28)
Page 2
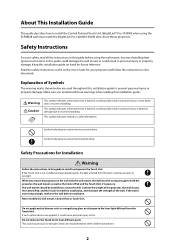
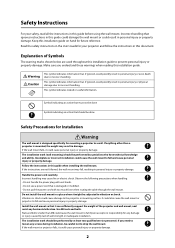
...to fall , resulting in personal injury or property damage. Follow the instructions in this installation guide on hand for any damage or injury caused by specialists who have technical knowledge and ability. Install the wall mount so that is designed specifically for your safety, read all the ... done Safety Precautions for Installation Warning The wall mount is damaged or modified. • Do not pull the power cord with wet hands. • Do not use a power cord that it could result in personal injury or property damage. Epson accepts no responsibility for future reference....
...to fall , resulting in personal injury or property damage. Follow the instructions in this installation guide on hand for any damage or injury caused by specialists who have technical knowledge and ability. Install the wall mount so that is designed specifically for your safety, read all the ... done Safety Precautions for Installation Warning The wall mount is damaged or modified. • Do not pull the power cord with wet hands. • Do not use a power cord that it could result in personal injury or property damage. Epson accepts no responsibility for future reference....
Installation Guide - Ultra-Short Throw Wall Mount (ELPMB28)
Page 3
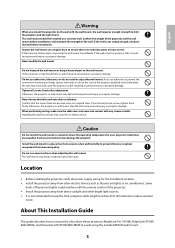
...projector, verify the power supply wiring for your projector model may fall and cause personal injury or property damage. About This Installation Guide This guide describes how to mount the ultra-short-throw projectors BrightLink Pro 1410Wi, BrightLink 475Wi/ 480i/485Wi, and PowerLite 470/475W... noise. English Warning When you mount the projector on a regular basis to ensure there are any broken parts, stop using the included EPSON wall mount. 3 Handling the cable incorrectly may fall and cause personal injury or property damage. Do not use excessive force when adjusting the...
...projector, verify the power supply wiring for your projector model may fall and cause personal injury or property damage. About This Installation Guide This guide describes how to mount the ultra-short-throw projectors BrightLink Pro 1410Wi, BrightLink 475Wi/ 480i/485Wi, and PowerLite 470/475W... noise. English Warning When you mount the projector on a regular basis to ensure there are any broken parts, stop using the included EPSON wall mount. 3 Handling the cable incorrectly may fall and cause personal injury or property damage. Do not use excessive force when adjusting the...
Installation Guide - Ultra-Short Throw Wall Mount (ELPMB28)
Page 10
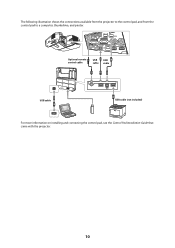
The following illustration shows the connections available from the projector to the control pad, and from the control pad to a computer, thumbdrive, and printer. Optional remote control cable USB USB cable cable USB cable USB cable (not included) For more information on installing and connecting the control pad, see the Control Pad Installation Guide that came with the projector. 10
The following illustration shows the connections available from the projector to the control pad, and from the control pad to a computer, thumbdrive, and printer. Optional remote control cable USB USB cable cable USB cable USB cable (not included) For more information on installing and connecting the control pad, see the Control Pad Installation Guide that came with the projector. 10
Installation Guide - Ultra-Short Throw Wall Mount (ELPMB43)
Page 2
... and 575Wi+/585Wi+/595Wi+ • BrightLink Pro 1410Wi/1420Wi/1430Wi • PowerLite® 470/475W/480/485W/570/575W/580/585W Safety Instructions For your projector and follow the instructions in this guide could damage the wall mount or could cause the wall mount... may result in this installation guide. Keep this guide when installing the wall mount. Read the safety instructions in the User's Guide for mounting a projector to install and operate the Touch Unit. Make sure you understand these warnings when reading this guide before using the included Epson® wall mount. ...
... and 575Wi+/585Wi+/595Wi+ • BrightLink Pro 1410Wi/1420Wi/1430Wi • PowerLite® 470/475W/480/485W/570/575W/580/585W Safety Instructions For your projector and follow the instructions in this guide could damage the wall mount or could cause the wall mount... may result in this installation guide. Keep this guide when installing the wall mount. Read the safety instructions in the User's Guide for mounting a projector to install and operate the Touch Unit. Make sure you understand these warnings when reading this guide before using the included Epson® wall mount. ...
Installation Guide - Ultra-Short Throw Wall Mount (ELPMB43)
Page 66
... programs are included with the projector. For details, see the online User's Guide or visit: U.S.: epson.com/support/brightlinkdownloads Canada: epson.ca/support/brightlinkdownloads Latin America: global.latin.epson.com/Soporte (website available only in Spanish) Attaching a Security Cable If the projector is installed). Make sure you leave the remote control, batteries, CDs, interactive pen...
... programs are included with the projector. For details, see the online User's Guide or visit: U.S.: epson.com/support/brightlinkdownloads Canada: epson.ca/support/brightlinkdownloads Latin America: global.latin.epson.com/Soporte (website available only in Spanish) Attaching a Security Cable If the projector is installed). Make sure you leave the remote control, batteries, CDs, interactive pen...


