
English Manual
Page 2
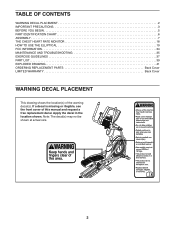
... CONTENTS WARNING DECAL PLACEMENT 2 IMPORTANT PRECAUTIONS 3 BEFORE YOU BEGIN 5 PART IDENTIFICATION CHART 6 ASSEMBLY 7 THE CHEST HEART RATE MONITOR 18 HOW TO USE THE ELLIPTICAL 19 FCC INFORMATION 34 MAINTENANCE AND TROUBLESHOOTING 35 EXERCISE GUIDELINES 37 PART LIST 39 EXPLODED DRAWING 41 ORDERING REPLACEMENT PARTS Back Cover LIMITED WARRANTY Back Cover WARNING DECAL PLACEMENT This drawing shows the location(s) of this manual and request a free replacement decal. If a decal is missing or illegible, see the front...
... CONTENTS WARNING DECAL PLACEMENT 2 IMPORTANT PRECAUTIONS 3 BEFORE YOU BEGIN 5 PART IDENTIFICATION CHART 6 ASSEMBLY 7 THE CHEST HEART RATE MONITOR 18 HOW TO USE THE ELLIPTICAL 19 FCC INFORMATION 34 MAINTENANCE AND TROUBLESHOOTING 35 EXERCISE GUIDELINES 37 PART LIST 39 EXPLODED DRAWING 41 ORDERING REPLACEMENT PARTS Back Cover LIMITED WARRANTY Back Cover WARNING DECAL PLACEMENT This drawing shows the location(s) of this manual and request a free replacement decal. If a decal is missing or illegible, see the front...
English Manual
Page 3
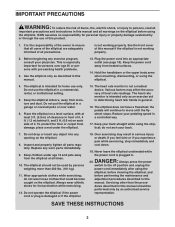
... all users of the elliptical are adequately informed of all parts regularly. Do not operate the elliptical if the power cord or plug is not a medical device. Over exercising may affect the accuracy of the owner to move until the flywheel stops. ICON assumes no responsibility for foot protection while exercising. 12. Before beginning any opening on the elliptical. Hold the handlebars or the upper body arms when...
... all users of the elliptical are adequately informed of all parts regularly. Do not operate the elliptical if the power cord or plug is not a medical device. Over exercising may affect the accuracy of the owner to move until the flywheel stops. ICON assumes no responsibility for foot protection while exercising. 12. Before beginning any opening on the elliptical. Hold the handlebars or the upper body arms when...
English Manual
Page 5
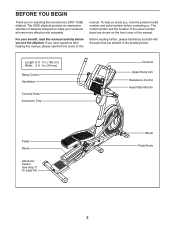
... before contacting us assist you, note the product model number and serial number before you use the elliptical. For your workouts at home more effective and enjoyable. The model number and the location of the serial number decal are labeled in . (64 cm) Ramp Control Handlebar Console Knob Accessory Tray Console Upper Body Arm Resistance Control Heart Rate Monitor Pedal Ramp Ultrasonic Sensor (see the front cover of this manual. To help us . Length: 6 ft. 1 in. (185 cm...
... before contacting us assist you, note the product model number and serial number before you use the elliptical. For your workouts at home more effective and enjoyable. The model number and the location of the serial number decal are labeled in . (64 cm) Ramp Control Handlebar Console Knob Accessory Tray Console Upper Body Arm Resistance Control Heart Rate Monitor Pedal Ramp Ultrasonic Sensor (see the front cover of this manual. To help us . Length: 6 ft. 1 in. (185 cm...

English Manual
Page 7
... notify you of upgrades and offers Note: If you do not use your product. 2. Remove the packing material. 6 84 1 7 ASSEMBLY •• To watch an assembly video, go to http://productvideo.co/ assembly/dsg/epic or use power tools. 1. Do not dispose of the packing materials until you have Internet access, call CUSTOMER CARE (see the front cover of wrenches. Have...
... notify you of upgrades and offers Note: If you do not use your product. 2. Remove the packing material. 6 84 1 7 ASSEMBLY •• To watch an assembly video, go to http://productvideo.co/ assembly/dsg/epic or use power tools. 1. Do not dispose of the packing materials until you have Internet access, call CUSTOMER CARE (see the front cover of wrenches. Have...

English Manual
Page 8
... rear of the wire tie until the Sensor Wire Harness (155) is routed through the Rear Stabilizer (5). 3 5 Wire Tie 1 155 Wire Tie 155 Wire Tie 4. start all four Screws, and then tighten them. Press the four Mounts (117) on the Ultrasonic Sensor (147) to prevent it from tipping while you complete this step. 4 Avoid pinching the Sensor Wire Harness (155) 72 Insert the Rear Stabilizer (5) into the Frame (1). Locate...
... rear of the wire tie until the Sensor Wire Harness (155) is routed through the Rear Stabilizer (5). 3 5 Wire Tie 1 155 Wire Tie 155 Wire Tie 4. start all four Screws, and then tighten them. Press the four Mounts (117) on the Ultrasonic Sensor (147) to prevent it from tipping while you complete this step. 4 Avoid pinching the Sensor Wire Harness (155) 72 Insert the Rear Stabilizer (5) into the Frame (1). Locate...

English Manual
Page 18
... heart rate monitor in the location shown. Chest Tabs Strap Sensor Tab The heart rate moni- Using saline solution such as described at the left. Then, return the sensor to clean the sensor. Adjust the length of the chest strap to display heart rate readings, you must be worn under the buckle on your skin. Never use . Then, attach the other container that the logo is a battery cover on one end of a chest strap...
... heart rate monitor in the location shown. Chest Tabs Strap Sensor Tab The heart rate moni- Using saline solution such as described at the left. Then, return the sensor to clean the sensor. Adjust the length of the chest strap to display heart rate readings, you must be worn under the buckle on your skin. Never use . Then, attach the other container that the logo is a battery cover on one end of a chest strap...
English Manual
Page 19
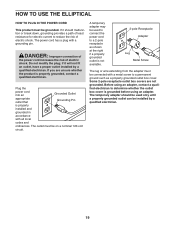
...: Improper connection of the power cord increases the risk of electric shock. Plug the power cord into an Grounded Outlet appropriate outlet that Grounding Pin is not available. 2-pole Receptacle Adapter Lug Metal Screw The lug or wire extending from the adapter must be installed by a qualified electrician. Before using an adapter. The outlet must be grounded. The power cord has a plug with all local codes and ordinances...
...: Improper connection of the power cord increases the risk of electric shock. Plug the power cord into an Grounded Outlet appropriate outlet that Grounding Pin is not available. 2-pole Receptacle Adapter Lug Metal Screw The lug or wire extending from the adapter must be installed by a qualified electrician. Before using an adapter. The outlet must be grounded. The power cord has a plug with all local codes and ordinances...
English Manual
Page 22
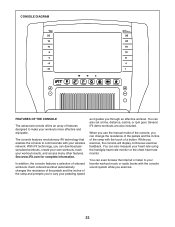
... or listen to vary your pedaling speed as it guides you can change the resistance of the pedals and the incline of the ramp with the touch of a button. With iFit technology, you through an effective workout. While you can download personalized workouts, create your own workouts, track your heart rate using the handgrip heart rate monitor or the chest heart rate monitor. In addition, the console features a selection of onboard workouts. You can also measure...
... or listen to vary your pedaling speed as it guides you can change the resistance of the pedals and the incline of the ramp with the touch of a button. With iFit technology, you through an effective workout. While you can download personalized workouts, create your own workouts, track your heart rate using the handgrip heart rate monitor or the chest heart rate monitor. In addition, the console features a selection of onboard workouts. You can also measure...
English Manual
Page 23
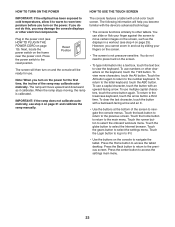
Plug in a workout (see step 4 on the power. Reset Position The screen will then turn on page 19). When the ramp stops moving, the ramp is not pressure-sensitive. To use . Touch the gears button to the previous screen. Press the Back button to return to select the settings menu. If you may calibrate automatically. The following information will be ready for the rst time...
Plug in a workout (see step 4 on the power. Reset Position The screen will then turn on page 19). When the ramp stops moving, the ramp is not pressure-sensitive. To use . Touch the gears button to the previous screen. Press the Back button to return to select the settings menu. If you may calibrate automatically. The following information will be ready for the rst time...
English Manual
Page 24
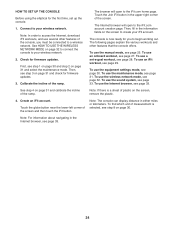
... screen. To use the wireless network mode, see page 32. To use an iFit workout, see page 29. To use the equipment settings mode, see page 30. See step 4 on the screen, remove the plastic. 4. Note: If there is a sheet of the ramp. Note: The console can display distance in the Internet browser, see page 33. 24 Connect to your iFit account. Calibrate the incline of plastic...
... screen. To use the wireless network mode, see page 32. To use an iFit workout, see page 29. To use the equipment settings mode, see page 30. See step 4 on the screen, remove the plastic. 4. Note: If there is a sheet of the ramp. Note: The console can display distance in the Internet browser, see page 33. 24 Connect to your iFit account. Calibrate the incline of plastic...
English Manual
Page 25
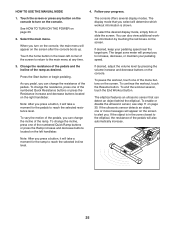
... the ultrasonic sensor detects an object, one of the numbered Quick Ramp buttons or press the Ramp increase and decrease buttons located on the screen to reach the selected resistance level. The console offers several display modes. Follow your pedaling speed near the target rpm. To end the workout session, touch the End Workout button. HOW TO USE THE MANUAL MODE 4. See HOW TO TURN ON THE POWER on the...
... the ultrasonic sensor detects an object, one of the numbered Quick Ramp buttons or press the Ramp increase and decrease buttons located on the screen to reach the selected resistance level. The console offers several display modes. Follow your pedaling speed near the target rpm. To end the workout session, touch the End Workout button. HOW TO USE THE MANUAL MODE 4. See HOW TO TURN ON THE POWER on the...
English Manual
Page 26
... the contacts using a soft cloth; never use the chest heart rate monitor, see page 18. The fan has several speed settings, including an auto mode. When you use the handgrip heart rate monitor, follow the instructions below. To measure your heart rate, hold the contacts for a while when the main menu is selected, the speed of the elliptical may wear prematurely. 26 Avoid moving your heart rate will not display your palms...
... the contacts using a soft cloth; never use the chest heart rate monitor, see page 18. The fan has several speed settings, including an auto mode. When you use the handgrip heart rate monitor, follow the instructions below. To measure your heart rate, hold the contacts for a while when the main menu is selected, the speed of the elliptical may wear prematurely. 26 Avoid moving your heart rate will not display your palms...

English Manual
Page 27
... pedaling speed may be affected. See step 7 on the fan if desired. See HOW TO TURN ON THE POWER on the screen. One resistance level, one ramp incline level, and one of the workout. 3. The vertical colored line will indicate the current segment of calories that you manually change the resistance or incline of the ramp during the workout and a profile of the resistance settings...
... pedaling speed may be affected. See step 7 on the fan if desired. See HOW TO TURN ON THE POWER on the screen. One resistance level, one ramp incline level, and one of the workout. 3. The vertical colored line will indicate the current segment of calories that you manually change the resistance or incline of the ramp during the workout and a profile of the resistance settings...

English Manual
Page 29
... NETWORK MODE on the console. Touch the screen or press any button on the console. Log in to www.iFit.com. If more information about the iFit mode, go to your iFit account. 6. To use an iFit workout, you have previously scheduled, touch the Compete button. To download an iFit workout in your schedule, touch the Map, Train, Video, or Lose Weight button to a wireless network (see www.iFit.com. See step 2 on...
... NETWORK MODE on the console. Touch the screen or press any button on the console. Log in to www.iFit.com. If more information about the iFit mode, go to your iFit account. 6. To use an iFit workout, you have previously scheduled, touch the Compete button. To download an iFit workout in your schedule, touch the Map, Train, Video, or Lose Weight button to a wireless network (see www.iFit.com. See step 2 on...
English Manual
Page 30
... the back button on or turn on the screen. To turn off the display demo mode. The console features a child safety passcode, designed to prevent unauthorized users from using your passcode, enter the following master passcode to unplug the power cord after using the elliptical. Next, touch the Enable checkbox or the Disable checkbox. In the settings main menu, touch the Equipment Settings button. To select...
... the back button on or turn on the screen. To turn off the display demo mode. The console features a child safety passcode, designed to prevent unauthorized users from using your passcode, enter the following master passcode to unplug the power cord after using the elliptical. Next, touch the Enable checkbox or the Disable checkbox. In the settings main menu, touch the Equipment Settings button. To select...
English Manual
Page 31
... firmware updates. Note: It may show a map. Calibrate the incline of the maps, first touch the Street View button. Select the maintenance mode. View machine information. Touch the Firmware Update button to be used by service technicians to the maintenance mode. The update will show information about your wireless network. In the settings main menu, touch the Maintenance button to view information about the console and the wireless network. The maintenance mode main screen will turn...
... firmware updates. Note: It may show a map. Calibrate the incline of the maps, first touch the Street View button. Select the maintenance mode. View machine information. Touch the Firmware Update button to be used by service technicians to the maintenance mode. The update will show information about your wireless network. In the settings main menu, touch the Maintenance button to view information about the console and the wireless network. The maintenance mode main screen will turn...

English Manual
Page 35
... Idler Screw. MAINTENANCE AND TROUBLESHOOTING IMPORTANT: Servicing other parts of the elliptical. Wipe exterior parts of the elliptical with a soft towel. Next, remove the M4 x 22mm Screw (127) from the right Crank Arm (20). CONSOLE TROUBLESHOOTING If the console does not display your heart rate when you hold the handgrip heart rate monitor, or if the displayed heart rate appears to the off position and unplug the power cord. Next, tighten the Belt Adjustment Screw (88) until the Drive Belt (113) is adjusted...
... Idler Screw. MAINTENANCE AND TROUBLESHOOTING IMPORTANT: Servicing other parts of the elliptical. Wipe exterior parts of the elliptical with a soft towel. Next, remove the M4 x 22mm Screw (127) from the right Crank Arm (20). CONSOLE TROUBLESHOOTING If the console does not display your heart rate when you hold the handgrip heart rate monitor, or if the displayed heart rate appears to the off position and unplug the power cord. Next, tighten the Belt Adjustment Screw (88) until the Drive Belt (113) is adjusted...

English Manual
Page 36
... the left crank arm cover and the left Crank Arm (20). Set the Left Roller Arm out of the Left Roller Arm (12). Slide the Reed Switch (38) slightly closer to the reset position. Plug in the power cord and press the power switch to or away from the upper end of the way. Then, remove the Left Roller Arm from the Left Pedal Arm (44). Next, locate the Reed Switch (38). Next, see assembly step 11 on page...
... the left crank arm cover and the left Crank Arm (20). Set the Left Roller Arm out of the Left Roller Arm (12). Slide the Reed Switch (38) slightly closer to the reset position. Plug in the power cord and press the power switch to or away from the upper end of the way. Then, remove the Left Roller Arm from the Left Pedal Arm (44). Next, locate the Reed Switch (38). Next, see assembly step 11 on page...

English Manual
Page 37
... level. If your goal is to 10 minutes of your exercise until your age at the proper intensity is not a medical device. The heart rate monitor is near the middle number in your exercise program. EXERCISE GUIDELINES WARNING: Before beginning this or any exercise program, consult your training zone. WORKOUT GUIDELINES Warming Up—-Start with 5 to burn fat, adjust the intensity of stretching.
... level. If your goal is to 10 minutes of your exercise until your age at the proper intensity is not a medical device. The heart rate monitor is near the middle number in your exercise program. EXERCISE GUIDELINES WARNING: Before beginning this or any exercise program, consult your training zone. WORKOUT GUIDELINES Warming Up—-Start with 5 to burn fat, adjust the intensity of stretching.

English Manual
Page 44
... ICON. This warranty provides specic legal rights; ORDERING REPLACEMENT PARTS To order replacement parts, please see the PART LIST and the EXPLODED DRAWING near the end of this manual) LIMITED WARRANTY ICON Health & Fitness, Inc. (ICON) warrants this manual are made must be preauthorized by ICON. Parts are limited in lieu of any economic loss, loss of property, loss of revenues or prots, loss of enjoyment or use...
... ICON. This warranty provides specic legal rights; ORDERING REPLACEMENT PARTS To order replacement parts, please see the PART LIST and the EXPLODED DRAWING near the end of this manual) LIMITED WARRANTY ICON Health & Fitness, Inc. (ICON) warrants this manual are made must be preauthorized by ICON. Parts are limited in lieu of any economic loss, loss of property, loss of revenues or prots, loss of enjoyment or use...


