

Owners Manual
Page 1
PORTABLE CD, CD-R / RW PLAYER with CASSETTE RECORDER and AM / FM STEREO RADIO OWNER'S MANUAL PD6537 Visit our web site at www.emersonradio.com PD6537_ib011303.p65 22 13/1/2003, 14:48
PORTABLE CD, CD-R / RW PLAYER with CASSETTE RECORDER and AM / FM STEREO RADIO OWNER'S MANUAL PD6537 Visit our web site at www.emersonradio.com PD6537_ib011303.p65 22 13/1/2003, 14:48
Owners Manual
Page 2
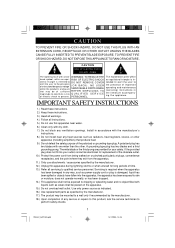
... to qualified service personnel. Use only power source as indicated. 16.) Use replacement parts as specified by the manufacturer. 17.) The product may be of sufficient RE F E R S E R V I CI NG T O magnitude to constitute a risk Q U A L I F I E D S E R V I C E of important operating and maintenance (servicing) instructions in any ventilation openings. A polarized plug has two blades with arrow- The lightning flash with one wider than the other apparatus (including amplifiers) that may...
... to qualified service personnel. Use only power source as indicated. 16.) Use replacement parts as specified by the manufacturer. 17.) The product may be of sufficient RE F E R S E R V I CI NG T O magnitude to constitute a risk Q U A L I F I E D S E R V I C E of important operating and maintenance (servicing) instructions in any ventilation openings. A polarized plug has two blades with arrow- The lightning flash with one wider than the other apparatus (including amplifiers) that may...
Owners Manual
Page 3
..., record the serial number in perfect working order before it left our factory. Model No: PD6537 Serial No: PD6537_ib011303.p65 2 2 13/1/2003, 14:48 However, there is your satisfaction. Emerson and Emerson retailers are getting the maximum benefit from each feature. Our engineers have included many useful and convenient features in this Emerson audio product. Please be sure to read this Owner's Manual completely to...
..., record the serial number in perfect working order before it left our factory. Model No: PD6537 Serial No: PD6537_ib011303.p65 2 2 13/1/2003, 14:48 However, there is your satisfaction. Emerson and Emerson retailers are getting the maximum benefit from each feature. Our engineers have included many useful and convenient features in this Emerson audio product. Please be sure to read this Owner's Manual completely to...
Owners Manual
Page 4
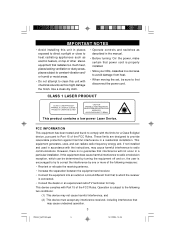
... manual. • Before turning 'On' the power, make certain that to which can radiate radio frequency energy and, if not installed and used in a cool area to avoid damage from that power cord is properly installed. • Store your CDs, cassettes in accordance with Part 15 of the FCC Rules. These limits are designed to first disconnect the power cord. This device complies with the instructions...
... manual. • Before turning 'On' the power, make certain that to which can radiate radio frequency energy and, if not installed and used in a cool area to avoid damage from that power cord is properly installed. • Store your CDs, cassettes in accordance with Part 15 of the FCC Rules. These limits are designed to first disconnect the power cord. This device complies with the instructions...

Owners Manual
Page 5
POWER SOURCES This unit is designed to operate on 8 pcs "C" batteries, not included, or on the back cabinet, then insert the plug in the event that your warranty. AC Operation Connect the small end of tape which is used to keep the CD and Cassette doors closed during shipment. ·Open the CD compartment by your unit ever needs to be returned for...
POWER SOURCES This unit is designed to operate on 8 pcs "C" batteries, not included, or on the back cabinet, then insert the plug in the event that your warranty. AC Operation Connect the small end of tape which is used to keep the CD and Cassette doors closed during shipment. ·Open the CD compartment by your unit ever needs to be returned for...

Owners Manual
Page 6
Battery Operation 1.) Remove the battery compartment door on battery power the AC cord must be disconnected from possible battery leakage. 5. Use only the size and type of batteries together (e.g. Be sure to the polarity diagram engraved inside the compartment. If this device: 1. This defeats the safety feature and could expose you probably AC Plug have your outdated outlet changed by pressing down on the back...
Battery Operation 1.) Remove the battery compartment door on battery power the AC cord must be disconnected from possible battery leakage. 5. Use only the size and type of batteries together (e.g. Be sure to the polarity diagram engraved inside the compartment. If this device: 1. This defeats the safety feature and could expose you probably AC Plug have your outdated outlet changed by pressing down on the back...

Owners Manual
Page 8
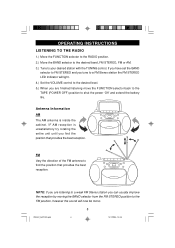
... 1.) VOLUME Control. 2.) FUNCTION (TAPE-POWER OFF/RADIO/CD ) Selector Switch. 3.) Carrying Handle. 4.) CD door. 5.) AC Cord Socket (Back Cabinet). 6.) Battery Compartment (Back Cabinet). 7.) FM Telescopic Antenna. 8.) TUNING Control. 9.) BAND (FM STEREO/FM/AM) Selector Switch. 10.) FM STEREO Indicator. 11.) Dial Pointer. 12.) Cassette Control keys. (PAUSE / STOP-EJECT / F.FWD / REW / PLAY / RECORD ) 13.) CD door OPEN Button. 14.) BEAT CUT Switch. 15.) PHONES (Stereo Headphone) Jack. 16.) CD Track LCD Display. 17.) CD REPEAT Button. 18.) Speakers. 19.) CD FWD...
... 1.) VOLUME Control. 2.) FUNCTION (TAPE-POWER OFF/RADIO/CD ) Selector Switch. 3.) Carrying Handle. 4.) CD door. 5.) AC Cord Socket (Back Cabinet). 6.) Battery Compartment (Back Cabinet). 7.) FM Telescopic Antenna. 8.) TUNING Control. 9.) BAND (FM STEREO/FM/AM) Selector Switch. 10.) FM STEREO Indicator. 11.) Dial Pointer. 12.) Cassette Control keys. (PAUSE / STOP-EJECT / F.FWD / REW / PLAY / RECORD ) 13.) CD door OPEN Button. 14.) BEAT CUT Switch. 15.) PHONES (Stereo Headphone) Jack. 16.) CD Track LCD Display. 17.) CD REPEAT Button. 18.) Speakers. 19.) CD FWD...
Owners Manual
Page 9
... position, however the sound will light. 4.) Set the VOLUME control to find the position that provides the best reception. IF AM reception is inside the cabinet. OPERATING INSTRUCTIONS LISTENING TO THE RADIO 1.) Move the FUNCTION selector to the RADIO position. 2.) Move the BAND selector to the desired band, FM STEREO, FM or AM. 3.) Tune to shut the power 'Off'and extend the battery life.
... position, however the sound will light. 4.) Set the VOLUME control to find the position that provides the best reception. IF AM reception is inside the cabinet. OPERATING INSTRUCTIONS LISTENING TO THE RADIO 1.) Move the FUNCTION selector to the RADIO position. 2.) Move the BAND selector to the desired band, FM STEREO, FM or AM. 3.) Tune to shut the power 'Off'and extend the battery life.
Owners Manual
Page 10
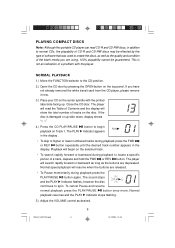
... REV button. The sound stops and the PLAY Indicator flashes, however the disc continues to spin. button to begin on the center spindle with the player. Normal playback resumes and the PLAY Indicator stops flashing. 5.) Adjust the VOLUME control as the quality and condition of the blank media you have not already removed the white transit card from the CD player, please remove it now. 3.) Place your CD on...
... REV button. The sound stops and the PLAY Indicator flashes, however the disc continues to spin. button to begin on the center spindle with the player. Normal playback resumes and the PLAY Indicator stops flashing. 5.) Adjust the VOLUME control as the quality and condition of the blank media you have not already removed the white transit card from the CD player, please remove it now. 3.) Place your CD on...

Owners Manual
Page 11
... track number appears in the player, close the CD door again. 8.) Move the FUNCTION selector to the TAPE (POWER OFF) position to begin playback. After the last track has played the disc stops automatically and the display again shows the total number of tracks on the disc. 7.) Open the CD door, remove your disc in the display, then press the PLAY/PAUSE button to shut the power 'Off...
... track number appears in the player, close the CD door again. 8.) Move the FUNCTION selector to the TAPE (POWER OFF) position to begin playback. After the last track has played the disc stops automatically and the display again shows the total number of tracks on the disc. 7.) Open the CD door, remove your disc in the display, then press the PLAY/PAUSE button to shut the power 'Off...
Owners Manual
Page 12
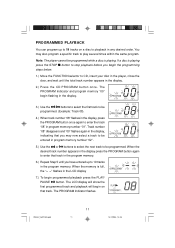
... the total track number appears in program memory number "02". 5.) Use the or buttons to select the next track to be programmed while a disc is full, the "- -" flashes in program memory number "01". Note: The player cannot be programmed. Track number "08"disappears and "00"flashes again in the display, indicating that track in the program memory. 6.) Repeat Step 5 until you begin programmed playback press the PLAY/ PAUSE button.
... the total track number appears in program memory number "02". 5.) Use the or buttons to select the next track to be programmed while a disc is full, the "- -" flashes in program memory number "01". Note: The player cannot be programmed. Track number "08"disappears and "00"flashes again in the display, indicating that track in the program memory. 6.) Repeat Step 5 until you begin programmed playback press the PLAY/ PAUSE button.

Owners Manual
Page 13
... appears in LCD display and all the tracks in your programmed sequence will be repeated continuously. To play the programmed tracks again, press the PROGRAM button and then the PLAY/PAUSE button. Program Repeat Playback You can use the Program and Repeat features together to the TAPE (POWER OFF) position. To cancel the programmed sequence from memory, press the STOP button at programming mode, open the CD door, or...
... appears in LCD display and all the tracks in your programmed sequence will be repeated continuously. To play the programmed tracks again, press the PROGRAM button and then the PLAY/PAUSE button. Program Repeat Playback You can use the Program and Repeat features together to the TAPE (POWER OFF) position. To cancel the programmed sequence from memory, press the STOP button at programming mode, open the CD door, or...

Owners Manual
Page 14
... may then open the door, remove the tape and close the door. IMPORTANT: Always press the STOP /EJECT key to disengage the tape mechanism. FWD and REW modes the motor continues to begin playback. 5.) Set the VOLUME control as desired. 6.) To advance the tape rapidly press the F. PLAYING CASSETTE TAPES 1.) Open the cassette door...mechanism. The Automatic Stop System does not function in the F. You must press the STOP /EJECT key to shut off the motor before it over and play the other side if desired. 8.) When you are playing a tape and then switch to the RADIO or CD function be sure to ...
... may then open the door, remove the tape and close the door. IMPORTANT: Always press the STOP /EJECT key to disengage the tape mechanism. FWD and REW modes the motor continues to begin playback. 5.) Set the VOLUME control as desired. 6.) To advance the tape rapidly press the F. PLAYING CASSETTE TAPES 1.) Open the cassette door...mechanism. The Automatic Stop System does not function in the F. You must press the STOP /EJECT key to shut off the motor before it over and play the other side if desired. 8.) When you are playing a tape and then switch to the RADIO or CD function be sure to ...
Owners Manual
Page 15
... the STOP /EJECT key to "Minimum". MAKING A TAPE RECORDING This model allows you to make tape recordings directly from the CD player, or the radio. • Refer to "PLAYING COMPACT DISCS" if necessary to operate the CD player. • Refer to "LISTENING TO THE RADIO" if necessary to tune in the mechanism. 3.) Close the cassette door. 4.) When you are ready to open the cassette door. 2.) Insert a good quality...
... the STOP /EJECT key to "Minimum". MAKING A TAPE RECORDING This model allows you to make tape recordings directly from the CD player, or the radio. • Refer to "PLAYING COMPACT DISCS" if necessary to operate the CD player. • Refer to "LISTENING TO THE RADIO" if necessary to tune in the mechanism. 3.) Close the cassette door. 4.) When you are ready to open the cassette door. 2.) Insert a good quality...
Owners Manual
Page 16
Before putting on the headphones reduce the VOLUME control to a low level, then put the headphones on and gradually increase the VOLUME control to the headphone jack. PD6537_ib011303.p65 15 15 13/1/2003, 14:48 The built in speakers are automatically disconnected when headphones are connected to a comfortable listening level. STEREO HEADPHONE JACK Connect a set of stereo headphones (not included) with a 3.5mm mini plug to the PHONES jack (located at left side cabinet) for private listening without disturbing others.
Before putting on the headphones reduce the VOLUME control to a low level, then put the headphones on and gradually increase the VOLUME control to the headphone jack. PD6537_ib011303.p65 15 15 13/1/2003, 14:48 The built in speakers are automatically disconnected when headphones are connected to a comfortable listening level. STEREO HEADPHONE JACK Connect a set of stereo headphones (not included) with a 3.5mm mini plug to the PHONES jack (located at left side cabinet) for private listening without disturbing others.
Owners Manual
Page 17
...side A of a cassette use a small screw driver or similar tool to save, blank cassettes are equipped with a piece of the tape. PD6537_ib011303.p65 16 16 13/1/2003, 14:48 This will allow the record key to record on the cassette has been removed. COVER OPENING WITH TAPE IN ORDER TO RECORD AGAIN.... The record key cannot be depressed if the erase prevention tab on side A of the cassette, cover the tab opening with erase prevention tabs for each side of cellophane tape. This prevents the record key...
...side A of a cassette use a small screw driver or similar tool to save, blank cassettes are equipped with a piece of the tape. PD6537_ib011303.p65 16 16 13/1/2003, 14:48 This will allow the record key to record on the cassette has been removed. COVER OPENING WITH TAPE IN ORDER TO RECORD AGAIN.... The record key cannot be depressed if the erase prevention tab on side A of the cassette, cover the tab opening with erase prevention tabs for each side of cellophane tape. This prevents the record key...

Owners Manual
Page 18
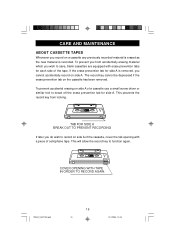
... of these parts and impair performance. Leading to direct sunlight, dust or oil, and do not touch the tape surfaces. PD6537_ib011303.p65 Pinch Roller Capstan Record/Play Erase Head Head 17 17 13/1/2003, 14:50 Take up any loose layers, using cassettes are no loose layers of tape visible through the center window). This removes particles of...
... of these parts and impair performance. Leading to direct sunlight, dust or oil, and do not touch the tape surfaces. PD6537_ib011303.p65 Pinch Roller Capstan Record/Play Erase Head Head 17 17 13/1/2003, 14:50 Take up any loose layers, using cassettes are no loose layers of tape visible through the center window). This removes particles of...

Owners Manual
Page 19
Do not use a CD cleaning kit. • Never write on or affix labels to the outside of the disc. PD6537_ib011303.p65 18 18 13/1/2003, 14:48 Wipe in a straight line from its storage case, press down on the center of the case and lift the disc out, holding...Small dust particles and light stains will have no effect on reproduction quality. • Clean the disc periodically with a soft cloth should remove most particles. If necessary, use any water or other liquids to get inside to the surface of compact discs. COMPACT DISC CARE • To remove a disc from the inside the...
Do not use a CD cleaning kit. • Never write on or affix labels to the outside of the disc. PD6537_ib011303.p65 18 18 13/1/2003, 14:48 Wipe in a straight line from its storage case, press down on the center of the case and lift the disc out, holding...Small dust particles and light stains will have no effect on reproduction quality. • Clean the disc periodically with a soft cloth should remove most particles. If necessary, use any water or other liquids to get inside to the surface of compact discs. COMPACT DISC CARE • To remove a disc from the inside the...
Owners Manual
Page 20
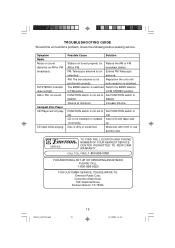
.... SERVICE TO FIND THE LOCATION AND PHONE R NUMBER OF YOUR NEAREST SERVICE CENTER PERMITTED TO PERFORM WARRANTY... TROUBLESHOOTING GUIDE Should this unit exhibit a problem, check the following before seeking service. Symptom Radio Noise or sound distorted on AM or FM broadcasts. FM STEREO indicator does not light. broadcast station. AM: The bar antenna is not installed or installed Insert CD with cloth or use another disc. to RADIO. Volume at minimum. Increase Volume.
.... SERVICE TO FIND THE LOCATION AND PHONE R NUMBER OF YOUR NEAREST SERVICE CENTER PERMITTED TO PERFORM WARRANTY... TROUBLESHOOTING GUIDE Should this unit exhibit a problem, check the following before seeking service. Symptom Radio Noise or sound distorted on AM or FM broadcasts. FM STEREO indicator does not light. broadcast station. AM: The bar antenna is not installed or installed Insert CD with cloth or use another disc. to RADIO. Volume at minimum. Increase Volume.
Owners Manual
Page 21
... facility, or products purchased, used, serviced or damaged outside of purchase, we will provide repair service at an authorized Depot Repair Facility, or replace the product in a padded box, enclose your unit to follow operating instructions, commercial use and conditions, for labor and parts at no charge for a period of ninety (90) days from negligence, misuse, abuse, accident, failure to : Emerson Radio Corp. 1901...
... facility, or products purchased, used, serviced or damaged outside of purchase, we will provide repair service at an authorized Depot Repair Facility, or replace the product in a padded box, enclose your unit to follow operating instructions, commercial use and conditions, for labor and parts at no charge for a period of ninety (90) days from negligence, misuse, abuse, accident, failure to : Emerson Radio Corp. 1901...

