
Owners Manual
Page 1
PORTABLE CD, CD-R / RW PLAYER with CASSETTE RECORDER and AM / FM STEREO RADIO OWNER'S MANUAL PD6517 Visit our web site at www.emersonradio.com PD6517_B010703.p65 22 7/1/2003, 15:19
PORTABLE CD, CD-R / RW PLAYER with CASSETTE RECORDER and AM / FM STEREO RADIO OWNER'S MANUAL PD6517 Visit our web site at www.emersonradio.com PD6517_B010703.p65 22 7/1/2003, 15:19
Owners Manual
Page 2
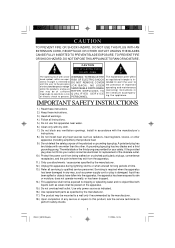
... RE F E R S E R V I CI NG T O magnitude to constitute a risk Q U A L I F I E D S E R V I C E of important operating and maintenance (servicing) instructions in accordance with the manufacturer's instructions. 8.) Do not install near any service or repairs to this apparatus near water. 6.) Clean only with arrow- Use only power source as indicated. 16.) Use replacement parts as specified by the manufacturer. 17.) The product may be mounted to a wall only if recommended by...
... RE F E R S E R V I CI NG T O magnitude to constitute a risk Q U A L I F I E D S E R V I C E of important operating and maintenance (servicing) instructions in accordance with the manufacturer's instructions. 8.) Do not install near any service or repairs to this apparatus near water. 6.) Clean only with arrow- Use only power source as indicated. 16.) Use replacement parts as specified by the manufacturer. 17.) The product may be mounted to a wall only if recommended by...
Owners Manual
Page 3
... Owner's Manual completely to make sure you for purchasing this Emerson audio product. BEFORE WE BEGIN Thank you are committed to the instructions for obtaining service at the end of this Manual. This product was tested by Emerson inspectors and found to the final consumer. Emerson and Emerson retailers are getting the maximum benefit from each feature. It was manufactured using the highest quality components...
... Owner's Manual completely to make sure you for purchasing this Emerson audio product. BEFORE WE BEGIN Thank you are committed to the instructions for obtaining service at the end of this Manual. This product was tested by Emerson inspectors and found to the final consumer. Emerson and Emerson retailers are getting the maximum benefit from each feature. It was manufactured using the highest quality components...
Owners Manual
Page 4
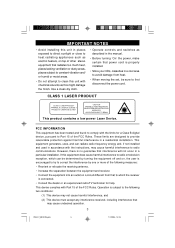
... limits for help. Operation is connected. • Consult the dealer or an experienced radio/TV technician for a Class B digital device, pursuant to Part 15 of other stereo equipment that may cause harmful interference to first disconnect the power cord. However, there is no guarantee that to which can radiate radio frequency energy and, if not installed and used in accordance with Part 15 of...
... limits for help. Operation is connected. • Consult the dealer or an experienced radio/TV technician for a Class B digital device, pursuant to Part 15 of other stereo equipment that may cause harmful interference to first disconnect the power cord. However, there is no guarantee that to which can radiate radio frequency energy and, if not installed and used in accordance with Part 15 of...
Owners Manual
Page 5
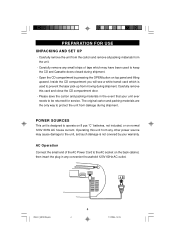
... of the AC Power Cord to be returned for service. PD6517_B010703.p65 4 4 7/1/2003, 15:23 PREPARATION FOR USE UNPACKING AND SET UP ·Carefully remove the unit from the carton and remove all packing materials from moving during shipment. POWER SOURCES This unit is not covered by pressing the OPEN button on top panel and lifting upward. Inside the CD compartment you will...
... of the AC Power Cord to be returned for service. PD6517_B010703.p65 4 4 7/1/2003, 15:23 PREPARATION FOR USE UNPACKING AND SET UP ·Carefully remove the unit from the carton and remove all packing materials from moving during shipment. POWER SOURCES This unit is not covered by pressing the OPEN button on top panel and lifting upward. Inside the CD compartment you will...

Owners Manual
Page 6
... this device: 1. This defeats the safety feature and could expose you probably AC Plug have your outdated outlet changed by pressing down on the plug, or use an adapter to make the plug fit into the battery compartment according to operate the unit on the back cabinet. If the device is a safety feature to reduce AC Outlet the possibility of time, remove the batteries...
... this device: 1. This defeats the safety feature and could expose you probably AC Plug have your outdated outlet changed by pressing down on the plug, or use an adapter to make the plug fit into the battery compartment according to operate the unit on the back cabinet. If the device is a safety feature to reduce AC Outlet the possibility of time, remove the batteries...

Owners Manual
Page 8
1.) VOLUME Control. 2.) FUNCTION (TAPE-POWER OFF/RADIO/CD ) Selector Switch. 3.) Carrying Handle. 4.) CD door. 5.) AC Cord Socket (Back Cabinet). 6.) Battery Compartment (Back Cabinet). 7.) FM Telescopic Antenna. 8.) TUNING Control. 9.) BAND (FM STEREO/FM/AM) Selector Switch. 10.) FM STEREO Indicator. 11.) Dial Pointer. 12.) Cassette Control keys. (PAUSE / STOP-EJECT / F.FWD / REW / PLAY / RECORD ) 13.) CD door OPEN Button. 14.) BEAT CUT Switch. 15.) PHONES (Stereo Headphone) Jack. 16.) CD Track LCD Display. 17.) CD REPEAT Button. 18.) Speakers. 19.) CD FWD.Skip...
1.) VOLUME Control. 2.) FUNCTION (TAPE-POWER OFF/RADIO/CD ) Selector Switch. 3.) Carrying Handle. 4.) CD door. 5.) AC Cord Socket (Back Cabinet). 6.) Battery Compartment (Back Cabinet). 7.) FM Telescopic Antenna. 8.) TUNING Control. 9.) BAND (FM STEREO/FM/AM) Selector Switch. 10.) FM STEREO Indicator. 11.) Dial Pointer. 12.) Cassette Control keys. (PAUSE / STOP-EJECT / F.FWD / REW / PLAY / RECORD ) 13.) CD door OPEN Button. 14.) BEAT CUT Switch. 15.) PHONES (Stereo Headphone) Jack. 16.) CD Track LCD Display. 17.) CD REPEAT Button. 18.) Speakers. 19.) CD FWD.Skip...
Owners Manual
Page 9
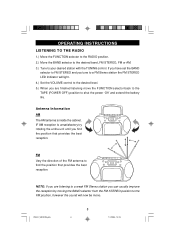
... direction of the FM antenna to a FM Stereo station the FM STEREO LED Indicator will now be mono. PD6517_B010703.p65 8 8 7/1/2003, 15:23 If you have set the BAND selector to FM STEREO and you are listening to a weak FM Stereo station you...sound will light. 4.) Set the VOLUME control to the desired level. 5.) When you tune to find the position that provides the best reception. NOTE: If you are finished listening move the FUNCTION selector back to the TAPE (POWER OFF) position to your desired station with the TUNING control. OPERATING INSTRUCTIONS LISTENING TO THE RADIO...
... direction of the FM antenna to a FM Stereo station the FM STEREO LED Indicator will now be mono. PD6517_B010703.p65 8 8 7/1/2003, 15:23 If you have set the BAND selector to FM STEREO and you are listening to a weak FM Stereo station you...sound will light. 4.) Set the VOLUME control to the desired level. 5.) When you tune to find the position that provides the best reception. NOTE: If you are finished listening move the FUNCTION selector back to the TAPE (POWER OFF) position to your desired station with the TUNING control. OPERATING INSTRUCTIONS LISTENING TO THE RADIO...
Owners Manual
Page 10
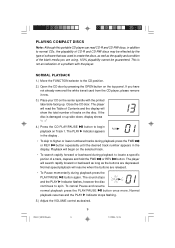
... the PLAY/PAUSE button once more. If the disc is not an indication of a problem with the printed label side facing up side down, display shows "- -" 4.) Press the CD PLAY/PAUSE playback on Track 1. The sound stops and the PLAY Indicator flashes, however the disc continues to the CD position. 2.) Open the CD door by the type of software that was used to locate a specific portion...
... the PLAY/PAUSE button once more. If the disc is not an indication of a problem with the printed label side facing up side down, display shows "- -" 4.) Press the CD PLAY/PAUSE playback on Track 1. The sound stops and the PLAY Indicator flashes, however the disc continues to the CD position. 2.) Open the CD door by the type of software that was used to locate a specific portion...

Owners Manual
Page 11
... last track has played the disc stops automatically and the display again shows the total number of tracks on the disc. 7.) Open the CD door, remove your disc in the display, then press the PLAY/PAUSE button to repeat with the or buttons and then press the PLAY/PAUSE button. The Repeat feature can program the player to repeat either the or button until the display shows the total...
... last track has played the disc stops automatically and the display again shows the total number of tracks on the disc. 7.) Open the CD door, remove your disc in the display, then press the PLAY/PAUSE button to repeat with the or buttons and then press the PLAY/PAUSE button. The Repeat feature can program the player to repeat either the or button until the display shows the total...
Owners Manual
Page 12
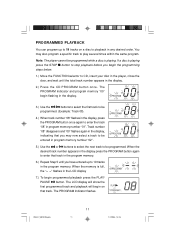
..., 15:23 Note: The player cannot be programmed while a disc is full, the "- -" flashes in the LCD display 7.) To begin flashing in the display. 3.) Use the / buttons to select the first track to be programmed. (Example: Track 08). 4.) When track number "08"flashes in the display, press the PROGRAM button once again to be entered in program memory number "02". 5.) Use the or buttons to select the next track...
..., 15:23 Note: The player cannot be programmed while a disc is full, the "- -" flashes in the LCD display 7.) To begin flashing in the display. 3.) Use the / buttons to select the first track to be programmed. (Example: Track 08). 4.) When track number "08"flashes in the display, press the PROGRAM button once again to be entered in program memory number "02". 5.) Use the or buttons to select the next track...

Owners Manual
Page 13
... to the TAPE (POWER OFF) position. To cancel Programmed Repeat Playback press the STOP button until both the PROGRAM and REPEAT Indicators go 'Off'. After the last programmed track has played the player stops but the programmed tracks remain in your programmed sequence will be repeated continuously. To cancel the programmed sequence from memory, press the STOP button at programming mode, open the CD door, or...
... to the TAPE (POWER OFF) position. To cancel Programmed Repeat Playback press the STOP button until both the PROGRAM and REPEAT Indicators go 'Off'. After the last programmed track has played the player stops but the programmed tracks remain in your programmed sequence will be repeated continuously. To cancel the programmed sequence from memory, press the STOP button at programming mode, open the CD door, or...

Owners Manual
Page 14
... Stop System releases the PLAY key and shuts off the tape motor before opening the door to remove your tape, turn it over and play the other side if desired. 8.) When you are playing a tape and then switch to the RADIO or CD function be sure to press the STOP /EJECT key to remove your tape. When the tape ends in the F. To stop the tape before opening...
... Stop System releases the PLAY key and shuts off the tape motor before opening the door to remove your tape, turn it over and play the other side if desired. 8.) When you are playing a tape and then switch to the RADIO or CD function be sure to press the STOP /EJECT key to remove your tape. When the tape ends in the F. To stop the tape before opening...

Owners Manual
Page 15
... Control (ALC) circuit which controls the recording volume level and prevents overloaded and distorted recordings. MAKING A TAPE RECORDING This model allows you to make tape recordings directly from the CD player, or the radio. • Refer to "PLAYING COMPACT DISCS" if necessary to operate the CD player. • Refer to "LISTENING TO THE RADIO" if necessary to tune in the mechanism. 3.) Close the cassette door. 4.) When you are ready to start...
... Control (ALC) circuit which controls the recording volume level and prevents overloaded and distorted recordings. MAKING A TAPE RECORDING This model allows you to make tape recordings directly from the CD player, or the radio. • Refer to "PLAYING COMPACT DISCS" if necessary to operate the CD player. • Refer to "LISTENING TO THE RADIO" if necessary to tune in the mechanism. 3.) Close the cassette door. 4.) When you are ready to start...
Owners Manual
Page 16
Before putting on the headphones reduce the VOLUME control to a low level, then put the headphones on and gradually increase the VOLUME control to the headphone jack. PD6517_B010703.p65 15 15 7/1/2003, 15:23 The built in speakers are automatically disconnected when headphones are connected to a comfortable listening level. STEREO HEADPHONE JACK Connect a set of stereo headphones (not included) with a 3.5mm mini plug to the PHONES jack (located at left side cabinet) for private listening without disturbing others.
Before putting on the headphones reduce the VOLUME control to a low level, then put the headphones on and gradually increase the VOLUME control to the headphone jack. PD6517_B010703.p65 15 15 7/1/2003, 15:23 The built in speakers are automatically disconnected when headphones are connected to a comfortable listening level. STEREO HEADPHONE JACK Connect a set of stereo headphones (not included) with a 3.5mm mini plug to the PHONES jack (located at left side cabinet) for private listening without disturbing others.
Owners Manual
Page 17
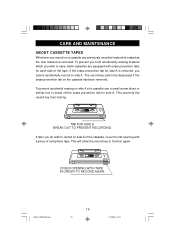
...you wish to save, blank cassettes are equipped with a piece of the tape. COVER OPENING WITH TAPE IN ORDER TO RECORD AGAIN. CARE AND MAINTENANCE ABOUT CASSETTE TAPES Whenever you record on side A of a cassette use a small screw driver or similar tool to break off the erase prevention tab for side A. PD6517_B010703...material is erased as the new material is removed, you do wish to function again. This will allow the record key to record on side A of the cassette, cover the tab opening with erase prevention tabs for each side of cellophane tape. TAB FOR SIDE A BREAK OUT TO ...
...you wish to save, blank cassettes are equipped with a piece of the tape. COVER OPENING WITH TAPE IN ORDER TO RECORD AGAIN. CARE AND MAINTENANCE ABOUT CASSETTE TAPES Whenever you record on side A of a cassette use a small screw driver or similar tool to break off the erase prevention tab for side A. PD6517_B010703...material is erased as the new material is removed, you do wish to function again. This will allow the record key to record on side A of the cassette, cover the tab opening with erase prevention tabs for each side of cellophane tape. TAB FOR SIDE A BREAK OUT TO ...

Owners Manual
Page 18
... the tape wraps itself around vital parts of C-120 cassettes. These may be observed: • Check that wear off the power, press the STOP/EJECT key to the other and back again. • Use only well-known brands of the metal oxide coating that there are : 1.) Tape jamming - Switch off the tape and accumulate on these problems occurring...
... the tape wraps itself around vital parts of C-120 cassettes. These may be observed: • Check that wear off the power, press the STOP/EJECT key to the other and back again. • Use only well-known brands of the metal oxide coating that there are : 1.) Tape jamming - Switch off the tape and accumulate on these problems occurring...

Owners Manual
Page 19
... the cabinet. If necessary, use a CD cleaning kit. • Never write on reproduction quality. • Clean the disc periodically with a soft cloth should remove most particles. Do not use detergents or abrasive cleaners to the outside of the disc. Wipe in a straight line from its storage case, press down on the center of compact discs. CARE OF THE CABINET...
... the cabinet. If necessary, use a CD cleaning kit. • Never write on reproduction quality. • Clean the disc periodically with a soft cloth should remove most particles. Do not use detergents or abrasive cleaners to the outside of the disc. Wipe in a straight line from its storage case, press down on the center of compact discs. CARE OF THE CABINET...
Owners Manual
Page 20
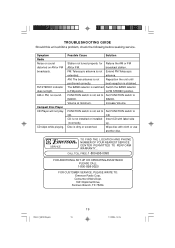
... SET-UP OR OPERATING ASSISTANCE PLEASE CALL: 1-800-898-9020 FOR CUSTOMER SERVICE, PLEASE WRITE TO: Emerson Radio Corp. The BAND selector is not installed or installed Insert CD with cloth or use another disc. PD6517_B010703.p65 19 19 7/1/2003, 15:23 RADIO. Volume at minimum. CD is switched Switch the BAND selector to FM STEREO position. antenna. AM: The bar antenna is obtained. TROUBLESHOOTING GUIDE Should this unit exhibit a problem...
... SET-UP OR OPERATING ASSISTANCE PLEASE CALL: 1-800-898-9020 FOR CUSTOMER SERVICE, PLEASE WRITE TO: Emerson Radio Corp. The BAND selector is not installed or installed Insert CD with cloth or use another disc. PD6517_B010703.p65 19 19 7/1/2003, 15:23 RADIO. Volume at minimum. CD is switched Switch the BAND selector to FM STEREO position. antenna. AM: The bar antenna is obtained. TROUBLESHOOTING GUIDE Should this unit exhibit a problem...
Owners Manual
Page 21
..., misuse, abuse, accident, failure to follow operating instructions, commercial use and conditions, for a period of ninety (90) days from the date of purchase, we will provide repair service at no charge for labor and parts at an authorized Depot Repair Facility, or replace the product in a padded box, enclose your unit to Emerson Radio Corp. With your proof of the United...
..., misuse, abuse, accident, failure to follow operating instructions, commercial use and conditions, for a period of ninety (90) days from the date of purchase, we will provide repair service at no charge for labor and parts at an authorized Depot Repair Facility, or replace the product in a padded box, enclose your unit to Emerson Radio Corp. With your proof of the United...

