
Owners Manual
Page 2
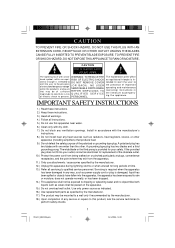
...:02 Use only power source as indicated. 16.) Use replacement parts as specified by the manufacturer. 17.) The product may be placed on or pinched particularly at plugs, convenience receptacles, and the point where they exit from the apparatus. 11.) Only use this apparatus during lightning storms or when unused for replacement of the polarized or grounding-type plug. Servicing is damaged...
...:02 Use only power source as indicated. 16.) Use replacement parts as specified by the manufacturer. 17.) The product may be placed on or pinched particularly at plugs, convenience receptacles, and the point where they exit from the apparatus. 11.) Only use this apparatus during lightning storms or when unused for replacement of the polarized or grounding-type plug. Servicing is damaged...
Owners Manual
Page 3
... to the instructions for purchasing this product. Model No: PD3812CH / PD3812BK / PD3812BL Serial No: PD3812_B032305.p65 2 2 23/3/2005, 15:02 The Emerson brand is always the chance that you experience any problems with the operation of this manual. Our engineers have included many useful and convenient features in perfect working order before it left our factory. It was manufactured using the highest...
... to the instructions for purchasing this product. Model No: PD3812CH / PD3812BK / PD3812BL Serial No: PD3812_B032305.p65 2 2 23/3/2005, 15:02 The Emerson brand is always the chance that you experience any problems with the operation of this manual. Our engineers have included many useful and convenient features in perfect working order before it left our factory. It was manufactured using the highest...
Owners Manual
Page 4
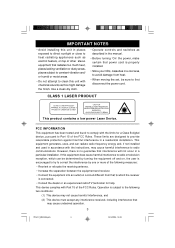
... harmful interference, and (2) This device must accept any interference received, including interference that may cause harmful interference to radio communications. Use a clean dry cloth. • Operate controls and switches as described in the manual. • Before turning 'On' the power, make certain that power cord is no guarantee that interference will not occur in a particular installation. IMPORTANT NOTES • Avoid installing this unit in places...
... harmful interference, and (2) This device must accept any interference received, including interference that may cause harmful interference to radio communications. Use a clean dry cloth. • Operate controls and switches as described in the manual. • Before turning 'On' the power, make certain that power cord is no guarantee that interference will not occur in a particular installation. IMPORTANT NOTES • Avoid installing this unit in places...
Owners Manual
Page 5
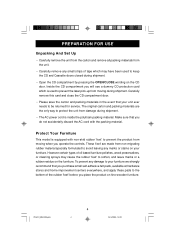
... 'feet' to prevent the product from damage during shipment. • The AC power cord is inside the polyfoam packing material. Protect Your Furniture This model is equipped with the packing material. PD3812_B032305.p65 4 4 23/3/2005, 15:02 PREPARATION FOR USE Unpacking And Set Up • Carefully remove the unit from the carton and remove all packing materials from...
... 'feet' to prevent the product from damage during shipment. • The AC power cord is inside the polyfoam packing material. Protect Your Furniture This model is equipped with the packing material. PD3812_B032305.p65 4 4 23/3/2005, 15:02 PREPARATION FOR USE Unpacking And Set Up • Carefully remove the unit from the carton and remove all packing materials from...

Owners Manual
Page 6
... sliding the door in the direction of the 'arrow'. 2.) Insert 8 "C"size batteries into the battery compartment according to follow the correct polarity when installing the batteries as indicated in this unit from any other power source may cause damage to the device. 3. Power Sources This unit is not to be used for a long period of time, remove the batteries to prevent damage or injury...
... sliding the door in the direction of the 'arrow'. 2.) Insert 8 "C"size batteries into the battery compartment according to follow the correct polarity when installing the batteries as indicated in this unit from any other power source may cause damage to the device. 3. Power Sources This unit is not to be used for a long period of time, remove the batteries to prevent damage or injury...

Owners Manual
Page 9
.... 1.) Cassette Door. 2.) POWER On/Off Button. 3.) FUNCTION Button. 4.) VOLUME DOWN Button. 5.) VOLUME UP Button. 6.) Multi-Function LCD Display. 7.) CD door. 8.) PHONES (Stereo Headphone) Jack. 9.) Carrying Handle. 10.) AC Cord Socket (Back Cabinet). 11.) Battery Compartment (Bottom Cabinet). 12.) FM Telescopic Antenna. 13.) CD door OPEN/CLOSE Position. 14.) PLAY MODE/M-UP Button. 15.) BASS BOOST Button. 16.) CLOCK/MEMORY/AUTO PRESET Button. 17.) CD PLAY/PAUSE Button. 18.) UP/SKIP/F.FWD. Button. 20.) CD STOP/BAND Button. 21.) Cassette Control Keys. (PAUSE / STOP...
.... 1.) Cassette Door. 2.) POWER On/Off Button. 3.) FUNCTION Button. 4.) VOLUME DOWN Button. 5.) VOLUME UP Button. 6.) Multi-Function LCD Display. 7.) CD door. 8.) PHONES (Stereo Headphone) Jack. 9.) Carrying Handle. 10.) AC Cord Socket (Back Cabinet). 11.) Battery Compartment (Bottom Cabinet). 12.) FM Telescopic Antenna. 13.) CD door OPEN/CLOSE Position. 14.) PLAY MODE/M-UP Button. 15.) BASS BOOST Button. 16.) CLOCK/MEMORY/AUTO PRESET Button. 17.) CD PLAY/PAUSE Button. 18.) UP/SKIP/F.FWD. Button. 20.) CD STOP/BAND Button. 21.) Cassette Control Keys. (PAUSE / STOP...

Owners Manual
Page 10
... the CLOCK/MEMORY/AUTO PRESET button. The display will always appear on the top panel to change from "12H" to "European" 24-Hour time if desired. The Minute digits will begin flashing. 5.) Press the or buttons to set the display to run. OPERATING INSTRUCTIONS Setting The Clock Note: The clock can only be set for "American" 12-hour time. "12 H" will begin flashing in TAPE mode and when power is 'Off'. 1.) Press the CLOCK/MEMORY/AUTO PRESET button...
... the CLOCK/MEMORY/AUTO PRESET button. The display will always appear on the top panel to change from "12H" to "European" 24-Hour time if desired. The Minute digits will begin flashing. 5.) Press the or buttons to set the display to run. OPERATING INSTRUCTIONS Setting The Clock Note: The clock can only be set for "American" 12-hour time. "12 H" will begin flashing in TAPE mode and when power is 'Off'. 1.) Press the CLOCK/MEMORY/AUTO PRESET button...
Owners Manual
Page 11
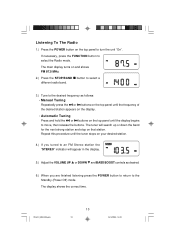
... display. 5.) Adjust the VOLUME UP or DOWN and BASS BOOST controls as follows: • Manual Tuning Repeatedly press the or buttons on the top panel until the display begins to the Standby (Power Off) mode. The main display turns on and shows FM 87.5 MHz. 2.) Press the STOP/BAND button to select a different radio band. 3.) Tune to the desired frequency as desired. 6.) When you tuned to an FM Stereo station the "STEREO...
... display. 5.) Adjust the VOLUME UP or DOWN and BASS BOOST controls as follows: • Manual Tuning Repeatedly press the or buttons on the top panel until the display begins to the Standby (Power Off) mode. The main display turns on and shows FM 87.5 MHz. 2.) Press the STOP/BAND button to select a different radio band. 3.) Tune to the desired frequency as desired. 6.) When you tuned to an FM Stereo station the "STEREO...

Owners Manual
Page 13
... time until you wish to select a preset channel number. The "MEMORY" indicator stops flashing. 5.) Repeat steps 1 through 4, selecting a different preset number in the tuner memory. PD3812_B032305.p65 12 12 23/3/2005, 15:02 The procedure for immediate recall. indicator appears and the "MEMORY" indicator flashes in preset channel #3. Example: FM 103.5 MHz. 2.) When the desired station appears on the display press the CLOCK/MEMORY/ AUTO PRESET button...
... time until you wish to select a preset channel number. The "MEMORY" indicator stops flashing. 5.) Repeat steps 1 through 4, selecting a different preset number in the tuner memory. PD3812_B032305.p65 12 12 23/3/2005, 15:02 The procedure for immediate recall. indicator appears and the "MEMORY" indicator flashes in preset channel #3. Example: FM 103.5 MHz. 2.) When the desired station appears on the display press the CLOCK/MEMORY/ AUTO PRESET button...
Owners Manual
Page 14
... change. Depress and hold the "CLOCK/MEMORY/AUTO PRESET" button until the display shows the desired station. Press the CLOCK/MEMORY/AUTO PRESET button again to preset memory number 1. To use the Auto-Preset feature, turn the unit 'On', select the Tuner function and the desired band. The tuner will start searching up the band and it encounters and these will automatically enter the first 10 strong stations on the top panel...
... change. Depress and hold the "CLOCK/MEMORY/AUTO PRESET" button until the display shows the desired station. Press the CLOCK/MEMORY/AUTO PRESET button again to preset memory number 1. To use the Auto-Preset feature, turn the unit 'On', select the Tuner function and the desired band. The tuner will start searching up the band and it encounters and these will automatically enter the first 10 strong stations on the top panel...
Owners Manual
Page 15
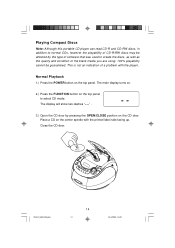
... media you are using. 100% playability cannot be affected by pressing the OPEN/CLOSE position on the CD door. The main display turns on. 2.) Press the FUNCTION button on the center spindle with the player. Close the CD door. Place a CD on the top panel to select CD mode. Music PD3812_B032305.p65 14 14 23/3/2005, 15:02 Playing Compact Discs Note: Although this portable CD player can read CD-R and CD...
... media you are using. 100% playability cannot be affected by pressing the OPEN/CLOSE position on the CD door. The main display turns on. 2.) Press the FUNCTION button on the center spindle with the player. Close the CD door. Place a CD on the top panel to select CD mode. Music PD3812_B032305.p65 14 14 23/3/2005, 15:02 Playing Compact Discs Note: Although this portable CD player can read CD-R and CD...

Owners Manual
Page 16
... listening open the CD door and remove your disc. 9.) To listen to begin playback on the top panel to the Radio or Cassette Tape, press the FUNCTION button as the player reads the disc. PAUSE Control To pause momentarily during CD playback press the PLAY/PAUSE the top panel again. button on the disc and the Play indicator stops flashing. To stop and the display will show the total number...
... listening open the CD door and remove your disc. 9.) To listen to begin playback on the top panel to the Radio or Cassette Tape, press the FUNCTION button as the player reads the disc. PAUSE Control To pause momentarily during CD playback press the PLAY/PAUSE the top panel again. button on the disc and the Play indicator stops flashing. To stop and the display will show the total number...

Owners Manual
Page 17
.../BAND button, opening the CD Door, or switching to begin playback. Press the PLAY MODE/M-UP button three times. Load the disc as the buttons are depressed. The tracks will search rapidly forward or backward as long as usual and wait until the display shows the total number of tracks. Note: The volume is automatically reduced during high speed music search. • To start at...
.../BAND button, opening the CD Door, or switching to begin playback. Press the PLAY MODE/M-UP button three times. Load the disc as the buttons are depressed. The tracks will search rapidly forward or backward as long as usual and wait until the display shows the total number of tracks. Note: The volume is automatically reduced during high speed music search. • To start at...

Owners Manual
Page 19
... player cannot be programmed. "P 0 2" appears briefly then "0 0" flashes again in the display, indicating that track in program memory number "P 0 1". If a disc is playing. PD3812_B032305.p65 18 18 23/3/2005, 15:02 The MEMORY indicator begins flashing in the display press the CLOCK/ MEMORY/AUTO PRESET button again to be programmed. Example: Track 08. 4.) Press the CLOCK/MEMORY/AUTO PRESET button once again to select the CD mode, insert your disc in the player...
... player cannot be programmed. "P 0 2" appears briefly then "0 0" flashes again in the display, indicating that track in program memory number "P 0 1". If a disc is playing. PD3812_B032305.p65 18 18 23/3/2005, 15:02 The MEMORY indicator begins flashing in the display press the CLOCK/ MEMORY/AUTO PRESET button again to be programmed. Example: Track 08. 4.) Press the CLOCK/MEMORY/AUTO PRESET button once again to select the CD mode, insert your disc in the player...

Owners Manual
Page 20
... display. 7.) To begin on page 18. • When Programmed Playback begins, press the PLAY MODE/M-UP button twice to 20 tracks in the memory. " indicator flashes in your programmed sequence will begin programmed playback press the PLAY/PAUSE button. After the last programmed track has played the player stops but the programmed tracks remain in the program memory. To play the programmed tracks again, press the CLOCK/MEMORY/AUTO PRESET button...
... display. 7.) To begin on page 18. • When Programmed Playback begins, press the PLAY MODE/M-UP button twice to 20 tracks in the memory. " indicator flashes in your programmed sequence will begin programmed playback press the PLAY/PAUSE button. After the last programmed track has played the player stops but the programmed tracks remain in the program memory. To play the programmed tracks again, press the CLOCK/MEMORY/AUTO PRESET button...

Owners Manual
Page 21
... the tape ends the Automatic Stop System releases the PLAY key and shuts off the tape motor. You may then open the cassette door, remove your tape, turn on the right side. To stop the tape before it 7.) To rewind the tape rapidly press the REWIND it over and play the other side if desired. key. The correct time appears in display. 2.) Open the...
... the tape ends the Automatic Stop System releases the PLAY key and shuts off the tape motor. You may then open the cassette door, remove your tape, turn on the right side. To stop the tape before it 7.) To rewind the tape rapidly press the REWIND it over and play the other side if desired. key. The correct time appears in display. 2.) Open the...
Owners Manual
Page 23
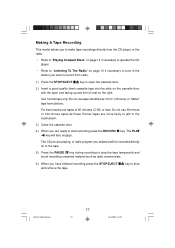
... to "Playing Compact Discs"on page 14 if necessary to operate the CD player. • Refer to "Listening To The Radio" on page 10 if necessary to tune in the mechanism. 3.) Close the cassette door. 4.) When you are playing, or radio program you selected will also engage. Making A Tape Recording This model allows you to make tape recordings directly from radio. 1.) Press the STOP/EJECT key to open the...
... to "Playing Compact Discs"on page 14 if necessary to operate the CD player. • Refer to "Listening To The Radio" on page 10 if necessary to tune in the mechanism. 3.) Close the cassette door. 4.) When you are playing, or radio program you selected will also engage. Making A Tape Recording This model allows you to make tape recordings directly from radio. 1.) Press the STOP/EJECT key to open the...
Owners Manual
Page 25
PHONES Jack Connect a set of stereo headphones (not included) with a 3.5mm mini plug to the PHONES jack. The built in speakers are automatically disconnected when headphones are connected to the PHONES jack (located at rear left top cabinet) for private listening without disturbing others. PD3812_B032305.p65 24 24 23/3/2005, 15:02 Before putting on the headphones reduce the VOLUME control to a low level, then put the headphones on and gradually increase the VOLUME control to a comfortable listening level.
PHONES Jack Connect a set of stereo headphones (not included) with a 3.5mm mini plug to the PHONES jack. The built in speakers are automatically disconnected when headphones are connected to the PHONES jack (located at rear left top cabinet) for private listening without disturbing others. PD3812_B032305.p65 24 24 23/3/2005, 15:02 Before putting on the headphones reduce the VOLUME control to a low level, then put the headphones on and gradually increase the VOLUME control to a comfortable listening level.
Owners Manual
Page 27
...: • Check that wear off the power, press the STOP/EJECT key to open the cassette door, and press the PLAY key. Clean the tape heads, pinch roller and capstan with a soft cloth or cotton pad dampened in playback, and 2.) Tape tangling - Cassette Care Two common causes of trouble experienced when using a pencil or hexagonal barrelled ballpoint...
...: • Check that wear off the power, press the STOP/EJECT key to open the cassette door, and press the PLAY key. Clean the tape heads, pinch roller and capstan with a soft cloth or cotton pad dampened in playback, and 2.) Tape tangling - Cassette Care Two common causes of trouble experienced when using a pencil or hexagonal barrelled ballpoint...

Owners Manual
Page 29
... to follow operating instructions, commercial use, rental, repairs by California residents) to : Emerson Radio Corp. 1901 Diplomat Drive. AU898M SERVICE TO FIND THE LOCATION AND PHONE R NUMBER OF YOUR NEAREST SERVICE CENTER PERMITTED TO PERFORM WARRANTY... LIMITED WARRANTY Emerson Radio Corp. CALL TOLL FREE: 1-800-695-0098 FOR ADDITIONAL SET-UP OR OPERATING ASSISTANCE PLEASE CALL: 1-800-898-9020 FOR CUSTOMER SERVICE, PLEASE WRITE TO: Emerson Radio Corp. PD3812_B032305...
... to follow operating instructions, commercial use, rental, repairs by California residents) to : Emerson Radio Corp. 1901 Diplomat Drive. AU898M SERVICE TO FIND THE LOCATION AND PHONE R NUMBER OF YOUR NEAREST SERVICE CENTER PERMITTED TO PERFORM WARRANTY... LIMITED WARRANTY Emerson Radio Corp. CALL TOLL FREE: 1-800-695-0098 FOR ADDITIONAL SET-UP OR OPERATING ASSISTANCE PLEASE CALL: 1-800-898-9020 FOR CUSTOMER SERVICE, PLEASE WRITE TO: Emerson Radio Corp. PD3812_B032305...

