
Owners Manual
Page 2
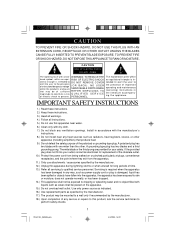
... install near water. 6.) Clean only with liquids such as power-supply cord or plug is intended to DO NOT REMOVE COVER alert the user to persons. The wide blade or the third prong are provided for long periods of time. 13.) Refer all instructions. 5.) Do not use this apparatus near any heat sources such as specified by the manufacturer. 17.) The product...
... install near water. 6.) Clean only with liquids such as power-supply cord or plug is intended to DO NOT REMOVE COVER alert the user to persons. The wide blade or the third prong are provided for long periods of time. 13.) Refer all instructions. 5.) Do not use this apparatus near any heat sources such as specified by the manufacturer. 17.) The product...
Owners Manual
Page 3
... to read this Emerson audio product. Emerson and Emerson retailers are getting the maximum benefit from each feature. For future reference, record the serial number in this Emerson audio product. Thank you are committed to the instructions for obtaining service at the end of this manual. Please be in perfect working order before it left our factory. Our engineers have included many useful and convenient features...
... to read this Emerson audio product. Emerson and Emerson retailers are getting the maximum benefit from each feature. For future reference, record the serial number in this Emerson audio product. Thank you are committed to the instructions for obtaining service at the end of this manual. Please be in perfect working order before it left our factory. Our engineers have included many useful and convenient features...
Owners Manual
Page 4
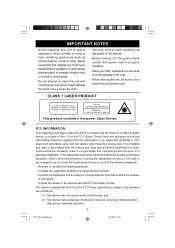
... the power cord. This equipment generates, uses, and can be sure to comply with Part 15 of the FCC Rules. However, there is connected. • Consult the dealer or an experienced radio/TV technician for a Class B digital device, pursuant to clean this unit with the instructions, may cause undesired operation. 3 PD3811BL_060304.p65 3 3/6/2004, 18:01 Use a clean dry cloth. • Operate controls and switches...
... the power cord. This equipment generates, uses, and can be sure to comply with Part 15 of the FCC Rules. However, there is connected. • Consult the dealer or an experienced radio/TV technician for a Class B digital device, pursuant to clean this unit with the instructions, may cause undesired operation. 3 PD3811BL_060304.p65 3 3/6/2004, 18:01 Use a clean dry cloth. • Operate controls and switches...
Owners Manual
Page 5
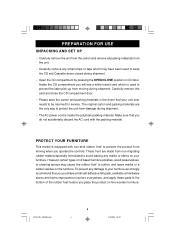
..., 18:01 Make sure that your furniture. PREPARATION FOR USE UNPACKING AND SET UP • Carefully remove the unit from the carton and remove all packing materials from the unit. • Carefully remove any small strips of tape which is equipped with the packing material. Inside the CD compartment you operate the controls. PROTECT YOUR FURNITURE This model is used to prevent...
..., 18:01 Make sure that your furniture. PREPARATION FOR USE UNPACKING AND SET UP • Carefully remove the unit from the carton and remove all packing materials from the unit. • Carefully remove any small strips of tape which is equipped with the packing material. Inside the CD compartment you operate the controls. PROTECT YOUR FURNITURE This model is used to prevent...

Owners Manual
Page 6
...p65 AC Outlet AC Plug 5 5 3/6/2004, 18:01 POWER SOURCES This unit is not covered by your outdated outlet changed by a qualified, licensed electrician. AC Operation Connect the small end of electric shock. NOTE: This unit has a polarized AC plug with one wide ...power source may cause damage to electric shock. This is a safety feature to reduce the possibility of the AC Power Cord to the AC socket on the back cabinet, then insert the plug in your AC outlet, you to the unit, and such damage is designed to operate on 8 "C"batteries, not included, or on the plug, or use an adapter...
...p65 AC Outlet AC Plug 5 5 3/6/2004, 18:01 POWER SOURCES This unit is not covered by your outdated outlet changed by a qualified, licensed electrician. AC Operation Connect the small end of electric shock. NOTE: This unit has a polarized AC plug with one wide ...power source may cause damage to electric shock. This is a safety feature to reduce the possibility of the AC Power Cord to the AC socket on the back cabinet, then insert the plug in your AC outlet, you to the unit, and such damage is designed to operate on 8 "C"batteries, not included, or on the plug, or use an adapter...
Owners Manual
Page 7
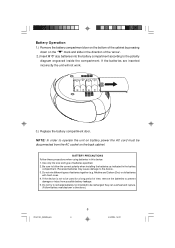
... operate the unit on battery power the AC cord must be disconnected from possible battery leakage. 5. Reversed batteries may cause damage to follow the correct polarity when installing the batteries as indicated in this device: 1. If the device is not to the polarity diagram engraved inside the compartment. Do not try to recharge batteries not intended to be used for a long period of time, remove...
... operate the unit on battery power the AC cord must be disconnected from possible battery leakage. 5. Reversed batteries may cause damage to follow the correct polarity when installing the batteries as indicated in this device: 1. If the device is not to the polarity diagram engraved inside the compartment. Do not try to recharge batteries not intended to be used for a long period of time, remove...

Owners Manual
Page 8
LOCATION OF CONTROLS AND INDICAT0RS 13 12 11 10 9 8 7 6 5 4 3 2 1 PHONES BBOAOSSST REPE AT PROGRAM STOP R.SKIP OPEN/CLOS E AM FM ST. FWD REW IN D PLAY R EC OR D 22 14 15 16 17 9 18 19 20 21 PD3811BL_060304.p65 7 7 3/6/2004, 18:01 PLAY/PAUSE P RO GRAM RE PE AT VOLUME PA US E STOP/EJECT F. TAPE CD F.SKI P PO WER P L AY /PA U S E FM ST.
LOCATION OF CONTROLS AND INDICAT0RS 13 12 11 10 9 8 7 6 5 4 3 2 1 PHONES BBOAOSSST REPE AT PROGRAM STOP R.SKIP OPEN/CLOS E AM FM ST. FWD REW IN D PLAY R EC OR D 22 14 15 16 17 9 18 19 20 21 PD3811BL_060304.p65 7 7 3/6/2004, 18:01 PLAY/PAUSE P RO GRAM RE PE AT VOLUME PA US E STOP/EJECT F. TAPE CD F.SKI P PO WER P L AY /PA U S E FM ST.

Owners Manual
Page 9
SKIP Button. 9.) Speakers. 10.) CD door. 11.) PHONES (Stereo Headphone) Jack. 12.) Carrying Handle. 13.) AC Cord Socket (Back Cabinet). 14.) Battery Compartment (Bottom Cabinet). 15.) TUNING Control. 16.) FM Telescopic Antenna. 17.) Dial Pointer. 18.) CD door OPEN/CLOSE Position. 19.) Function (AM/FM ST./TAPE/CD) Selector Switch. 20.) VOLUME Control. 21.) Cassette Control Keys. (PAUSE / STOP-EJECT / F.FWD / REWIND / PLAY / RECORD ) 22.) Cassette Door. 1.) CD Track LED Display. PD3811BL_060304.p65...
SKIP Button. 9.) Speakers. 10.) CD door. 11.) PHONES (Stereo Headphone) Jack. 12.) Carrying Handle. 13.) AC Cord Socket (Back Cabinet). 14.) Battery Compartment (Bottom Cabinet). 15.) TUNING Control. 16.) FM Telescopic Antenna. 17.) Dial Pointer. 18.) CD door OPEN/CLOSE Position. 19.) Function (AM/FM ST./TAPE/CD) Selector Switch. 20.) VOLUME Control. 21.) Cassette Control Keys. (PAUSE / STOP-EJECT / F.FWD / REWIND / PLAY / RECORD ) 22.) Cassette Door. 1.) CD Track LED Display. PD3811BL_060304.p65...
Owners Manual
Page 10
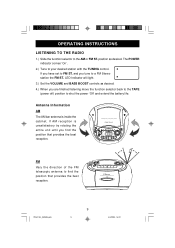
... PLAY R EC ORD FM Vary the direction of the FM telescopic antenna to a FM Stereo station the FM ST. LED Indicator will light. 3.) Set the VOLUME and BASS BOOST controls as desired. PHONES BBOAOSSST R EPEAT P ROGRA M S TOP R.SKIP OPE N/CLOSE AM FM ST. TAPE CD F.SKI P POWER P LAY / PA US E FM ST. OPERATING INSTRUCTIONS LISTENING TO THE RADIO 1.) Slide the function selector to your desired station with the TUNING control...
... PLAY R EC ORD FM Vary the direction of the FM telescopic antenna to a FM Stereo station the FM ST. LED Indicator will light. 3.) Set the VOLUME and BASS BOOST controls as desired. PHONES BBOAOSSST R EPEAT P ROGRA M S TOP R.SKIP OPE N/CLOSE AM FM ST. TAPE CD F.SKI P POWER P LAY / PA US E FM ST. OPERATING INSTRUCTIONS LISTENING TO THE RADIO 1.) Slide the function selector to your desired station with the TUNING control...
Owners Manual
Page 11
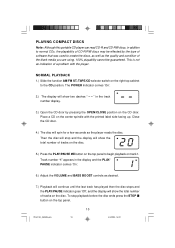
..../TAPE/CD selector switch on the top panel. This is not an indication of a problem with the printed label side facing up. " in the track number display. 3.) Open the CD door by the type of software that was used to create the discs, as well as the player reads the disc. PLAYING COMPACT DISCS Note: Although this portable CD player can read CD-R and CD-RW discs, in addition to normal CDs...
..../TAPE/CD selector switch on the top panel. This is not an indication of a problem with the printed label side facing up. " in the track number display. 3.) Open the CD door by the type of software that was used to create the discs, as well as the player reads the disc. PLAYING COMPACT DISCS Note: Although this portable CD player can read CD-R and CD-RW discs, in addition to normal CDs...
Owners Manual
Page 12
... buttons are finished listening open the CD door and remove your disc. 9.) To listen to the radio slide the function AM/FM ST./TAPE/CD selector switch to turn the power 'Off'. button on the desired track. Note: The volume is automatically reduced during CD playback press the PLAY/PAUSE the top panel again. To start at the same point on the disc and the PLAY/PAUSE indicator stops flashing...
... buttons are finished listening open the CD door and remove your disc. 9.) To listen to the radio slide the function AM/FM ST./TAPE/CD selector switch to turn the power 'Off'. button on the desired track. Note: The volume is automatically reduced during CD playback press the PLAY/PAUSE the top panel again. To start at the same point on the disc and the PLAY/PAUSE indicator stops flashing...

Owners Manual
Page 13
... button, switching to be repeated and then press the REPEAT button on the top panel twice. The Repeat mode can program the player to continuously repeat a single track or the entire disc. The entire disc will be repeated continuously. PD3811BL_060304.p65 12 12 3/6/2004, 18:01 The REPEAT indicator remains 'On'. button to begin playback. If necessary, press the PLAY/PAUSE button...
... button, switching to be repeated and then press the REPEAT button on the top panel twice. The Repeat mode can program the player to continuously repeat a single track or the entire disc. The entire disc will be repeated continuously. PD3811BL_060304.p65 12 12 3/6/2004, 18:01 The REPEAT indicator remains 'On'. button to begin playback. If necessary, press the PLAY/PAUSE button...

Owners Manual
Page 14
... PROGRAM button again to enter that you begin flashing in the display. 3.) Use the / buttons to select the first track to 20 tracks in program memory number "01". The PROGRAM Indicator and program memory "0" begin the programming steps below. 1.) Slide the function AM/FM ST./TAPE/CD selector switch to play several times within the same program. You may now select a track to be programmed while a disc is playing. If a disc...
... PROGRAM button again to enter that you begin flashing in the display. 3.) Use the / buttons to select the first track to 20 tracks in program memory number "01". The PROGRAM Indicator and program memory "0" begin the programming steps below. 1.) Slide the function AM/FM ST./TAPE/CD selector switch to play several times within the same program. You may now select a track to be programmed while a disc is playing. If a disc...

Owners Manual
Page 15
... the STOP button until both the PROGRAM and REPEAT Indicators go 'Off'. 7.) To begin on that track. The REPEAT Indicator appears in LED display and all the tracks in the memory. The PROGRAM Indicator flashes. To cancel the programmed sequence from memory, press the STOP button at programming mode, open the CD door, or move the function selector switch to activate the All...
... the STOP button until both the PROGRAM and REPEAT Indicators go 'Off'. 7.) To begin on that track. The REPEAT Indicator appears in LED display and all the tracks in the memory. The PROGRAM Indicator flashes. To cancel the programmed sequence from memory, press the STOP button at programming mode, open the CD door, or move the function selector switch to activate the All...

Owners Manual
Page 16
key. To stop the tape, open the cassette door, remove your tape, turn it ends press the STOP/EJECT key. The POWER Indicator comes 'On'. 5.) Adjust the VOLUME and BASS BOOST control as desired. 6.) To advance the tape rapidly press the F.FWD ends press the STOP/EJECT key. PD3811BL_060304.p65 15 15 3/6/2004, 18:01 PLAYING CASSETTE TAPES 1.) Open the cassette door by pressing the...
key. To stop the tape, open the cassette door, remove your tape, turn it ends press the STOP/EJECT key. The POWER Indicator comes 'On'. 5.) Adjust the VOLUME and BASS BOOST control as desired. 6.) To advance the tape rapidly press the F.FWD ends press the STOP/EJECT key. PD3811BL_060304.p65 15 15 3/6/2004, 18:01 PLAYING CASSETTE TAPES 1.) Open the cassette door by pressing the...
Owners Manual
Page 18
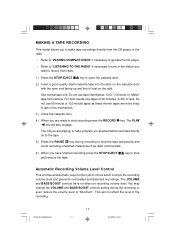
... slots on the cassette door with the open end facing up and the full reel on recording volume level. MAKING A TAPE RECORDING This model allows you to make tape recordings directly from the CD player, or the radio. • Refer to "PLAYING COMPACT DISCS"if necessary to operate the CD player. • Refer to "LISTENING TO THE RADIO"if necessary to tune in the mechanism. 3.) Close the cassette door...
... slots on the cassette door with the open end facing up and the full reel on recording volume level. MAKING A TAPE RECORDING This model allows you to make tape recordings directly from the CD player, or the radio. • Refer to "PLAYING COMPACT DISCS"if necessary to operate the CD player. • Refer to "LISTENING TO THE RADIO"if necessary to tune in the mechanism. 3.) Close the cassette door...
Owners Manual
Page 19
PD3811BL_060304.p65 18 18 3/6/2004, 18:01 Before putting on the headphones reduce the VOLUME control to a low level, then put the headphones on and gradually increase the VOLUME control to the PHONES jack. The built in speakers are automatically disconnected when headphones are connected to a comfortable listening level. PHONES Jack Connect a set of stereo headphones (not included) with a 3.5mm mini plug to the PHONES jack (located at left top cabinet) for private listening without disturbing others.
PD3811BL_060304.p65 18 18 3/6/2004, 18:01 Before putting on the headphones reduce the VOLUME control to a low level, then put the headphones on and gradually increase the VOLUME control to the PHONES jack. The built in speakers are automatically disconnected when headphones are connected to a comfortable listening level. PHONES Jack Connect a set of stereo headphones (not included) with a 3.5mm mini plug to the PHONES jack (located at left top cabinet) for private listening without disturbing others.
Owners Manual
Page 21
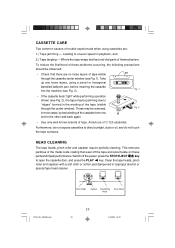
... cassette from one end to open the cassette door, and press the PLAY key. Avoid use of themechanism. This removes particles of the metal oxide coating that there are : 1.) Tape jamming - Switch off the tape and accumulate on these problems occurring, the following precautions should be observed: • Check that wear off the power, press the STOP/EJECT key...
... cassette from one end to open the cassette door, and press the PLAY key. Avoid use of themechanism. This removes particles of the metal oxide coating that there are : 1.) Tape jamming - Switch off the tape and accumulate on these problems occurring, the following precautions should be observed: • Check that wear off the power, press the STOP/EJECT key...

Owners Manual
Page 22
... and dust should remove most particles. PD3811BL_060304.p65 21 21 3/6/2004, 18:01 If necessary, use a CD cleaning kit. • Never write on the cabinet. Do not use detergents or abrasive cleaners to the outside of the disc. Never use any water or ...other liquids to get inside to clean the disc. Wipe in a straight line from its storage case, press down on the center of compact discs. Small dust particles and light...
... and dust should remove most particles. PD3811BL_060304.p65 21 21 3/6/2004, 18:01 If necessary, use a CD cleaning kit. • Never write on the cabinet. Do not use detergents or abrasive cleaners to the outside of the disc. Never use any water or ...other liquids to get inside to clean the disc. Wipe in a straight line from its storage case, press down on the center of compact discs. Small dust particles and light...
Owners Manual
Page 23
... required by an unauthorized facility, or products purchased, used, serviced or damaged outside of the United States. CALL TOLL FREE: 1-800-695-0098 FOR ADDITIONAL SET-UP OR OPERATING ASSISTANCE PLEASE CALL: 1-800-898-9020 FOR CUSTOMER SERVICE, PLEASE WRITE TO: Emerson Radio Corp. AU898M SERVICE TO FIND THE LOCATION AND PHONE R NUMBER OF YOUR NEAREST SERVICE CENTER PERMITTED TO PERFORM WARRANTY... Consumer Affairs...
... required by an unauthorized facility, or products purchased, used, serviced or damaged outside of the United States. CALL TOLL FREE: 1-800-695-0098 FOR ADDITIONAL SET-UP OR OPERATING ASSISTANCE PLEASE CALL: 1-800-898-9020 FOR CUSTOMER SERVICE, PLEASE WRITE TO: Emerson Radio Corp. AU898M SERVICE TO FIND THE LOCATION AND PHONE R NUMBER OF YOUR NEAREST SERVICE CENTER PERMITTED TO PERFORM WARRANTY... Consumer Affairs...

