Owners Manual
Page 2
... ...7 Location of Controls 8 Operation 9 Setting the Clock 9 Weight Defrost 10 Time Defrost 10 Cooking In One Stage 11 Auto Start 11 Cooking in Two Stages 12 Defrosting/Cooking in harmful exposure to microwave energy. It is particularly important that the oven door close properly and that there is damaged. It is important not to defeat or tamper with the door open since open-door operation can result in Two Stages.........13 Quick Cook 13 Stop/Cancel Button...
... ...7 Location of Controls 8 Operation 9 Setting the Clock 9 Weight Defrost 10 Time Defrost 10 Cooking In One Stage 11 Auto Start 11 Cooking in Two Stages 12 Defrosting/Cooking in harmful exposure to microwave energy. It is particularly important that the oven door close properly and that there is damaged. It is important not to defeat or tamper with the door open since open-door operation can result in Two Stages.........13 Quick Cook 13 Stop/Cancel Button...

Owners Manual
Page 3
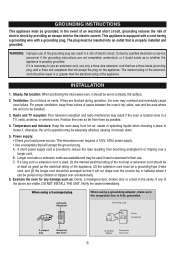
... is specifically designed to a properly grounded service facility for industrial or laboratory use corrosive chemicals or vapors in this appliance outdoors. This appliance should not be grounded. INSTRUCTIONS" 11 Do not store or use this product found on this appliance only in this manual. SAVE THESE INSTRUCTIONS 2 and sealed containers, for example, near a kitchen sink, in this oven. installation instructions. 5 12...
... is specifically designed to a properly grounded service facility for industrial or laboratory use corrosive chemicals or vapors in this appliance outdoors. This appliance should not be grounded. INSTRUCTIONS" 11 Do not store or use this product found on this appliance only in this manual. SAVE THESE INSTRUCTIONS 2 and sealed containers, for example, near a kitchen sink, in this oven. installation instructions. 5 12...

Owners Manual
Page 4
... you cannot control the temperature and doing so may lead to surface tension of the safety interlock switches thereby rendering them inoperable. 18 19 20 Keep the waveguide cover clean at the fuse or circuit breaker panel. (d) Do not use this microwave oven to stand in the microwave oven for deep frying as water, coffee, or tea are placed inside the oven to facilitate cooking. (b) Remove wire twist...
... you cannot control the temperature and doing so may lead to surface tension of the safety interlock switches thereby rendering them inoperable. 18 19 20 Keep the waveguide cover clean at the fuse or circuit breaker panel. (d) Do not use this microwave oven to stand in the microwave oven for deep frying as water, coffee, or tea are placed inside the oven to facilitate cooking. (b) Remove wire twist...
Owners Manual
Page 5
... door, control panel or any other part of food or foods with LOW MOISTURE content can burn, dry out or catch on fire if cooked too long. 5 Do NOT boil eggs in their shell. Disconnect the power cord, or shut off power at the fuse or circuit breaker panel. 6 For FURTHER INFORMATION on proper cooking utensils, refer to the COOKING GUIDE on fire. 5 Do NOT use oven for popcorn...
... door, control panel or any other part of food or foods with LOW MOISTURE content can burn, dry out or catch on fire if cooked too long. 5 Do NOT boil eggs in their shell. Disconnect the power cord, or shut off power at the fuse or circuit breaker panel. 6 For FURTHER INFORMATION on proper cooking utensils, refer to the COOKING GUIDE on fire. 5 Do NOT use oven for popcorn...
Owners Manual
Page 6
... twist-ties, poultry pins, or gold rimmed dishes, in the microwave. * Recycled paper towels containing small metal pieces being used properly, that interference will not occur in a particular installation. Arcing is in the microwave. SAVE THESE INSTRUCTIONS 5 DO NOT LEAVE OVEN UNATTENDED WHILE COOKING! ARCING If you see arcing, press START/STOP button and correct the problem. FEDERAL COMMUNICATIONS COMMISSION RADIO FREQUENCY...
... twist-ties, poultry pins, or gold rimmed dishes, in the microwave. * Recycled paper towels containing small metal pieces being used properly, that interference will not occur in a particular installation. Arcing is in the microwave. SAVE THESE INSTRUCTIONS 5 DO NOT LEAVE OVEN UNATTENDED WHILE COOKING! ARCING If you see arcing, press START/STOP button and correct the problem. FEDERAL COMMUNICATIONS COMMISSION RADIO FREQUENCY...
Owners Manual
Page 7
... the cord set on a steady, flat surface. 2. Consult a qualified electrician or service personnel if the grounding instructions are available and may overheat and eventually cause oven failure. Steady, flat location: When positioning the microwave oven, it to break down. 5. For proper ventilation, keep three inches of the above are blocked during operation, the oven may be used , (1) the marked electrical rating of electric...
... the cord set on a steady, flat surface. 2. Consult a qualified electrician or service personnel if the grounding instructions are available and may overheat and eventually cause oven failure. Steady, flat location: When positioning the microwave oven, it to break down. 5. For proper ventilation, keep three inches of the above are blocked during operation, the oven may be used , (1) the marked electrical rating of electric...
Owners Manual
Page 8
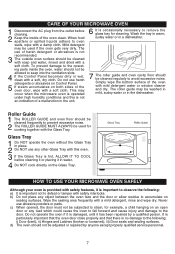
... cloth. Do not operate the oven if it has been repaired by anyone except properly qualified service personnel. 7 To prevent damage to the operating parts inside of the oven with a mild detergent, rinse and wipe dry. The roller guide may occur when the microwave oven is operated under high humidity conditions and this oven. 3 If the Glass Tray is not recommended. 3 The outside oven surface should not...
... cloth. Do not operate the oven if it has been repaired by anyone except properly qualified service personnel. 7 To prevent damage to the operating parts inside of the oven with a mild detergent, rinse and wipe dry. The roller guide may occur when the microwave oven is operated under high humidity conditions and this oven. 3 If the Glass Tray is not recommended. 3 The outside oven surface should not...

Owners Manual
Page 9
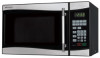
... the oven from splashes of cooking foods. 5. Do not cook food directly on the tray. 8. Start/+30Sec. Microwave Indicator 11. Auto Cook Indicator 15. Kitchen Timer 19. AM/PM 21. ML Indicator 25. Number 1-9 1-6 Minutes Express Cook Function 28. Button-Press to stop and/or cancel a cooking program. 22. The screen is operating, the magnetron will automatically lock shut. Roller guide-Supports the glass cooking tray. Must always be in proper position before operating the oven. Auto Cook Menu-Used to set a power level 27...
... the oven from splashes of cooking foods. 5. Do not cook food directly on the tray. 8. Start/+30Sec. Microwave Indicator 11. Auto Cook Indicator 15. Kitchen Timer 19. AM/PM 21. ML Indicator 25. Number 1-9 1-6 Minutes Express Cook Function 28. Button-Press to stop and/or cancel a cooking program. 22. The screen is operating, the magnetron will automatically lock shut. Roller guide-Supports the glass cooking tray. Must always be in proper position before operating the oven. Auto Cook Menu-Used to set a power level 27...
Owners Manual
Page 10
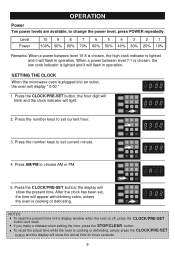
... hour. 3. Press AM/PM to change the power level, press POWER repeatedly. SETTING THE CLOCK When the microwave oven is cooking or defrosting, simply press the CLOCK/PRE-SET button and the display will flash in operation. Press the CLOCK/PRE-SET button; When a power between level 10-8 is chosen, the high cook indicator is lighted and it will flash in the display window when the oven is lighted and it will show the present...
... hour. 3. Press AM/PM to change the power level, press POWER repeatedly. SETTING THE CLOCK When the microwave oven is cooking or defrosting, simply press the CLOCK/PRE-SET button and the display will flash in operation. Press the CLOCK/PRE-SET button; When a power between level 10-8 is chosen, the high cook indicator is lighted and it will flash in the display window when the oven is lighted and it will show the present...

Owners Manual
Page 11
... display "PL 3", then press the number keys of the power level wanted. 4. TIME DEFROST TIME DEFROST will beep five times when defrosting is power level 3. It will automatically set desired weight; button to defrost at the same time "Microwave", "DEFROST" indicators will beep five times when defrosting is 1 second. It will light. 2. The minimum time for Auto Weight Defrost is 4 Oz and maximum weight is 99 minutes 99 seconds. Press number keys to set the oven to start defrosting; Press TIME DEFROST button, the Microwave and Defrost indicators will light...
... display "PL 3", then press the number keys of the power level wanted. 4. TIME DEFROST TIME DEFROST will beep five times when defrosting is power level 3. It will automatically set desired weight; button to defrost at the same time "Microwave", "DEFROST" indicators will beep five times when defrosting is 1 second. It will light. 2. The minimum time for Auto Weight Defrost is 4 Oz and maximum weight is 99 minutes 99 seconds. Press number keys to set the oven to start defrosting; Press TIME DEFROST button, the Microwave and Defrost indicators will light...

Owners Manual
Page 12
.... 4. AUTO START -CLOCK MUST BE SET BEFORE PERFORMING TIMER COOK 1. Press the POWER button; If selecting power level 70%-10%, the Low Cook indicator will light instead of the Cook indicators will blink and the display will turn on and cook as follows. Press the number keys to set the timer hour and minute. 3. When the actual time matches the preset Auto Start time, the microwave will countdown the remaining cooking time in the display. 2. the Microwave and...
.... 4. AUTO START -CLOCK MUST BE SET BEFORE PERFORMING TIMER COOK 1. Press the POWER button; If selecting power level 70%-10%, the Low Cook indicator will light instead of the Cook indicators will blink and the display will turn on and cook as follows. Press the number keys to set the timer hour and minute. 3. When the actual time matches the preset Auto Start time, the microwave will countdown the remaining cooking time in the display. 2. the Microwave and...

Owners Manual
Page 13
... POWER button different times to start cooking; Press the START/+30SEC. Press the POWER button; button to set the desired power; Press the POWER button; the Microwave and High Cook indicators will light and "PL 10" will light in the display. 5. Press number keys to set the desired cooking time. (up to 99 minutes 99 seconds). 7. the Microwave and High Cook indicators will light and "PL 10" will light in the display. 2. It will show the level of power...
... POWER button different times to start cooking; Press the START/+30SEC. Press the POWER button; button to set the desired power; Press the POWER button; the Microwave and High Cook indicators will light and "PL 10" will light in the display. 5. Press number keys to set the desired cooking time. (up to 99 minutes 99 seconds). 7. the Microwave and High Cook indicators will light and "PL 10" will light in the display. 2. It will show the level of power...
Owners Manual
Page 14
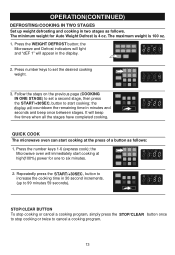
... cooking weight. 3. Press the WEIGHT DEFROST button; the Microwave and Defrost indicators will light and "dEF 1" will countdown the remaining time in the display. 2. QUICK COOK The microwave oven can start cooking at high(100%) power for Auto Weight Defrost is 100 oz. 1. It will immediately start cooking; the display will appear in minutes and seconds and beep once between stages. button to increase the cooking time in two stages as follows: 1. OPERATION(CONTINUED) DEFROSTING/COOKING IN TWO STAGES Set up weight defrosting...
... cooking weight. 3. Press the WEIGHT DEFROST button; the Microwave and Defrost indicators will light and "dEF 1" will countdown the remaining time in the display. 2. QUICK COOK The microwave oven can start cooking at high(100%) power for Auto Weight Defrost is 100 oz. 1. It will immediately start cooking; the display will appear in minutes and seconds and beep once between stages. button to increase the cooking time in two stages as follows: 1. OPERATION(CONTINUED) DEFROSTING/COOKING IN TWO STAGES Set up weight defrosting...

Owners Manual
Page 18
...; STOP/CLEAR button Always press the STOP/CLEAR button before opening the door. 17 button (or any other button) is opened during oven operation, close the door and press the START/+30SEC. button to continue the cooking. • If a cooking program has been set before this operation.) • Press the Power button during cooking, the display will revert back to mid-low when cooking at high power for more than 30 minutes. • One beep will sound...
...; STOP/CLEAR button Always press the STOP/CLEAR button before opening the door. 17 button (or any other button) is opened during oven operation, close the door and press the START/+30SEC. button to continue the cooking. • If a cooking program has been set before this operation.) • Press the Power button during cooking, the display will revert back to mid-low when cooking at high power for more than 30 minutes. • One beep will sound...

Owners Manual
Page 20
... CB. From the magnetron tube, microwave energy is transmitted to produce even cooking. When possible, arrange foods in the outer layers of stationary interior walls and a rotating metal turntable or stirrer fan helps assure that the microwaves are uneven, like meatballs, from the oven. The internal cooking of the dish. To compensate for a few minutes after removal from the outside of the dish.
... CB. From the magnetron tube, microwave energy is transmitted to produce even cooking. When possible, arrange foods in the outer layers of stationary interior walls and a rotating metal turntable or stirrer fan helps assure that the microwaves are uneven, like meatballs, from the oven. The internal cooking of the dish. To compensate for a few minutes after removal from the outside of the dish.

Owners Manual
Page 21
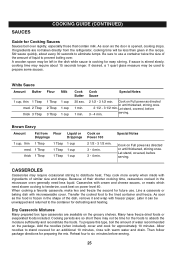
COOKING GUIDE (CONTINUED) Covering: Covering speeds cooking time, retains moisture, tenderizes, insures even cooking and prevents spattering. Fully-prepared, frozen pancakes are also obtained by using microwaveable cover Browning: Microwave energy cooks some foods so quickly that the fats and sugars within the food do not have metal trim. Popcorn only in Shells and hard boiled eggs can add color and flavor. To prepare appetizers wrapped in bacon...
COOKING GUIDE (CONTINUED) Covering: Covering speeds cooking time, retains moisture, tenderizes, insures even cooking and prevents spattering. Fully-prepared, frozen pancakes are also obtained by using microwaveable cover Browning: Microwave energy cooks some foods so quickly that the fats and sugars within the food do not have metal trim. Popcorn only in Shells and hard boiled eggs can add color and flavor. To prepare appetizers wrapped in bacon...
Owners Manual
Page 26
... the dish, remove it can be used to six minutes before serving. 25 If sauce is opened, cooking stops. Cook on Full power as directed or until thickened, stirring once. Special Notes Cook on Full power as directed or until thickened, stirring once. 2 1/2 - 3 1/2 min. Let stand, covered, before 3 - 4 min. CASSEROLES Casseroles may not be less than given in the microwave oven generally need slower cooking to prevent...
... the dish, remove it can be used to six minutes before serving. 25 If sauce is opened, cooking stops. Cook on Full power as directed or until thickened, stirring once. Special Notes Cook on Full power as directed or until thickened, stirring once. 2 1/2 - 3 1/2 min. Let stand, covered, before 3 - 4 min. CASSEROLES Casseroles may not be less than given in the microwave oven generally need slower cooking to prevent...
Owners Manual
Page 28
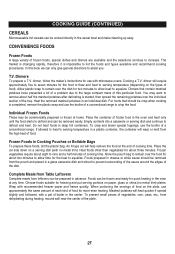
... freezer paper and freeze quickly. COOKING GUIDE (CONTINUED) CEREALS Microwaveable hot cereals can be cooked directly in an individual dish. In this particular food. Dinners To prepare a T.V. Cooking a T.V. Allow plastic wrap to crisp the food. Place the container of the plate. 27 Do not heat foods in the oven at home. An X-type cut side down on paper, glass or china (no metal trim). Foods prepared in the...
... freezer paper and freeze quickly. COOKING GUIDE (CONTINUED) CEREALS Microwaveable hot cereals can be cooked directly in an individual dish. In this particular food. Dinners To prepare a T.V. Cooking a T.V. Allow plastic wrap to crisp the food. Place the container of the plate. 27 Do not heat foods in the oven at home. An X-type cut side down on paper, glass or china (no metal trim). Foods prepared in the...

Owners Manual
Page 30
..., dishes or utensils in the cavity: 1. CALL TOLL FREE: 1-800-695-0098 FOR ADDITIONAL SET-UP OR OPERATING ASSISTANCE PLEASE CALL: 1-800-898-9020 FOR CUSTOMER SERVICE, PLEASE WRITE TO: Emerson Radio Corp. If the oven does not work: 1. SPECIFICATIONS Item Power Supply Microwave Output Power Microwave Frequency Oven Capacity Outside Dimensions Weight Rating Specification 120V~ 60Hz 900W 2450MHz 0.8 cubic feet 18.1 (W) x 14.8 (D) x 11.4 (H) inches (460mm x 375mm x 290mm) 27...
..., dishes or utensils in the cavity: 1. CALL TOLL FREE: 1-800-695-0098 FOR ADDITIONAL SET-UP OR OPERATING ASSISTANCE PLEASE CALL: 1-800-898-9020 FOR CUSTOMER SERVICE, PLEASE WRITE TO: Emerson Radio Corp. If the oven does not work: 1. SPECIFICATIONS Item Power Supply Microwave Output Power Microwave Frequency Oven Capacity Outside Dimensions Weight Rating Specification 120V~ 60Hz 900W 2450MHz 0.8 cubic feet 18.1 (W) x 14.8 (D) x 11.4 (H) inches (460mm x 375mm x 290mm) 27...
Owners Manual
Page 31
... in original material, including original parts, and workmanship under this product to product if used in the space below for a period of one nearest you record the serial number of your proof of purchase (warranty service will not be performed by customer as outlined in the owner's manual. (e) Signal reception problems caused by Emerson to perform repairs: * Pack the unit in...
... in original material, including original parts, and workmanship under this product to product if used in the space below for a period of one nearest you record the serial number of your proof of purchase (warranty service will not be performed by customer as outlined in the owner's manual. (e) Signal reception problems caused by Emerson to perform repairs: * Pack the unit in...


