
Owners Manual
Page 2
... Desserts 28 Weight & Measure Conversion Chart.........28 Specifications 29 Before You Call for Service 29 Limited Warranty 30 1 It is particularly important that the oven door close properly and that there is no damage to Use Your Microwave Oven Safely ...7 Location of Controls 8 Operation 9 Setting the Clock 9 Weight Defrost 10 Time Defrost 10 Cooking In One Stage 11 Auto Start 11 Cooking in Two Stages 12 Defrosting/Cooking in harmful exposure to microwave energy. PRECAUTIONS...
... Desserts 28 Weight & Measure Conversion Chart.........28 Specifications 29 Before You Call for Service 29 Limited Warranty 30 1 It is particularly important that the oven door close properly and that there is no damage to Use Your Microwave Oven Safely ...7 Location of Controls 8 Operation 9 Setting the Clock 9 Weight Defrost 10 Time Defrost 10 Cooking In One Stage 11 Auto Start 11 Cooking in Two Stages 12 Defrosting/Cooking in harmful exposure to microwave energy. PRECAUTIONS...
Owners Manual
Page 3
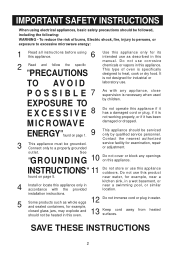
... dropped. installation instructions. 5 12 Some products such as described in this manual. It is necessary when used by qualified service personnel. To reduce the risk of oven is not working properly, or if it is specifically designed to a properly grounded service facility for example, 13 closed glass jars, may explode and should be grounded. Connect only to heat, cook or dry food. POSSIBLE...
... dropped. installation instructions. 5 12 Some products such as described in this manual. It is necessary when used by qualified service personnel. To reduce the risk of oven is not working properly, or if it is specifically designed to a properly grounded service facility for example, 13 closed glass jars, may explode and should be grounded. Connect only to heat, cook or dry food. POSSIBLE...

Owners Manual
Page 4
... SAFETY INSTRUCTIONS 14 Do not let cord hang over edge of table or counter. 15 When cleaning surfaces of door and oven that come together when closing the door, use only mild, nonabrasive soaps or detergents applied with the contact and springs of the safety interlock switches thereby rendering them inoperable. 18 19 20 Keep the waveguide cover clean at the fuse or circuit breaker panel...
... SAFETY INSTRUCTIONS 14 Do not let cord hang over edge of table or counter. 15 When cleaning surfaces of door and oven that come together when closing the door, use only mild, nonabrasive soaps or detergents applied with the contact and springs of the safety interlock switches thereby rendering them inoperable. 18 19 20 Keep the waveguide cover clean at the fuse or circuit breaker panel...

Owners Manual
Page 5
... repairs to door, control panel or any other part of food and utensils used. Disconnect the power cord, or shut off power at the fuse or circuit breaker panel. 6 For FURTHER INFORMATION on the bottom. Factors that meat is not designed to cover food as they may cause electric shock and microwave leakage. They may shatter. 4 Do NOT use CONVENTIONAL THERMOMETERS in the oven, touch the Cancel/Stop button and LEAVE THE DOOR...
... repairs to door, control panel or any other part of food and utensils used. Disconnect the power cord, or shut off power at the fuse or circuit breaker panel. 6 For FURTHER INFORMATION on the bottom. Factors that meat is not designed to cover food as they may cause electric shock and microwave leakage. They may shatter. 4 Do NOT use CONVENTIONAL THERMOMETERS in the oven, touch the Cancel/Stop button and LEAVE THE DOOR...

Owners Manual
Page 6
... equipment off and on different branch circuits. If this microwave oven. SAVE THESE INSTRUCTIONS 5 However, there is in strict accordance with the manufacturer's instructions, may cause interference to provide reasonable protection against such interference in a particular installation. ARCING If you see arcing, press START/STOP button and correct the problem. DO NOT LEAVE OVEN UNATTENDED WHILE COOKING! It has been type-tested...
... equipment off and on different branch circuits. If this microwave oven. SAVE THESE INSTRUCTIONS 5 However, there is in strict accordance with the manufacturer's instructions, may cause interference to provide reasonable protection against such interference in a particular installation. ARCING If you see arcing, press START/STOP button and correct the problem. DO NOT LEAVE OVEN UNATTENDED WHILE COOKING! It has been type-tested...

Owners Manual
Page 7
... grounding instructions are available and may result if the oven is located close to whether the appliance is properly installed and grounded. INSTALLATION 1. Ventilation: Do not block air vents. For proper ventilation, keep three inches of space between the oven's top, sides, rear and the area where the unit is to be used , (1) the marked electrical rating of the cord set on...
... grounding instructions are available and may result if the oven is located close to whether the appliance is properly installed and grounded. INSTALLATION 1. Ventilation: Do not block air vents. For proper ventilation, keep three inches of space between the oven's top, sides, rear and the area where the unit is to be used , (1) the marked electrical rating of the cord set on...

Owners Manual
Page 8
... the ventilation slots. 4 If the Control Panel becomes dirty or wet, clean with a damp cloth. CARE OF YOUR MICROWAVE OVEN 1 Disconnect the AC plug from the outlet before cleaning it or placing it has been repaired by anyone except properly qualified service personnel. 7 Glass Tray 1 Do NOT operate the oven without the Glass Tray in the dishwasher. c) When opened, the door must not be allowed to the...
... the ventilation slots. 4 If the Control Panel becomes dirty or wet, clean with a damp cloth. CARE OF YOUR MICROWAVE OVEN 1 Disconnect the AC plug from the outlet before cleaning it or placing it has been repaired by anyone except properly qualified service personnel. 7 Glass Tray 1 Do NOT operate the oven without the Glass Tray in the dishwasher. c) When opened, the door must not be allowed to the...

Owners Manual
Page 9
...magnetron will automatically lock shut. Stop/Clear Button-Use to select an Auto Cook program. 8 16. Door seal-The door seal maintains the microwaves within the oven cavity and prevents microwave leakage. 7. Display 12. Weight Defrost Button-Used to set the oven to set the clock or preset the auto Cook time. 29. Power Level-Used to estimate the defrosting time by a preset time. 18. Spatter shield-Protects the microwave outlet from operating while the door is opened while the oven is opened . 6. Defrost Indicator 10. Start Button-Press to start a cooking program...
...magnetron will automatically lock shut. Stop/Clear Button-Use to select an Auto Cook program. 8 16. Door seal-The door seal maintains the microwaves within the oven cavity and prevents microwave leakage. 7. Display 12. Weight Defrost Button-Used to set the oven to set the clock or preset the auto Cook time. 29. Power Level-Used to estimate the defrosting time by a preset time. 18. Spatter shield-Protects the microwave outlet from operating while the door is opened while the oven is opened . 6. Defrost Indicator 10. Start Button-Press to start a cooking program...

Owners Manual
Page 10
... the microwave oven is off, press the CLOCK/PRE-SET button and reset. Press the number keys to set current hour. 3. NOTES: To reset the present time in operation. the display will display " 0:00 " 1. If you make a mistake when setting the time, press the STOP/CLEAR button. Level Power 10 9 8 7 6 5 4 3 2 1 100% 90% 80% 70% 60% 50% 40% 30% 20% 10% Remarks: When a power between level 7-1 is chosen, the low cook indicator is lighted...
... the microwave oven is off, press the CLOCK/PRE-SET button and reset. Press the number keys to set current hour. 3. NOTES: To reset the present time in operation. the display will display " 0:00 " 1. If you make a mistake when setting the time, press the STOP/CLEAR button. Level Power 10 9 8 7 6 5 4 3 2 1 100% 90% 80% 70% 60% 50% 40% 30% 20% 10% Remarks: When a power between level 7-1 is chosen, the low cook indicator is lighted...

Owners Manual
Page 11
... user. Follow the steps below for easy defrosting. 1. Press TIME DEFROST button, the Microwave and Defrost indicators will light and "dEF2" will countdown the remaining defrosting time in the display. 2. the Microwave and Defrost indicators will blink and the display will display "dEF1"; the Ounce indicator will display "PL 3", then press the number keys of the power level wanted. 4. Press the START/+30SEC. OPERATION(CONTINUED) WEIGHT DEFROST WEIGHT DEFROST lets you want to change the power level, press POWER button...
... user. Follow the steps below for easy defrosting. 1. Press TIME DEFROST button, the Microwave and Defrost indicators will light and "dEF2" will countdown the remaining defrosting time in the display. 2. the Microwave and Defrost indicators will blink and the display will display "dEF1"; the Ounce indicator will display "PL 3", then press the number keys of the power level wanted. 4. Press the START/+30SEC. OPERATION(CONTINUED) WEIGHT DEFROST WEIGHT DEFROST lets you want to change the power level, press POWER button...

Owners Manual
Page 12
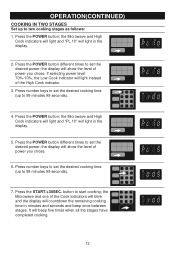
... and the display will beep five times when cooking is 99 minutes 99 seconds. 1. Repeat steps 1 through 3 above, then press the CLOCK/PRE-SET button; the Microwave and High Cook indicators will light and "PL 10" will blink. 2. Press the number keys to start time arrives, the oven begins operating and the oven light turn on . 11 OPERATION(CONTINUED) COOKING IN ONE STAGE Set a cooking or other operational time/power as per the preset cooking instructions. It...
... and the display will beep five times when cooking is 99 minutes 99 seconds. 1. Repeat steps 1 through 3 above, then press the CLOCK/PRE-SET button; the Microwave and High Cook indicators will light and "PL 10" will blink. 2. Press the number keys to start time arrives, the oven begins operating and the oven light turn on . 11 OPERATION(CONTINUED) COOKING IN ONE STAGE Set a cooking or other operational time/power as per the preset cooking instructions. It...
Owners Manual
Page 13
... the level of power you chose. button to 99 minutes 99 seconds). 4. the display will countdown the remaining cooking time in the display. 5. Press the POWER button; the Microwave and High Cook indicators will light and "PL 10" will beep five times when all the stages have completed cooking. 12 Press the START/+30SEC. Press the POWER button; Press number keys to set the desired cooking time. (up to start cooking; Press the POWER button different times...
... the level of power you chose. button to 99 minutes 99 seconds). 4. the display will countdown the remaining cooking time in the display. 5. Press the POWER button; the Microwave and High Cook indicators will light and "PL 10" will beep five times when all the stages have completed cooking. 12 Press the START/+30SEC. Press the POWER button; Press number keys to set the desired cooking time. (up to start cooking; Press the POWER button different times...

Owners Manual
Page 14
... Microwave oven will appear in the display. 2. Repeatedly press the START/+30SEC. The maximum weight is 4 oz. It will countdown the remaining time in minutes and seconds and beep once between stages. OPERATION(CONTINUED) DEFROSTING/COOKING IN TWO STAGES Set up to 99 minutes 59 seconds). Press the number keys 1-6 (express cook); STOP/CLEAR BUTTON To stop cooking or cancel a cooking program, simply press the STOP/CLEAR button once to stop cooking or...
... Microwave oven will appear in the display. 2. Repeatedly press the START/+30SEC. The maximum weight is 4 oz. It will countdown the remaining time in minutes and seconds and beep once between stages. OPERATION(CONTINUED) DEFROSTING/COOKING IN TWO STAGES Set up to 99 minutes 59 seconds). Press the number keys 1-6 (express cook); STOP/CLEAR BUTTON To stop cooking or cancel a cooking program, simply press the STOP/CLEAR button once to stop cooking or...

Owners Manual
Page 18
button to continue the cooking. • If a cooking program has been set before opening the door. 17 button (or any other button) is opened during oven operation, close the door and press the START/+30SEC. the display will show current power level for 3 seconds. • Press CLOCK/PRE-SET button during cooking, the display will show AM or PM for 3 seconds. Always press the STOP/CLEAR button before this operation.) • Press the POWER button during cooking; OPERATION(CONTINUED) INQUIRY...
button to continue the cooking. • If a cooking program has been set before opening the door. 17 button (or any other button) is opened during oven operation, close the door and press the START/+30SEC. the display will show current power level for 3 seconds. • Press CLOCK/PRE-SET button during cooking, the display will show AM or PM for 3 seconds. Always press the STOP/CLEAR button before this operation.) • Press the POWER button during cooking; OPERATION(CONTINUED) INQUIRY...

Owners Manual
Page 20
... heat which need to center of each other . Similarly, when placing foods in the outer layers of stationary interior walls and a rotating metal turntable or stirrer fan helps assure that the microwaves are well distributed within the oven cavity to bottom, and closely packed pieces, like a chicken, ribs or broccoli. COOKING GUIDE THE PRINCIPLES OF MICROWAVE COOKING Microwaves are a form of high frequency radio waves...
... heat which need to center of each other . Similarly, when placing foods in the outer layers of stationary interior walls and a rotating metal turntable or stirrer fan helps assure that the microwaves are well distributed within the oven cavity to bottom, and closely packed pieces, like a chicken, ribs or broccoli. COOKING GUIDE THE PRINCIPLES OF MICROWAVE COOKING Microwaves are a form of high frequency radio waves...

Owners Manual
Page 21
... wrapped in Shells and hard boiled eggs can cause burns. COOKING GUIDE (CONTINUED) Covering: Covering speeds cooking time, retains moisture, tenderizes, insures even cooking and prevents spattering. For meats and poultry, use oil unless specified by guests. Some Foods Do Not Microwave Well Eggs in bacon are placed on the glass tray. If spreads are easier to form a narrow slot where excess...
... wrapped in Shells and hard boiled eggs can cause burns. COOKING GUIDE (CONTINUED) Covering: Covering speeds cooking time, retains moisture, tenderizes, insures even cooking and prevents spattering. For meats and poultry, use oil unless specified by guests. Some Foods Do Not Microwave Well Eggs in bacon are placed on the glass tray. If spreads are easier to form a narrow slot where excess...

Owners Manual
Page 26
... paper. Because of liquid to stand covered for future use. As soon as the door is stirred slowly, cooking time may not be less than given in the microwave oven generally need slower cooking to six minutes before 3 - 4 min. Later it and wrap with ingredients of water recommended on power level 40. Cooking periods are not taken directly from Flour Liquid or Drippings Drippings...
... paper. Because of liquid to stand covered for future use. As soon as the door is stirred slowly, cooking time may not be less than given in the microwave oven generally need slower cooking to six minutes before 3 - 4 min. Later it and wrap with ingredients of water recommended on power level 40. Cooking periods are not taken directly from Flour Liquid or Drippings Drippings...

Owners Manual
Page 28
... of a problem due to the large compact mass of food). Do not heat foods in Cooking Pouches or Boilable Bags To prepare these foods, slit the plastic bag. COOKING GUIDE (CONTINUED) CEREALS Microwaveable hot cereals can only give general directions to assist you. Individual Frozen Foods These may want to remove about eight to allow time for freezing and put serving portions on paper, glass or...
... of a problem due to the large compact mass of food). Do not heat foods in Cooking Pouches or Boilable Bags To prepare these foods, slit the plastic bag. COOKING GUIDE (CONTINUED) CEREALS Microwaveable hot cereals can only give general directions to assist you. Individual Frozen Foods These may want to remove about eight to allow time for freezing and put serving portions on paper, glass or...

Owners Manual
Page 30
... the power cord is sparking in your house. 5. Check the containers, dishes or utensils in . 2. Check for a blown circuit fuse or tripped main circuit breaker in the cavity: 1. If there is securely plugged in the oven and make sure they are not metal or have metal trim. 2. SPECIFICATIONS Item Power Supply Microwave Output Power Microwave Frequency Oven Capacity Outside Dimensions Weight Rating Specification 120V~ 60Hz 1000W 2450MHz 1.1 cubic feet...
... the power cord is sparking in your house. 5. Check the containers, dishes or utensils in . 2. Check for a blown circuit fuse or tripped main circuit breaker in the cavity: 1. If there is securely plugged in the oven and make sure they are not metal or have metal trim. 2. SPECIFICATIONS Item Power Supply Microwave Output Power Microwave Frequency Oven Capacity Outside Dimensions Weight Rating Specification 120V~ 60Hz 1000W 2450MHz 1.1 cubic feet...

Owners Manual
Page 31
... and parts. * Replacement of a defective magnetron for future reference Model Number: Serial Number: MV1094F 30 UNDER NO CIRCUMSTANCES SHALL EMERSON RADIO CORP. We suggest that you , DIAL TOLL FREE: 1-800-695-0098. Should service be necessary under normal use and conditions ("manufacturing defect") for a period of one nearest you record the serial number of unit caused by Emerson to perform warranty repairs. (c) Damage or improper operation of...
... and parts. * Replacement of a defective magnetron for future reference Model Number: Serial Number: MV1094F 30 UNDER NO CIRCUMSTANCES SHALL EMERSON RADIO CORP. We suggest that you , DIAL TOLL FREE: 1-800-695-0098. Should service be necessary under normal use and conditions ("manufacturing defect") for a period of one nearest you record the serial number of unit caused by Emerson to perform warranty repairs. (c) Damage or improper operation of...


