

Owners Manual
Page 2
... plug has two blades with the manufacturer's instructions. 5.) Do not install near water. 3.) Clean only with dry cloth. 4.) Do not block any ventilation openings. PERSONNEL. IMPORTANT SAFETY INSTRUCTIONS 1.) Read these instructions. Heed all warnings. 2.) Do not use attachments / accessories specified by the manufacturer. 9.) Unplug this product, ask the service technician to qualified service personnel. Use only power source as indicated. 14.) Use replacement parts...
... plug has two blades with the manufacturer's instructions. 5.) Do not install near water. 3.) Clean only with dry cloth. 4.) Do not block any ventilation openings. PERSONNEL. IMPORTANT SAFETY INSTRUCTIONS 1.) Read these instructions. Heed all warnings. 2.) Do not use attachments / accessories specified by the manufacturer. 9.) Unplug this product, ask the service technician to qualified service personnel. Use only power source as indicated. 14.) Use replacement parts...
Owners Manual
Page 4
... equipment into an outlet on , the user is properly installed. • When moving the set, be sure to first disconnect the AC power cord and remove cords connected to radio or television reception, which the receiver is no guarantee that may cause undesired operation. This equipment generates, uses, and can be determined by turning the equipment off and on a circuit different from...
... equipment into an outlet on , the user is properly installed. • When moving the set, be sure to first disconnect the AC power cord and remove cords connected to radio or television reception, which the receiver is no guarantee that may cause undesired operation. This equipment generates, uses, and can be determined by turning the equipment off and on a circuit different from...

Owners Manual
Page 7
... your alarm setting will maintain the clock and alarm time settings. When power is interrupted the clock display will go off but the battery will also be maintained. If you notice that you install a well-known brand of Alkaline battery for longest life and best performance. Reset the clock and replace the battery as soon as possible. To install the back up system operational you should install a new battery every...
... your alarm setting will maintain the clock and alarm time settings. When power is interrupted the clock display will go off but the battery will also be maintained. If you notice that you install a well-known brand of Alkaline battery for longest life and best performance. Reset the clock and replace the battery as soon as possible. To install the back up system operational you should install a new battery every...
Owners Manual
Page 9
... Power Cord. 25.) FM Wire Antenna. 26.) CD compartment. 27.) CD Door OPEN/CLOSE Position. 28.) SNOOZE Button. 29.) SLEEP Button. 30.) ALARM SET/DISPLAY Button. 31.) ALARM 2 Button. 1.) AM/PROG. (AM Radio 'On' or CD Program Track) Indicator. 2.) AL2 (Alarm 2) 'On' Indicator. 3.) VOLUME Control. 4.) AL1 (Alarm 1) 'On' Indicator. 5.) PM Indicator. 6.) TIME-DN/F.REV Button. 7.) STOP Button. 8.) CD PLAY/PAUSE Button. 9.) TIME-UP/F.FWD Button. 10.) SLEEP Indicator. 11.) TUNING Control. 12.) FM Radio 'On' Indicator. 13.) LED Display. 14.) AUX Jack. 15.) PHONES Jack. 16.) ALARM 1 Button...
... Power Cord. 25.) FM Wire Antenna. 26.) CD compartment. 27.) CD Door OPEN/CLOSE Position. 28.) SNOOZE Button. 29.) SLEEP Button. 30.) ALARM SET/DISPLAY Button. 31.) ALARM 2 Button. 1.) AM/PROG. (AM Radio 'On' or CD Program Track) Indicator. 2.) AL2 (Alarm 2) 'On' Indicator. 3.) VOLUME Control. 4.) AL1 (Alarm 1) 'On' Indicator. 5.) PM Indicator. 6.) TIME-DN/F.REV Button. 7.) STOP Button. 8.) CD PLAY/PAUSE Button. 9.) TIME-UP/F.FWD Button. 10.) SLEEP Indicator. 11.) TUNING Control. 12.) FM Radio 'On' Indicator. 13.) LED Display. 14.) AUX Jack. 15.) PHONES Jack. 16.) ALARM 1 Button...
Owners Manual
Page 10
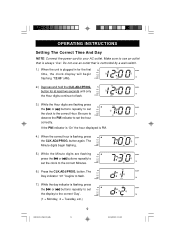
... buttons repeatly to set the display to the correct Hour. button. button for the first time, the clock display will begin flashing. 5.) While the Minute digits are flashing press the or buttons repeatly to set the clock to the correct 'Day'. (1 = Monday, 2 = Tuesday, etc.) CKD1100_052107.p65 9 9 21/5/2007, 10:44 button again. The Day indicator "d:1" begins to the correct Minutes. 6.) Press the CLK.ADJ/PROG. OPERATING INSTRUCTIONS Setting The Correct Time And Day NOTE: Connect the power cord...
... buttons repeatly to set the display to the correct Hour. button. button for the first time, the clock display will begin flashing. 5.) While the Minute digits are flashing press the or buttons repeatly to set the clock to the correct 'Day'. (1 = Monday, 2 = Tuesday, etc.) CKD1100_052107.p65 9 9 21/5/2007, 10:44 button again. The Day indicator "d:1" begins to the correct Minutes. 6.) Press the CLK.ADJ/PROG. OPERATING INSTRUCTIONS Setting The Correct Time And Day NOTE: Connect the power cord...
Owners Manual
Page 11
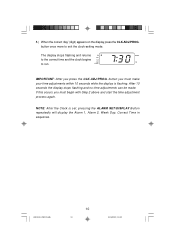
IMPORTANT: After you must make your time adjustments within 10 seconds while the display is set, pressing the ALARM SET/DISPLAY Button repeatedly will display the Alarm 1, Alarm 2, Week Day, Correct Time in sequence. button you must begin with Step 2 above and start the time adjustment process again. CKD1100_052107.p65 10 10 21/5/2007, 10:44 NOTE: After the Clock is flashing. button once more to run. If this occurs you press...
IMPORTANT: After you must make your time adjustments within 10 seconds while the display is set, pressing the ALARM SET/DISPLAY Button repeatedly will display the Alarm 1, Alarm 2, Week Day, Correct Time in sequence. button you must begin with Step 2 above and start the time adjustment process again. CKD1100_052107.p65 10 10 21/5/2007, 10:44 NOTE: After the Clock is flashing. button once more to run. If this occurs you press...

Owners Manual
Page 12
... RADIO/BAND button again to repeatedly switch between the AM and FM bands. 3.) Rotate the TUNING control on the right side panel to tune to the desired station. 4.) Rotate the VOLUME control on . 2.) Press the RADIO/BAND button to select the Radio function. The POWER LED indicator goes off. If AM reception is unsatisfactory try turning the entire unit slightly until you are finished listening press the ALARM OFF/POWER button...
... RADIO/BAND button again to repeatedly switch between the AM and FM bands. 3.) Rotate the TUNING control on the right side panel to tune to the desired station. 4.) Rotate the VOLUME control on . 2.) Press the RADIO/BAND button to select the Radio function. The POWER LED indicator goes off. If AM reception is unsatisfactory try turning the entire unit slightly until you are finished listening press the ALARM OFF/POWER button...
Owners Manual
Page 13
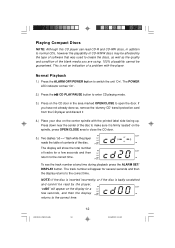
...cd - -"flash while the player reads the table of contents of tracks for a few seconds, and then the display returns to make sure it 4.) Place your disc on the center spindle with the player. The track number will show the total number of the disc. CKD1100_052107.p65...center of the disc to the correct time. To see the track number at any time during playback press the ALARM SET/ DISPLAY button. Normal Playback 1.) Press the ALARM OFF/POWER button to the correct time. The POWER LED indicator comes 'On'. 2.) Press the CD PLAY/PAUSE button to enter CD playing mode. 3.) Press ...
...cd - -"flash while the player reads the table of contents of tracks for a few seconds, and then the display returns to make sure it 4.) Place your disc on the center spindle with the player. The track number will show the total number of the disc. CKD1100_052107.p65...center of the disc to the correct time. To see the track number at any time during playback press the ALARM SET/ DISPLAY button. Normal Playback 1.) Press the ALARM OFF/POWER button to the correct time. The POWER LED indicator comes 'On'. 2.) Press the CD PLAY/PAUSE button to enter CD playing mode. 3.) Press ...

Owners Manual
Page 17
... programmed and continue until all programmed tracks have played the player stops but the program remains in the memory. NOTES: • After all the desired tracks press the CD PLAY/ PAUSE button to the Radio function also clears the program. Opening the CD door, pressing the ALARM OFF/POWER button to shut the unit 'Off', or switching to begin programmed playback again. button and then press the STOP button...
... programmed and continue until all programmed tracks have played the player stops but the program remains in the memory. NOTES: • After all the desired tracks press the CD PLAY/ PAUSE button to the Radio function also clears the program. Opening the CD door, pressing the ALARM OFF/POWER button to shut the unit 'Off', or switching to begin programmed playback again. button and then press the STOP button...
Owners Manual
Page 18
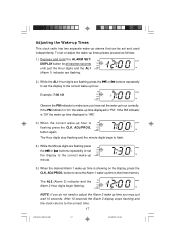
... set and used independently. To set or adjust the wake-up times please proceed as follows: 1.) Depress and hold the ALARM SET/ DISPLAY button for at least two seconds until just the Hour digits and the AL1 (Alarm 1) indicator are flashing. 2.) While the AL1 Hour digits are flashing press the or buttons repeatedly to set the wake-up hour correctly. ADJ/PROG. button to store the Alarm 1 wake-up time in the timer memory. Adjusting the Wake-up Times This clock radio...
... set and used independently. To set or adjust the wake-up times please proceed as follows: 1.) Depress and hold the ALARM SET/ DISPLAY button for at least two seconds until just the Hour digits and the AL1 (Alarm 1) indicator are flashing. 2.) While the AL1 Hour digits are flashing press the or buttons repeatedly to set the wake-up hour correctly. ADJ/PROG. button to store the Alarm 1 wake-up time in the timer memory. Adjusting the Wake-up Times This clock radio...

Owners Manual
Page 19
... must make your wake-up time adjustments within 10 seconds while the wake-up hour is flashing. After 10 seconds the wake-up time display stops flashing, the display returns to the correct time, and no wake-up hour. CKD1100_052107.p65 18 18 21/5/2007, 15:56 6.) While the Alarm 2 Hour digits are flashing press the or buttons repeatedly to set the display to the correct wake-up minute. 9.) When the desired Alarm 2 wake-up time in the timer...
... must make your wake-up time adjustments within 10 seconds while the wake-up hour is flashing. After 10 seconds the wake-up time display stops flashing, the display returns to the correct time, and no wake-up hour. CKD1100_052107.p65 18 18 21/5/2007, 15:56 6.) While the Alarm 2 Hour digits are flashing press the or buttons repeatedly to set the display to the correct wake-up minute. 9.) When the desired Alarm 2 wake-up time in the timer...
Owners Manual
Page 20
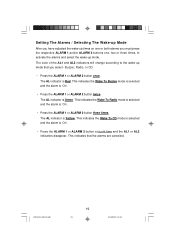
... the respective ALARM 1 and/or ALARM 2 buttons one or both alarms you select - Buzzer, Radio, or CD. • Press the ALARM 1 or ALARM 2 button once. The color of the AL1 and AL2 indicators will change according to activate the alarms and select the wake-up mode. The AL indicator is 'On'. • Press the ALARM 1 or ALARM 2 button three times. This indicates the Wake To CD mode is selected...
... the respective ALARM 1 and/or ALARM 2 buttons one or both alarms you select - Buzzer, Radio, or CD. • Press the ALARM 1 or ALARM 2 button once. The color of the AL1 and AL2 indicators will change according to activate the alarms and select the wake-up mode. The AL indicator is 'On'. • Press the ALARM 1 or ALARM 2 button three times. This indicates the Wake To CD mode is selected...
Owners Manual
Page 21
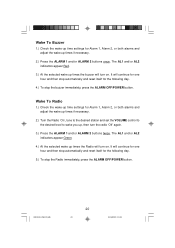
... times if necessary. 2.) Press the ALARM 1 and/or ALARM 2 buttons once. Wake To Radio 1.) Check the wake-up time settings for the following day. 5.) To stop automatically and reset itself for Alarm 1, Alarm 2, or both alarms and adjust the wake up times the buzzer will continue for one hour and then stop automatically and reset itself for the following day. 4.) To stop the buzzer immediately, press the ALARM OFF/POWER button. It will turn the radio 'Off'again. 3.) Press the ALARM 1 and/or ALARM 2 buttons...
... times if necessary. 2.) Press the ALARM 1 and/or ALARM 2 buttons once. Wake To Radio 1.) Check the wake-up time settings for the following day. 5.) To stop automatically and reset itself for Alarm 1, Alarm 2, or both alarms and adjust the wake up times the buzzer will continue for one hour and then stop automatically and reset itself for the following day. 4.) To stop the buzzer immediately, press the ALARM OFF/POWER button. It will turn the radio 'Off'again. 3.) Press the ALARM 1 and/or ALARM 2 buttons...

Owners Manual
Page 22
... the wake-up time settings for the following day. 5.) To stop the CD player immediately, press the ALARM OFF/POWER button. Then press the STOP button to stop automatically and reset itself for Alarm 1, Alarm 2, or both alarms and adjust the wake up times the CD player will turn on. NOTE: If there's no CD inserted, or the CD is damaged, it will play for one hour, or until the end of the disc, whichever...
... the wake-up time settings for the following day. 5.) To stop the CD player immediately, press the ALARM OFF/POWER button. Then press the STOP button to stop automatically and reset itself for Alarm 1, Alarm 2, or both alarms and adjust the wake up times the CD player will turn on. NOTE: If there's no CD inserted, or the CD is damaged, it will play for one hour, or until the end of the disc, whichever...

Owners Manual
Page 23
... Dimmer Control The display DIMMER selector switch located on again. Snooze/Repeat Alarm After the alarm turns on in the morning you find the display to be repeated several times if desired, but after one hour the alarm will stop for approximately 9 minutes and then come on the left side cabinet was set to the LOW position. If you can be too bright for a few extra minutes sleep...
... Dimmer Control The display DIMMER selector switch located on again. Snooze/Repeat Alarm After the alarm turns on in the morning you find the display to be repeated several times if desired, but after one hour the alarm will stop for approximately 9 minutes and then come on the left side cabinet was set to the LOW position. If you can be too bright for a few extra minutes sleep...

Owners Manual
Page 24
..., the sound stops when the disc ends, even if a longer sleep time was selected. Sleep To Music Timer You can use the sleep timer to fall asleep to the Radio or CD player up to 90 minutes and have the unit shut off automatically. 4.) To stop the Radio or CD player before the sleep timer counts down to "00", press the ALARM OFF/STANDBY button to turn the power 'On'. Operate the Radio or CD player as...
..., the sound stops when the disc ends, even if a longer sleep time was selected. Sleep To Music Timer You can use the sleep timer to fall asleep to the Radio or CD player up to 90 minutes and have the unit shut off automatically. 4.) To stop the Radio or CD player before the sleep timer counts down to "00", press the ALARM OFF/STANDBY button to turn the power 'On'. Operate the Radio or CD player as...
Owners Manual
Page 25
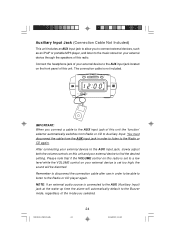
... AUX (Auxiliary Input) jack at the wake-up time the alarm will be able to listen to Auxiliary Input. Remember to disconnect the connection cable after use in order to listen to the Buzzer mode, regardless of this unit and your external device to the AUX input jack, slowly adjust both the volume controls on the front panel of the mode you to connect external devices, such as an iPod...
... AUX (Auxiliary Input) jack at the wake-up time the alarm will be able to listen to Auxiliary Input. Remember to disconnect the connection cable after use in order to listen to the Buzzer mode, regardless of this unit and your external device to the AUX input jack, slowly adjust both the volume controls on the front panel of the mode you to connect external devices, such as an iPod...

Owners Manual
Page 26
Then put on the headphones. Headphone (PHONES) Jack This unit includes a 3.5mm PHONES (headphone) jack on the headphones and gradually adjust the volume control to connect a set of stereo headphones (not included) for private listening without disturbing others. Remember that prolonged listening with headphones or ear buds at high volume levels may eventually cause hearing loss. When using stereo headphones always set the volume control to a low level before you to the desired level...
Then put on the headphones. Headphone (PHONES) Jack This unit includes a 3.5mm PHONES (headphone) jack on the headphones and gradually adjust the volume control to connect a set of stereo headphones (not included) for private listening without disturbing others. Remember that prolonged listening with headphones or ear buds at high volume levels may eventually cause hearing loss. When using stereo headphones always set the volume control to a low level before you to the desired level...
Owners Manual
Page 28
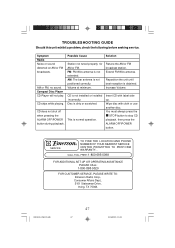
... use another disc. SERVICE TO FIND THE LOCATION AND PHONE R NUMBER OF YOUR NEAREST SERVICE CENTER PERMITTED TO PERFORM WARRANTY... CD is not positioned correctly. You must always press the STOP button to stop CD playback, then press the ALARM OFF/POWER button. TROUBLESHOOTING GUIDE Should this unit exhibit a problem, check the following before seeking service. AM or FM, no sound. Compact Disc Player CD Player will not play. CD does not shut...
... use another disc. SERVICE TO FIND THE LOCATION AND PHONE R NUMBER OF YOUR NEAREST SERVICE CENTER PERMITTED TO PERFORM WARRANTY... CD is not positioned correctly. You must always press the STOP button to stop CD playback, then press the ALARM OFF/POWER button. TROUBLESHOOTING GUIDE Should this unit exhibit a problem, check the following before seeking service. AM or FM, no sound. Compact Disc Player CD Player will not play. CD does not shut...
Owners Manual
Page 29
... number when calling to follow operating instructions, commercial use and conditions, for labor and parts at an authorized Depot Repair Facility, or replace the product in the amount of $9.00 (not required by an unauthorized facility, or products purchased, used, serviced or damaged outside of your check or money order payable to locate the Serial Number of the United States. LIMITED WARRANTY Emerson Radio...
... number when calling to follow operating instructions, commercial use and conditions, for labor and parts at an authorized Depot Repair Facility, or replace the product in the amount of $9.00 (not required by an unauthorized facility, or products purchased, used, serviced or damaged outside of your check or money order payable to locate the Serial Number of the United States. LIMITED WARRANTY Emerson Radio...


