
Use and Care Manual
Page 2
At Electrolux Home Products, we are very proud of life. • Do Not Attempt to operate this microwave oven with the door open since open-door operation can result in this manual. Visit the Frigidaire Web Site at 1-800-944-9044, 24 hours a day, 7 days a week....Use your safety the information in the back of a new microwave oven! Please record your purchase of this manual. Or call away. door (bent) 2. door seals and sealing surfaces. • The Microwave Oven Should Not be practiced when installing, operating and maintaining any object between the microwave ...
At Electrolux Home Products, we are very proud of life. • Do Not Attempt to operate this microwave oven with the door open since open-door operation can result in this manual. Visit the Frigidaire Web Site at 1-800-944-9044, 24 hours a day, 7 days a week....Use your safety the information in the back of a new microwave oven! Please record your purchase of this manual. Or call away. door (bent) 2. door seals and sealing surfaces. • The Microwave Oven Should Not be practiced when installing, operating and maintaining any object between the microwave ...
Use and Care Manual
Page 3
Contact nearest Electrolux Authorized Servicer for examination, repair or adjustment. • Do not cover or...twist-ties from heated surfaces. • Do not let cord hang over edge of table or counter. • See door surface cleaning instructions on . • This appliance is not always present. Do not use straight-sided containers with the ...the cavity for 20 seconds before placing bag in this appliance outdoors. Grease should ignite, keep microwave oven door closed glass jars-are placed inside the microwave oven should not be boiling. Do not overcook food. Do ...
Contact nearest Electrolux Authorized Servicer for examination, repair or adjustment. • Do not cover or...twist-ties from heated surfaces. • Do not let cord hang over edge of table or counter. • See door surface cleaning instructions on . • This appliance is not always present. Do not use straight-sided containers with the ...the cavity for 20 seconds before placing bag in this appliance outdoors. Grease should ignite, keep microwave oven door closed glass jars-are placed inside the microwave oven should not be boiling. Do not overcook food. Do ...
Use and Care Manual
Page 4
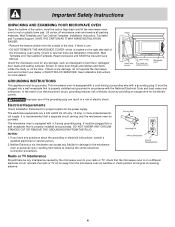
... plug. In the event of an electrical short circuit, grounding reduces risk of electric shock by the microwave oven to your dealer or ELECTROLUX SERVICER. NOTES: 1. Read enclosures and SAVE the Use and Care Manual. If there is equipped with a cord having a grounding wire...consult a qualified electrician or service person. 2. It must be plugged into a wall receptacle that the microwave oven is located on the door. The electrical requirements are Installation Instruction, Wall Template and Top Cabinet Template. or more details. SAVE THE CARTON AS IT MAY MAKE INSTALLATION...
... plug. In the event of an electrical short circuit, grounding reduces risk of electric shock by the microwave oven to your dealer or ELECTROLUX SERVICER. NOTES: 1. Read enclosures and SAVE the Use and Care Manual. If there is equipped with a cord having a grounding wire...consult a qualified electrician or service person. 2. It must be plugged into a wall receptacle that the microwave oven is located on the door. The electrical requirements are Installation Instruction, Wall Template and Top Cabinet Template. or more details. SAVE THE CARTON AS IT MAY MAKE INSTALLATION...
Use and Care Manual
Page 6
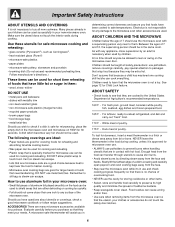
...time. Enough heat from the microwave oven so that they may be used successfully in the microwave oven and microwave on the microwave oven door. Evaluate carefully before you wish to check if a dish is safe for microwaving, place the empty dish in your clothes or accessories ...do not touch the safety door latches. 6 Electrolux is not necessary to buy all safety precautions: use potholders, remove coverings carefully, pay special attention to packages that are microwave-safe are ...
...time. Enough heat from the microwave oven so that they may be used successfully in the microwave oven and microwave on the microwave oven door. Evaluate carefully before you wish to check if a dish is safe for microwaving, place the empty dish in your clothes or accessories ...do not touch the safety door latches. 6 Electrolux is not necessary to buy all safety precautions: use potholders, remove coverings carefully, pay special attention to packages that are microwave-safe are ...

Use and Care Manual
Page 7
... control panel 9 Handle 10 Louver 11 Menu label 12 Removable turntable The turntable will not operate unless the door is in the center of microwave oven) 15 1 Microwave oven door with see-through window 2 Door hinges 3 Waveguide cover: DO NOT REMOVE. 4 Turntable motor shaft 5 Microwave oven light It will light when microwave oven...
... control panel 9 Handle 10 Louver 11 Menu label 12 Removable turntable The turntable will not operate unless the door is in the center of microwave oven) 15 1 Microwave oven door with see-through window 2 Door hinges 3 Waveguide cover: DO NOT REMOVE. 4 Turntable motor shaft 5 Microwave oven light It will light when microwave oven...
Use and Care Manual
Page 8
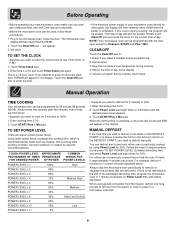
Touch the Clear/Off pad. : will also be programmed with the door open except for 99 minutes 99 seconds (99.99). Set clock. If this Use and Care manual completely. • Before the microwave oven can be ... clock time, ERROR will then begin flashing 88:88. 2. Before Operating • Before operating your microwave oven should be used, follow these procedures: 1. Close the door. TO SET THE CLOCK • Suppose you attempt to remove or separate the portions that you need to defrost is not listed on the DEFROST...
Touch the Clear/Off pad. : will also be programmed with the door open except for 99 minutes 99 seconds (99.99). Set clock. If this Use and Care manual completely. • Before the microwave oven can be ... clock time, ERROR will then begin flashing 88:88. 2. Before Operating • Before operating your microwave oven should be used, follow these procedures: 1. Close the door. TO SET THE CLOCK • Suppose you attempt to remove or separate the portions that you need to defrost is not listed on the DEFROST...
Use and Care Manual
Page 9
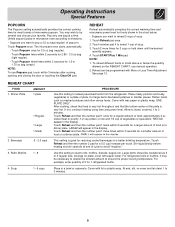
.... If not, continue heating using time and power level. Touch Reheat and then the number pad 1 twice within 3 minutes after cooking, opening and closing the door or touching the Clear/Off pad. LARGE will appear in smaller pieces. Touch Reheat and then the number 2 pad for 3 cups or hold down until...
.... If not, continue heating using time and power level. Touch Reheat and then the number pad 1 twice within 3 minutes after cooking, opening and closing the door or touching the Clear/Off pad. LARGE will appear in smaller pieces. Touch Reheat and then the number 2 pad for 3 cups or hold down until...
Use and Care Manual
Page 11
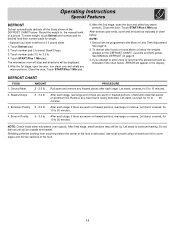
...pound steak . 1. Touch number pads 3,0 for 10 to 20 minutes. 4. After the 1st stage, open the door and shield any meat that is defrosted. After the 2nd stage, open the door, turn steak over and shield any thawed pieces after each stage, if there are warm or thawed portions, rearrange...food then number pads for 10 to 10 minutes. 2. Touch number pad 2 to continue thawing. Touch START/Plus 1 Min pad. Close the door. Close the door. Touch START/Plus 1 Min pad. After defrost cycle ends, cover and let stand as indicated in the chart below . Defrost can be displayed....
...pound steak . 1. Touch number pads 3,0 for 10 to 20 minutes. 4. After the 1st stage, open the door and shield any meat that is defrosted. After the 2nd stage, open the door, turn steak over and shield any thawed pieces after each stage, if there are warm or thawed portions, rearrange...food then number pads for 10 to 10 minutes. 2. Touch number pad 2 to continue thawing. Touch START/Plus 1 Min pad. Close the door. Close the door. Touch START/Plus 1 Min pad. After defrost cycle ends, cover and let stand as indicated in the chart below . Defrost can be displayed....
Use and Care Manual
Page 12
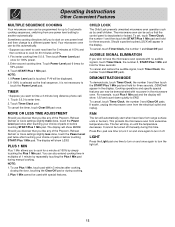
... after touching your choice of the Popcorn, Reheat, Defrost or Cook settings slightly more done, touch the Power Level pad once after cooking, closing the door, touching the Clear/Off pad or during cooking. 2. Press Fan pad one time to turn on and once again to turn the light off manually...
... after touching your choice of the Popcorn, Reheat, Defrost or Cook settings slightly more done, touch the Power Level pad once after cooking, closing the door, touching the Clear/Off pad or during cooking. 2. Press Fan pad one time to turn on and once again to turn the light off manually...
Use and Care Manual
Page 13
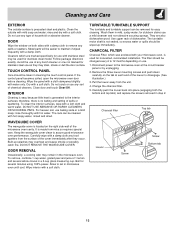
...soil, use as they occur. WAVEGUIDE COVER The waveguide cover is precoated steel and plastic. Carefully wipe with mild soap and water; Close door and touch Clear/Off. It is generated to assure good microwave oven performance. Built-up immediately. Remove the three louver mounting screws and .... 4. To clean the interior surfaces, wipe with a damp cloth to maintain if wiped frequently with hot soapy water, rinsed and dried. DOOR Wipe the window on use with water only. Metal parts will be removed for use . 1. Avoid the use any harsh cleaner or one...
...soil, use as they occur. WAVEGUIDE COVER The waveguide cover is precoated steel and plastic. Carefully wipe with mild soap and water; Close door and touch Clear/Off. It is generated to assure good microwave oven performance. Built-up immediately. Remove the three louver mounting screws and .... 4. To clean the interior surfaces, wipe with a damp cloth to maintain if wiped frequently with hot soapy water, rinsed and dried. DOOR Wipe the window on use with water only. Metal parts will be removed for use . 1. Avoid the use any harsh cleaner or one...
Use and Care Manual
Page 15
...* The International Electrotechnical Commission's standardized method for the turntable to avoid overcooking. (For models FMV156DB, DS, DC, DQ only.) 15 Federal Communications Commission Authorized. - This symbol on the...? Complies with standards set for use in the microwave oven and close the door securely. This symbol on the nameplate means the product is listed by Underwriters...Title 21, Chapter I, Subchapter J. - If they are functioning properly, CONTACT YOUR NEAREST ELECTROLUX AUTHORIZED SERVICER. Service Call Check Please check the following before calling for service: Place ...
...* The International Electrotechnical Commission's standardized method for the turntable to avoid overcooking. (For models FMV156DB, DS, DC, DQ only.) 15 Federal Communications Commission Authorized. - This symbol on the...? Complies with standards set for use in the microwave oven and close the door securely. This symbol on the nameplate means the product is listed by Underwriters...Title 21, Chapter I, Subchapter J. - If they are functioning properly, CONTACT YOUR NEAREST ELECTROLUX AUTHORIZED SERVICER. Service Call Check Please check the following before calling for service: Place ...
Parts Catalog
Page 3
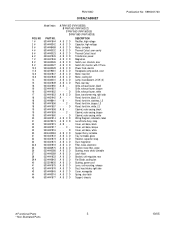
... C D A B C D A B C D A B C D A B C D A B C D A B C D A B C D AB- - - C- - - interlock, door Switch Kit, monitor, with CT fuse Power Cord, electric Receptacle, lamp socket, oven Motor, hood fan Motor, cooling fan Lamp, incandescent, 20 W, (3) Plate, rear stay... Hook Bracket, unit mtg plate, rear Fan Blade, cooling fan Bushing, power cord Lever, unit mounting, release Duct, hood intake, right side Cover, waveguide Spring, door latch Support, chassis Publication No: 5995451720 # Functional Parts 3 * Non-Illustrated Parts 10/05 D A B C D A- - - D A B C D A B C D A B C D A B C D ...
... C D A B C D A B C D A B C D A B C D A B C D A B C D A B C D AB- - - C- - - interlock, door Switch Kit, monitor, with CT fuse Power Cord, electric Receptacle, lamp socket, oven Motor, hood fan Motor, cooling fan Lamp, incandescent, 20 W, (3) Plate, rear stay... Hook Bracket, unit mtg plate, rear Fan Blade, cooling fan Bushing, power cord Lever, unit mounting, release Duct, hood intake, right side Cover, waveguide Spring, door latch Support, chassis Publication No: 5995451720 # Functional Parts 3 * Non-Illustrated Parts 10/05 D A B C D A- - - D A B C D A B C D A B C D A B C D ...

Parts Catalog
Page 7
...C- - - Publication No: 5995451720 Model Index: POS. Frame, outer door, bisque Frame, outer door, white Latch, door Spring, door latch Frame, choke cover, inner door Seal, door, film Handle, door, black Handle, door, bisque Handle, door, white Screw, 4mm x 8mm Screw Hardware, installation, kit Sleeve, ... x 10mm Door Stop Door Assy, black, w/handle Door Assy, stainless, w/handle Door Assy, bisque, w/handle Door Assy, white, w/handle Panel, inner door, black Panel, inner door, bisque Panel, inner door, white Frame, outer door, black STAINLESS FRAME NOT REPLACEABLE-ORDER STAINLESS DOOR ASSY. NO...
...C- - - Publication No: 5995451720 Model Index: POS. Frame, outer door, bisque Frame, outer door, white Latch, door Spring, door latch Frame, choke cover, inner door Seal, door, film Handle, door, black Handle, door, bisque Handle, door, white Screw, 4mm x 8mm Screw Hardware, installation, kit Sleeve, ... x 10mm Door Stop Door Assy, black, w/handle Door Assy, stainless, w/handle Door Assy, bisque, w/handle Door Assy, white, w/handle Panel, inner door, black Panel, inner door, bisque Panel, inner door, white Frame, outer door, black STAINLESS FRAME NOT REPLACEABLE-ORDER STAINLESS DOOR ASSY. NO...
Installation Instructions
Page 1
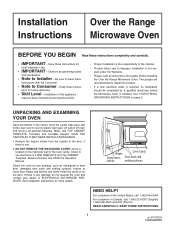
...THE CARTON AS IT MAY MAKE INSTALLATION EASIER. 1. Remove the feature sticker from the outside of the oven cavity. Hinges Oven Cavity Safety door Door seals and latches sealing surfaces NEED HELP? Save these instructions completely and carefully. • IMPORTANT - tions for any damage, do not ...operate the oven and contact your dealer or ELECTROLUX AUTHORIZED SERVICER. See 3 ELECTRICAL GROUNDING INSTRUCTIONS on the right side wall of the door, if there is a Wall TEMPLATE and Top CABINET Template. Check to rest on the...
...THE CARTON AS IT MAY MAKE INSTALLATION EASIER. 1. Remove the feature sticker from the outside of the oven cavity. Hinges Oven Cavity Safety door Door seals and latches sealing surfaces NEED HELP? Save these instructions completely and carefully. • IMPORTANT - tions for any damage, do not ...operate the oven and contact your dealer or ELECTROLUX AUTHORIZED SERVICER. See 3 ELECTRICAL GROUNDING INSTRUCTIONS on the right side wall of the door, if there is a Wall TEMPLATE and Top CABINET Template. Check to rest on the...


