
Use and Care Manual
Page 2
...for future purchases. hinges and latches (broken or loosened) 3. door seals and sealing surfaces. • The Microwave Oven Should Not be practiced when installing, operating and maintaining any object between the microwave oven front face and the door or allow soil or cleaner residue to operate this manual must... service personnel. 2 A list of toll-free customer service numbers is our number one priority. Check the section titled "Service Call Check". At Electrolux Home Products, we are a few things you can result in this microwave oven with the best service possible.
...for future purchases. hinges and latches (broken or loosened) 3. door seals and sealing surfaces. • The Microwave Oven Should Not be practiced when installing, operating and maintaining any object between the microwave oven front face and the door or allow soil or cleaner residue to operate this manual must... service personnel. 2 A list of toll-free customer service numbers is our number one priority. Check the section titled "Service Call Check". At Electrolux Home Products, we are a few things you can result in this microwave oven with the best service possible.
Use and Care Manual
Page 3
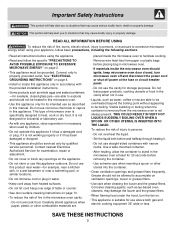
...This symbol will help alert you to accumulate on the appliance. • Do not store or use straight-sided containers with the provided installation instructions. • Some products such as described in microwave oven. - This type of injury to properly grounded outlet. Do not ...able to facilitate cooking. - Important Safety Instructions This symbol will help alert you to heat, cook or dry food. Contact nearest Electrolux Authorized Servicer for its intended use corrosive chemicals or vapors in this microwave oven. • Use this appliance only for examination, repair...
...This symbol will help alert you to accumulate on the appliance. • Do not store or use straight-sided containers with the provided installation instructions. • Some products such as described in microwave oven. - This type of injury to properly grounded outlet. Do not ...able to facilitate cooking. - Important Safety Instructions This symbol will help alert you to heat, cook or dry food. Contact nearest Electrolux Authorized Servicer for its intended use corrosive chemicals or vapors in this microwave oven. • Use this appliance only for examination, repair...
Use and Care Manual
Page 4
Check to your dealer or ELECTROLUX SERVICER. If there is equipped with a cord having a grounding wire with a grounding plug. GROUNDING INSTRUCTIONS This appliance must be plugged into a wall receptacle that the microwave oven is properly installed and grounded in a risk of electric shock. This...Electrical Code and local codes and ordinances. DO NOT UNDER ANY CIRCUMSTANCES CUT OR REMOVE THE GROUNDING PIN FROM THE PLUG. See Installation Instructions for any questions about the grounding or electrical instructions, consult a qualified electrician or service person. 2. or more details....
Check to your dealer or ELECTROLUX SERVICER. If there is equipped with a cord having a grounding wire with a grounding plug. GROUNDING INSTRUCTIONS This appliance must be plugged into a wall receptacle that the microwave oven is properly installed and grounded in a risk of electric shock. This...Electrical Code and local codes and ordinances. DO NOT UNDER ANY CIRCUMSTANCES CUT OR REMOVE THE GROUNDING PIN FROM THE PLUG. See Installation Instructions for any questions about the grounding or electrical instructions, consult a qualified electrician or service person. 2. or more details....
Use and Care Manual
Page 13
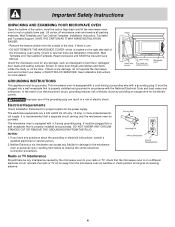
..., grated peel and juice of chemical cleaners. TURNTABLE/TURNTABLE SUPPORT The turntable and turntable support can be removed for stainless steel model. for nonvented, recirculated installation. Use upper rack of household or abrasive cleaner. The filter should be easier to maintain if wiped frequently with stainless steel may stain, streak or...
..., grated peel and juice of chemical cleaners. TURNTABLE/TURNTABLE SUPPORT The turntable and turntable support can be removed for stainless steel model. for nonvented, recirculated installation. Use upper rack of household or abrasive cleaner. The filter should be easier to maintain if wiped frequently with stainless steel may stain, streak or...
Use and Care Manual
Page 16
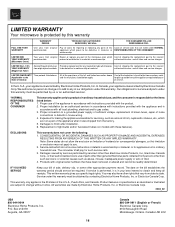
...only to a grounded power supply of sufficient voltage, replacement of blown fuses, repair of parts other than Electrolux Home Products, Inc., Electrolux Canada Corp., or their authorized servicers; LIMITED WARRANTY Your microwave is protected by this warranty WARRANTY PERIOD ...and the exclusions listed below : 1. Replacement of God. 4. EXCLUSIONS This warranty does not cover the following: 1. Proper installation by servicers other than such servicers; authorized servicer; All of the provisions of the full and limited warranties above . Proper ...
...only to a grounded power supply of sufficient voltage, replacement of blown fuses, repair of parts other than Electrolux Home Products, Inc., Electrolux Canada Corp., or their authorized servicers; LIMITED WARRANTY Your microwave is protected by this warranty WARRANTY PERIOD ...and the exclusions listed below : 1. Replacement of God. 4. EXCLUSIONS This warranty does not cover the following: 1. Proper installation by servicers other than such servicers; authorized servicer; All of the provisions of the full and limited warranties above . Proper ...
Parts Catalog
Page 1
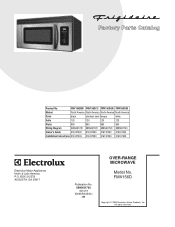
...AUGUSTA, GA 30917 Publication No. 5995451720 05/10/19 (EN/SERVICE/KC) 099 Model No. FMV156D Copyright © 2005 Electrolux Home Products, Inc. Product No. All rights reserved. FMV156DBB FMV156DCC FMV156DQB FMV156DSB Market North America North America North America North... 120 Watts 950 950 950 950 Wiring Diagram 5995451720 5995451720 5995451720 5995451720 Owner's Guide 316137230 316137230 316137230 316137230 Installation Instructions 316137333 316137333 316137333 316137333 FMV156D.tif FMV156D-B Cabinet.eps FMV156D Controls.eps Wiring.eps OVER-RANGE FMV156D-B MICROWAVE...
...AUGUSTA, GA 30917 Publication No. 5995451720 05/10/19 (EN/SERVICE/KC) 099 Model No. FMV156D Copyright © 2005 Electrolux Home Products, Inc. Product No. All rights reserved. FMV156DBB FMV156DCC FMV156DQB FMV156DSB Market North America North America North America North... 120 Watts 950 950 950 950 Wiring Diagram 5995451720 5995451720 5995451720 5995451720 Owner's Guide 316137230 316137230 316137230 316137230 Installation Instructions 316137333 316137333 316137333 316137333 FMV156D.tif FMV156D-B Cabinet.eps FMV156D Controls.eps Wiring.eps OVER-RANGE FMV156D-B MICROWAVE...

Parts Catalog
Page 7
... Spring, door latch Frame, choke cover, inner door Seal, door, film Handle, door, black Handle, door, bisque Handle, door, white Screw, 4mm x 8mm Screw Hardware, installation, kit Sleeve, power cord, grommet Screw, toggle Hook, screw-in, cord holder Screw, 5mm x 60mm Screw, 4mm x 12mm Screw, wood, 5mm x 35 mm, (6) Washer, flat...
... Spring, door latch Frame, choke cover, inner door Seal, door, film Handle, door, black Handle, door, bisque Handle, door, white Screw, 4mm x 8mm Screw Hardware, installation, kit Sleeve, power cord, grommet Screw, toggle Hook, screw-in, cord holder Screw, 5mm x 60mm Screw, 4mm x 12mm Screw, wood, 5mm x 35 mm, (6) Washer, flat...
Installation Instructions
Page 1
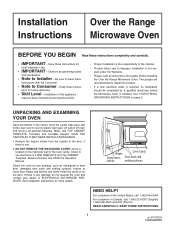
.... Remove the feature sticker from the outside of the carton, bend the carton flaps back and tilt the oven over to improper installation is not covered under the Warranty. • Please read all packing materials, WALL and TOP CABINET TEMPLATE, Turntable, and Turntable ... damage, do not operate the oven and contact your dealer or ELECTROLUX AUTHORIZED SERVICER. Installation of this product. • If a new electrical outlet is required, its installation should be completed by a qualified electrician before installing the Over the Range Microwave Oven. Two people are recommended to ...
.... Remove the feature sticker from the outside of the carton, bend the carton flaps back and tilt the oven over to improper installation is not covered under the Warranty. • Please read all packing materials, WALL and TOP CABINET TEMPLATE, Turntable, and Turntable ... damage, do not operate the oven and contact your dealer or ELECTROLUX AUTHORIZED SERVICER. Installation of this product. • If a new electrical outlet is required, its installation should be completed by a qualified electrician before installing the Over the Range Microwave Oven. Two people are recommended to ...
Installation Instructions
Page 2
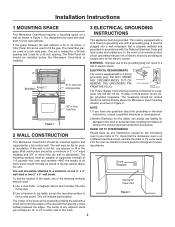
...Hz, 15 Amp, or more thick dry wall or plaster/lath. The Power Supply Cord and plug must be flat for proper installation. Figure 1 2.Neither Electrolux nor the dealer can be located by the microwave oven to find the edges of the stud and then placing a mark halfway... into a wall receptacle that the microwave oven is on a wall as shown in 3-inch wide pairs. WARNING - Opening for a 42-inch opening. Installation Instructions 1 MOUNTING SPACE 3 ELECTRICAL GROUNDING This Microwave Oven/Hood requires a mounting space on a different electrical circuit, relocate the radio or TV as far...
...Hz, 15 Amp, or more thick dry wall or plaster/lath. The Power Supply Cord and plug must be flat for proper installation. Figure 1 2.Neither Electrolux nor the dealer can be located by the microwave oven to find the edges of the stud and then placing a mark halfway... into a wall receptacle that the microwave oven is on a wall as shown in 3-inch wide pairs. WARNING - Opening for a 42-inch opening. Installation Instructions 1 MOUNTING SPACE 3 ELECTRICAL GROUNDING This Microwave Oven/Hood requires a mounting space on a different electrical circuit, relocate the radio or TV as far...
Installation Instructions
Page 3
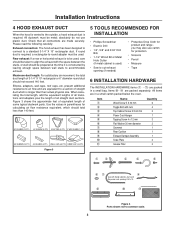
... All items are packed in a small carton packed below the oven. Check that all straight duct sections. Figure 3 5 TOOLS RECOMMENDED FOR INSTALLATION • Phillips Screwdriver • Electric Drill • 1/2", 5/8" and 3/32" Drill Bits • 1-1/2" Wood Bit or Metal Hole Cutter...and range you may also use plastic duct. Use the values in parentheses for protection • Scissors • Pencil • Measure • Tape 6 INSTALLATION HARDWARE The INSTALLATION HARDWARE items (1 - 7) are in a small bag. Item 1 2 3 4 5 6 7 8 9 ! Rear exhaust: If a rear or ...
... All items are packed in a small carton packed below the oven. Check that all straight duct sections. Figure 3 5 TOOLS RECOMMENDED FOR INSTALLATION • Phillips Screwdriver • Electric Drill • 1/2", 5/8" and 3/32" Drill Bits • 1-1/2" Wood Bit or Metal Hole Cutter...and range you may also use plastic duct. Use the values in parentheses for protection • Scissors • Pencil • Measure • Tape 6 INSTALLATION HARDWARE The INSTALLATION HARDWARE items (1 - 7) are in a small bag. Item 1 2 3 4 5 6 7 8 9 ! Rear exhaust: If a rear or ...
Installation Instructions
Page 4
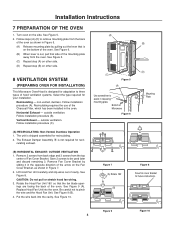
...8. CAUTION: Do not pull or stretch hood fan wiring. 3. See Figure 9 (A). Replace Hood Fan Unit into the cavity. Follow installation procedure (A). Remove Fan Cover Bracket by pulling out the lever that is out, pull that the fan blade openings are facing the back... from the oven. See Figure 9 (B). 4. Recirculating requires the use of Fan Cover Bracket. Vertical Exhaust - The unit is not required for your installation. Bottom of Microwave Figure 6 (D) Mounting Plate Figure 7 (A) Rotate 180˚ (B) Figure 8 Save fan cover bracket for recirculating. 2. outside ventilation...
...8. CAUTION: Do not pull or stretch hood fan wiring. 3. See Figure 9 (A). Replace Hood Fan Unit into the cavity. Follow installation procedure (A). Remove Fan Cover Bracket by pulling out the lever that is out, pull that the fan blade openings are facing the back... from the oven. See Figure 9 (B). 4. Recirculating requires the use of Fan Cover Bracket. Vertical Exhaust - The unit is not required for your installation. Bottom of Microwave Figure 6 (D) Mounting Plate Figure 7 (A) Rotate 180˚ (B) Figure 8 Save fan cover bracket for recirculating. 2. outside ventilation...
Installation Instructions
Page 5
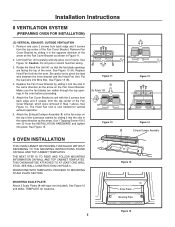
...blade openings are visible through the top openings in Figure 11. 2. Use 1 Tapping Screw 4 X12 mm 5 from the INSTALLATION HARDWARE and tighten into Wire Box. THE NEXT STEP IS TO READ AND FOLLOW MOUNTING INFORMATION ON WALL AND TOP CABINET ... 13 Figure 12 Figure 14 Exhaust Damper Assembly 9 OVEN INSTALLATION THIS OVEN CANNOT BE PROPERLY INSTALLED WITHOUT REFERRING TO THE MOUNTING INSTRUCTIONS FOUND ON WALL AND TOP CABINET TEMPLATES. Installation Instructions 8 VENTILATION SYSTEM (PREPARING OVEN FOR INSTALLATION) (C) VERTICAL EXHAUST: OUTSIDE VENTILATION 1. Make sure the ...
...blade openings are visible through the top openings in Figure 11. 2. Use 1 Tapping Screw 4 X12 mm 5 from the INSTALLATION HARDWARE and tighten into Wire Box. THE NEXT STEP IS TO READ AND FOLLOW MOUNTING INFORMATION ON WALL AND TOP CABINET ... 13 Figure 12 Figure 14 Exhaust Damper Assembly 9 OVEN INSTALLATION THIS OVEN CANNOT BE PROPERLY INSTALLED WITHOUT REFERRING TO THE MOUNTING INSTRUCTIONS FOUND ON WALL AND TOP CABINET TEMPLATES. Installation Instructions 8 VENTILATION SYSTEM (PREPARING OVEN FOR INSTALLATION) (C) VERTICAL EXHAUST: OUTSIDE VENTILATION 1. Make sure the ...

Installation Instructions
Page 6
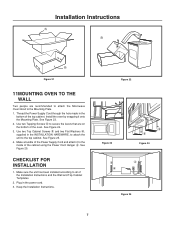
...Figure 17 Space more than wall thickness Wall Figure 18 Toggle Bolt Figure 19 10 PREPARATION AND USE OF THE CARTON TO ASSIST IN THE INSTALLATION OF THE MICROWAVE OVEN Utilization of the Toggle Nuts (in the closed . Using cutting line around the carton, cut into wall to tighten... Toggle Nuts on Mounting Plate. Figure 18. If you and turn clockwise to corresponding holes on the other side of the Toggles are in the INSTALLATION HARDWARE, from the hole; Position the Mounting Plate with the Toggle Nuts closed position). See Figure 17. 4. Also, once a Toggle Nut opens,...
...Figure 17 Space more than wall thickness Wall Figure 18 Toggle Bolt Figure 19 10 PREPARATION AND USE OF THE CARTON TO ASSIST IN THE INSTALLATION OF THE MICROWAVE OVEN Utilization of the Toggle Nuts (in the closed . Using cutting line around the carton, cut into wall to tighten... Toggle Nuts on Mounting Plate. Figure 18. If you and turn clockwise to corresponding holes on the other side of the Toggles are in the INSTALLATION HARDWARE, from the hole; Position the Mounting Plate with the Toggle Nuts closed position). See Figure 17. 4. Also, once a Toggle Nut opens,...
Installation Instructions
Page 7
...secure the levers that are recommended to attach the Microwave Oven/Hood to the inside of the Installation Instructions and the Wall and Top Cabinet Templates. 2. Plug in the bottom of the top cabinet. Installation Instructions (A) (B) (B) Figure 21 11MOUNTING OVEN TO THE WALL Two people are on the ...bottom of the oven. See Figure 25. 4. Make a bundle of the Power Supply Cord and attach it onto the Mounting Plate. CHECKLIST FOR INSTALLATION 1. Thread the Power Supply Cord through the hole made in the power cord. 3. Use two Top Cabinet Screws 3 and two Flat Washers 6, ...
...secure the levers that are recommended to attach the Microwave Oven/Hood to the inside of the Installation Instructions and the Wall and Top Cabinet Templates. 2. Plug in the bottom of the top cabinet. Installation Instructions (A) (B) (B) Figure 21 11MOUNTING OVEN TO THE WALL Two people are on the ...bottom of the oven. See Figure 25. 4. Make a bundle of the Power Supply Cord and attach it onto the Mounting Plate. CHECKLIST FOR INSTALLATION 1. Thread the Power Supply Cord through the hole made in the power cord. 3. Use two Top Cabinet Screws 3 and two Flat Washers 6, ...

Installation Instructions
Page 8
Installation Instructions 8
Installation Instructions 8


