Complete Owner's Guide (English)
Page 2
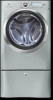
... online support and product information visit http://www.electroluxappliances.com Table of your product with Electrolux enhances our ability to serve you. This Use & Care Guide is part of our commitment to customer satisfaction and product quality throughout the life of contents Finding information 2 SAFETY 3-5 Features 6 Operating Instructions 7-26 • Getting Started 7 • Normal Operating Sounds 7 • Operating Your Washer 8-13 • Cycle Selection 14-19 • Washing/Rinsing Temperature 20-21 • Spin...
... online support and product information visit http://www.electroluxappliances.com Table of your product with Electrolux enhances our ability to serve you. This Use & Care Guide is part of our commitment to customer satisfaction and product quality throughout the life of contents Finding information 2 SAFETY 3-5 Features 6 Operating Instructions 7-26 • Getting Started 7 • Normal Operating Sounds 7 • Operating Your Washer 8-13 • Cycle Selection 14-19 • Washing/Rinsing Temperature 20-21 • Spin...
Complete Owner's Guide (English)
Page 5
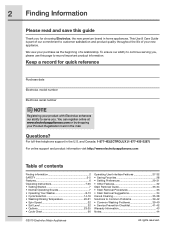
... from electrical power cord. Failure to the weather. • Do not install on carpet. Do not, under any user maintenance. It may be necessary to reinforce the floor to the washer: • All repairs and servicing must be removed. Safety 5 Important Safety Instructions, continued PREVENT INJURY • To prevent shock hazard and assure stability during operation, the washer must be installed and electrically grounded...
... from electrical power cord. Failure to the weather. • Do not install on carpet. Do not, under any user maintenance. It may be necessary to reinforce the floor to the washer: • All repairs and servicing must be removed. Safety 5 Important Safety Instructions, continued PREVENT INJURY • To prevent shock hazard and assure stability during operation, the washer must be installed and electrically grounded...
Complete Owner's Guide (English)
Page 11
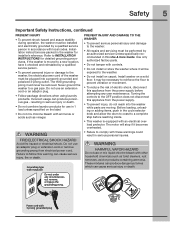
.... Liquid Fabric Softener If desired, pour the recommended amount of a fabric softener-dispensing ball is not recommended in unwarranted repair costs. IMPORTANT Use of detergent to the chamber labeled "Liquid Bleach" and marked with this symbol . They could disable your machine and result in tumble action washers. NOTE To prevent staining, do not over fill the "Fabric Softener" chamber or pour liquid fabric softener directly on the wash load. Put liquid products...
.... Liquid Fabric Softener If desired, pour the recommended amount of a fabric softener-dispensing ball is not recommended in unwarranted repair costs. IMPORTANT Use of detergent to the chamber labeled "Liquid Bleach" and marked with this symbol . They could disable your machine and result in tumble action washers. NOTE To prevent staining, do not over fill the "Fabric Softener" chamber or pour liquid fabric softener directly on the wash load. Put liquid products...
Complete Owner's Guide (English)
Page 15
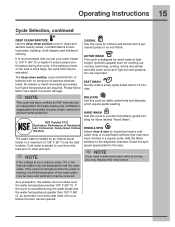
... Commercial, Family-Sized Clothes Washers The wash water is recommended that you set your outlet is locked once the water temperature reaches 130° F (55° C). NOTE If the voltage at your water heater to 120° F (49° C) or higher to drain and spin. RINSE & SPIN Select rinse & spin for loads that may deselect the rinse option. Operating Instructions 15 Cycle Selection, continued DEEP CLEAN SANITIZE Use the deep clean sanitize cycle to provide...
... Commercial, Family-Sized Clothes Washers The wash water is recommended that you set your outlet is locked once the water temperature reaches 130° F (55° C). NOTE If the voltage at your water heater to 120° F (49° C) or higher to drain and spin. RINSE & SPIN Select rinse & spin for loads that may deselect the rinse option. Operating Instructions 15 Cycle Selection, continued DEEP CLEAN SANITIZE Use the deep clean sanitize cycle to provide...
Complete Owner's Guide (English)
Page 17
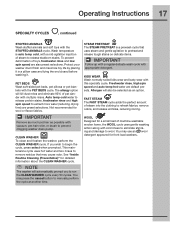
... fleece fabrics. To prevent deformation of steam into the clothing to run the CLEAN WASHER cycle every 50 cycles. IMPORTANT Remove as much pet hair as an option. This maintenance cycle uses hot water and two rinses to remove residue that uses steam and gentle agitation to prevent clogging washer drain pump. NOTE The washer will kill dust mites and eliminate 95% of steam to release stubborn stains. FAST STEAM The FAST STEAM cycle adds the perfect amount...
... fleece fabrics. To prevent deformation of steam into the clothing to run the CLEAN WASHER cycle every 50 cycles. IMPORTANT Remove as much pet hair as an option. This maintenance cycle uses hot water and two rinses to remove residue that uses steam and gentle agitation to prevent clogging washer drain pump. NOTE The washer will kill dust mites and eliminate 95% of steam to release stubborn stains. FAST STEAM The FAST STEAM cycle adds the perfect amount...

Complete Owner's Guide (English)
Page 27
... display, reset settings, clean the washer, and run the installation cycle. USER GUIDES Scroll through the stain guide to 3 custom cycles each custom user. SET PREFS The set prefs feature allows you to personalize up to the desired stain category. Press the select button to lock the control panel will be displayed. See save as favorite in "Operating User Interface Preferences" for user preferences. LIST OF SAVED FAVORITES CUSTOM MODE INSTALL CYCLE RESET CONTRAST BRIGHTNESS VOLUME LANGUAGE CYCLE DESC ON CYCLES GUIDE SETTINGS GUIDE OPTIONS GUIDE SET PREFS GUIDE LIST...
... display, reset settings, clean the washer, and run the installation cycle. USER GUIDES Scroll through the stain guide to 3 custom cycles each custom user. SET PREFS The set prefs feature allows you to personalize up to the desired stain category. Press the select button to lock the control panel will be displayed. See save as favorite in "Operating User Interface Preferences" for user preferences. LIST OF SAVED FAVORITES CUSTOM MODE INSTALL CYCLE RESET CONTRAST BRIGHTNESS VOLUME LANGUAGE CYCLE DESC ON CYCLES GUIDE SETTINGS GUIDE OPTIONS GUIDE SET PREFS GUIDE LIST...
Complete Owner's Guide (English)
Page 38
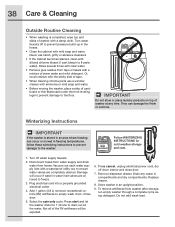
... or labels with a mixture of washer at any water in the hoses. • Clean the cabinet with mild soap and water. Turn off drum interior and close door. 7. Damage will be expelled. 6. Plug electrical cord into a properly grounded electrical outlet. 4. Select the spin only cycle. Not all the water. Or, touch residue with a damp cloth. Store washer in water inlet valves are completely drained. Remove dispenser drawer. Do not add wash load. Close door. 5. They can occur or moved...
... or labels with a mixture of washer at any water in the hoses. • Clean the cabinet with mild soap and water. Turn off drum interior and close door. 7. Damage will be expelled. 6. Plug electrical cord into a properly grounded electrical outlet. 4. Select the spin only cycle. Not all the water. Or, touch residue with a damp cloth. Store washer in water inlet valves are completely drained. Remove dispenser drawer. Do not add wash load. Close door. 5. They can occur or moved...
Complete Owner's Guide (English)
Page 39
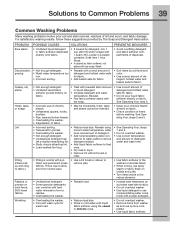
... water temperature using correct water temperature, water level, and amount of detergent. • Add nonprecipitating water conditioner to wash water to remove detergent residue. • Add liquid fabric softener to final rinse. • Dry load in dryer. • Remove lint with lint brush or roller. • See Operating Your, steps 1 and 2. • Do not overload washer. • Use correct temperature and amount of detergent and hottest water safe for fabric. • Do not pour liquid fabric softener directly on fabric. • Check condition of dispenser. Wash...
... water temperature using correct water temperature, water level, and amount of detergent. • Add nonprecipitating water conditioner to wash water to remove detergent residue. • Add liquid fabric softener to final rinse. • Dry load in dryer. • Remove lint with lint brush or roller. • See Operating Your, steps 1 and 2. • Do not overload washer. • Use correct temperature and amount of detergent and hottest water safe for fabric. • Do not pour liquid fabric softener directly on fabric. • Check condition of dispenser. Wash...

Complete Owner's Guide (English)
Page 40
... door and dispenser drawer open for fabric or treat with clean dry towel all around gasket. • Use only HE (high efficiency detergent) along with recommended dosage. • Remove wash load immediately upon cycle completion. • Pour one gallon hot water. 40 Solutions to Common Problems Common Washing Problems, continued PROBLEM POSSIBLE CAUSES SOLUTIONS PREVENTIVE MEASURES Yellow buildup of body soil on synthetic fabrics • Agitation time too short. • Wash water temperature too...
... door and dispenser drawer open for fabric or treat with clean dry towel all around gasket. • Use only HE (high efficiency detergent) along with recommended dosage. • Remove wash load immediately upon cycle completion. • Pour one gallon hot water. 40 Solutions to Common Problems Common Washing Problems, continued PROBLEM POSSIBLE CAUSES SOLUTIONS PREVENTIVE MEASURES Yellow buildup of body soil on synthetic fabrics • Agitation time too short. • Wash water temperature too...

Complete Owner's Guide (English)
Page 41
.... Stop washer and redistribute wash load. See INSTALLATION INSTRUCTIONS for removing ship- Reset circuit breaker or replace fuse. Heavily soiled items. Wipe drum with Lemon Pledge® spray or wipes. Vibrating noise. Water supply faucets are not turned on water supply faucets. It will stop if it becomes overheated. Clean residue from items before washing LCD displays DEMO MODE. Solutions to Common Problems 41 Service Prevention Checklist Before calling for service, review this washer. Wash load unevenly distributed in set...
.... Stop washer and redistribute wash load. See INSTALLATION INSTRUCTIONS for removing ship- Reset circuit breaker or replace fuse. Heavily soiled items. Wipe drum with Lemon Pledge® spray or wipes. Vibrating noise. Water supply faucets are not turned on water supply faucets. It will stop if it becomes overheated. Clean residue from items before washing LCD displays DEMO MODE. Solutions to Common Problems 41 Service Prevention Checklist Before calling for service, review this washer. Wash load unevenly distributed in set...
Complete Owner's Guide (English)
Page 42
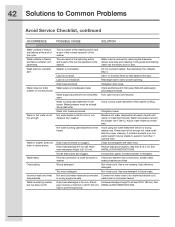
... washing action and is part of the normal operation of the washer. Do not overload washer. Load is not adequate in this guide) and draining water into the empty drum or sink. Check another faucet in washer does not drain or drains slowly. Wait until water supply and pressure increase. open hot and cold faucets. Install rubber washer. Run rinse cycle. Hot and cold water hoses are not completely Fully open . Incorrect wash and rinse temperatures. See Operating Your Washer, step 4. Drain hose standpipe is not hot enough. Drain hose...
... washing action and is part of the normal operation of the washer. Do not overload washer. Load is not adequate in this guide) and draining water into the empty drum or sink. Check another faucet in washer does not drain or drains slowly. Wait until water supply and pressure increase. open hot and cold faucets. Install rubber washer. Run rinse cycle. Hot and cold water hoses are not completely Fully open . Incorrect wash and rinse temperatures. See Operating Your Washer, step 4. Drain hose standpipe is not hot enough. Drain hose...
Product Specifications Sheet (English)
Page 1
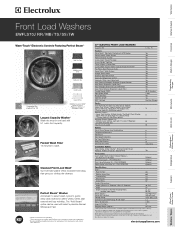
... Controls with LCD Display Perfect Steam™ Wash System Perfect Balance™ System Luxury-Quiet™ Sound Package Luxury-Design® Lighting Touch-2-Open™/ (Close) Door Luxury-Glide® Touch-2-Open™/ (Close) Dispenser Drawer Full Fabric Stain Removal Guide Expert Care™ Wash System Integral Water Heater Stainless Steel Wash Drum Automatic Temperature Control Automatic Water Level Adjustment Auto Prewash Detergent Dispenser (Liquid / Powder) Auto Bleach Dispenser (Liquid Only) Auto Detergent Dispenser (Liquid / Powder) Auto Fabric Softener Dispenser (Liquid...
... Controls with LCD Display Perfect Steam™ Wash System Perfect Balance™ System Luxury-Quiet™ Sound Package Luxury-Design® Lighting Touch-2-Open™/ (Close) Door Luxury-Glide® Touch-2-Open™/ (Close) Dispenser Drawer Full Fabric Stain Removal Guide Expert Care™ Wash System Integral Water Heater Stainless Steel Wash Drum Automatic Temperature Control Automatic Water Level Adjustment Auto Prewash Detergent Dispenser (Liquid / Powder) Auto Bleach Dispenser (Liquid Only) Auto Detergent Dispenser (Liquid / Powder) Auto Fabric Softener Dispenser (Liquid...
Product Specifications Sheet (English)
Page 2
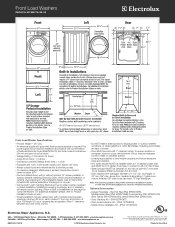
...; Drain Hose Extension Kit - (PN # 137098000). • Mobile Home Installation Kit - (PN # 137067200). Attached 59" drain hose can reach 79"-high standpipe. Front Load Washers EWFLS70J RR / MB / TS / SS / IW Front Load Washer Specifications • Product Weight - 237 Lbs. • An electrical supply with standpipe diameter of 1-1/4" min. and height of optional dryer stacking kit. (For installation details, refer to change specifications or discontinue models without optional 15" drawer pedestal, or stacked beneath matching Electrolux Dryer...
...; Drain Hose Extension Kit - (PN # 137098000). • Mobile Home Installation Kit - (PN # 137067200). Attached 59" drain hose can reach 79"-high standpipe. Front Load Washers EWFLS70J RR / MB / TS / SS / IW Front Load Washer Specifications • Product Weight - 237 Lbs. • An electrical supply with standpipe diameter of 1-1/4" min. and height of optional dryer stacking kit. (For installation details, refer to change specifications or discontinue models without optional 15" drawer pedestal, or stacked beneath matching Electrolux Dryer...
Wiring Diagram (All Languages)
Page 2
... recirculation pump and drum light will signal the last 5 error codes with the estimated time of reset you hear a beep. If applicable, turn on setting up , the part(s) of the program you can be shown. 12. Exiting Diagnostic Mode To return the washer to normal operation: a) Unplug the power cord, wait 5-8 seconds, then reconnect the power cord OR b) Turn the program knob clockwise back to the "hand wash" cycle. 3. Press the "start /pause" button...
... recirculation pump and drum light will signal the last 5 error codes with the estimated time of reset you hear a beep. If applicable, turn on setting up , the part(s) of the program you can be shown. 12. Exiting Diagnostic Mode To return the washer to normal operation: a) Unplug the power cord, wait 5-8 seconds, then reconnect the power cord OR b) Turn the program knob clockwise back to the "hand wash" cycle. 3. Press the "start /pause" button...
Wiring Diagram (All Languages)
Page 3
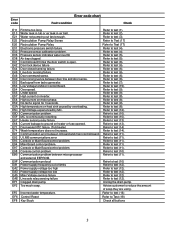
... or fuse opened. High Voltage experienced by overloading. Communication problem. Heater sensing relay failure. Drum water NTC failure. (Tub heater) Wash temperature does not increase. Communication error between door line and door sense. UI_MB communications error Console or Main Board control problem. Console or Main Board control problem. Console control problem. Communication problem between microprocessor and external EEPROM. Communication protocol Power supply frequency out of soap they are using. Too much soap. Refer to test...
... or fuse opened. High Voltage experienced by overloading. Communication problem. Heater sensing relay failure. Drum water NTC failure. (Tub heater) Wash temperature does not increase. Communication error between door line and door sense. UI_MB communications error Console or Main Board control problem. Console or Main Board control problem. Console control problem. Communication problem between microprocessor and external EEPROM. Communication protocol Power supply frequency out of soap they are using. Too much soap. Refer to test...
Wiring Diagram (All Languages)
Page 4
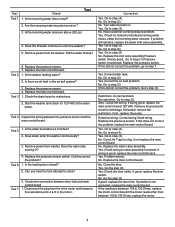
... water hoses, clean the incoming water screens. Is the water level above (20) psi. 4. No. Go to step (2). No. If problem still remains, replace the water inlet valve assembly. Correct the air leak problem. Go to step (6) No. If good, replace the door switch. Are the incoming water faucets turned on . Is the washer leaking water? 2. Test 5 1. Is the loading door closed? 2. Yes. Yes. Replace the main control board. Test 4 Inspect the wiring between 105 & 130 Ohms, replace the motor. 4 Check wire...
... water hoses, clean the incoming water screens. Is the water level above (20) psi. 4. No. Go to step (2). No. If problem still remains, replace the water inlet valve assembly. Correct the air leak problem. Go to step (6) No. If good, replace the door switch. Are the incoming water faucets turned on . Is the washer leaking water? 2. Test 5 1. Is the loading door closed? 2. Yes. Yes. Replace the main control board. Test 4 Inspect the wiring between 105 & 130 Ohms, replace the motor. 4 Check wire...
Wiring Diagram (All Languages)
Page 5
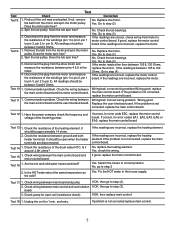
... corrected, replace the motor control board. No. Does the motor spin free? 2. Spin the tub pulley. Test 14: 1. Is it around 4.8K ohms? Check wiring between 3 and 6 Ohms. Test 10: 1. Unplug the unit for error code E5C, replace the motor control board. Does the tub spin free? Replace the motor. All readings should be Yes. If the problem is not corrected replace main control. 5 Communication problem. Is the HOT water about the same temperature as the cold? If not, remove the...
... corrected, replace the motor control board. No. Does the motor spin free? 2. Spin the tub pulley. Test 14: 1. Is it around 4.8K ohms? Check wiring between 3 and 6 Ohms. Test 10: 1. Unplug the unit for error code E5C, replace the motor control board. Does the tub spin free? Replace the motor. All readings should be Yes. If the problem is not corrected replace main control. 5 Communication problem. Is the HOT water about the same temperature as the cold? If not, remove the...
Installation Instructions (All Languages)
Page 3
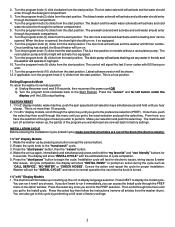
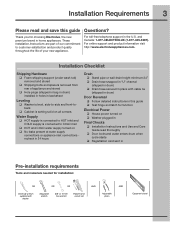
... cable tie (shipped in drum) Door Reversal ‰ Follow detailed instructions in this guide Questions? Installation Requirements 3 Please read and save this guide ‰ Test hinge and latch for function Electrical Power ‰ House power turned on ‰ Washer plugged in Final Checks ‰ Installation Instructions and Use and Care Guide read thoroughly ‰ Door locks and water enters drum when cycle starts ‰ Registration card sent in Pre-installation requirements Tools and materials needed for choosing Electrolux, the...
... cable tie (shipped in drum) Door Reversal ‰ Follow detailed instructions in this guide Questions? Installation Requirements 3 Please read and save this guide ‰ Test hinge and latch for function Electrical Power ‰ House power turned on ‰ Washer plugged in Final Checks ‰ Installation Instructions and Use and Care Guide read thoroughly ‰ Door locks and water enters drum when cycle starts ‰ Registration card sent in Pre-installation requirements Tools and materials needed for choosing Electrolux, the...
Installation Instructions (All Languages)
Page 4
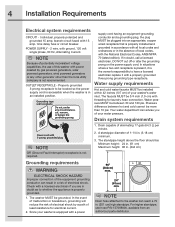
.... Water supply requirements Hot and cold water faucets MUST be located so the power supply cord is accessible when the washer is not required. 1. The faucets MUST be plugged into an appropriate, copper wired receptacle that is properly grounded. 1. Water pressure MUST be grounded. A standpipe diameter of your washer's water inlet. Individual, properly polarized and grounded 15 amp. branch circuit fused with threading for electrical current...
.... Water supply requirements Hot and cold water faucets MUST be located so the power supply cord is accessible when the washer is not required. 1. The faucets MUST be plugged into an appropriate, copper wired receptacle that is properly grounded. 1. Water pressure MUST be grounded. A standpipe diameter of your washer's water inlet. Individual, properly polarized and grounded 15 amp. branch circuit fused with threading for electrical current...
Installation Instructions (All Languages)
Page 9
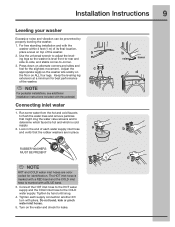
...;ush the water lines and remove particles that the rubber washers are color coded for best performance of its final location, place a level on ALL four legs. b raise lower d b RUBBER WASHERS MUST BE PRESENT c d NOTE HOT and COLD water inlet hoses are in the end of each supply connection another 2/3 turn with the washer within 4 feet (1 m) of the washer. Tighten by properly leveling the washer. 1. Installation Instructions 9 Leveling your washer Excessive noise and vibration can...
...;ush the water lines and remove particles that the rubber washers are color coded for best performance of its final location, place a level on ALL four legs. b raise lower d b RUBBER WASHERS MUST BE PRESENT c d NOTE HOT and COLD water inlet hoses are in the end of each supply connection another 2/3 turn with the washer within 4 feet (1 m) of the washer. Tighten by properly leveling the washer. 1. Installation Instructions 9 Leveling your washer Excessive noise and vibration can...


