
Complete Owner's Guide (English)
Page 3
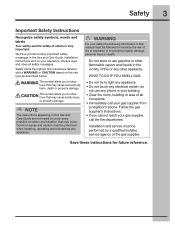
Do not store or use any appliance. Installation and service must be followed to minimize the risk of this Use and Care Guide are labeled with a WARNING or CAUTION based on your gas supplier from a neighbor's phone. We have provided many important safety messages...not use gasoline or other appliance. Safety items throughout this manual must be practiced when installing, operating and maintaining any phone in your safety the following information in the Use and Care Guide, Installation Instructions and on the risk type as described below: This symbol alerts you to cover ...
Do not store or use any appliance. Installation and service must be followed to minimize the risk of this Use and Care Guide are labeled with a WARNING or CAUTION based on your gas supplier from a neighbor's phone. We have provided many important safety messages...not use gasoline or other appliance. Safety items throughout this manual must be practiced when installing, operating and maintaining any phone in your safety the following information in the Use and Care Guide, Installation Instructions and on the risk type as described below: This symbol alerts you to cover ...
Complete Owner's Guide (English)
Page 5
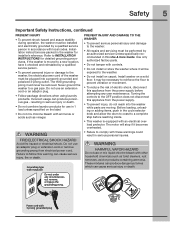
... injury and damage to a complete stop if it will be exposed to the OFF position does not disconnect this Use & Care Guide. The motor will stop before attempting any circumstances, cut, remove, or bypass the grounding prong. Do not use in 1 load...a properly grounded and polarized 3-prong outlet. Power cord with other household chemicals such as vinegar. Do not, under any user maintenance. Installation instructions are moving. Safety 5 Important Safety Instructions, continued PREVENT INJURY • To prevent shock hazard and assure stability during operation, the...
... injury and damage to a complete stop if it will be exposed to the OFF position does not disconnect this Use & Care Guide. The motor will stop before attempting any circumstances, cut, remove, or bypass the grounding prong. Do not use in 1 load...a properly grounded and polarized 3-prong outlet. Power cord with other household chemicals such as vinegar. Do not, under any user maintenance. Installation instructions are moving. Safety 5 Important Safety Instructions, continued PREVENT INJURY • To prevent shock hazard and assure stability during operation, the...

Complete Owner's Guide (English)
Page 27
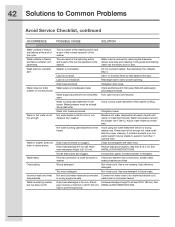
... the select button for 3 seconds. Use this option for the CYCLES GUIDE, SETTINGS GUIDE, OPTIONS GUIDE, and SET PREFS GUIDE for user preferences. LIST OF SAVED FAVORITES CUSTOM MODE INSTALL CYCLE RESET CONTRAST BRIGHTNESS VOLUME LANGUAGE CYCLE DESC ON CYCLES GUIDE SETTINGS GUIDE OPTIONS GUIDE SET PREFS GUIDE LIST OF STAIN TYPES & SUGGESTED TREATMENTS CONTROL LOCK ON CONTROL LOCK...
... the select button for 3 seconds. Use this option for the CYCLES GUIDE, SETTINGS GUIDE, OPTIONS GUIDE, and SET PREFS GUIDE for user preferences. LIST OF SAVED FAVORITES CUSTOM MODE INSTALL CYCLE RESET CONTRAST BRIGHTNESS VOLUME LANGUAGE CYCLE DESC ON CYCLES GUIDE SETTINGS GUIDE OPTIONS GUIDE SET PREFS GUIDE LIST OF STAIN TYPES & SUGGESTED TREATMENTS CONTROL LOCK ON CONTROL LOCK...
Complete Owner's Guide (English)
Page 42
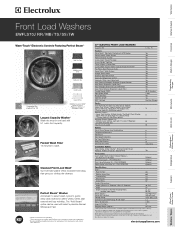
... pipes. Drain hose is not hot enough. Hot water heater is set too low or is not adequate in this guide) and draining water into the empty drum or sink. Install rubber washer. See pipe must be unable to support more than 8' (2.4 m). 42 Solutions to at least 23.6"... (60 cm). Water inlet hoses are connected Connect hot water hose to hot water faucet and cold to help balance the load. See INSTALLATION INSTRUCTIONS. Wrong detergent. Straighten hoses. Rearrange load to less than 1 use . Water leaks. Water supply is a distance from washer. Adjust water...
... pipes. Drain hose is not hot enough. Hot water heater is set too low or is not adequate in this guide) and draining water into the empty drum or sink. Install rubber washer. See pipe must be unable to support more than 8' (2.4 m). 42 Solutions to at least 23.6"... (60 cm). Water inlet hoses are connected Connect hot water hose to hot water faucet and cold to help balance the load. See INSTALLATION INSTRUCTIONS. Wrong detergent. Straighten hoses. Rearrange load to less than 1 use . Water leaks. Water supply is a distance from washer. Adjust water...
Product Specifications Sheet (English)
Page 1
...exclusive technology that gets your clothes the cleanest. Specifications subject to Center of -Cycle Chime 9 6 8 6 6 22 Adjustable Installation Options Freestanding, Under Counter*, Stacked (Under Dryer), Pedestal, Hidden (In Closet), Second Floor Yes Accessories Luxury-Glide® Touch... electric & plumbing codes. Ft. Perfect Steam™ Washer Add steam to select wash cycles to Product Installation Guide for detailed installation instructions on AHAM washability test protocol for safe operation. Features Wave-Touch™ Electronic Controls with Add Steam...
...exclusive technology that gets your clothes the cleanest. Specifications subject to Center of -Cycle Chime 9 6 8 6 6 22 Adjustable Installation Options Freestanding, Under Counter*, Stacked (Under Dryer), Pedestal, Hidden (In Closet), Second Floor Yes Accessories Luxury-Glide® Touch... electric & plumbing codes. Ft. Perfect Steam™ Washer Add steam to select wash cycles to Product Installation Guide for detailed installation instructions on AHAM washability test protocol for safe operation. Features Wave-Touch™ Electronic Controls with Add Steam...
Product Specifications Sheet (English)
Page 2
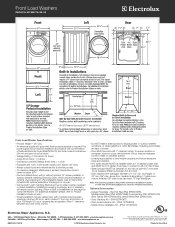
..., refer to improve our products. opening also acceptable. Do NOT install on the web at Electrolux Home Products, Inc. Note: For planning purposes only. Refer to 48-1/2" inlet hoses. • Water pressure MUST be 3/4" garden hose type, to connect to Product Installation Guide on carpeted surface. • Leveling legs supplied to level washer properly...
..., refer to improve our products. opening also acceptable. Do NOT install on the web at Electrolux Home Products, Inc. Note: For planning purposes only. Refer to 48-1/2" inlet hoses. • Water pressure MUST be 3/4" garden hose type, to connect to Product Installation Guide on carpeted surface. • Leveling legs supplied to level washer properly...
Installation Instructions (All Languages)
Page 3
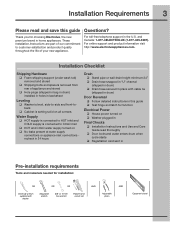
...1-877-4ELECTROLUX (1-877-435-3287). Installation Requirements 3 Please read thoroughly ‰ Door locks and water enters drum when cycle starts ‰ Registration card sent in Pre-installation requirements Tools and materials needed for choosing Electrolux, the new premium brand in home... appliances. For online support and product information visit http://www.electroluxappliances.com. Thank you for installation: OR OR OR Universal wrench supplied with cable tie (shipped in drum) Door Reversal ‰ Follow detailed instructions in this guide...
...1-877-4ELECTROLUX (1-877-435-3287). Installation Requirements 3 Please read thoroughly ‰ Door locks and water enters drum when cycle starts ‰ Registration card sent in Pre-installation requirements Tools and materials needed for choosing Electrolux, the new premium brand in home... appliances. For online support and product information visit http://www.electroluxappliances.com. Thank you for installation: OR OR OR Universal wrench supplied with cable tie (shipped in drum) Door Reversal ‰ Follow detailed instructions in this guide...

Installation Instructions (All Languages)
Page 8
... a later date, the shipping hardware must be easily pulled through shipping hole. Insert them in the holes in the small bag supplied with washer instruction guides. Remove all of the following: 1 SHIPPING FORK 5 SPACERS 5 P CLAMPS 5 BOLTS Installing hole plugs IMPORTANT Save all shipping bolts and spacers for future use.
... a later date, the shipping hardware must be easily pulled through shipping hole. Insert them in the holes in the small bag supplied with washer instruction guides. Remove all of the following: 1 SHIPPING FORK 5 SPACERS 5 P CLAMPS 5 BOLTS Installing hole plugs IMPORTANT Save all shipping bolts and spacers for future use.
Installation Instructions (All Languages)
Page 10
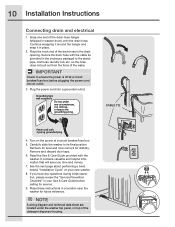
...;nal position. Snap one end of the drain hose in a location near the washer for stability. Remove and discard door tape. 6. 10 Installation Instructions Connecting drain and electrical 1. Place the hook end of the drain hose hanger (shipped in place. 2. Grounding type wall receptacle Do not..., under the washer top panel, on your Use & Care Guide before plugging the power cord into a grounded outlet. Recheck for level and rock corners for future reference. Place these instructions in the drain ...
...;nal position. Snap one end of the drain hose in a location near the washer for stability. Remove and discard door tape. 6. 10 Installation Instructions Connecting drain and electrical 1. Place the hook end of the drain hose hanger (shipped in place. 2. Grounding type wall receptacle Do not..., under the washer top panel, on your Use & Care Guide before plugging the power cord into a grounded outlet. Recheck for level and rock corners for future reference. Place these instructions in the drain ...
Installation Instructions (All Languages)
Page 11
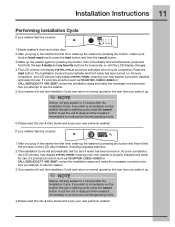
... then rewake it up . If it prompts an action such as NO WATER, CHECK HOSES or CALL SERVICE 877 435 3287, review the installation steps and make the necessary corrections before you wish to immediately run the washer through a washing cycle, press the cancel button to put the... unit to continue the normal operating mode. 4.Please read the Use & Care Guide and enjoy your new washer is properly installed and ready for use the washer. 3.Your washer will automatically test for 3 minutes after the Installation Cycle. NOTE Washer will stay awake for , and if water has been turned...
... then rewake it up . If it prompts an action such as NO WATER, CHECK HOSES or CALL SERVICE 877 435 3287, review the installation steps and make the necessary corrections before you wish to immediately run the washer through a washing cycle, press the cancel button to put the... unit to continue the normal operating mode. 4.Please read the Use & Care Guide and enjoy your new washer is properly installed and ready for use the washer. 3.Your washer will automatically test for 3 minutes after the Installation Cycle. NOTE Washer will stay awake for , and if water has been turned...


