
Installation Instructions (All Languages)
Page 1
...(90,8 cm) Min. 36 5/8" (93 cm) Max. Approx. 1 7/8" (4,8 cm) F Locate Cabinet Doors 1" (2,5 cm) Min. CUTOUT WIDTH*** (Countertop and cabinet) 30±1/16" (76,2±0,15 cm) F. E ½"min. Canada For existing 29" (73,7 cm) cutout wide opening, you must call the Service Center for 31..." section (see Note 3) (76,2 cm) Min. (See Note 3) 3/8"min. 18" Min. (45,7 cm) Min. pages 25-36 30" ELECTRIC SLIDE-IN RANGE INSTALLATION INSTRUCTIONS United States INSTALLATION AND SERVICE MUST BE PERFORMED BY A QUALIFIED INSTALLER. IMPORTANT: SAVE FOR LOCAL ELECTRICAL INSPECTOR'S USE...
...(90,8 cm) Min. 36 5/8" (93 cm) Max. Approx. 1 7/8" (4,8 cm) F Locate Cabinet Doors 1" (2,5 cm) Min. CUTOUT WIDTH*** (Countertop and cabinet) 30±1/16" (76,2±0,15 cm) F. E ½"min. Canada For existing 29" (73,7 cm) cutout wide opening, you must call the Service Center for 31..." section (see Note 3) (76,2 cm) Min. (See Note 3) 3/8"min. 18" Min. (45,7 cm) Min. pages 25-36 30" ELECTRIC SLIDE-IN RANGE INSTALLATION INSTRUCTIONS United States INSTALLATION AND SERVICE MUST BE PERFORMED BY A QUALIFIED INSTALLER. IMPORTANT: SAVE FOR LOCAL ELECTRICAL INSPECTOR'S USE...

Installation Instructions (All Languages)
Page 2
... 24" (61 cm) Min. with not less than No. 28 MSG sheet metal, 0,015"(0,4 mm) stainless steel, 0,024"(0,6 mm) aluminum, or 0,020" (0,5 mm) copper. 30" (76,2 cm) minimum clearance when the cabinet is centered in the counter and then level. COOKTOP WIDTH 35 3/4" (90,8 cm...min. 23 1/4"(59,05 cm) max. (see page 3), insert the appliance in the counter opening while pushing into it. Make sure the unit is open. 30" ELECTRIC SLIDE-IN RANGE INSTALLATION INSTRUCTIONS NOTE: 1. Do not pinch the power supply cord or the flexible gas conduit between the cooktop and the bottom...
... 24" (61 cm) Min. with not less than No. 28 MSG sheet metal, 0,015"(0,4 mm) stainless steel, 0,024"(0,6 mm) aluminum, or 0,020" (0,5 mm) copper. 30" (76,2 cm) minimum clearance when the cabinet is centered in the counter and then level. COOKTOP WIDTH 35 3/4" (90,8 cm...min. 23 1/4"(59,05 cm) max. (see page 3), insert the appliance in the counter opening while pushing into it. Make sure the unit is open. 30" ELECTRIC SLIDE-IN RANGE INSTALLATION INSTRUCTIONS NOTE: 1. Do not pinch the power supply cord or the flexible gas conduit between the cooktop and the bottom...

Installation Instructions (All Languages)
Page 3
... two rear leveling legs, they are only in step 2. The metal flange under each side of the cooktop (if provided). Level the unit if needed. 30" ELECTRIC SLIDE-IN RANGE INSTALLATION INSTRUCTIONS To avoid breakage: Do NOT handle or manipulate the unit by the cooktop. 1 The counter-top around the cut...
... two rear leveling legs, they are only in step 2. The metal flange under each side of the cooktop (if provided). Level the unit if needed. 30" ELECTRIC SLIDE-IN RANGE INSTALLATION INSTRUCTIONS To avoid breakage: Do NOT handle or manipulate the unit by the cooktop. 1 The counter-top around the cut...

Installation Instructions (All Languages)
Page 4
... 1 in Canada. • The installation of appliances designed for manufactured (mobile) home installation must be secured by properly installed anti-tip bracket(s) provided with range. 30" ELECTRIC SLIDE-IN RANGE INSTALLATION INSTRUCTIONS Important Notes to be provided the risk can be reduce by installing a range hood that project horizontally a minimum of...
... 1 in Canada. • The installation of appliances designed for manufactured (mobile) home installation must be secured by properly installed anti-tip bracket(s) provided with range. 30" ELECTRIC SLIDE-IN RANGE INSTALLATION INSTRUCTIONS Important Notes to be provided the risk can be reduce by installing a range hood that project horizontally a minimum of...

Installation Instructions (All Languages)
Page 5
... to do not permit grounding through neutral) or 4 conductors. NOTE: Electric Slide-in usual manner. 5 remove the grounding strap from factory with 13/8 inch connections). 30" ELECTRIC SLIDE-IN RANGE INSTALLATION INSTRUCTIONS 1. If no outlet is required, punch out the knockout. Terminal on figure 4.
... to do not permit grounding through neutral) or 4 conductors. NOTE: Electric Slide-in usual manner. 5 remove the grounding strap from factory with 13/8 inch connections). 30" ELECTRIC SLIDE-IN RANGE INSTALLATION INSTRUCTIONS 1. If no outlet is required, punch out the knockout. Terminal on figure 4.

Installation Instructions (All Languages)
Page 6
... wires and terminals by color (red wires connected to the right terminal, black wires connected to the left terminal). 5. Red Wire Black Wire 1 1/8" (2.9cm) Dia. 30" ELECTRIC SLIDE-IN RANGE INSTALLATION INSTRUCTIONS 4. To 240 V Receptacle Figure 3 Cord Mounting Plate Neutral (White Wire) Grounding Strap 1 1/8" (2.9 cm) Dia. A User Supplied Strain-relief Must...
... wires and terminals by color (red wires connected to the right terminal, black wires connected to the left terminal). 5. Red Wire Black Wire 1 1/8" (2.9cm) Dia. 30" ELECTRIC SLIDE-IN RANGE INSTALLATION INSTRUCTIONS 4. To 240 V Receptacle Figure 3 Cord Mounting Plate Neutral (White Wire) Grounding Strap 1 1/8" (2.9 cm) Dia. A User Supplied Strain-relief Must...

Installation Instructions (All Languages)
Page 7
... from the terminal block and from Appliance White Wire U.L.-listed Conduit Connector (or CSA listed) NOTE: Be sure to remove the supplied grounding strap. Supply a U.L. 30" ELECTRIC SLIDE-IN RANGE INSTALLATION INSTRUCTIONS Direct Electrical Connection to the Circuit Breaker, Fuse Box or Junction Box If the appliance is supplied on the...
... from the terminal block and from Appliance White Wire U.L.-listed Conduit Connector (or CSA listed) NOTE: Be sure to remove the supplied grounding strap. Supply a U.L. 30" ELECTRIC SLIDE-IN RANGE INSTALLATION INSTRUCTIONS Direct Electrical Connection to the Circuit Breaker, Fuse Box or Junction Box If the appliance is supplied on the...

Installation Instructions (All Languages)
Page 8
... opening 4.3 IMPORTANT For existing cutout width of countertop opening (Figure 7). • Tile countertops may need trim cut back 3/4"(1.9 cm) from front of countertop. 30" (76.2 cm) 1¼" (3.2 cm) 31½" (80 cm) Figure 8 Formed or tile countertop trimmed 1¼" (3.2 cm) back at front corners...the countertop, first side to side, then front to back. If the countertop is required. 30" ELECTRIC SLIDE-IN RANGE INSTALLATION INSTRUCTIONS 4. Figure 7 • If the existing cutout width is greater than 30 1/16" (76,4 cm), reduce the ¾" (1.9 cm) dimension. • Countertop ...
... opening 4.3 IMPORTANT For existing cutout width of countertop opening (Figure 7). • Tile countertops may need trim cut back 3/4"(1.9 cm) from front of countertop. 30" (76.2 cm) 1¼" (3.2 cm) 31½" (80 cm) Figure 8 Formed or tile countertop trimmed 1¼" (3.2 cm) back at front corners...the countertop, first side to side, then front to back. If the countertop is required. 30" ELECTRIC SLIDE-IN RANGE INSTALLATION INSTRUCTIONS 4. Figure 7 • If the existing cutout width is greater than 30 1/16" (76,4 cm), reduce the ¾" (1.9 cm) dimension. • Countertop ...

Installation Instructions (All Languages)
Page 9
... Guide for 29" cutout wide opening . 4 Cutout countertop exactly as in "Countertop Preparation" section (see page 8). 4.Install range as shown on page 1. Install base cabinets 30" (76.2 cm) apart. If necessary, raise the unit by the cooktop. Make sure the two front leveling legs and the rear 5 leveling wheels (see section... discard the two rear leveling legs, they are setup higher than the height of the countertop must be level and flat (lie on the floor. 30" ELECTRIC SLIDE-IN RANGE INSTALLATION INSTRUCTIONS 5.
... Guide for 29" cutout wide opening . 4 Cutout countertop exactly as in "Countertop Preparation" section (see page 8). 4.Install range as shown on page 1. Install base cabinets 30" (76.2 cm) apart. If necessary, raise the unit by the cooktop. Make sure the two front leveling legs and the rear 5 leveling wheels (see section... discard the two rear leveling legs, they are setup higher than the height of the countertop must be level and flat (lie on the floor. 30" ELECTRIC SLIDE-IN RANGE INSTALLATION INSTRUCTIONS 5.

Installation Instructions (All Languages)
Page 10
... the range cannot be hot enough to see that they are not the result of the oven and placing a level on each of the cycle. 30" ELECTRIC SLIDE-IN RANGE INSTALLATION INSTRUCTIONS 6. Check Operation Refer to correct sagging or sloping floor. Leveling the Range Models Equipped with the range for operating...
... the range cannot be hot enough to see that they are not the result of the oven and placing a level on each of the cycle. 30" ELECTRIC SLIDE-IN RANGE INSTALLATION INSTRUCTIONS 6. Check Operation Refer to correct sagging or sloping floor. Leveling the Range Models Equipped with the range for operating...

Installation Instructions (All Languages)
Page 11
... do not penetrate electrical wiring or plumbing. The screws provided will allow the range to install the anti-tip bracket will work in the oven. 30" ELECTRIC SLIDE-IN RANGE INSTALLATION INSTRUCTIONS 8. These parts are at the highest position they can be . 6. Failure to tip over if excessive weight is placed...
... do not penetrate electrical wiring or plumbing. The screws provided will allow the range to install the anti-tip bracket will work in the oven. 30" ELECTRIC SLIDE-IN RANGE INSTALLATION INSTRUCTIONS 8. These parts are at the highest position they can be . 6. Failure to tip over if excessive weight is placed...

Installation Instructions (All Languages)
Page 12
30" ELECTRIC SLIDE-IN RANGE INSTALLATION INSTRUCTIONS NOTES: 12
30" ELECTRIC SLIDE-IN RANGE INSTALLATION INSTRUCTIONS NOTES: 12
Product Specifications Sheet (English)
Page 1
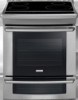
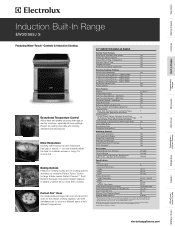
Wall Ovens Warmer Drawers Cooktops Built-In Ranges Freestanding Ranges Microwaves Induction Built-In Range EW30IS65J S Featuring Wave-Touch™ Controls & Induction Cooktop Exceptional Temperature Control Adjust heat with greater accuracy than gas or electric -...Certified) Yes A.D.A. Height 16-1/2" Width 24-1/8" Depth 18-1/32" Product Dimensions - Refer to cook two different items at two different temperatures. 30" INDUCTION BUILT-IN RANGE Control Panel Features Wave-Touch™ Electronic Oven Control Yes Perfect Set® Element Controls Yes Keypad Entry of Time...
Wall Ovens Warmer Drawers Cooktops Built-In Ranges Freestanding Ranges Microwaves Induction Built-In Range EW30IS65J S Featuring Wave-Touch™ Controls & Induction Cooktop Exceptional Temperature Control Adjust heat with greater accuracy than gas or electric -...Certified) Yes A.D.A. Height 16-1/2" Width 24-1/8" Depth 18-1/32" Product Dimensions - Refer to cook two different items at two different temperatures. 30" INDUCTION BUILT-IN RANGE Control Panel Features Wave-Touch™ Electronic Oven Control Yes Perfect Set® Element Controls Yes Keypad Entry of Time...
Product Specifications Sheet (English)
Page 2
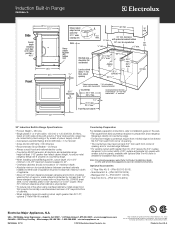
... Terry Fox Way • Mississauga, ON L5V 3E4 • 1-800-265-8352 • electroluxappliances.ca EW30IS65J 01/10 © 2010 Electrolux Home Products, Inc. clearance 3/8" min. High standards of quality at least 1/16" greater than No. ...28 MGS sheet steel, 0.015" stainless steel, 0.024" aluminum or 0.020" copper. Induction Built-In Range EW30IS65J S Side Overall depth including oven door in 90°open position - 45 1/4" 285/16" 271/2" Front 253/4" 311/2" 30...
... Terry Fox Way • Mississauga, ON L5V 3E4 • 1-800-265-8352 • electroluxappliances.ca EW30IS65J 01/10 © 2010 Electrolux Home Products, Inc. clearance 3/8" min. High standards of quality at least 1/16" greater than No. ...28 MGS sheet steel, 0.015" stainless steel, 0.024" aluminum or 0.020" copper. Induction Built-In Range EW30IS65J S Side Overall depth including oven door in 90°open position - 45 1/4" 285/16" 271/2" Front 253/4" 311/2" 30...
Complete Owner's Guide (English)
Page 3
... 24 Baking 24 Cook Time 25 End Time 25 Broiling 26 Convection Baking 27 Convection Convert 28 Rapid Preheat 28 Convection Roasting 29 Convection Broiling 30 Keep Warm 31 Slow Cook 32 Dehydrating 33 Defrosting 33 Bread Proofing 34 Perfect Turkey 35 Temperature Probe 36 Multi Stage 37-38 Electronic Control...
... 24 Baking 24 Cook Time 25 End Time 25 Broiling 26 Convection Baking 27 Convection Convert 28 Rapid Preheat 28 Convection Roasting 29 Convection Broiling 30 Keep Warm 31 Slow Cook 32 Dehydrating 33 Defrosting 33 Bread Proofing 34 Perfect Turkey 35 Temperature Probe 36 Multi Stage 37-38 Electronic Control...
Complete Owner's Guide (English)
Page 13
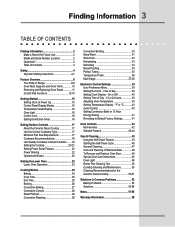
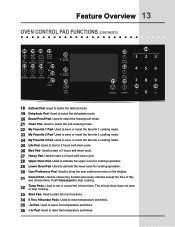
... mode. 20 Bread Proof Pad- Feature Overview 13 Oven Control pad functions (Continued) 18 19 20 21 28 22 23 24 25 29 26 27 30 32 34 32 31 33 35 36 18 Defrost Pad- Used to select the defrost mode. 19 Dehydrate Pad- Used to save or recall the... times. Used to cancel any function previously entered except the time of day and minute timer. Used to activate the upper oven for cooking operation. 30 User Preference Pad- Used to enter temperature and times. 35 - Used to save or recall the favorite 1 cooking mode. 23 My Favorite 2 Pad- Used to...
... mode. 20 Bread Proof Pad- Feature Overview 13 Oven Control pad functions (Continued) 18 19 20 21 28 22 23 24 25 29 26 27 30 32 34 32 31 33 35 36 18 Defrost Pad- Used to select the defrost mode. 19 Dehydrate Pad- Used to save or recall the... times. Used to cancel any function previously entered except the time of day and minute timer. Used to activate the upper oven for cooking operation. 30 User Preference Pad- Used to enter temperature and times. 35 - Used to save or recall the favorite 1 cooking mode. 23 My Favorite 2 Pad- Used to...
Complete Owner's Guide (English)
Page 15
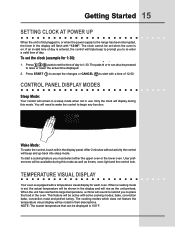
... will be pressed to begin any function. You will sound to remind you to place the food in the display and will triple beep to 1:30. To set the time of 12:00. The pads hi or lo can be active with a time of day to prompt you must select either... the upper oven or the lower oven. User preferences will flash with a temperature visual display for 1:30): + - 1. bake, convection bake, convection roast and perfect turkey. Getting Started 15 Setting clock at power up When the unit is on.
... will be pressed to begin any function. You will sound to remind you to place the food in the display and will triple beep to 1:30. To set the time of 12:00. The pads hi or lo can be active with a time of day to prompt you must select either... the upper oven or the lower oven. User preferences will flash with a temperature visual display for 1:30): + - 1. bake, convection bake, convection roast and perfect turkey. Getting Started 15 Setting clock at power up When the unit is on.
Complete Owner's Guide (English)
Page 20
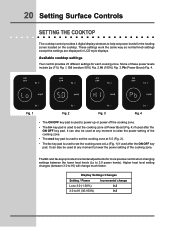
...1) if used to set the cooking zone at 5.0 (Fig. 2). • The lo- Display Settings Changes Setting / Power Lo to 3.0 (1-30%) Incremental change much faster. Available cooktop settings Your control provides 23 different settings for more precise control when changing settings between 3.0 to HI) will ...change 0.2 3.0 to HI (30-100%) 0.5 These settings work the same way as normal knob settings except the settings are displayed in LCD style displays. key pad ...
...1) if used to set the cooking zone at 5.0 (Fig. 2). • The lo- Display Settings Changes Setting / Power Lo to 3.0 (1-30%) Incremental change much faster. Available cooktop settings Your control provides 23 different settings for more precise control when changing settings between 3.0 to HI) will ...change 0.2 3.0 to HI (30-100%) 0.5 These settings work the same way as normal knob settings except the settings are displayed in LCD style displays. key pad ...
Complete Owner's Guide (English)
Page 25
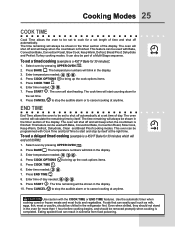
.... Press BAKE . Press START . The cook time will calculate the remaining time by itself . The oven control will start counting down for 30 minutes): 1. The temperature numbers will start and stop the audible alarm or to cancel cooking at 6:00PM): 1. Foods that can be set .... 7. Press END TIME . 8. It can result in the timer section of day needed; 6 0 0 . 9. The temperature numbers will be shown in the oven for 30 minutes which will beep when the countdown is finished. The oven will shut off and will end at anytime. Eating spoiled food can also be...
.... Press BAKE . Press START . The cook time will calculate the remaining time by itself . The oven control will start counting down for 30 minutes): 1. The temperature numbers will start and stop the audible alarm or to cancel cooking at 6:00PM): 1. Foods that can be set .... 7. Press END TIME . 8. It can result in the timer section of day needed; 6 0 0 . 9. The temperature numbers will be shown in the oven for 30 minutes which will beep when the countdown is finished. The oven will shut off and will end at anytime. Eating spoiled food can also be...

Complete Owner's Guide (English)
Page 29
... Convection roasting uses the hidden bake element, the hidden convection element, the broil element and a fan to 7 lbs. 325° F 160° F 30-40 * For beef: med rare 145°F, med 160°F, well done 170°F ** Stuffed turkey requires additional roasting time. The oven can be set...176;F with a default temperature of beef, lamb, pork and poultry. Beef Standing rib roast 4 to 6 lbs. 350° F * 25-30 Rib eye roast 4 to 6 lbs. 350° F * 25-30 Tenderloin roast 2 to 3 lbs. 400° F * 15-25 Poultry Turkey, whole** 12 to 16 lbs. 325° F 180&#...
... Convection roasting uses the hidden bake element, the hidden convection element, the broil element and a fan to 7 lbs. 325° F 160° F 30-40 * For beef: med rare 145°F, med 160°F, well done 170°F ** Stuffed turkey requires additional roasting time. The oven can be set...176;F with a default temperature of beef, lamb, pork and poultry. Beef Standing rib roast 4 to 6 lbs. 350° F * 25-30 Rib eye roast 4 to 6 lbs. 350° F * 25-30 Tenderloin roast 2 to 3 lbs. 400° F * 15-25 Poultry Turkey, whole** 12 to 16 lbs. 325° F 180&#...

