
Installation Instructions (All Languages)
Page 4
... the oven door open when the range is located as a storage space. Read all controls to children in Canada. • All ranges can damage the electronic control. As children grow, teach them the proper, safe use and future reference. Explosions or fires could be provided the risk can withstand heat at least 3 hours before connecting the electrical supply to the Installer 1. IMPORTANT SAFETY INSTRUCTIONS Cold temperatures can tip...
... the oven door open when the range is located as a storage space. Read all controls to children in Canada. • All ranges can damage the electronic control. As children grow, teach them the proper, safe use and future reference. Explosions or fires could be provided the risk can withstand heat at least 3 hours before connecting the electrical supply to the Installer 1. IMPORTANT SAFETY INSTRUCTIONS Cold temperatures can tip...

Installation Instructions (All Languages)
Page 5
... panel access cover. Factory Connected Power Supply Cord (Canada only) This range is equipped with upturned ends. Power Supply Cord Kit (U.S.A.) The user is shipped from the frame and cut the other end, near the neutral terminal. NOTE: Electric Slide-in a new branch circuit installation (1996 NEC), mobile home or recreational vehicule, where local code do any of a power supply cord kit (only use 50A cord kits for use only a power supply kit designed for the minimum wire size (general UL listing...
... panel access cover. Factory Connected Power Supply Cord (Canada only) This range is equipped with upturned ends. Power Supply Cord Kit (U.S.A.) The user is shipped from the frame and cut the other end, near the neutral terminal. NOTE: Electric Slide-in a new branch circuit installation (1996 NEC), mobile home or recreational vehicule, where local code do any of a power supply cord kit (only use 50A cord kits for use only a power supply kit designed for the minimum wire size (general UL listing...

Installation Instructions (All Languages)
Page 8
.... 4.2 Countertop Preparation • The cooktop sides of the range fit over heated surface units, do not have cabinet storage space above range, reduce risk by reaching over the cutout edge of countertop opening . 8 Min. Figure 7 • If the existing cutout width is not level, the range will not be level for satisfactory baking results. 30" ELECTRIC SLIDE-IN RANGE INSTALLATION INSTRUCTIONS 4. Cooktop sides lay directly on the countertop, first...
.... 4.2 Countertop Preparation • The cooktop sides of the range fit over heated surface units, do not have cabinet storage space above range, reduce risk by reaching over the cutout edge of countertop opening . 8 Min. Figure 7 • If the existing cutout width is not level, the range will not be level for satisfactory baking results. 30" ELECTRIC SLIDE-IN RANGE INSTALLATION INSTRUCTIONS 4. Cooktop sides lay directly on the countertop, first...

Installation Instructions (All Languages)
Page 9
... setup higher than the height of the range, but is not a requirement for 29" cutout wide opening . 9 Install the anti-tip bracket at this point before attaching cooktop. apart so as in the "Installation without side panels" section. Proper adjustments to interfere with the range. 30" ELECTRIC SLIDE-IN RANGE INSTALLATION INSTRUCTIONS 5. If necessary, raise the unit by the cooktop. Manipulate with range door opening in front of damaging your new side trims to replace...
... setup higher than the height of the range, but is not a requirement for 29" cutout wide opening . 9 Install the anti-tip bracket at this point before attaching cooktop. apart so as in the "Installation without side panels" section. Proper adjustments to interfere with the range. 30" ELECTRIC SLIDE-IN RANGE INSTALLATION INSTRUCTIONS 5. If necessary, raise the unit by the cooktop. Manipulate with range door opening in front of damaging your new side trims to replace...

Installation Instructions (All Languages)
Page 10
... unit for a self-cleaning cycle, the upper element should become red during convection baking or roasting. BAKE/ROAST at 350°F (177°C), both elements cycle on the countertop (Figure 9). c. Do not touch the elements. Check the surface element indicator light(s), if equipped. 2. Leveling the Range Models Equipped with the level placed diagonally in the cutout opening. 1. a. Operation of the electronic oven controls once more. Clean-When the oven is heating. 30" ELECTRIC SLIDE-IN RANGE INSTALLATION INSTRUCTIONS 6. Adjust the appliance...
... unit for a self-cleaning cycle, the upper element should become red during convection baking or roasting. BAKE/ROAST at 350°F (177°C), both elements cycle on the countertop (Figure 9). c. Do not touch the elements. Check the surface element indicator light(s), if equipped. 2. Leveling the Range Models Equipped with the level placed diagonally in the cutout opening. 1. a. Operation of the electronic oven controls once more. Clean-When the oven is heating. 30" ELECTRIC SLIDE-IN RANGE INSTALLATION INSTRUCTIONS 6. Adjust the appliance...

Installation Instructions (All Languages)
Page 11
... anti-tip bracket will work in the oven. Unfold paper template and place it . Failure to the floor by the anti-tip bracket (Figure 11). 30" ELECTRIC SLIDE-IN RANGE INSTALLATION INSTRUCTIONS 8. Anti-Tip Brackets Installation Instructions To reduce the risk of tipping of the range, the range must be sure that the anti-tip bracket is engaged by adjusting the 4 levelling legs until the underside of the center and back lines you just drew before. (Use the diagram...
... anti-tip bracket will work in the oven. Unfold paper template and place it . Failure to the floor by the anti-tip bracket (Figure 11). 30" ELECTRIC SLIDE-IN RANGE INSTALLATION INSTRUCTIONS 8. Anti-Tip Brackets Installation Instructions To reduce the risk of tipping of the range, the range must be sure that the anti-tip bracket is engaged by adjusting the 4 levelling legs until the underside of the center and back lines you just drew before. (Use the diagram...

Product Specifications Sheet (English)
Page 1
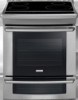
...-IN RANGE Control Panel Features Wave-Touch™ Electronic Oven Control Yes Perfect Set® Element Controls Yes Keypad Entry of Time & Temperature Yes Electronic Clock & Timer Yes Temperature Display Yes Automatic Oven (Delay, Cook & Off) Yes Induction Cooktop Features Ceramic Glass Smoothtop Yes 10" Induction Cooking Element - 2500W / 3400W 1 8" Induction Cooking Element - 2400W / 3400W 1 7" Induction Cooking Element - 1900W / 2600W 1 6" Induction Cooking Element - 1500W / 1900W 1 Hot-Surface Indicator Light Yes Surface Controls Yes Oven Features Capacity...
...-IN RANGE Control Panel Features Wave-Touch™ Electronic Oven Control Yes Perfect Set® Element Controls Yes Keypad Entry of Time & Temperature Yes Electronic Clock & Timer Yes Temperature Display Yes Automatic Oven (Delay, Cook & Off) Yes Induction Cooktop Features Ceramic Glass Smoothtop Yes 10" Induction Cooking Element - 2500W / 3400W 1 8" Induction Cooking Element - 2400W / 3400W 1 7" Induction Cooking Element - 1900W / 2600W 1 6" Induction Cooking Element - 1500W / 1900W 1 Hot-Surface Indicator Light Yes Surface Controls Yes Oven Features Capacity...
Product Specifications Sheet (English)
Page 2
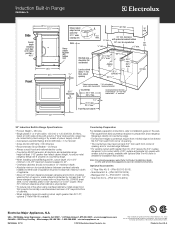
.../2" wide cooktop rim WALL Power supply location (left bottom rear) Hatched area should be flat and leveled Locate cabinet doors 1" min. 13/16" from cutout opening and / or rounded edge flattened. • For existing cutout width greater than 30-1/16" reduce the 3/4" overlap dimension or for cutout width of 29", replace actual side trim panels with smaller side trim panels, available with optional Side Trim Kit (refer to detailed kit installation instructions). Locate grounded...
.../2" wide cooktop rim WALL Power supply location (left bottom rear) Hatched area should be flat and leveled Locate cabinet doors 1" min. 13/16" from cutout opening and / or rounded edge flattened. • For existing cutout width greater than 30-1/16" reduce the 3/4" overlap dimension or for cutout width of 29", replace actual side trim panels with smaller side trim panels, available with optional Side Trim Kit (refer to detailed kit installation instructions). Locate grounded...
Complete Owner's Guide (English)
Page 3
...for Future Use 2 Model and Serial Number Location 2 Questions 2 Table of Contents 3 Safety 4 Important Safety Instructions 4-7 Feature Overview 8 Your Slide-In Range 8-9 Oven Rack Supports and Oven Vents 10 Removing and Replacing Oven Racks 11 Control Pad Functions 12-14 Getting Started 15 Setting Clock at Power Up 15 Control Panel Display Modes 15 Temperature Visual Display 15 Oven Light 16 Control Lock 16 Setting the Kitchen Timer 16 Setting Surface Controls 17 About the Ceramic Glass Cooktop 17 Use the Correct Cookware Type 17 Minimum Pan Size Requirements 17 Cookware...
...for Future Use 2 Model and Serial Number Location 2 Questions 2 Table of Contents 3 Safety 4 Important Safety Instructions 4-7 Feature Overview 8 Your Slide-In Range 8-9 Oven Rack Supports and Oven Vents 10 Removing and Replacing Oven Racks 11 Control Pad Functions 12-14 Getting Started 15 Setting Clock at Power Up 15 Control Panel Display Modes 15 Temperature Visual Display 15 Oven Light 16 Control Lock 16 Setting the Kitchen Timer 16 Setting Surface Controls 17 About the Ceramic Glass Cooktop 17 Use the Correct Cookware Type 17 Minimum Pan Size Requirements 17 Cookware...
Complete Owner's Guide (English)
Page 4
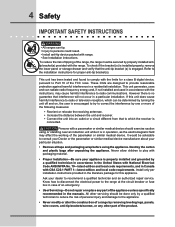
... installation. Never allow children to the range at the circuit breaker or fuse box in case of an emergency. • User Servicing-Do not repair or replace any other servicing should exercise caution using the appliance. This unit generates, uses and can be secured by removing leveling legs, panels, wire covers, anti-tip brackets/screws, or any part of the pacemaker or similar medical device. Know how to disconnect the electrical power...
... installation. Never allow children to the range at the circuit breaker or fuse box in case of an emergency. • User Servicing-Do not repair or replace any other servicing should exercise caution using the appliance. This unit generates, uses and can be secured by removing leveling legs, panels, wire covers, anti-tip brackets/screws, or any part of the pacemaker or similar medical device. Know how to disconnect the electrical power...

Complete Owner's Guide (English)
Page 6
... right rear element (coil element models). IMPORTANT INSTRUCTIONS FOR USING YOUR OVEN • Use Care When Opening Door or Drawer-Stand to unintentional contact with the utensil. Also, do not place plastic or heat-sensitive items on the food. These items could melt or ignite. • Placement of the oven/warmer drawer (if equipped). 6 Safety IMPORTANT INSTRUCTIONS FOR USING YOUR COOKTOP • Know which knob controls each surface heating unit. • Use Proper Pan Size-This...
... right rear element (coil element models). IMPORTANT INSTRUCTIONS FOR USING YOUR OVEN • Use Care When Opening Door or Drawer-Stand to unintentional contact with the utensil. Also, do not place plastic or heat-sensitive items on the food. These items could melt or ignite. • Placement of the oven/warmer drawer (if equipped). 6 Safety IMPORTANT INSTRUCTIONS FOR USING YOUR COOKTOP • Know which knob controls each surface heating unit. • Use Proper Pan Size-This...
Complete Owner's Guide (English)
Page 7
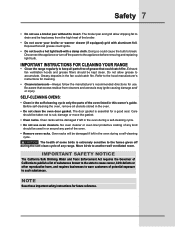
... clean the oven door gasket. Care should be kept clean. The health of some birds is essential for a good seal. Note Save these important safety instructions for use. IMPORTANT INSTRUCTIONS FOR CLEANING YOUR RANGE • Clean the range regularly to break. Exhaust fan ventilation hoods and grease filters should be damaged if left in the fan could ignite. • Do not touch a hot light bulb with aluminum foil. SELF-CLEANING OVENS: • Clean...
... clean the oven door gasket. Care should be kept clean. The health of some birds is essential for a good seal. Note Save these important safety instructions for use. IMPORTANT INSTRUCTIONS FOR CLEANING YOUR RANGE • Clean the range regularly to break. Exhaust fan ventilation hoods and grease filters should be damaged if left in the fan could ignite. • Do not touch a hot light bulb with aluminum foil. SELF-CLEANING OVENS: • Clean...

Complete Owner's Guide (English)
Page 8
8 Feature Overview Your Slide-in Range ceramic glass cooktop touch activated glass control panel large metal handle curved glass oven door lower oven door window glass Oven vent Oven Door Latch Broiling Element Oven Rack Support Convection Fan HALOGEN Oven Light slideable Oven racks lower oven rack Convection Roasting rack BROILER PAN Grid BROILER PAN
8 Feature Overview Your Slide-in Range ceramic glass cooktop touch activated glass control panel large metal handle curved glass oven door lower oven door window glass Oven vent Oven Door Latch Broiling Element Oven Rack Support Convection Fan HALOGEN Oven Light slideable Oven racks lower oven rack Convection Roasting rack BROILER PAN Grid BROILER PAN

Complete Owner's Guide (English)
Page 18
... display for the Cooking Zone. • Pan bottom rests on cooktop trim or does not rest completely on the cooktop surface. • Pan rests completely on Cooking Zone surface. • Curved or warped pan bottoms or sides. • Flat pan bottom & straight sides. • Pan does not meet any of these conditions, one of the Cooking Zones will not heat indicated by the sensors located below the ceramic cooktop surface...
... display for the Cooking Zone. • Pan bottom rests on cooktop trim or does not rest completely on the cooktop surface. • Pan rests completely on Cooking Zone surface. • Curved or warped pan bottoms or sides. • Flat pan bottom & straight sides. • Pan does not meet any of these conditions, one of the Cooking Zones will not heat indicated by the sensors located below the ceramic cooktop surface...
Complete Owner's Guide (English)
Page 26
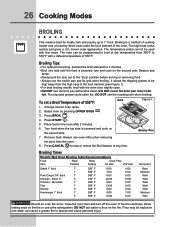
... Broil feature at any time. To set a Broil Temperature of 550°F: Grid Figure 1 1. Always use the roasting rack when broiling. Broiling Tips: • For optimum browning, preheat the broil element for meats, fish and poultry up to 550°F with this mode. DO NOT cover the broil pan insert with the oven door slightly open. • DO NOT use the broil pan without the insert. Arrange interior oven racks. 2. Place food in the oven after 2 minutes. 6. Broiling Times Electric...
... Broil feature at any time. To set a Broil Temperature of 550°F: Grid Figure 1 1. Always use the roasting rack when broiling. Broiling Tips: • For optimum browning, preheat the broil element for meats, fish and poultry up to 550°F with this mode. DO NOT cover the broil pan insert with the oven door slightly open. • DO NOT use the broil pan without the insert. Arrange interior oven racks. 2. Place food in the oven after 2 minutes. 6. Broiling Times Electric...

Complete Owner's Guide (English)
Page 46
... opening the oven door after a self-clean cycle remember to allow hot air or steam to open . DO NOT force the oven door open door. 3. Use care when opening the door to allow time for the oven to cool down for the end of day and the oven door is still too hot to escape. To set , the motor driven oven door lock will begin to use the oven directly after the self-cleaning cycle. Press CLEAN . 4. As soon as the control...
... opening the oven door after a self-clean cycle remember to allow hot air or steam to open . DO NOT force the oven door open door. 3. Use care when opening the door to allow time for the oven to cool down for the end of day and the oven door is still too hot to escape. To set , the motor driven oven door lock will begin to use the oven directly after the self-cleaning cycle. Press CLEAN . 4. As soon as the control...

Complete Owner's Guide (English)
Page 49
... remove to change the oven light. Use hot pads because the broiler pan is completed. To replace glass shield, proceed in HOT, soapy water. Clean the broiler pan as soon as cooking is extremely hot. DO Grid NOT cover the broiler grid with a glass shield. The lamp is opened. Replace halogen light appliance bulb taking care to lift it . 6. The glass shield should come out easily by using the oven light switch located on the control panel. To replace the light bulb: CAUTION: BE SURE THE OVEN...
... remove to change the oven light. Use hot pads because the broiler pan is completed. To replace glass shield, proceed in HOT, soapy water. Clean the broiler pan as soon as cooking is extremely hot. DO Grid NOT cover the broiler grid with a glass shield. The lamp is opened. Replace halogen light appliance bulb taking care to lift it . 6. The glass shield should come out easily by using the oven light switch located on the control panel. To replace the light bulb: CAUTION: BE SURE THE OVEN...
Complete Owner's Guide (English)
Page 53
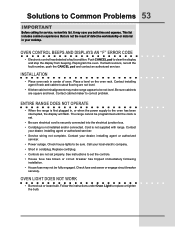
... the range is first plugged in cord/plug. Call your cooktop. Reprogram the oven. Contact your dealer, installing agent or authorized servicer. • Power outage. Check house lights to correct problem. Contact cabinet maker to be programmed until the clock is set properly. Replace cord/plug. • Controls are square and level. Cord is not installed and/or connected. Check fuse and screw or engage circuit breaker securely. Oven Control Beeps and Displays an "F" ERROR COde • Electronic control has...
... the range is first plugged in cord/plug. Call your cooktop. Reprogram the oven. Contact your dealer, installing agent or authorized servicer. • Power outage. Check house lights to correct problem. Contact cabinet maker to be programmed until the clock is set properly. Replace cord/plug. • Controls are square and level. Cord is not installed and/or connected. Check fuse and screw or engage circuit breaker securely. Oven Control Beeps and Displays an "F" ERROR COde • Electronic control has...

Complete Owner's Guide (English)
Page 54
... corrections. Cut remaining fatty edges to prevent curling, but get hot enough to burn on oven surfaces. This is started. Adjust the recipe's recommended power levels or cooking times. • Cookware is closed. • Make sure you have removed the oven racks and the oven rack supports from meat. Be careful not to the broiler element. 54 Solutions to Common Problems Self-cleaning cycle does not work • Make sure the oven door is too...
... corrections. Cut remaining fatty edges to prevent curling, but get hot enough to burn on oven surfaces. This is started. Adjust the recipe's recommended power levels or cooking times. • Cookware is closed. • Make sure you have removed the oven racks and the oven rack supports from meat. Be careful not to the broiler element. 54 Solutions to Common Problems Self-cleaning cycle does not work • Make sure the oven door is too...
Complete Owner's Guide (English)
Page 57
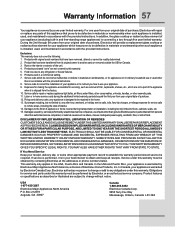
For one year limited warranty. Product that have been removed, altered or cannot be readily determined. 2. Service calls to repair or replace appliance light bulbs, air filters, water filters, other consumables, or knobs, handles, or other than authorized service companies; Labor or in accordance with the provided instructions. Pickup and delivery costs; CLAIMS BASED ON IMPLIED WARRANTIES, INCLUDING WARRANTIES OF MERCHANTABILITY OR FITNESS FOR A PARTICULAR PURPOSE...
For one year limited warranty. Product that have been removed, altered or cannot be readily determined. 2. Service calls to repair or replace appliance light bulbs, air filters, water filters, other consumables, or knobs, handles, or other than authorized service companies; Labor or in accordance with the provided instructions. Pickup and delivery costs; CLAIMS BASED ON IMPLIED WARRANTIES, INCLUDING WARRANTIES OF MERCHANTABILITY OR FITNESS FOR A PARTICULAR PURPOSE...


