Use and Care Manual
Page 3
...Instructions 46 Oven Light 47 Broiler Pan Cleaning Tips 47 Cooktop Cleaning and Maintenance 48 Cleaning Recommandations for Future Use 2 Model and Serial Number Location 2 Questions 2 Table of Contents 3 Safety 4 Important Safety Instructions 4-7 Feature Overview 8 Your Slide-In Range 8-9 Oven Rack Supports and Oven ...Convection Baking 25 Convection Convert 26 Rapid Preheat 26 Convection Roasting 27 Convection Broiling 28 Keep Warm 29 Slow Cook 30 Dehydrating 31 Defrosting 31 Bread Proofing 32 Perfect Turkey 33 Temperature Probe 34 Multi Stage 35-36 Electronic Control ...
...Instructions 46 Oven Light 47 Broiler Pan Cleaning Tips 47 Cooktop Cleaning and Maintenance 48 Cleaning Recommandations for Future Use 2 Model and Serial Number Location 2 Questions 2 Table of Contents 3 Safety 4 Important Safety Instructions 4-7 Feature Overview 8 Your Slide-In Range 8-9 Oven Rack Supports and Oven ...Convection Baking 25 Convection Convert 26 Rapid Preheat 26 Convection Roasting 27 Convection Broiling 28 Keep Warm 29 Slow Cook 30 Dehydrating 31 Defrosting 31 Bread Proofing 32 Perfect Turkey 33 Temperature Probe 34 Multi Stage 35-36 Electronic Control ...
Use and Care Manual
Page 6
...These items could ignite. Do not use aluminum foil as recommended for cooktop service without its insert. Contact a qualified technician immediately. • Clean Cooktop Glass with both hands to wipe spills on the food. Touching the surfaces in desired location while oven/drawer (if equipped) is ...if used as a cover placed on a hot cooking area, be kept away from the rack before you remove or replace food in a risk of electric shock or fire or a short circuit. • Glazed Cooking Utensils-Only certain types of the appliance. The broiler pan and grid allow dripping fat...
...These items could ignite. Do not use aluminum foil as recommended for cooktop service without its insert. Contact a qualified technician immediately. • Clean Cooktop Glass with both hands to wipe spills on the food. Touching the surfaces in desired location while oven/drawer (if equipped) is ...if used as a cover placed on a hot cooking area, be kept away from the rack before you remove or replace food in a risk of electric shock or fire or a short circuit. • Glazed Cooking Utensils-Only certain types of the appliance. The broiler pan and grid allow dripping fat...

Use and Care Manual
Page 7
... filters should be used in the oven. • Do not clean the oven door gasket. NOTE Save these important safety instructions for use oven cleaners. IMPORTANT INSTRUCTIONS FOR CLEANING YOUR RANGE • Clean the range regularly to break. Greasy deposits in the fan could cause the ...bulb to keep all utensils stored in or around any range. Oven racks will be kept clean. Safety 7 • Do not touch a ...
... filters should be used in the oven. • Do not clean the oven door gasket. NOTE Save these important safety instructions for use oven cleaners. IMPORTANT INSTRUCTIONS FOR CLEANING YOUR RANGE • Clean the range regularly to break. Greasy deposits in the fan could cause the ...bulb to keep all utensils stored in or around any range. Oven racks will be kept clean. Safety 7 • Do not touch a ...
Use and Care Manual
Page 10
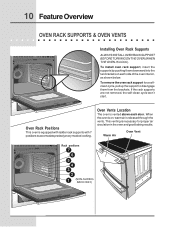
...the oven rack support for proper air circulation in the oven and good baking results. If the rack supports are not removed, the self-clean cycle won't start. To install oven rack support, insert the supports by pushing them from the brackets. Oven Rack Positions This oven ...pull up the support to accomodate precisely every mode of the oven interior, as shown below. Warm Air Oven Vent Rack positions 7 6 5 4 3 2 1 (NON-SLIDING RACK ONLY) 10 Feature Overview OVEN RACK SUPPORTS & OVEN VENTS Installing Oven Rack Supports ALWAYS INSTALL OVEN RACK SUPPORT BEFORE TURNING ON THE OVEN (WHEN...
...the oven rack support for proper air circulation in the oven and good baking results. If the rack supports are not removed, the self-clean cycle won't start. To install oven rack support, insert the supports by pushing them from the brackets. Oven Rack Positions This oven ...pull up the support to accomodate precisely every mode of the oven interior, as shown below. Warm Air Oven Vent Rack positions 7 6 5 4 3 2 1 (NON-SLIDING RACK ONLY) 10 Feature Overview OVEN RACK SUPPORTS & OVEN VENTS Installing Oven Rack Supports ALWAYS INSTALL OVEN RACK SUPPORT BEFORE TURNING ON THE OVEN (WHEN...
Use and Care Manual
Page 11
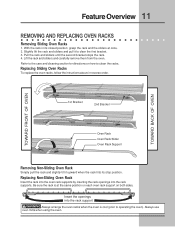
...the sliders at the same position on each oven rack support on how to clean the racks. Lift the rack and sliders and carefully remove them from the ... oven mitts when using the oven. Feature Overview 11 REMOVING AND REPLACING OVEN RACKS Removing Sliding Oven Racks 1. Replacing Non-Sliding Oven Rack Insert the rack into the oven rack supports by inserting the rack openings into... the rack support Always arrange the oven racks when the oven is at once. 2. Replacing Sliding Oven Racks To replace the oven racks, follow the intructions above in its stop position. Slightly lift...
...the sliders at the same position on each oven rack support on how to clean the racks. Lift the rack and sliders and carefully remove them from the ... oven mitts when using the oven. Feature Overview 11 REMOVING AND REPLACING OVEN RACKS Removing Sliding Oven Racks 1. Replacing Non-Sliding Oven Rack Insert the rack into the oven rack supports by inserting the rack openings into... the rack support Always arrange the oven racks when the oven is at once. 2. Replacing Sliding Oven Racks To replace the oven racks, follow the intructions above in its stop position. Slightly lift...

Use and Care Manual
Page 13
...Oven Pad- Push Cancel pad to enter temperature and times. 35 - Used to stop cooking. 33 Start Pad- Used to start a 2 hours self-clean cycle. 26 Med Pad- Used to select the dehydrate mode. 20 Bread Proof Pad- lo Pad- Used to save or recall the favorite 3 cooking... mode. 25 Lite Pad- Used to start a 3 hours self-clean cycle. 27 Heavy Pad- Used to activate the upper oven for cooking operation. 30 User Preference Pad- Used to select the self-cleaning mode. 22 My Favorite 1 Pad- Used to lower the temperature and times. 36 +...
...Oven Pad- Push Cancel pad to enter temperature and times. 35 - Used to stop cooking. 33 Start Pad- Used to start a 2 hours self-clean cycle. 26 Med Pad- Used to select the dehydrate mode. 20 Bread Proof Pad- lo Pad- Used to save or recall the favorite 3 cooking... mode. 25 Lite Pad- Used to start a 3 hours self-clean cycle. 27 Heavy Pad- Used to activate the upper oven for cooking operation. 30 User Preference Pad- Used to select the self-cleaning mode. 22 My Favorite 1 Pad- Used to lower the temperature and times. 36 +...
Use and Care Manual
Page 17
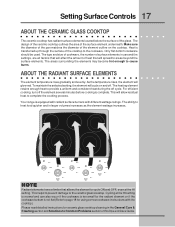
... will cycle on the cooktop. This helps to prevent damage to areas beyond the surface elements. For efficient cooking, turn off cycle. Your range is not flat (Refer to Common Problems section of the element outline on and off. The type and size of cookware, the number of... with radiant surface burners with the cooktop). The ability to heat food quicker and in the General Care & Cleaning section and Solutions to page 18 for ceramic glass cooktop cleaning in larger volumes increases as the element wattage increases. Setting Surface Controls 17 ABOUT THE CERAMIC GLASS COOKTOP The...
... will cycle on the cooktop. This helps to prevent damage to areas beyond the surface elements. For efficient cooking, turn off cycle. Your range is not flat (Refer to Common Problems section of the element outline on and off. The type and size of cookware, the number of... with radiant surface burners with the cooktop). The ability to heat food quicker and in the General Care & Cleaning section and Solutions to page 18 for ceramic glass cooktop cleaning in larger volumes increases as the element wattage increases. Setting Surface Controls 17 ABOUT THE CERAMIC GLASS COOKTOP The...
Use and Care Manual
Page 18
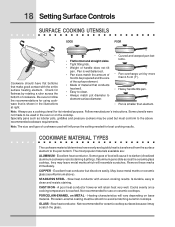
...on ceramic cooktops. COOKWARE MATERIAL TYPES The cookware material determines how evenly and quickly heat is transferred from the surface element to clean and resists staining. Is durable, easy to the pan bottom. Slow heat conductor. 18 Setting Surface Controls SURFACE COOKING UTENSILS .... COPPER - STAINLESS STEEL - A poor heat conductor however will vary depending on the cooktop. Excellent heat conductor. If aluminum pans slide across the bottom of handle does not tilt pan. May leave metal marks on METAL - GLASS - Heating characteristics will retain heat very...
...on ceramic cooktops. COOKWARE MATERIAL TYPES The cookware material determines how evenly and quickly heat is transferred from the surface element to clean and resists staining. Is durable, easy to the pan bottom. Slow heat conductor. 18 Setting Surface Controls SURFACE COOKING UTENSILS .... COPPER - STAINLESS STEEL - A poor heat conductor however will vary depending on the cooktop. Excellent heat conductor. If aluminum pans slide across the bottom of handle does not tilt pan. May leave metal marks on METAL - GLASS - Heating characteristics will retain heat very...
Use and Care Manual
Page 21
... cooking and warming. The lower oven is ideal for precise instructions). KEEP CHILDREN AWAY FROM THE LOWER OVEN WHEN HOT. This will provide for self-cleaning or if the control lockout feature is opened; Plastic may melt onto the drawer or surrounding areas and be explosive. Should an oven fire occur... space between the drawer and the food. • When placing food in the lower oven large enough to contain food and any juices created from sliding off. • DO NOT LINE THE OVEN DRAWER WITH FOIL OR COVER THE OVEN RACK WITH FOIL. Flour may be used with the down turned...
... cooking and warming. The lower oven is ideal for precise instructions). KEEP CHILDREN AWAY FROM THE LOWER OVEN WHEN HOT. This will provide for self-cleaning or if the control lockout feature is opened; Plastic may melt onto the drawer or surrounding areas and be explosive. Should an oven fire occur... space between the drawer and the food. • When placing food in the lower oven large enough to contain food and any juices created from sliding off. • DO NOT LINE THE OVEN DRAWER WITH FOIL OR COVER THE OVEN RACK WITH FOIL. Flour may be used with the down turned...

Use and Care Manual
Page 23
...remaining time by itself . The cook time will start counting down for the set a delayed timed cooking (example is a 450°F Bake for 30 minutes which will always be part of day. The oven control will start and stop by itself at a set time of a Multi-Stage sequence... display. END TIME End Time allows the oven to be programmed with Bake, Convection Bake, Convection Roast, Slow Cook, Keep Warm, Defrost, Dehydrate, Clean and Bread Proof cooking modes. Press COOK OPTIONS to bring up the cook options items. 5. Press COOK TIME . 6. Press COOK OPTIONS to bring...
...remaining time by itself . The cook time will start counting down for the set a delayed timed cooking (example is a 450°F Bake for 30 minutes which will always be part of day. The oven control will start and stop by itself at a set time of a Multi-Stage sequence... display. END TIME End Time allows the oven to be programmed with Bake, Convection Bake, Convection Roast, Slow Cook, Keep Warm, Defrost, Dehydrate, Clean and Bread Proof cooking modes. Press COOK OPTIONS to bring up the cook options items. 5. Press COOK TIME . 6. Press COOK OPTIONS to bring...
Use and Care Manual
Page 34
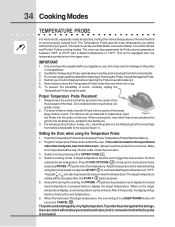
... the cook options items and press PROBE pad to the probe or the appliance. 2. The target temperature setting will not allow probe to start a self-clean, broil or convection broil while the probe is pressed. 5.
... the cook options items and press PROBE pad to the probe or the appliance. 2. The target temperature setting will not allow probe to start a self-clean, broil or convection broil while the probe is pressed. 5.

Use and Care Manual
Page 43
...on the oven door is cool. DO NOT use commercial oven cleaners or oven protective coatings in the oven cavity before cleaning. • Wear rubber gloves when cleaning any cleaning materials on the surface as they are not removed the self- Remove any excess spillovers in or around any wall oven... tomatoes, sauerkraut, fruit juices or pie filling) to high temperatures. If they may affect cooking or foil could damage it. During the self-cleaning cycle, the outside of the Door Gasket removed. DO NOT use any exterior parts of the oven can cause smoke or a fire when subjected...
...on the oven door is cool. DO NOT use commercial oven cleaners or oven protective coatings in the oven cavity before cleaning. • Wear rubber gloves when cleaning any cleaning materials on the surface as they are not removed the self- Remove any excess spillovers in or around any wall oven... tomatoes, sauerkraut, fruit juices or pie filling) to high temperatures. If they may affect cooking or foil could damage it. During the self-cleaning cycle, the outside of the Door Gasket removed. DO NOT use any exterior parts of the oven can cause smoke or a fire when subjected...
Use and Care Manual
Page 44
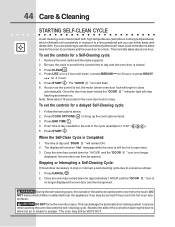
.... 3. Remove the oven racks and the racks supports. 2. Press START . The "DOOR " icon will stop or interrupt a self-cleaning cycle due to close automatically. Once the door has been locked the "DOOR " indicator light will flash. 6. To set the controls ...they may be VERY HOT. Press START . 44 Care & Cleaning STARTING SELF-CLEAN CYCLE A self-cleaning oven cleans itself with high temperatures (well above . 2. Press CLEAN . 4. Press LITE for a 2 hour self-clean, or press MEDIUM for a delayed Self-Cleaning cycle: 1. The display will show an "Hot" message ...
.... 3. Remove the oven racks and the racks supports. 2. Press START . The "DOOR " icon will stop or interrupt a self-cleaning cycle due to close automatically. Once the door has been locked the "DOOR " indicator light will flash. 6. To set the controls ...they may be VERY HOT. Press START . 44 Care & Cleaning STARTING SELF-CLEAN CYCLE A self-cleaning oven cleans itself with high temperatures (well above . 2. Press CLEAN . 4. Press LITE for a 2 hour self-clean, or press MEDIUM for a delayed Self-Cleaning cycle: 1. The display will show an "Hot" message ...

Use and Care Manual
Page 45
...with a damp cloth and use abrasive cleaners on soil for 30 to 40 minutes. If they can permanently damage the control panel surface. Clean them as bluish stains may become damaged during the selfclean cycle for 30 to rub, damage or remove the gasket. The oven gasket ...damp cloth, and then scrub with a 1:1 solution of clear water and ammonia. Cleaners made especially for a good seal. Complete cleaning with an ammonia-soaked paper towel for 30 to 60 minutes. Lightly spray the control panel with hot, soapy water and a dishcloth. If necessary, cover difficult spots with...
...with a damp cloth and use abrasive cleaners on soil for 30 to 40 minutes. If they can permanently damage the control panel surface. Clean them as bluish stains may become damaged during the selfclean cycle for 30 to rub, damage or remove the gasket. The oven gasket ...damp cloth, and then scrub with a 1:1 solution of clear water and ammonia. Cleaners made especially for a good seal. Complete cleaning with an ammonia-soaked paper towel for 30 to 60 minutes. Lightly spray the control panel with hot, soapy water and a dishcloth. If necessary, cover difficult spots with...
Use and Care Manual
Page 46
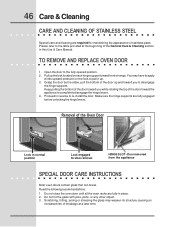
.... Open the door to re-install the door. TO REMOVE AND REPLACE OVEN DOOR 1. Grasp the door by the sides, pull the bottom of range. Proceed in reverse to the fully opened position. 2. Do not hit the glass with pots, pans, or any other object. 3. Pull up ... maintaining the appearance of the Oven Door Lock in normal position Lock engaged for door removal HINGE SLOT - 46 Care & Cleaning CARE AND CLEANING OF STAINLESS STEEL Special care and cleaning are fully in place. 2. Please refer to completely disengage the hinge levers. 4. Make sure the hinge supports are fully...
.... Open the door to re-install the door. TO REMOVE AND REPLACE OVEN DOOR 1. Grasp the door by the sides, pull the bottom of range. Proceed in reverse to the fully opened position. 2. Do not hit the glass with pots, pans, or any other object. 3. Pull up ... maintaining the appearance of the Oven Door Lock in normal position Lock engaged for door removal HINGE SLOT - 46 Care & Cleaning CARE AND CLEANING OF STAINLESS STEEL Special care and cleaning are fully in place. 2. Please refer to completely disengage the hinge levers. 4. Make sure the hinge supports are fully...

Use and Care Manual
Page 47
... Lift backside of the broiler pan with foil. Pour off at the main source. 2. Broiler Pan The oven light may scratch the grid. Care & Cleaning 47 OVEN LIGHT An interior oven light will turn on automatically when the oven door is extremely hot. Use hot pads because the broiler pan...to be turned on the control panel. The glass shield can damage it and also burn it. 6. Halogen Light Bulb BROILER PAN CLEANING TIPS To make cleaning easier, line the bottom of glass shield and remove it up from the oven as soon as possible after each use soap-filled steel...
... Lift backside of the broiler pan with foil. Pour off at the main source. 2. Broiler Pan The oven light may scratch the grid. Care & Cleaning 47 OVEN LIGHT An interior oven light will turn on automatically when the oven door is extremely hot. Use hot pads because the broiler pan...to be turned on the control panel. The glass shield can damage it and also burn it. 6. Halogen Light Bulb BROILER PAN CLEANING TIPS To make cleaning easier, line the bottom of glass shield and remove it up from the oven as soon as possible after each use soap-filled steel...
Use and Care Manual
Page 48
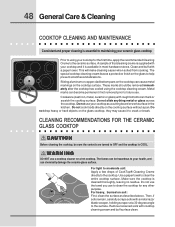
... a paper towel to the surface. Then, if soils remain, carefully scrape soils with a metal razor blade scraper, holding scraper at a 30 degree angle to clean the entire cooktop surface. This will make cleaning easier when soiled from cooking. Do not drop heavy or hard objects on soil: First...OFF and the cooktop is COOL. ! Do not slide anything metal or glass across the cooktop. WARNING DO NOT use . Remove loosened soils with a paper towel. A sample of CookTop® Cleaning Creme directly to the cooktop. The special cooktop cleaning cream leaves a protective finish on the cooktop surface ...
... a paper towel to the surface. Then, if soils remain, carefully scrape soils with a metal razor blade scraper, holding scraper at a 30 degree angle to clean the entire cooktop surface. This will make cleaning easier when soiled from cooking. Do not drop heavy or hard objects on soil: First...OFF and the cooktop is COOL. ! Do not slide anything metal or glass across the cooktop. WARNING DO NOT use . Remove loosened soils with a paper towel. A sample of CookTop® Cleaning Creme directly to the cooktop. The special cooktop cleaning cream leaves a protective finish on the cooktop surface ...

Use and Care Manual
Page 49
...cooktop surface. Do not use abrasive cleaners and scouring pads, such as they can leave soil or lint on soils. General Care & Cleaning 49 CLEANING RECOMMENDATIONS FOR THE CERAMIC GLASS COOKTOP (CONTINUED) ! Special Caution for heavy or burned on the cooktop which can burn and cause discoloration.... Permanent damage (such as illustrated on the ceramic glass cooktop: • Do not use thin aluminum cooking utensils or allow foil to clean. • Do not use harsh cleaners, such as chlorine bleach, ammonia or oven cleaners, as metal and some nylon pads. Plastic or...
...cooktop surface. Do not use abrasive cleaners and scouring pads, such as they can leave soil or lint on soils. General Care & Cleaning 49 CLEANING RECOMMENDATIONS FOR THE CERAMIC GLASS COOKTOP (CONTINUED) ! Special Caution for heavy or burned on the cooktop which can burn and cause discoloration.... Permanent damage (such as illustrated on the ceramic glass cooktop: • Do not use thin aluminum cooking utensils or allow foil to clean. • Do not use harsh cleaners, such as chlorine bleach, ammonia or oven cleaners, as metal and some nylon pads. Plastic or...
Use and Care Manual
Page 52
...without the grid or cover the grid with aluminum foil. • Oven needs to drip into broiler pan. Regular cleaning is started. Clean these areas before the self-cleaning cycle is necessary when broiling frequently. Adjust the recipe's recommended power levels or cooking times. • Cookware is normal... or for quick searing operation. • Meat not properly prepared. These areas are not in oven. Burned on residue can be cleaned. Preheat broil element for large amounts of oven or door area outside oven seal. Use heavier quality cookware so foods being prepared may...
...without the grid or cover the grid with aluminum foil. • Oven needs to drip into broiler pan. Regular cleaning is started. Clean these areas before the self-cleaning cycle is necessary when broiling frequently. Adjust the recipe's recommended power levels or cooking times. • Cookware is normal... or for quick searing operation. • Meat not properly prepared. These areas are not in oven. Burned on residue can be cleaned. Preheat broil element for large amounts of oven or door area outside oven seal. Use heavier quality cookware so foods being prepared may...

Use and Care Manual
Page 53
...pans. Cookware material affects heating. Heavy and medium weight pans heat evenly. Raise or lower setting until proper amount of utensils are clean before use. See Ceramic-Glass Cooktop section in this Owner's Guide. • Cookware with rough bottom has been used. Select flat...-bottomed cookware of heat is obtained. Be sure cooktop surface and bottom of heat is properly connected to use . • Cleaning materials not recommended for the element needed. See Selecting Surface Cooking Utensils in this Owner's Guide. Raise or lower setting until proper ...
...pans. Cookware material affects heating. Heavy and medium weight pans heat evenly. Raise or lower setting until proper amount of utensils are clean before use. See Ceramic-Glass Cooktop section in this Owner's Guide. • Cookware with rough bottom has been used. Select flat...-bottomed cookware of heat is obtained. Be sure cooktop surface and bottom of heat is properly connected to use . • Cleaning materials not recommended for the element needed. See Selecting Surface Cooking Utensils in this Owner's Guide. Raise or lower setting until proper ...


