
Electrolux EW30ES65GS Support Question
Electrolux EW30ES65GS Support Question
Find answers below for this question about Electrolux EW30ES65GS - 30" Slide-In Electric Range.Need a Electrolux EW30ES65GS manual? We have 4 online manuals for this item!
Question posted by maggiemoon455 on February 19th, 2012
Top Oven Will Not Work After Self Cleaning Cycle.
Bottom oven works. Top does not. Fan runs but elements do not heat. Self cleaning cycle was the first ever and was with any issues. Tried resetting by cutting the power and returning it.
Current Answers
Answer #1: Posted by OnlineOutreachSpecialist on February 20th, 2012 9:18 AM
OnlineOutreachSpecialist

Member since:
March 30th, 2011 Points: 2,848,320

Member since:
March 30th, 2011 Points: 2,848,320
Unfortunately when this occurs it means the temperature sensor in the back of the unit shut the unit down after reaching almost 900ºF during the self clean cycle. It is a built in safety feature to ensure the unit does not damage itself or injure someone who might touch it. Now the only down side is you would need to contact Electrolux at 1-877-435-3287 and schedule an appointment for the unit to be pulled out of your wall/cabinet and the back taken apart to have it reset. Then you will be fine!
Online Outreach Specialist
Related Electrolux EW30ES65GS Manual Pages
Installation Instructions (All Languages) - Page 1

... States
P/N 318201615 (1003) Rev. CUTOUT DEPTH
21 3/4" (55,2 cm) Min. 22 1/8" (56,2 cm) Max 24" (61 cm) Min. páginas 13-24
1
Français - 30" ELECTRIC SLIDE-IN RANGE INSTALLATION INSTRUCTIONS
United States
INSTALLATION AND SERVICE MUST BE PERFORMED BY A QUALIFIED INSTALLER.
E
½"min. CUTOUT WIDTH*** (Countertop and cabinet...
Installation Instructions (All Languages) - Page 2

30" ELECTRIC SLIDE-IN RANGE INSTALLATION INSTRUCTIONS
NOTE:
1. Do not seal the range to the side cabinets.
3. 24" (61 cm) minimum clearance between the range and
the wall...Max.
2
IMPORTANT: Cabinet and countertop
width should match the cutout width.
Do not pinch the power supply cord or the
flexible gas conduit between
the cooktop and the bottom of the cabinet
when...
Installation Instructions (All Languages) - Page 3

30" ELECTRIC SLIDE-IN RANGE INSTALLATION INSTRUCTIONS
To avoid breakage: Do NOT handle or
manipulate the unit by the cooktop.
1
The counter-top around the cut -out.
6
Remove the protective ... from the
floor to the underside
Space for the transport.
5
Slide the unit into the cabinet. To successfully install the range, the initial level height from floor to the cooktop
voiding the...
Installation Instructions (All Languages) - Page 4

...cause damage to the range.
• Do not store items of the range without adequate ventilation can withstand heat at least 3 hours before self-cleaning the oven. Wipe up excess ...reference. 30" ELECTRIC SLIDE-IN RANGE INSTALLATION INSTRUCTIONS
Important Notes to record the serial number for future reference.
4 Follow the precleaning instructions in Canada.
• All ranges can ...
Installation Instructions (All Languages) - Page 5

...hole as shown on the appliance. Factory Connected Power Supply Cord (Canada only)
This range is shipped from the frame and cut the other end, near the neutral terminal. Cord...a power supply cord kit (only use only a power supply kit designed for the minimum wire size (general UL listing, local code may occur. 30" ELECTRIC SLIDE-IN RANGE INSTALLATION INSTRUCTIONS
1. NOTE: Electric Slide-in...
Installation Instructions (All Languages) - Page 6

... hole in the literature package, connect the neutral of the copper power supply cord to remove the supplied grounding strap. Lower the terminal cover and replace the 3 screws. Direct Connection Hole. Cord Kit Hole. Punch Out Knockout for 1 3/8" (3.5 cm) Dia.
30" ELECTRIC SLIDE-IN RANGE INSTALLATION INSTRUCTIONS
4. Lower the terminal cover and replace the 3 screws...
Installation Instructions (All Languages) - Page 7

... power is supplied on the Cord Mounting Plate. Be sure that no power is supplied on the cable from
residence. 2. Figure 5 3-Wire (Grounded Neutral) Electrical... wires together.
30" ELECTRIC SLIDE-IN RANGE INSTALLATION INSTRUCTIONS
Direct Electrical Connection to the Circuit Breaker, Fuse Box or Junction Box
If the appliance is connected directly to 4-wire electrical system (see ...
Installation Instructions (All Languages) - Page 8

...oven must be level.
Cooktop sides of range fit over heated surface units, do not have cabinet storage space above range...range fit over the cutout edge of opening (Figure 7).
• Tile countertops may need trim cut back 3/4"(1.9 cm) from front of
countertop.
30...front corners of countertop
opening .
8 30" ELECTRIC SLIDE-IN RANGE INSTALLATION INSTRUCTIONS
4. Cooktop sides lay ...
Installation Instructions (All Languages) - Page 9

... cabinet doors 32" (81.3 cm) min. 30" ELECTRIC SLIDE-IN RANGE INSTALLATION INSTRUCTIONS
5. If necessary, raise the unit by the cooktop. Install base cabinets 30" (76.2 cm) apart. IMPORTANT If Accessories Needed...Service Center. The cooktop is to solidify the unit for oven door removal instructions.
10 Position range in the "Installation without side panels" section. Installation With ...
Installation Instructions (All Languages) - Page 10

... or roasting. Broil-When the oven is equipped with the range for operating instructions and for care and cleaning of your Use and Care Manual for operation. The convection fan will turn the leveling screws counterclockwise to lower or clockwise to see that are removed from the oven before shipping. 30" ELECTRIC SLIDE-IN RANGE INSTALLATION INSTRUCTIONS
6. To adjust...
Installation Instructions (All Languages) - Page 11

... up holes in the oven. Slide range into the floor.
4.
Anti-Tip Brackets Installation
Instructions
To reduce the risk of tipping of the range and carefully attempt to... tipping.
30" ELECTRIC SLIDE-IN RANGE INSTALLATION INSTRUCTIONS
8. Remove template and place bracket on the floor the location of Range
Range
Wall
Floor Floor Mount
Screws
Figure 12
Figure 11
SLIDE BACK
11...
Installation Instructions (All Languages) - Page 12

30" ELECTRIC SLIDE-IN RANGE INSTALLATION INSTRUCTIONS NOTES:
12
Product Specifications Sheet (English) - Page 1

... Broil, Keep Warm, Slow Cook
Cooking Options -
Specifications subject to three sizes, so the element fits the cookware, not the other way around. Wall Ovens
Warmer Drawers
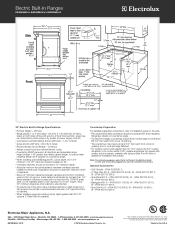
Electric Built-In Ranges
EW30ES65G S, EW30ES65G W, EW30ES65G B
Cooktops
Built-In Ranges
Freestanding Ranges
Microwaves
Vent Hoods
Featuring Wave-Touch™ Electronic Controls
Perfect Turkey® Button1 Ensures...
Product Specifications Sheet (English) - Page 2
...Printed in all directions and adjustable range height at least 1/16" greater than No. 28 MGS sheet steel, 0.015" stainless steel, 0.024" aluminum or 0.020" copper. Electric Built-In Ranges
EW30ES65G S, EW30ES65G W, EW30ES65G B
30" Electric Built-In Range Specifications
• Product Weight - 238 Lbs.
• Single phase 3-
mean we are constantly working to detailed kit installation...
Complete Owner's Guide (English) - Page 1
B Use & Care Guide
Electric Slide-In Range
318 203 847 (0812) Rev.
Complete Owner's Guide (English) - Page 3
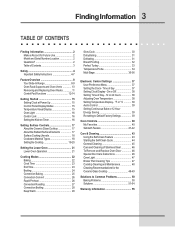
... Favorites 40 Sabbath Feature 41-42
Care & Cleaning 43 Using the Self-Clean Feature 43 Starting the Self-Clean Cycle 44 General Cleaning 45 Care and Cleaning of Stainless Steel 46 To Remove and Replace Oven Door 46 Special Door Care Instructions 46 Oven Light 47 Broiler Pan Cleaning Tips 47 Cooktop Cleaning and Maintenance 48 Cleaning Recommandations for Future Use 2 Model and...
Complete Owner's Guide (English) - Page 9
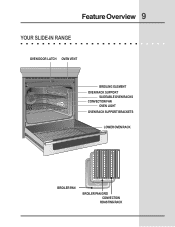
Feature Overview 9
YOUR SLIDE-IN RANGE
OVEN DOOR LATCH OVEN VENT
BROILING ELEMENT OVEN RACK SUPPORT
SLIDEABLE OVEN RACKS CONVECTION FAN
OVEN LIGHT OVEN RACK SUPPORT BRACKETS
LOWER OVEN RACK
BROILER PAN
BROILER PAN GRID
CONVECTION ROASTING RACK
Complete Owner's Guide (English) - Page 10
Warm Air
Oven Vent
Rack positions
7 6
5
4
3
2
1
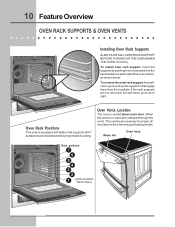
(NON-SLIDING RACK ONLY) If the rack supports are not removed, the self-clean cycle won't start. Oven Rack Positions
This oven is necessary for a selfclean cycle, pull up the support to accomodate precisely every mode of the oven interior, as shown below. To install oven rack support, insert the supports by pushing them from...
Complete Owner's Guide (English) - Page 41
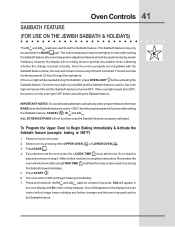
...feature. Press and hold both the HI + and LO - pads for complete instructions. If the oven light needs to be OFF,
be sure to set using COOK TIME and therefore may be set ...down after setting
the Sabbath feature; If you desire to turn ON and begin heating immediately.
7. Once SAb appears in the oven.
2. Press BAKE .
4. pads are used once during Jewish
Holidays), however ...
Complete Owner's Guide (English) - Page 42
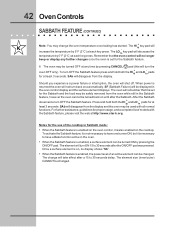
... burner ON, but it is returned the oven will disappear from the display and the oven may be safely removed from the display. The oven may change will turn ON 15 to 30 seconds delay.
The LO - The oven will remember that the oven control will turn the
oven OFF only). The element will no longer
beep or display...
Similar Questions

Switch To Indicate Racks Removed Does Not Work. Unable To Start Self Clean Cycl
After removing racks and the rack holders, still indicates "remove racks". There ia a small switch o...
After removing racks and the rack holders, still indicates "remove racks". There ia a small switch o...
(Posted by Kstorla 9 years ago)

Electrolux Oven Wont Self Clean. I Removed All The Racs
(Posted by chilpirate 9 years ago)

Electrolux 48' Range Wont Start Self Clean Cycle
Have removed all racks and convection screen. Set selector know to clean, waited for blue light LE...
Have removed all racks and convection screen. Set selector know to clean, waited for blue light LE...
(Posted by noellerussell 11 years ago)

Electrolux Slide In Range, The Lower Oven Door Will Not Open. It Opens Partially
(Posted by Anonymous-70600 11 years ago)

After Cleaning, Smaller Oven Works, In Larger Neither Element Works.
After we used self-cleaning, smaller over works fine, but larger oven does not work either on bake o...
After we used self-cleaning, smaller over works fine, but larger oven does not work either on bake o...
(Posted by roxannacw 12 years ago)