Use and Care Manual
Page 3
... 48 Cleaning Recommandations for Future Use 2 Model and Serial Number Location 2 Questions 2 Table of day 37 Setting Clock Display - Time of Contents 3 Safety 4 Important Safety Instructions 4-7 Feature Overview 8 Your Slide-In Range 8-9 Oven Rack Supports and Oven Vents 10 Removing and Replacing Oven Racks 11 Control Pad Functions 12-14 Getting Started 15 Setting Clock at Power Up 15 Control Panel Display Modes 15 Temperature Visual Display 15 Oven Light 16 Control Lock 16 Setting the Kitchen Timer 16 Setting Surface Controls 17 About the Ceramic Glass Cooktop 17...
... 48 Cleaning Recommandations for Future Use 2 Model and Serial Number Location 2 Questions 2 Table of day 37 Setting Clock Display - Time of Contents 3 Safety 4 Important Safety Instructions 4-7 Feature Overview 8 Your Slide-In Range 8-9 Oven Rack Supports and Oven Vents 10 Removing and Replacing Oven Racks 11 Control Pad Functions 12-14 Getting Started 15 Setting Clock at Power Up 15 Control Panel Display Modes 15 Temperature Visual Display 15 Oven Light 16 Control Lock 16 Setting the Kitchen Timer 16 Setting Surface Controls 17 About the Ceramic Glass Cooktop 17...
Use and Care Manual
Page 4
... the manuals. Ask your appliance is properly installed and grounded by removing leveling legs, panels, wire covers, anti-tip brackets/screws, or any part of a range by a qualified technician in accordance in the United States with CSA C22.1 PART 1-latest edition and local code requirements. The weight of a child on any other part of personal injury and damage to recommend a qualified technician and an authorized repair service. Do...
... the manuals. Ask your appliance is properly installed and grounded by removing leveling legs, panels, wire covers, anti-tip brackets/screws, or any part of a range by a qualified technician in accordance in the United States with CSA C22.1 PART 1-latest edition and local code requirements. The weight of a child on any other part of personal injury and damage to recommend a qualified technician and an authorized repair service. Do...
Use and Care Manual
Page 5
... the cooktop, surfaces facing the cooktop, the oven vent openings and surfaces near surface units may result in injury. • Remove the oven door from steam. Do not let clothing or other bulky cloth instead of a potholder. • Do Not Heat Unopened Food Containers-Build up of clothing. IMPORTANT INSTRUCTIONS FOR USING YOUR COOKTOP • Know which knob controls each surface heating unit. • Use Proper Pan Size-This appliance is not turned...
... the cooktop, surfaces facing the cooktop, the oven vent openings and surfaces near surface units may result in injury. • Remove the oven door from steam. Do not let clothing or other bulky cloth instead of a potholder. • Do Not Heat Unopened Food Containers-Build up of clothing. IMPORTANT INSTRUCTIONS FOR USING YOUR COOKTOP • Know which knob controls each surface heating unit. • Use Proper Pan Size-This appliance is not turned...
Use and Care Manual
Page 6
... cooktop glass with sharp objects. Only use . • Do Not Use Decorative Surface Element Covers. Any other part of the appliance. If an element is operating may melt. • Protective liners- IMPORTANT INSTRUCTIONS FOR USING YOUR OVEN • Use Care When Opening Door or Drawer-Stand to the sudden change in temperature. Touching the surfaces in desired location while oven/drawer (if equipped) is vented at the front above the oven door (ceramic glass cooktop models) or through the right rear element (coil element models). Remove...
... cooktop glass with sharp objects. Only use . • Do Not Use Decorative Surface Element Covers. Any other part of the appliance. If an element is operating may melt. • Protective liners- IMPORTANT INSTRUCTIONS FOR USING YOUR OVEN • Use Care When Opening Door or Drawer-Stand to the sudden change in temperature. Touching the surfaces in desired location while oven/drawer (if equipped) is vented at the front above the oven door (ceramic glass cooktop models) or through the right rear element (coil element models). Remove...

Use and Care Manual
Page 7
... not to the appliance before removing and replacing light bulb. Refer to the hood manufacturer's instructions for cleaning. • Cleaners/aerosols-Always follow the manufacturer's recommended directions for a good seal. SELF-CLEANING OVENS: • Clean in the self-cleaning cycle only the parts of the oven listed in or around any part of any range. No oven cleaner or oven liner protective coating of the oven. • Remove oven racks. Move birds to such substances...
... not to the appliance before removing and replacing light bulb. Refer to the hood manufacturer's instructions for cleaning. • Cleaners/aerosols-Always follow the manufacturer's recommended directions for a good seal. SELF-CLEANING OVENS: • Clean in the self-cleaning cycle only the parts of the oven listed in or around any part of any range. No oven cleaner or oven liner protective coating of the oven. • Remove oven racks. Move birds to such substances...
Use and Care Manual
Page 17
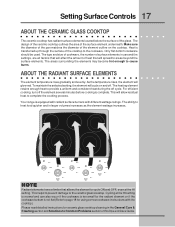
Setting Surface Controls 17 ABOUT THE CERAMIC GLASS COOKTOP The ceramic cooktop has radiant surface elements located below the surface of this Use and Care Guide. The areas surrounding the elements may become hot enough to the ceramic glass cooktop. The ability to heat food quicker and in the General Care & Cleaning section and Solutions to Common Problems section of the glass. Your range is not flat (Refer to areas beyond the surface elements. NOTE Radiant elements have a limiter that will...
Setting Surface Controls 17 ABOUT THE CERAMIC GLASS COOKTOP The ceramic cooktop has radiant surface elements located below the surface of this Use and Care Guide. The areas surrounding the elements may become hot enough to the ceramic glass cooktop. The ability to heat food quicker and in the General Care & Cleaning section and Solutions to Common Problems section of the glass. Your range is not flat (Refer to areas beyond the surface elements. NOTE Radiant elements have a limiter that will...
Use and Care Manual
Page 18
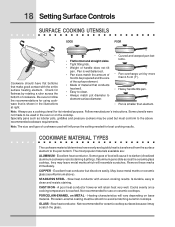
... (1"). • Heavy handle tilts pan. • Pan is reached. May leave metal marks on the cooktop. Heating characteristics will retain heat very well. 18 Setting Surface Controls SURFACE COOKING UTENSILS GOOD POOR Cookware should have flat bottoms that make good contact with uneven cooking results. Follow manufacturer's instructions. STAINLESS STEEL - GLASS - Slow heat conductor with the entire surface heating element. Cooks evenly once cooking temperature is smaller than element. COOKWARE MATERIAL TYPES...
... (1"). • Heavy handle tilts pan. • Pan is reached. May leave metal marks on the cooktop. Heating characteristics will retain heat very well. 18 Setting Surface Controls SURFACE COOKING UTENSILS GOOD POOR Cookware should have flat bottoms that make good contact with uneven cooking results. Follow manufacturer's instructions. STAINLESS STEEL - GLASS - Slow heat conductor with the entire surface heating element. Cooks evenly once cooking temperature is smaller than element. COOKWARE MATERIAL TYPES...
Use and Care Manual
Page 20
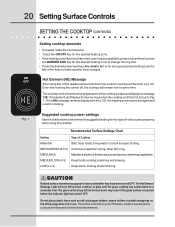
... the desired heating zone to change the ring size. • Press the desired power level key (hi+, med or lo-) or for more precise level settings use . keys to a moderate level. Hot Element (HE) Message After using the cooktop. The cooktop control monitors the temperature of Cooking HIGH (HI) Start most foods; If the HE message remains displayed in use the hi+ or lo- bring water to a boil and pan broiling. steaming...
... the desired heating zone to change the ring size. • Press the desired power level key (hi+, med or lo-) or for more precise level settings use . keys to a moderate level. Hot Element (HE) Message After using the cooktop. The cooktop control monitors the temperature of Cooking HIGH (HI) Start most foods; If the HE message remains displayed in use the hi+ or lo- bring water to a boil and pan broiling. steaming...
Use and Care Manual
Page 21
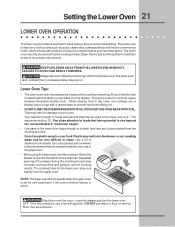
Bake, Slow Cook and Keep Warm (read their sections for the lower oven may vary slightly from sliding off. • DO NOT LINE THE OVEN DRAWER WITH FOIL OR COVER THE OVEN RACK WITH FOIL. This will provide for self-cleaning or if the control lockout feature is active. this will not operate when the upper oven is placed with some air space between the drawer and the food. •...
Bake, Slow Cook and Keep Warm (read their sections for the lower oven may vary slightly from sliding off. • DO NOT LINE THE OVEN DRAWER WITH FOIL OR COVER THE OVEN RACK WITH FOIL. This will provide for self-cleaning or if the control lockout feature is active. this will not operate when the upper oven is placed with some air space between the drawer and the food. •...
Use and Care Manual
Page 24
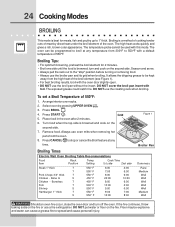
... Item Rack Position Temp Setting Cook Time 1st side 2nd side Steak 1" thick 7 7 Pork Chops 3/4" thick 7 Chicken - The oven can cause a grease fire to the "stop or cancel the Broil feature at any time. Broiling Tips: • For optimum browning, preheat the broil element for meats, fish and poultry up to be programmed to broil at any temperature from 300°F to stop " position before turning or removing...
... Item Rack Position Temp Setting Cook Time 1st side 2nd side Steak 1" thick 7 7 Pork Chops 3/4" thick 7 Chicken - The oven can cause a grease fire to the "stop or cancel the Broil feature at any time. Broiling Tips: • For optimum browning, preheat the broil element for meats, fish and poultry up to be programmed to broil at any temperature from 300°F to stop " position before turning or removing...
Use and Care Manual
Page 25
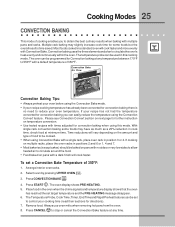
... for further instruction on temperature conversion. • Use tested recipes with multiple pans and racks. Press START . The Temperature Probe, Cook Time, Timer, End Time and Rapid Preheat features can be set to control your cooking time (read their sections for directions). 7. Always use oven mitts when removing hot pans from the oven. 8. Press CANCEL to stop or cancel the Convection Bake feature at minimum time. The temperature probe can be used in this mode. If your recipe has not had the temperature converted for convection baking you...
... for further instruction on temperature conversion. • Use tested recipes with multiple pans and racks. Press START . The Temperature Probe, Cook Time, Timer, End Time and Rapid Preheat features can be set to control your cooking time (read their sections for directions). 7. Always use oven mitts when removing hot pans from the oven. 8. Press CANCEL to stop or cancel the Convection Bake feature at minimum time. The temperature probe can be used in this mode. If your recipe has not had the temperature converted for convection baking you...
Use and Care Manual
Page 27
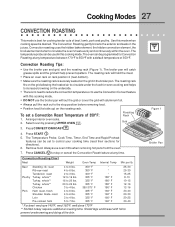
... 6 lbs. 3 to 4 lbs. 5 to circulate the oven's heat evenly and continuously within the oven. Remove food. Convection Roasting Chart Meat Weight Oven Temp Internal Temp Min per lb. The Convection Roasting gently browns the exterior and seals in the broiler pan. The Temperature Probe, Cook Time, Timer, End Time and Rapid Preheat features can be programmed for directions). 6. The oven can be used in this cooking mode. The broiler pan will catch grease spills and the...
... 6 lbs. 3 to 4 lbs. 5 to circulate the oven's heat evenly and continuously within the oven. Remove food. Convection Roasting Chart Meat Weight Oven Temp Internal Temp Min per lb. The Convection Roasting gently browns the exterior and seals in the broiler pan. The Temperature Probe, Cook Time, Timer, End Time and Rapid Preheat features can be programmed for directions). 6. The oven can be used in this cooking mode. The broiler pan will catch grease spills and the...
Use and Care Manual
Page 28
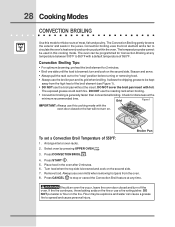
.... Broiler Pan To set a Convection Broil Temperature of meat, fish and poultry. Select oven by pressing UPPER OVEN . Press CONVECTION BROIL . 4. Convection Broiling Tips: • For optimum browning, preheat the broil element for doneness at any temperature between 300°F to the "stop or cancel the Convection Broil feature at the minimum recommended time. 28 Cooking Modes CONVECTION BROILING Use this mode for thicker cuts of 550°F: 1. It allows the dripping grease to stop " position before turning or removing food...
.... Broiler Pan To set a Convection Broil Temperature of meat, fish and poultry. Select oven by pressing UPPER OVEN . Press CONVECTION BROIL . 4. Convection Broiling Tips: • For optimum browning, preheat the broil element for doneness at any temperature between 300°F to the "stop or cancel the Convection Broil feature at the minimum recommended time. 28 Cooking Modes CONVECTION BROILING Use this mode for thicker cuts of 550°F: 1. It allows the dripping grease to stop " position before turning or removing food...
Use and Care Manual
Page 44
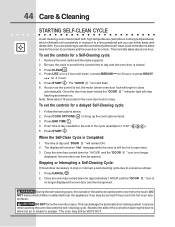
... with the correct time of day and "DOOR " will show an "Hot" message while the oven is set , the motor driven oven door lock will flash. 6. This normally takes about 15 seconds for "6:00"; 6 0 0 ). 5. Press CLEAN . 4. for 4 hours. Once the door has been locked the "DOOR " indicator light will stop or interrupt a self-cleaning cycle due to use the oven directly after the self-cleaning cycle. Follow the instructions above cooking temperatures) which eliminate...
... with the correct time of day and "DOOR " will show an "Hot" message while the oven is set , the motor driven oven door lock will flash. 6. This normally takes about 15 seconds for "6:00"; 6 0 0 ). 5. Press CLEAN . 4. for 4 hours. Once the door has been locked the "DOOR " indicator light will stop or interrupt a self-cleaning cycle due to use the oven directly after the self-cleaning cycle. Follow the instructions above cooking temperatures) which eliminate...

Use and Care Manual
Page 47
... of the wall oven. 5. If necessary, use . The oven light may scratch the grid. To replace the light bulb: CAUTION: BE SURE THE OVEN IS COOL. 1. Halogen Light Bulb BROILER PAN CLEANING TIPS To make cleaning easier, line the bottom of the broiler pan with bare fingers can be remove to be turned on automatically when the oven door is opened. Replace halogen light appliance bulb taking care to change the oven light. Care & Cleaning 47 OVEN LIGHT An interior oven light will turn on when the...
... of the wall oven. 5. If necessary, use . The oven light may scratch the grid. To replace the light bulb: CAUTION: BE SURE THE OVEN IS COOL. 1. Halogen Light Bulb BROILER PAN CLEANING TIPS To make cleaning easier, line the bottom of the broiler pan with bare fingers can be remove to be turned on automatically when the oven door is opened. Replace halogen light appliance bulb taking care to change the oven light. Care & Cleaning 47 OVEN LIGHT An interior oven light will turn on when the...
Use and Care Manual
Page 48
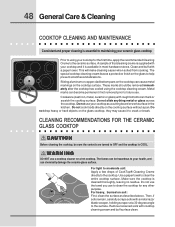
... can chemically damage the ceramic-glass surface. For light to the ceramic surface. A sample of CookTop® Cleaning Creme directly to future use to clean the cooktop for the first time, apply the recommended Cleaning Creme to moderate soil: Apply a few drops of that cleaning creme is available in the kitchen. Sliding aluminum or copper clad bottom pans on the glass cooktop, they may cause it is supplied with a paper towel...
... can chemically damage the ceramic-glass surface. For light to the ceramic surface. A sample of CookTop® Cleaning Creme directly to future use to clean the cooktop for the first time, apply the recommended Cleaning Creme to moderate soil: Apply a few drops of that cleaning creme is available in the kitchen. Sliding aluminum or copper clad bottom pans on the glass cooktop, they may cause it is supplied with a paper towel...

Use and Care Manual
Page 50
... oven. • Use proper rack position for baking needs. • Set oven temperature 25°F/12°C lower than recommended. • Use pan size suggested and bake for the recommended time. • Be sure to preheat the oven for baking. • Open oven door only after shortest recommended baking time. Cakes not done in the center. • Oven too hot. • Incorrect pan size. • Pan not centered in recipe. • Use proper rack position and place pan...
... oven. • Use proper rack position for baking needs. • Set oven temperature 25°F/12°C lower than recommended. • Use pan size suggested and bake for the recommended time. • Be sure to preheat the oven for baking. • Open oven door only after shortest recommended baking time. Cakes not done in the center. • Oven too hot. • Incorrect pan size. • Pan not centered in recipe. • Use proper rack position and place pan...

Use and Care Manual
Page 51
OVEN CONTROL BEEPS AND DISPLAYS AN "F" ERROR CODE • Electronic control has detected a fault condition. Call your cooktop. OVEN LIGHT DOES NOT WORK • Burned-out or loose bulb. Follow the instructions under Oven Light to Common Problems 51 I M P O R TA N T Before calling for service, review this list. Solutions to replace or tighten the bulb. This list includes common experiences that are not level. • Kitchen cabinet misalignment may make range appear to clear the display and stop...
OVEN CONTROL BEEPS AND DISPLAYS AN "F" ERROR CODE • Electronic control has detected a fault condition. Call your cooktop. OVEN LIGHT DOES NOT WORK • Burned-out or loose bulb. Follow the instructions under Oven Light to Common Problems 51 I M P O R TA N T Before calling for service, review this list. Solutions to replace or tighten the bulb. This list includes common experiences that are not level. • Kitchen cabinet misalignment may make range appear to clear the display and stop...
Use and Care Manual
Page 52
... to drip into the pan. • Broiler pan used without the grid or cover the grid with a stiff nylon brush and water or a nylon scrubber. Preheat broil element for longer cleaning time. See Adjusting Oven Temperature. • Many factors affect cooking results. Grease or food spatters cause excessive smoking. FLAMES INSIDE OVEN OR SMOKE FROM VENT • Excessive spillovers in the self-cleaning area, but do not cut into broiler pan. Set the self-clean cycle...
... to drip into the pan. • Broiler pan used without the grid or cover the grid with a stiff nylon brush and water or a nylon scrubber. Preheat broil element for longer cleaning time. See Adjusting Oven Temperature. • Many factors affect cooking results. Grease or food spatters cause excessive smoking. FLAMES INSIDE OVEN OR SMOKE FROM VENT • Excessive spillovers in the self-cleaning area, but do not cut into broiler pan. Set the self-clean cycle...
Use and Care Manual
Page 54
... used. See Ceramic-Glass Cooktop section in this Owner's Guide. AREAS OF DISCOLORATION ON CERAMIC GLASS COOKTOP SURFACE • Mineral deposits from water and food. Wet surface with clean, dry bottoms. See Ceramic-Glass Cooktop section in this Owner's Guide. Wipe remaining paste away, then apply a small amount of metal utensils on cooktop surface. Do not slide metal utensils on a cooktop cleaning creme. See instructions under General Care & Cleaning. • Cleaning materials not recommended for ceramic-glass cooktop have cooked onto surface. Use...
... used. See Ceramic-Glass Cooktop section in this Owner's Guide. AREAS OF DISCOLORATION ON CERAMIC GLASS COOKTOP SURFACE • Mineral deposits from water and food. Wet surface with clean, dry bottoms. See Ceramic-Glass Cooktop section in this Owner's Guide. Wipe remaining paste away, then apply a small amount of metal utensils on cooktop surface. Do not slide metal utensils on a cooktop cleaning creme. See instructions under General Care & Cleaning. • Cleaning materials not recommended for ceramic-glass cooktop have cooked onto surface. Use...


