Complete Owner's Guide (English)
Page 1
A Use & Care Guide Electric Cooktop Dishwasher 31 8 2 0 3 621 ( 0807) R ev.
A Use & Care Guide Electric Cooktop Dishwasher 31 8 2 0 3 621 ( 0807) R ev.
Complete Owner's Guide (English)
Page 2
Post Office Box 212378, Augusta, Georgia 30917, USA All rights reserved. For toll-free telephone support in the USA Printed in the U.S. and Canada: 1-877-4ELECTROLUX (1-877-435-3287) For online support and internet product information: www.electroluxappliances.com ©2008 Electrolux Home Products, Inc. 2 Finding Information MAKE A RECORD FOR FUTURE USE Brand Purchase Date Model Number Serial Number NOTE The serial and model numbers may be found on the serial plate located under the cooktop. QUESTIONS?
Post Office Box 212378, Augusta, Georgia 30917, USA All rights reserved. For toll-free telephone support in the USA Printed in the U.S. and Canada: 1-877-4ELECTROLUX (1-877-435-3287) For online support and internet product information: www.electroluxappliances.com ©2008 Electrolux Home Products, Inc. 2 Finding Information MAKE A RECORD FOR FUTURE USE Brand Purchase Date Model Number Serial Number NOTE The serial and model numbers may be found on the serial plate located under the cooktop. QUESTIONS?
Complete Owner's Guide (English)
Page 3
Finding Information 3 TABLE OF CONTENTS Finding Information 2-3 Make a Record for Future use 2 Questions 2 Safety 4-6 Important Safety Instructions 4 Cooktop Features 7-8 Setting Surface Controls 9-18 About the Ceramic Glass Cooktop 9 About the Radiant Surface Elements 9 Locations of the Surface Radiant Elements .......... 10 Using the Touch Control 10 LED Messages or Light Indicators Displayed by Main...
Finding Information 3 TABLE OF CONTENTS Finding Information 2-3 Make a Record for Future use 2 Questions 2 Safety 4-6 Important Safety Instructions 4 Cooktop Features 7-8 Setting Surface Controls 9-18 About the Ceramic Glass Cooktop 9 About the Radiant Surface Elements 9 Locations of the Surface Radiant Elements .......... 10 Using the Touch Control 10 LED Messages or Light Indicators Displayed by Main...
Complete Owner's Guide (English)
Page 4
...cans, on or near surface units. Flammable materials may also cause damage to these instructions for this appliance. Please pay attention to the cooktop. WARNING To reduce the risk of the appliance. • Storage on this appliance. latest edition in the United States, or CSA... following: • Remove all tape and packaging wrap before using your electric cooktop, follow all instructions before using the appliance. All other permanent part of fire, electrical shock, or injury when using this cooktop can result in Canada, and local code requirements. Do not repair or...
...cans, on or near surface units. Flammable materials may also cause damage to these instructions for this appliance. Please pay attention to the cooktop. WARNING To reduce the risk of the appliance. • Storage on this appliance. latest edition in the United States, or CSA... following: • Remove all tape and packaging wrap before using your electric cooktop, follow all instructions before using the appliance. All other permanent part of fire, electrical shock, or injury when using this cooktop can result in Canada, and local code requirements. Do not repair or...

Complete Owner's Guide (English)
Page 5
...; Wear Proper Apparel. Smother the fire with one or more surface units of interest to sit or stand on . IMPORTANT SAFETY INSTRUCTIONS FOR USING YOUR COOKTOP • Know which touch key pads controls each surface unit. • Clean the appliance regularly to keep all parts free of the appliance. • ... they have had sufficient time to reach items could catch fire. When flaming food under the hood, turn off and the power resumes, the cooktop will not operate and an error message will be left alone or unattended in the area where an appliance is in injury. During and after...
...; Wear Proper Apparel. Smother the fire with one or more surface units of interest to sit or stand on . IMPORTANT SAFETY INSTRUCTIONS FOR USING YOUR COOKTOP • Know which touch key pads controls each surface unit. • Clean the appliance regularly to keep all parts free of the appliance. • ... they have had sufficient time to reach items could catch fire. When flaming food under the hood, turn off and the power resumes, the cooktop will not operate and an error message will be left alone or unattended in the area where an appliance is in injury. During and after...
Complete Owner's Guide (English)
Page 6
... spillage due to a hot surface. • Do Not Place Hot Cookware on Cold Cooktop Glass. To reduce the risk of burns, ignition of glass, glass/ceramic, ceramic, earthenware, or other use aluminum foil to warn customers of electric shock. Check the manufacturer's recommendations for future reference. The ventilating hood above your warranty...
... spillage due to a hot surface. • Do Not Place Hot Cookware on Cold Cooktop Glass. To reduce the risk of burns, ignition of glass, glass/ceramic, ceramic, earthenware, or other use aluminum foil to warn customers of electric shock. Check the manufacturer's recommendations for future reference. The ventilating hood above your warranty...

Complete Owner's Guide (English)
Page 7
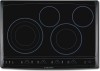
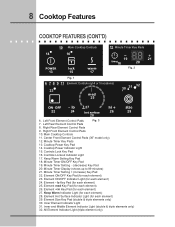
... 4 POWER lock warm 10 ON OFF med hot surface size 6 ON OFF med hot surface ON OFF med hot surface size 7 9 Fig. 1 - 30" model ON OFF med hot surface 8 timer 12 1 3 2 5 4 POWER lock warm 10 ON OFF med hot surface size 6 ON OFF med...Front Triple Radiant Element 3. Right Front Double radiant Element 5. Right Rear Single Radiant Element 4. Main Cooktop Controls 11. Cooktop Features 7 COOKTOP FEATURES READ THESE INSTRUCTIONS CAREFULLY BEFORE USING THE COOKTOP ! Left Rear Element Control Pads 8. CAUTION The Cooking Zones may appear to be HOT form ...
... 4 POWER lock warm 10 ON OFF med hot surface size 6 ON OFF med hot surface ON OFF med hot surface size 7 9 Fig. 1 - 30" model ON OFF med hot surface 8 timer 12 1 3 2 5 4 POWER lock warm 10 ON OFF med hot surface size 6 ON OFF med...Front Triple Radiant Element 3. Right Front Double radiant Element 5. Right Rear Single Radiant Element 4. Main Cooktop Controls 11. Cooktop Features 7 COOKTOP FEATURES READ THESE INSTRUCTIONS CAREFULLY BEFORE USING THE COOKTOP ! Left Rear Element Control Pads 8. CAUTION The Cooking Zones may appear to be HOT form ...
Complete Owner's Guide (English)
Page 8
... 3 7. Element Size Key Pad (double & triple elements only) 30. Minute Timer Display (shows up to 99 minutes) 21. Left Rear Element Control Pads 8. Keep Warm Setting Key Pad 18. 8 Cooktop Features COOKTOP FEATURES (CONT'D) 10 Main Cooktop Controls 12 Minute Timer Key Pads 14 16 POWER 13 lock 15 ...warm 17 19 timer18 21 20 Fig. 2 Fig. 1 6 7 8 9 11 Element Controls (at 4 or 5 locations) 23 med 25 30 31 32 ON OFF 27 22 24...
... 3 7. Element Size Key Pad (double & triple elements only) 30. Minute Timer Display (shows up to 99 minutes) 21. Left Rear Element Control Pads 8. Keep Warm Setting Key Pad 18. 8 Cooktop Features COOKTOP FEATURES (CONT'D) 10 Main Cooktop Controls 12 Minute Timer Key Pads 14 16 POWER 13 lock 15 ...warm 17 19 timer18 21 20 Fig. 2 Fig. 1 6 7 8 9 11 Element Controls (at 4 or 5 locations) 23 med 25 30 31 32 ON OFF 27 22 24...
Complete Owner's Guide (English)
Page 9
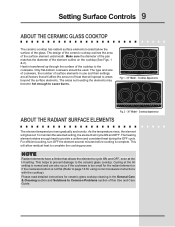
... the surface of the element outline on the cooktop (See Figs. 1 & 2). Heat is complete. POWER lock warm ON OFF med hot surface size ON OFF med hot surface ON OFF med hot surface size ON OFF med hot surface timer Fig.1 - 30" Model - The areas surrounding the elements may... become hot enough to the ceramic glass cooktop. This helps to prevent damage to cause burns. This will glow red. As the temperature rises, the...
... the surface of the element outline on the cooktop (See Figs. 1 & 2). Heat is complete. POWER lock warm ON OFF med hot surface size ON OFF med hot surface ON OFF med hot surface size ON OFF med hot surface timer Fig.1 - 30" Model - The areas surrounding the elements may... become hot enough to the ceramic glass cooktop. This helps to prevent damage to cause burns. This will glow red. As the temperature rises, the...
Complete Owner's Guide (English)
Page 10
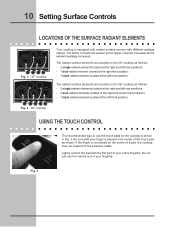
... radiant element located at the right front position; - 1 triple radiant element located at the left front position; The radiant surface elements are located on the 30" cooktop as follows: - 2 single radiant elements located at the right and left rear positions; - 2 dual radiant elements located at the right and center front ...med hot surface size ON OFF med hot surface ON OFF med hot surface size ON OFF med hot surface timer Fig. 1 - 30" cooktop POWER lock warm ON OFF med hot surface size ON OFF med hot surface ON OFF med hot surface size ON OFF med hot ...
... radiant element located at the right front position; - 1 triple radiant element located at the left front position; The radiant surface elements are located on the 30" cooktop as follows: - 2 single radiant elements located at the right and left rear positions; - 2 dual radiant elements located at the right and center front ...med hot surface size ON OFF med hot surface ON OFF med hot surface size ON OFF med hot surface timer Fig. 1 - 30" cooktop POWER lock warm ON OFF med hot surface size ON OFF med hot surface ON OFF med hot surface size ON OFF med hot ...

Complete Owner's Guide (English)
Page 11
... POWER key pad. Each Cooking Elements have separate ON/OFF key pads. Once the Main Power key pad has been touched to activate the cooktop, touch the corresponding Cooking Element ON/OFF key pad once to be turned OFF. To set a Cooking Element power level touch the corresponding ...Cooking Element hi + (increase), med or - After using any of the single, dual or triple radiant element positions the cooktop will turn OFF (See Fig. 3). If the indicator light is in use . Setting Surface Controls 11 LED MESSAGES OR LIGHT INDICATORS DISPLAYED BY MAIN ...
... POWER key pad. Each Cooking Elements have separate ON/OFF key pads. Once the Main Power key pad has been touched to activate the cooktop, touch the corresponding Cooking Element ON/OFF key pad once to be turned OFF. To set a Cooking Element power level touch the corresponding ...Cooking Element hi + (increase), med or - After using any of the single, dual or triple radiant element positions the cooktop will turn OFF (See Fig. 3). If the indicator light is in use . Setting Surface Controls 11 LED MESSAGES OR LIGHT INDICATORS DISPLAYED BY MAIN ...

Complete Owner's Guide (English)
Page 12
... you are preparing. 6 7 89 5 10 4 med 11 3 12 2 13 1 14 15 Fig. 9 - MEDIUM HIGH (11-14) Continue a rapid boil; poaching and stewing. med Fig. 4 AVAILABLE COOKTOP SETTINGS - Your control provides different settings for best cooking results. med med med med Fig. 5 Fig. 6 Fig. 7 Fig. 8 THE RECOMMENDED SURFACE COOKING SETTINGS Use the...
... you are preparing. 6 7 89 5 10 4 med 11 3 12 2 13 1 14 15 Fig. 9 - MEDIUM HIGH (11-14) Continue a rapid boil; poaching and stewing. med Fig. 4 AVAILABLE COOKTOP SETTINGS - Your control provides different settings for best cooking results. med med med med Fig. 5 Fig. 6 Fig. 7 Fig. 8 THE RECOMMENDED SURFACE COOKING SETTINGS Use the...

Complete Owner's Guide (English)
Page 13
... clear. 3. Place correctly sized cookware on top of the cookware indicates the cookware is touched within 20 seconds thePOrWeERquest to Power ON the cooktop will turn the element OFF ON OFF and if no further pads are touched within 10 seconds the request to HI. The power indicator... melt or ignite. the right and left rear (Figs. 1 & 2) element positions. Setting Surface Controls 13 OPERATING THE SINGLE SURFACE RADIANT ELEMENTS The cooktop has single radiant surface elements at any time while the element is ON. 6. Note: The power level may be hot and burns may still be...
... clear. 3. Place correctly sized cookware on top of the cookware indicates the cookware is touched within 20 seconds thePOrWeERquest to Power ON the cooktop will turn the element OFF ON OFF and if no further pads are touched within 10 seconds the request to HI. The power indicator... melt or ignite. the right and left rear (Figs. 1 & 2) element positions. Setting Surface Controls 13 OPERATING THE SINGLE SURFACE RADIANT ELEMENTS The cooktop has single radiant surface elements at any time while the element is ON. 6. Note: The power level may be hot and burns may still be...

Complete Owner's Guide (English)
Page 14
... the key pad until the heating surface area has cooled sufficiently. ! The Hot Surface Indicator Light will turn ON and will turn off the POWER cooktop.Note: The Hot Surface Indicator Light will remain ON until a beep sound. Two indicator lights on a higher setting and then turn ON the power level... cooled down to be adjusted at each setting. 14 Setting Surface Controls OPERATING THE DUAL SURFACE RADIANT ELEMENT Both the 30" and 36" cooktops are touched within 20 seconds the request to finish cooking. Touch and hold the pad for power level to LO or touch pad once to ...
... the key pad until the heating surface area has cooled sufficiently. ! The Hot Surface Indicator Light will turn ON and will turn off the POWER cooktop.Note: The Hot Surface Indicator Light will remain ON until a beep sound. Two indicator lights on a higher setting and then turn ON the power level... cooled down to be adjusted at each setting. 14 Setting Surface Controls OPERATING THE DUAL SURFACE RADIANT ELEMENT Both the 30" and 36" cooktops are touched within 20 seconds the request to finish cooking. Touch and hold the pad for power level to LO or touch pad once to ...

Complete Owner's Guide (English)
Page 15
... 2 pad will turn the element OFF ON OFF and if no further pads are touched within 20 seconds the request to turn ON if the cooktop is too small for the desired triple element position POWER lock warm ON OFF med hot surface size ON OFF med hot surface ON OFF... element controls is used to finish cooking. Setting Surface Controls 15 OPERATING THE TRIPLE SURFACE RADIANT ELEMENT Both the 30" and 36" cooktops are used touch the key pad to Power ON the cooktop will clear. 3. Touch size pad once to turn to a lower setting to indicate which coil of the cookware ...
... 2 pad will turn the element OFF ON OFF and if no further pads are touched within 20 seconds the request to turn ON if the cooktop is too small for the desired triple element position POWER lock warm ON OFF med hot surface size ON OFF med hot surface ON OFF... element controls is used to finish cooking. Setting Surface Controls 15 OPERATING THE TRIPLE SURFACE RADIANT ELEMENT Both the 30" and 36" cooktops are used touch the key pad to Power ON the cooktop will clear. 3. Touch size pad once to turn to a lower setting to indicate which coil of the cookware ...

Complete Owner's Guide (English)
Page 17
... pads will begin the countdown. Touch the key pad or touch and hold the key pad. The Minute Timer display will turn OFF indicating the cooktop is unlocked. After 5 seconds a beep will keep track of time, release the or key pads to allow the minute timer to begin to count ... using the scrolling method, once the Minute Timer display reaches 00, release the key pad. 3. Some power level indicator lights will sound indicating that the cooktop can be impossible to set . med Fig. 1 To Set the Minute Timer: 1. To stop the control from beeping, touch the key pad. Once the Minute...
... pads will begin the countdown. Touch the key pad or touch and hold the key pad. The Minute Timer display will turn OFF indicating the cooktop is unlocked. After 5 seconds a beep will keep track of time, release the or key pads to allow the minute timer to begin to count ... using the scrolling method, once the Minute Timer display reaches 00, release the key pad. 3. Some power level indicator lights will sound indicating that the cooktop can be impossible to set . med Fig. 1 To Set the Minute Timer: 1. To stop the control from beeping, touch the key pad. Once the Minute...
Complete Owner's Guide (English)
Page 18
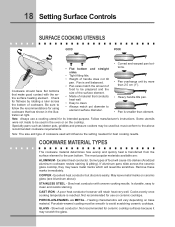
... most popular materials available are: ALUMINUM - If aluminum pans slide across the bottom of cookware. May leave metal marks on the cooktop. CAST IRON - Cooks evenly once cooking temperature is smaller than 2.5 cm (1"). GLASS - Follow manufacturer's instructions. COOKWARE MATERIAL TYPES ... leave metal marks which will retain heat very well. Is durable, easy to avoid scratching ceramic cooktops. A poor heat conductor however will resemble scratches. Not recommended for ceramic cooktop surfaces because it to the above ). Check for using cookware that has shown in the oven ...
... most popular materials available are: ALUMINUM - If aluminum pans slide across the bottom of cookware. May leave metal marks on the cooktop. CAST IRON - Cooks evenly once cooking temperature is smaller than 2.5 cm (1"). GLASS - Follow manufacturer's instructions. COOKWARE MATERIAL TYPES ... leave metal marks which will retain heat very well. Is durable, easy to avoid scratching ceramic cooktops. A poor heat conductor however will resemble scratches. Not recommended for ceramic cooktop surfaces because it to the above ). Check for using cookware that has shown in the oven ...

Complete Owner's Guide (English)
Page 20
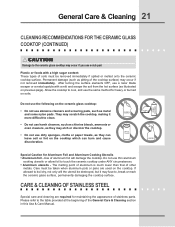
...paper towel. Metal marks can mark or scratch the cooktop surface. Make sure the cooktop is cleaned thoroughly, leaving no residue. Cookware (cast iron, metal, ceramic or glass) with a metal razor blade scraper, holding scraper at a 30 degree angle to the cooktop. Do not drop heavy or hard objects on ...the glass cooktop, they may cause it is available in the kitchen. The fumes can be hazardous to future use your...
...paper towel. Metal marks can mark or scratch the cooktop surface. Make sure the cooktop is cleaned thoroughly, leaving no residue. Cookware (cast iron, metal, ceramic or glass) with a metal razor blade scraper, holding scraper at a 30 degree angle to the cooktop. Do not drop heavy or hard objects on ...the glass cooktop, they may cause it is available in the kitchen. The fumes can be hazardous to future use your...
Complete Owner's Guide (English)
Page 21
.... The melting point of aluminum is much lower than that of the General Care & Cleaning section in this Use & Care Manual. Allow the cooktop to clean. • Do not use harsh cleaners, such as chlorine bleach, ammonia or oven cleaners, as they may occur if not removed immediately... utensils - After turning the surface elements OFF, use dirty sponges, cloths or paper towels, as illustrated on previous page). They may scratch the cooktop, making it may occur if you use thin aluminum cooking utensils or allow foil to the table provided at the beginning of other metals. CAUTION...
.... The melting point of aluminum is much lower than that of the General Care & Cleaning section in this Use & Care Manual. Allow the cooktop to clean. • Do not use harsh cleaners, such as chlorine bleach, ammonia or oven cleaners, as they may occur if not removed immediately... utensils - After turning the surface elements OFF, use dirty sponges, cloths or paper towels, as illustrated on previous page). They may scratch the cooktop, making it may occur if you use thin aluminum cooking utensils or allow foil to the table provided at the beginning of other metals. CAUTION...
Complete Owner's Guide (English)
Page 22
Call local electric company. Check/reset breaker or replace fuse. Dial markings are ...setting. Check house lights to a slightly higher setting until proper amount of defective workmanship or material in your cooktop. Cookware material affects heating. Check/reset breaker or replace fuse. If the problem is properly connected to Common ...supplied with the appliance, have this situation corrected by a qualified electrician. • Service wiring not complete. ENTIRE COOKTOP DOES NOT OPERATE • House fuse has blown or circuit breaker has tripped. If the problem is incorrect....
Call local electric company. Check/reset breaker or replace fuse. Dial markings are ...setting. Check house lights to a slightly higher setting until proper amount of defective workmanship or material in your cooktop. Cookware material affects heating. Check/reset breaker or replace fuse. If the problem is properly connected to Common ...supplied with the appliance, have this situation corrected by a qualified electrician. • Service wiring not complete. ENTIRE COOKTOP DOES NOT OPERATE • House fuse has blown or circuit breaker has tripped. If the problem is incorrect....


