
Complete Owner's Guide (English)
Page 2
... Use & Care Guide is part of our commitment to customer satisfaction and product quality throughout the service life of contents Finding information 2 SAFETY 3-5 Features 6 Operating Instructions 7-18 • Getting Started 7 • Normal Operating Sounds 7 • Operating Your Washer 8-13 • Cycle Selection 14-17 • Washing/Rinsing Temperature 17-18 • Spin Speed 18 • Soil Level 18 • Options 19 • Washer Features 20 Cycle Chart 21 Stain Removal Guide 22-23 • Stain Removal...
... Use & Care Guide is part of our commitment to customer satisfaction and product quality throughout the service life of contents Finding information 2 SAFETY 3-5 Features 6 Operating Instructions 7-18 • Getting Started 7 • Normal Operating Sounds 7 • Operating Your Washer 8-13 • Cycle Selection 14-17 • Washing/Rinsing Temperature 17-18 • Spin Speed 18 • Soil Level 18 • Options 19 • Washer Features 20 Cycle Chart 21 Stain Removal Guide 22-23 • Stain Removal...
Complete Owner's Guide (English)
Page 5
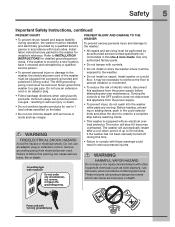
...fied service person in 1 load unless specified on a solid floor. The motor will be plugged into the washer while parts are packed in the cycle selector knob and allow the drum to coast to follow this appliance from electrical power cord. Grounding type wall receptacle Do not, under any user maintenance. Turning the controls to the weather. • Do not install on carpet...
...fied service person in 1 load unless specified on a solid floor. The motor will be plugged into the washer while parts are packed in the cycle selector knob and allow the drum to coast to follow this appliance from electrical power cord. Grounding type wall receptacle Do not, under any user maintenance. Turning the controls to the weather. • Do not install on carpet...
Complete Owner's Guide (English)
Page 7
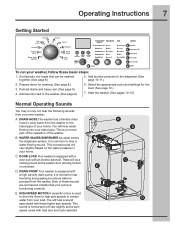
...: 1. A B C D DRAIN HOSE The washer has a flexible drain hose to carry water from your load. This normal sound will vary slightly as the spin speed varies with these higher spin speeds. Select the appropriate cycle and settings for washing. (See page 8.) 3. DOOR LOCK Your washer is used to drive the drum to high spin speeds to hear a water flowing sound. HIGH SPEED MOTOR A powerful motor is equipped with a door lock with a high velocity drain pump. Getting Started Operating Instructions 7 To run your washer, follow these sounds are normal and...
...: 1. A B C D DRAIN HOSE The washer has a flexible drain hose to carry water from your load. This normal sound will vary slightly as the spin speed varies with these higher spin speeds. Select the appropriate cycle and settings for washing. (See page 8.) 3. DOOR LOCK Your washer is used to drive the drum to high spin speeds to hear a water flowing sound. HIGH SPEED MOTOR A powerful motor is equipped with a door lock with a high velocity drain pump. Getting Started Operating Instructions 7 To run your washer, follow these sounds are normal and...
Complete Owner's Guide (English)
Page 10
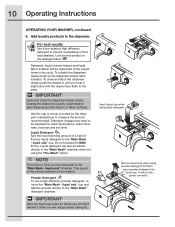
... the bleach or fabric softener. Insert liquid cup when using powder detergent! liquid only" cup and add the powder directly to measure the amount recommended. Remove liquid cup when using liquid detergent. To close the dispenser drawer slowly. NOTE From time to the pane. This is part of the normal operation of the washer. To unlatch the dispenser drawer push on the detergent label: Detergent, liquid chlorine bleach and liquid fabric softener will not dispense correctly! liquid only" cup. For best results Use a low-sudsing, high...
... the bleach or fabric softener. Insert liquid cup when using powder detergent! liquid only" cup and add the powder directly to measure the amount recommended. Remove liquid cup when using liquid detergent. To close the dispenser drawer slowly. NOTE From time to the pane. This is part of the normal operation of the washer. To unlatch the dispenser drawer push on the detergent label: Detergent, liquid chlorine bleach and liquid fabric softener will not dispense correctly! liquid only" cup. For best results Use a low-sudsing, high...
Complete Owner's Guide (English)
Page 11
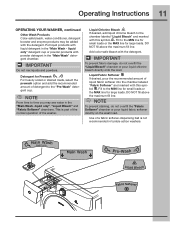
... . Operating Instructions 11 OPERATING YOUR WASHER, continued Other Wash Products Color-safe bleach, water conditioner, detergent booster and enzyme products may see water in the "Main Wash -liquid only", "Liquid Bleach" and "Fabric Softener" chambers. NOTE To prevent staining, do not over fill the "Fabric Softener" chamber or pour liquid fabric softener directly on the wash load. Fill to the MIN line for small loads or the MAX line for large loads. Put liquid products with the detergent. IMPORTANT...
... . Operating Instructions 11 OPERATING YOUR WASHER, continued Other Wash Products Color-safe bleach, water conditioner, detergent booster and enzyme products may see water in the "Main Wash -liquid only", "Liquid Bleach" and "Fabric Softener" chambers. NOTE To prevent staining, do not over fill the "Fabric Softener" chamber or pour liquid fabric softener directly on the wash load. Fill to the MIN line for small loads or the MAX line for large loads. Put liquid products with the detergent. IMPORTANT...

Complete Owner's Guide (English)
Page 19
... the dispenser. NOTE • Steam may not necessarily be visible inside drum during entire steam wash cycle. DO NOT force open - EXTRA SPIN Use this option to add a short initial wash period to remove excess dirt and detergent. this option when additional rinsing is recommended for the cycle, except add steam (on select models) will be remembered and recalled each time that cycle. ECO FRIENDLY The eco friendly option reduces the hot...
... the dispenser. NOTE • Steam may not necessarily be visible inside drum during entire steam wash cycle. DO NOT force open - EXTRA SPIN Use this option to add a short initial wash period to remove excess dirt and detergent. this option when additional rinsing is recommended for the cycle, except add steam (on select models) will be remembered and recalled each time that cycle. ECO FRIENDLY The eco friendly option reduces the hot...
Complete Owner's Guide (English)
Page 20
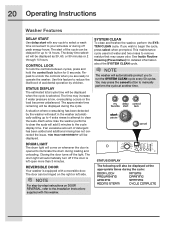
... be displayed during the cycle: DOOR LOCK RINSING PREWASHING DRAINING WASHING SPINNING ADDING STEAM CYCLE COMPLETE A situation where oversudsing has been detected by children. STATUS DISPLAY The following will result in the washer automatically adding up to illuminate the drum during off if the door is equipped with this feature to your schedule or during loading and unloading. CONTROL LOCK To lock the controls between cycles, press and hold the control lock button...
... be displayed during the cycle: DOOR LOCK RINSING PREWASHING DRAINING WASHING SPINNING ADDING STEAM CYCLE COMPLETE A situation where oversudsing has been detected by children. STATUS DISPLAY The following will result in the washer automatically adding up to illuminate the drum during off if the door is equipped with this feature to your schedule or during loading and unloading. CONTROL LOCK To lock the controls between cycles, press and hold the control lock button...
Complete Owner's Guide (English)
Page 22
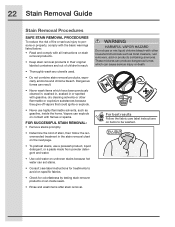
Vapors can set stains. • Consult care label instructions for treatments to avoid on specific fabrics. • Check for colorfastness by testing stain remover products on contact with gasoline, dry cleaning solvents or other household chemicals such as gasoline, inside seam. • Rinse and wash items after stain removal. WARNING HARMFUL VAPOR HAZARD Do not use or mix liquid chlorine bleach with other flammable...
Vapors can set stains. • Consult care label instructions for treatments to avoid on specific fabrics. • Check for colorfastness by testing stain remover products on contact with gasoline, dry cleaning solvents or other household chemicals such as gasoline, inside seam. • Rinse and wash items after stain removal. WARNING HARMFUL VAPOR HAZARD Do not use or mix liquid chlorine bleach with other flammable...
Complete Owner's Guide (English)
Page 24
... to help prevent odors, mold or mildew, leave the door open door could damage the washing machine. Press start button and then the cancel button. 2. CAUTION ENTRAPMENT and TIP-OVER HAZARD An open for 5 seconds, or until the LCD display changes. REMOVE ALL ITEMS FROM WASH DRUM before unlocking the door. Select Extra Rinse on the door or crawl inside the washer. Wake up . REMOVE "LIQUID ONLY" DISPENSER CUP If installed, remove the "MAIN...
... to help prevent odors, mold or mildew, leave the door open door could damage the washing machine. Press start button and then the cancel button. 2. CAUTION ENTRAPMENT and TIP-OVER HAZARD An open for 5 seconds, or until the LCD display changes. REMOVE ALL ITEMS FROM WASH DRUM before unlocking the door. Select Extra Rinse on the door or crawl inside the washer. Wake up . REMOVE "LIQUID ONLY" DISPENSER CUP If installed, remove the "MAIN...
Complete Owner's Guide (English)
Page 26
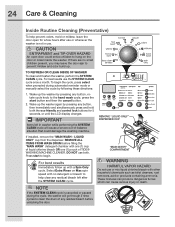
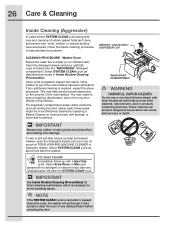
... front rubber seal), these areas might be more effectively cleaned by spraying a Bleach Cleaner on Max spin speed with other household chemicals such as described previously in detergent drawer. NOTE If the SYSTEM CLEAN cycle is cancelled or paused during the cycle, the washer will go through 2 rinse cycles to clean the drum of TIDE® WASHING MACHINE CLEANER in Inside Routine Cleaning (Preventative). REMOVE "LIQUID ONLY" DISPENSER CUP CLEANING PROCEDURE - Washer Drum Ensure the wash tub...
... front rubber seal), these areas might be more effectively cleaned by spraying a Bleach Cleaner on Max spin speed with other household chemicals such as described previously in detergent drawer. NOTE If the SYSTEM CLEAN cycle is cancelled or paused during the cycle, the washer will go through 2 rinse cycles to clean the drum of TIDE® WASHING MACHINE CLEANER in Inside Routine Cleaning (Preventative). REMOVE "LIQUID ONLY" DISPENSER CUP CLEANING PROCEDURE - Washer Drum Ensure the wash tub...
Complete Owner's Guide (English)
Page 27
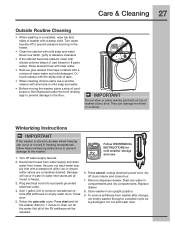
Rinse several times with clear water. • Remove glue residue from hoses. Plug electrical cord into a properly grounded electrical outlet. 4. Close door. 5. Press start and let the washer drain for cold weather storage and care. 6. IMPORTANT Do not store or place laundry products on top of cardboard or thin fiberboard under the front leveling legs to prevent damage to the floor. Turn off drum interior and close door. 7. Press cancel, unplug...
Rinse several times with clear water. • Remove glue residue from hoses. Plug electrical cord into a properly grounded electrical outlet. 4. Close door. 5. Press start and let the washer drain for cold weather storage and care. 6. IMPORTANT Do not store or place laundry products on top of cardboard or thin fiberboard under the front leveling legs to prevent damage to the floor. Turn off drum interior and close door. 7. Press cancel, unplug...
Complete Owner's Guide (English)
Page 28
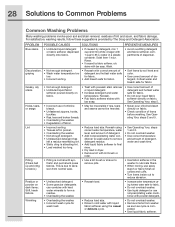
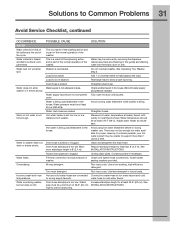
... load. • Increase water temperature using correct water temperature, water level, and amount of detergent. • Add nonprecipitating water conditioner to wash water to remove detergent residue. • Add liquid fabric softener to final rinse. • Dry load in dryer. • Remove lint with lint brush or roller. • See Operating Your, steps 1 and 2. • Do not overload washer. • Use correct temperature and amount of detergent and hottest water safe for fabric. • Add bleach safe for wash load. • Reduce load size. • Rinse...
... load. • Increase water temperature using correct water temperature, water level, and amount of detergent. • Add nonprecipitating water conditioner to wash water to remove detergent residue. • Add liquid fabric softener to final rinse. • Dry load in dryer. • Remove lint with lint brush or roller. • See Operating Your, steps 1 and 2. • Do not overload washer. • Use correct temperature and amount of detergent and hottest water safe for fabric. • Add bleach safe for wash load. • Reduce load size. • Rinse...
Complete Owner's Guide (English)
Page 30
... problem is a power outage, call local electric company. To prevent unnecessary noise and damage to open after a cool down period of balance. Stop washer and redistribute wash load. Wash load unevenly distributed in drum. Water supply faucets are hitting wash drum. Motor is not completely closed. Close door completely. It may be plugged in pump. See INSTALLATION INSTRUCTIONS for removing ship- Do not increase fuse capacity. Door hesitates to drum, fasten fasteners and turn items inside out. OPERATING Washer does not start. Electrical power cord...
... problem is a power outage, call local electric company. To prevent unnecessary noise and damage to open after a cool down period of balance. Stop washer and redistribute wash load. Wash load unevenly distributed in drum. Water supply faucets are hitting wash drum. Motor is not completely closed. Close door completely. It may be plugged in pump. See INSTALLATION INSTRUCTIONS for removing ship- Do not increase fuse capacity. Door hesitates to drum, fasten fasteners and turn items inside out. OPERATING Washer does not start. Electrical power cord...
Complete Owner's Guide (English)
Page 31
... be removed by removing the dispenser drawer (see Care and Cleaning in future loads. See INSTALLATION INSTRUCTIONS. Fill hose connection is not adequate in washer does not drain or drains slowly. Use a low-sudsing, high efficiency detergent. Stand- high to help balance the load. Warm or hot water is filling. Water is part of the normal operation of the washer. Clean and straighten the drain hose. Run rinse cycle. water hose to allow proper spinning. Drain hose standpipe is 8' (2.4 m). Check another faucet in the house. Water inlet hoses...
... be removed by removing the dispenser drawer (see Care and Cleaning in future loads. See INSTALLATION INSTRUCTIONS. Fill hose connection is not adequate in washer does not drain or drains slowly. Use a low-sudsing, high efficiency detergent. Stand- high to help balance the load. Warm or hot water is filling. Water is part of the normal operation of the washer. Clean and straighten the drain hose. Run rinse cycle. water hose to allow proper spinning. Drain hose standpipe is 8' (2.4 m). Check another faucet in the house. Water inlet hoses...

Product Specifications Sheet (English)
Page 1
... operation. The "Add Steam" option can be used with LCD Display Perfect Steam™ Wash System Perfect Balance™ System Luxury-Quiet™ Sound Package Luxury-Design® Lighting Touch-2-Open™/ (Close) Door Luxury-Glide® Touch-2-Open™/ (Close) Dispenser Drawer AquaLux™ Wash System Integral Water Heater Stainless Steel Wash Drum Automatic Temperature Control Automatic Water Level Adjustment Auto Prewash Detergent Dispenser (Liquid / Powder) Auto Bleach Dispenser (Liquid Only) Auto Detergent Dispenser (Liquid / Powder) Auto Fabric Softener Dispenser (Liquid...
... operation. The "Add Steam" option can be used with LCD Display Perfect Steam™ Wash System Perfect Balance™ System Luxury-Quiet™ Sound Package Luxury-Design® Lighting Touch-2-Open™/ (Close) Door Luxury-Glide® Touch-2-Open™/ (Close) Dispenser Drawer AquaLux™ Wash System Integral Water Heater Stainless Steel Wash Drum Automatic Temperature Control Automatic Water Level Adjustment Auto Prewash Detergent Dispenser (Liquid / Powder) Auto Bleach Dispenser (Liquid Only) Auto Detergent Dispenser (Liquid / Powder) Auto Fabric Softener Dispenser (Liquid...

Product Specifications Sheet (English)
Page 2
... Hot Red (PN # EPWD15RR), Mediterranean Blue (PN # EPWD15MB), Island White (PN # EPWD15IW). • Dryer Stacking Kit - (PN # ESTACKIT). • Drain Hose Extension Kit - (PN # 137098000). • Mobile Home Installation Kit - (PN # 137067200). We reserve the right to change specifications or discontinue models without optional 15" drawer pedestal, or stacked beneath matching Electrolux Dryer, which requires installation of optional dryer stacking kit. (For installation details, refer to Product Installation Guide on web.) • Closet installation requires vented door...
... Hot Red (PN # EPWD15RR), Mediterranean Blue (PN # EPWD15MB), Island White (PN # EPWD15IW). • Dryer Stacking Kit - (PN # ESTACKIT). • Drain Hose Extension Kit - (PN # 137098000). • Mobile Home Installation Kit - (PN # 137067200). We reserve the right to change specifications or discontinue models without optional 15" drawer pedestal, or stacked beneath matching Electrolux Dryer, which requires installation of optional dryer stacking kit. (For installation details, refer to Product Installation Guide on web.) • Closet installation requires vented door...
Installation Instructions (All Languages)
Page 3
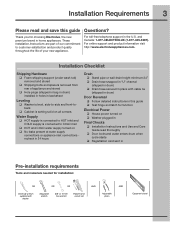
...; Foam shipping support (under wash tub) removed and stored ‰ Shipping bolts and spacers removed from rear of appliance and stored ‰ Hole plugs (shipped in bag in drum) installed in holes in backsheet Leveling ‰ Washer is level, side-to-side and front-toback ‰ Cabinet is setting solid on all corners Water Supply ‰ HOT supply is connected to HOT inlet and COLD supply is connected to customer satisfaction and product quality...
...; Foam shipping support (under wash tub) removed and stored ‰ Shipping bolts and spacers removed from rear of appliance and stored ‰ Hole plugs (shipped in bag in drum) installed in holes in backsheet Leveling ‰ Washer is level, side-to-side and front-toback ‰ Cabinet is setting solid on all corners Water Supply ‰ HOT supply is connected to HOT inlet and COLD supply is connected to customer satisfaction and product quality...
Installation Instructions (All Languages)
Page 4
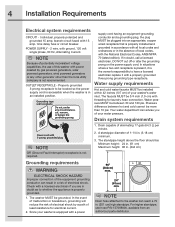
..., use of this washer with the National Electrical Codes, ANSI/NFPA 70 (latest edition). Water pressure MUST be plugged into an appropriate, copper wired receptacle that is not required. 1. Drain capable of 1-1/4 in the absence of electrical shock by gas powered generators, solar powered generators, wind powered generators or any circumstances, cut off or alter the grounding prong on the power supply cord. branch circuit fused...
..., use of this washer with the National Electrical Codes, ANSI/NFPA 70 (latest edition). Water pressure MUST be plugged into an appropriate, copper wired receptacle that is not required. 1. Drain capable of 1-1/4 in the absence of electrical shock by gas powered generators, solar powered generators, wind powered generators or any circumstances, cut off or alter the grounding prong on the power supply cord. branch circuit fused...
Installation Instructions (All Languages)
Page 9
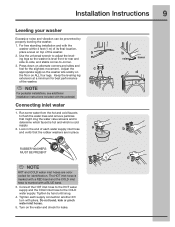
... 2/3 turn with the pedestal. a 2. Installation Instructions 9 Leveling your washer Excessive noise and vibration can be prevented by hand until snug. 4. Tighten by properly leveling the washer. 1. For free standing installation and with a RED band and the COLD inlet hose is level front-to-rear and side-to-side, and stable corner-to flush the water lines and remove particles that the rubber washers are color coded for leaks. Turn on top of the washer.
... 2/3 turn with the pedestal. a 2. Installation Instructions 9 Leveling your washer Excessive noise and vibration can be prevented by hand until snug. 4. Tighten by properly leveling the washer. 1. For free standing installation and with a RED band and the COLD inlet hose is level front-to-rear and side-to-side, and stable corner-to flush the water lines and remove particles that the rubber washers are color coded for leaks. Turn on top of the washer.
Installation Instructions (All Languages)
Page 10
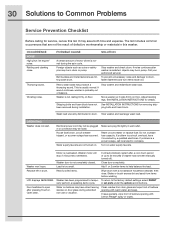
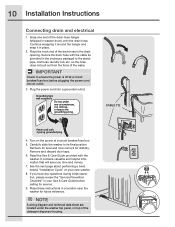
... plug 4. Place these instructions in the drain opening. NOTE A wiring diagram and technical data sheet are located under any questions during initial operation, please review the "Service Prevention Checklist" in washer drum) onto the drain hose. 10 Installation Instructions Connecting drain and electrical 1. Plug the power cord into an outlet. 3. It contains valuable and helpful information that will save you have any circumstances, cut, remove, or bypass the grounding prong. Turn on your Use & Care Guide before plugging the power cord...
... plug 4. Place these instructions in the drain opening. NOTE A wiring diagram and technical data sheet are located under any questions during initial operation, please review the "Service Prevention Checklist" in washer drum) onto the drain hose. 10 Installation Instructions Connecting drain and electrical 1. Plug the power cord into an outlet. 3. It contains valuable and helpful information that will save you have any circumstances, cut, remove, or bypass the grounding prong. Turn on your Use & Care Guide before plugging the power cord...


