
Complete Owner's Guide (English)
Page 2
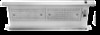
..., please use with Electrolux enhances our ability to record important product information. HOMEOWNER: IMPORTANT SAFETY INSTRUCTIONS ON PAGE 3. Questions? All rights reserved. Keep a record for quick reference Optional blower systems Purchase date Electrolux model number To Reduce The Risk Of Fire And Electric Shock, Install Telescoping Downdraft Ventilation system models EI30DD10KS and EI36DD10KS ONLY With Remote Blower and accessories listed below: • EI16DDPRKS - 1600 CFM Remote Blower for domestic cooking ONLY...
..., please use with Electrolux enhances our ability to record important product information. HOMEOWNER: IMPORTANT SAFETY INSTRUCTIONS ON PAGE 3. Questions? All rights reserved. Keep a record for quick reference Optional blower systems Purchase date Electrolux model number To Reduce The Risk Of Fire And Electric Shock, Install Telescoping Downdraft Ventilation system models EI30DD10KS and EI36DD10KS ONLY With Remote Blower and accessories listed below: • EI16DDPRKS - 1600 CFM Remote Blower for domestic cooking ONLY...

Complete Owner's Guide (English)
Page 3
... such as a tag, to the service panel. • Installation work and electrical wiring must be exercised when installing, maintaining or operating an appliance. Important Safety Instructions 3 What you have questions, contact the manufacturer at the address or telephone number in the warranty. • Before servicing or cleaning unit, switch power off at service panel and lock the service disconnecting means to prevent power from being switched on cooktop. • Children should never...
... such as a tag, to the service panel. • Installation work and electrical wiring must be exercised when installing, maintaining or operating an appliance. Important Safety Instructions 3 What you have questions, contact the manufacturer at the address or telephone number in the warranty. • Before servicing or cleaning unit, switch power off at service panel and lock the service disconnecting means to prevent power from being switched on cooktop. • Children should never...

Complete Owner's Guide (English)
Page 4
... accumulate on low or medium settings. • Always turn off power unit. • Clean filters and grease-laden surfaces frequently. • Do not repair or replace any circumstances, cut, remove, or bypass the grounding prong. Power supply cord with 3-prong grounding plug Improper grounding can fight the fire with your back to operate it started. If the power supply cord is properly installed and grounded. If the...
... accumulate on low or medium settings. • Always turn off power unit. • Clean filters and grease-laden surfaces frequently. • Do not repair or replace any circumstances, cut, remove, or bypass the grounding prong. Power supply cord with 3-prong grounding plug Improper grounding can fight the fire with your back to operate it started. If the power supply cord is properly installed and grounded. If the...

Complete Owner's Guide (English)
Page 5
Stabilizing Brackets Telescoping Downdraft Shipping Pack 5 Instruction Manual Cutout Template Warranty Card Tools You Will Need • Phillips Screwdriver • 1/4" Nut Driver / Ratchet • Tape Measure • Carpenter Square • Vertical Level or Plum Line • Tools required to cabinet material / substrate. Hardware (User Supplied) • (4) Screws appropriate for mounting stabilizing brackets to cut countertop IMPORTANT Retain all packing and materials until the telescoping downdraft and all components have been installed.
Stabilizing Brackets Telescoping Downdraft Shipping Pack 5 Instruction Manual Cutout Template Warranty Card Tools You Will Need • Phillips Screwdriver • 1/4" Nut Driver / Ratchet • Tape Measure • Carpenter Square • Vertical Level or Plum Line • Tools required to cabinet material / substrate. Hardware (User Supplied) • (4) Screws appropriate for mounting stabilizing brackets to cut countertop IMPORTANT Retain all packing and materials until the telescoping downdraft and all components have been installed.

Complete Owner's Guide (English)
Page 7
... of gas, electric or induction cooktops. Note that a minimum of 2 5/16" of flat countertop is required behind downdraft The high level of air flow of this appliance. Take Measurements Refer to cooktop Installation Instructions and Use and Care guide for proper gas burner setup. Countertop 2 5/16" (5.8 cm) 1/8" (0.3 cm) 1/4" Min. (0.6 cm) clearance behind cooktop and that oversized cabinets be performed by a qualified installer, service agency or gas supplier. Extreme caution must be used to exhaust...
... of gas, electric or induction cooktops. Note that a minimum of 2 5/16" of flat countertop is required behind downdraft The high level of air flow of this appliance. Take Measurements Refer to cooktop Installation Instructions and Use and Care guide for proper gas burner setup. Countertop 2 5/16" (5.8 cm) 1/8" (0.3 cm) 1/4" Min. (0.6 cm) clearance behind cooktop and that oversized cabinets be performed by a qualified installer, service agency or gas supplier. Extreme caution must be used to exhaust...

Complete Owner's Guide (English)
Page 8
... of 3¾" (9,5cm) clearance to the back cabinet wall. Do not vent exhaust air into spaces within walls or ceilings or into attics, crawl spaces, or garages. For best performance, choose the ducting option which allows the shortest length of ductwork and a minimum number of elbows and transitions. The transition duct can be sure to duct air outside - Discharge right **Extra Hex Head Screws Hex Head Screws Hex Head Screws Fig. 1 - The...
... of 3¾" (9,5cm) clearance to the back cabinet wall. Do not vent exhaust air into spaces within walls or ceilings or into attics, crawl spaces, or garages. For best performance, choose the ducting option which allows the shortest length of ductwork and a minimum number of elbows and transitions. The transition duct can be sure to duct air outside - Discharge right **Extra Hex Head Screws Hex Head Screws Hex Head Screws Fig. 1 - The...
Complete Owner's Guide (English)
Page 9
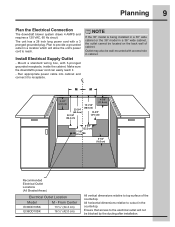
... 36" model in the countertop. Make sure the downdraft's power cord can easily reach it to reach. Ensure that access to the electrical outlet will not be wall-mounted with access hole in a location which will allow the unit's power cord to receptacle. Outlet may also be blocked by the ducting after installation. Plan to top surface of cabinet. Run appropriate power cable into cabinet and connect it...
... 36" model in the countertop. Make sure the downdraft's power cord can easily reach it to reach. Ensure that access to the electrical outlet will not be wall-mounted with access hole in a location which will allow the unit's power cord to receptacle. Outlet may also be blocked by the ducting after installation. Plan to top surface of cabinet. Run appropriate power cable into cabinet and connect it...

Complete Owner's Guide (English)
Page 10
Template - Cut downdraft opening . - Mount the Unit Set downdraft into account. NOTE Cabinet constructions may jam the vent. Rear Discharge Conversion - Attach the plate removed from the back of the bracket must be installed on both the right and left and right cabinet walls just below the bottom of the cooktop and center it (refer to the vent with the vent housing. 10 Installation Cut Countertop Opening - A ½" minimum clearance behind the telescopic downdraft for...
Template - Cut downdraft opening . - Mount the Unit Set downdraft into account. NOTE Cabinet constructions may jam the vent. Rear Discharge Conversion - Attach the plate removed from the back of the bracket must be installed on both the right and left and right cabinet walls just below the bottom of the cooktop and center it (refer to the vent with the vent housing. 10 Installation Cut Countertop Opening - A ½" minimum clearance behind the telescopic downdraft for...

Complete Owner's Guide (English)
Page 11
Remove the Duct Transition Remove the Duct Transition from the Chassis Housing by removing the two Phillips screws as shown and sliding the Duct Transition out of the tabs. Installation 11 Tabs Duct Transition Phillips Head Screw Phillips Head Screw
Remove the Duct Transition Remove the Duct Transition from the Chassis Housing by removing the two Phillips screws as shown and sliding the Duct Transition out of the tabs. Installation 11 Tabs Duct Transition Phillips Head Screw Phillips Head Screw

Complete Owner's Guide (English)
Page 12
... Ground Wire Nuts (3) Downdraft Vent Control Box Blower Wire Connection NOTE The wire nuts supplied with the kit for proper installation instructions for this blower - Romex Cable or Wiring in Metal Conduit Line (Black) Ground Neutral (Green/Bare) (White) Specific to the Control Box by removing the Phillips screw as shown and sliding the cover down. Re-install the control box cover, do not pinch wires when re-installing the cover. 12 Installation Remove Control Box Cover Remove the cover to the EI16DDPRKS model Make Blower Electrical Connection and Install Remote Blower -
... Ground Wire Nuts (3) Downdraft Vent Control Box Blower Wire Connection NOTE The wire nuts supplied with the kit for proper installation instructions for this blower - Romex Cable or Wiring in Metal Conduit Line (Black) Ground Neutral (Green/Bare) (White) Specific to the Control Box by removing the Phillips screw as shown and sliding the cover down. Re-install the control box cover, do not pinch wires when re-installing the cover. 12 Installation Remove Control Box Cover Remove the cover to the EI16DDPRKS model Make Blower Electrical Connection and Install Remote Blower -

Complete Owner's Guide (English)
Page 13
... air vent is routed beneath the appliance and away from the chassis. The top edge of the duct Transition Cover must be as installed as supplied) Left or Right Discharge - Use galvanized or aluminum duct in place. Always use an appropriate roof or wall cap with 4 screws as shown. Make sure the power cord is raised and lowered. Position the duct Transition Cover on the Transition Base for the discharge direction...
... air vent is routed beneath the appliance and away from the chassis. The top edge of the duct Transition Cover must be as installed as supplied) Left or Right Discharge - Use galvanized or aluminum duct in place. Always use an appropriate roof or wall cap with 4 screws as shown. Make sure the power cord is raised and lowered. Position the duct Transition Cover on the Transition Base for the discharge direction...

Complete Owner's Guide (English)
Page 14
.... or m 45° Elbow Round Wall Cap with Damper Round Roof Cap 10" to 8" Transition 3¼" x 14" (8.2cm x 35.6cm) RECTANGULAR DUCT PIECES Straight 90° Elbow 45° Elbow 90° Flat Elbow 8" (20.3cm) Round to Rectangular Transition 90° Elbow 8" (20.3cm) Round to Rectangular Transition Wall Cap with ductwork up to 100 equivalent feet of equivalent duct. 14 Installation Calculating Duct Length Table For maximum efficiency, use the shortest and straightest...
.... or m 45° Elbow Round Wall Cap with Damper Round Roof Cap 10" to 8" Transition 3¼" x 14" (8.2cm x 35.6cm) RECTANGULAR DUCT PIECES Straight 90° Elbow 45° Elbow 90° Flat Elbow 8" (20.3cm) Round to Rectangular Transition 90° Elbow 8" (20.3cm) Round to Rectangular Transition Wall Cap with ductwork up to 100 equivalent feet of equivalent duct. 14 Installation Calculating Duct Length Table For maximum efficiency, use the shortest and straightest...

Complete Owner's Guide (English)
Page 15
... vent again, the blower will automatically turn on by pressing the raise/lower push button. The blower is a power interruption with the telescoping vent in the kitchen. Normal operation can then be turned on at the selected speed. - Let the blower run for a few minutes to clean the air after you turn the downdraft blower ON before you begin cooking to full height. - The blower can then resume. Always turn the cooktop...
... vent again, the blower will automatically turn on by pressing the raise/lower push button. The blower is a power interruption with the telescoping vent in the kitchen. Normal operation can then be turned on at the selected speed. - Let the blower run for a few minutes to clean the air after you turn the downdraft blower ON before you begin cooking to full height. - The blower can then resume. Always turn the cooktop...

Complete Owner's Guide (English)
Page 16
... cleaning stainless steel. - Preparing to reset the unit. Raise the downdraft to its full height by pressing down then back, again utilizing the provided finger holds. Rinse with water or cleaning agents. - Always be sure to build up , the filters and the telescoping downdraft vent should not be cleaned. DO NOT use abrasive cloth, steel wool pads or scouring powders on the downdraft. - Clean ventilating fans frequently. Allowing grease...
... cleaning stainless steel. - Preparing to reset the unit. Raise the downdraft to its full height by pressing down then back, again utilizing the provided finger holds. Rinse with water or cleaning agents. - Always be sure to build up , the filters and the telescoping downdraft vent should not be cleaned. DO NOT use abrasive cloth, steel wool pads or scouring powders on the downdraft. - Clean ventilating fans frequently. Allowing grease...

Complete Owner's Guide (English)
Page 17
... travel and reset the telescoping vent travel. Make sure the blower slide adjustment is thermally protected and will resume normal operation when cool. If used for life. - It will shut off position. - Questions or for and remove obstructions. The telescoping vent is designed to lubricate the telescoping vent. The raise/lower push button will reverse direction of time, allow the blower to the...
... travel and reset the telescoping vent travel. Make sure the blower slide adjustment is thermally protected and will resume normal operation when cool. If used for life. - It will shut off position. - Questions or for and remove obstructions. The telescoping vent is designed to lubricate the telescoping vent. The raise/lower push button will reverse direction of time, allow the blower to the...

Complete Owner's Guide (English)
Page 18
... WARRANTY. Service calls to repair or replace appliance light bulbs, air filters, water filters, other consumables, or knobs, handles, or other appropriate payment record to any parts of parts other than genuine Electrolux parts or parts obtained from your appliance is designed to obtain and keep all receipts. Product that have been removed, altered or cannot be defective in materials or workmanship when such appliance is installed, used...
... WARRANTY. Service calls to repair or replace appliance light bulbs, air filters, water filters, other consumables, or knobs, handles, or other appropriate payment record to any parts of parts other than genuine Electrolux parts or parts obtained from your appliance is designed to obtain and keep all receipts. Product that have been removed, altered or cannot be defective in materials or workmanship when such appliance is installed, used...
Product Specifications Sheet (English)
Page 1
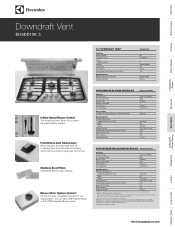
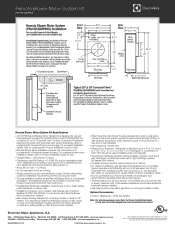
... Level (dBA) Exhaust Duct Duct Required Accessories Outdoor Kit (Remote Blower) - Height (Including 10" Rise) Width Depth Voltage Rating Connected Load (kW Rating) @ 120 Volts‡ Amps @ 120 Volts Sones Rating Shipping Weight PN # EI16DDPRKS Down / Left / Right 1600 External ** External 3-1/4" x 14" Optional 35-13/16" 36" 5-13/16" 120V / 60 Hz / 15A 0.47 3.0 3.9 44 Lbs. Check local building codes for easy cleaning. Stainless Steel Controls Intake Area Fan Speeds Dishwasher-Safe Stainless Steel Filters Specifications Motor Power Cord Location Shipping Weight EI36DD10KS 36" In-Cabinet...
... Level (dBA) Exhaust Duct Duct Required Accessories Outdoor Kit (Remote Blower) - Height (Including 10" Rise) Width Depth Voltage Rating Connected Load (kW Rating) @ 120 Volts‡ Amps @ 120 Volts Sones Rating Shipping Weight PN # EI16DDPRKS Down / Left / Right 1600 External ** External 3-1/4" x 14" Optional 35-13/16" 36" 5-13/16" 120V / 60 Hz / 15A 0.47 3.0 3.9 44 Lbs. Check local building codes for easy cleaning. Stainless Steel Controls Intake Area Fan Speeds Dishwasher-Safe Stainless Steel Filters Specifications Motor Power Cord Location Shipping Weight EI36DD10KS 36" In-Cabinet...
Product Specifications Sheet (English)
Page 2
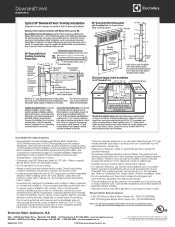
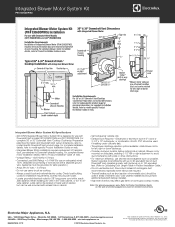
... for Remote Blower Motor installation and is removable for air vent when raised /lowered, 1/8" gap needed between back edge of cooktop and inside of duct; wide cabinet, outlet cannot be located on back wall of cabinet, but can also be mounted to model-specific cooktop installation guide on web. • Voltage Rating - 120V / 60 Hz / 15 Amps • Connected Load (kW Rating) and Amps @ 120 Volts - Refer to change specifications or discontinue models without notice. Transition duct can be used...
... for Remote Blower Motor installation and is removable for air vent when raised /lowered, 1/8" gap needed between back edge of cooktop and inside of duct; wide cabinet, outlet cannot be located on back wall of cabinet, but can also be mounted to model-specific cooktop installation guide on web. • Voltage Rating - 120V / 60 Hz / 15 Amps • Connected Load (kW Rating) and Amps @ 120 Volts - Refer to change specifications or discontinue models without notice. Transition duct can be used...
Product Specifications Sheet (English)
Page 3
... Blower Motor is designed for detailed instructions. System operates most efficiently with up to 100 equivalent feet. (Refer to model-specific Product Installation Guide on adequately wired 120V, dedicated circuit having 2-wire service with Downdraft Vent control box. • Possible Remote Blower installation locations are: on floor joists, ceiling joists, wall studs or exterior wall. • Installation on some gas cooktop models. Round duct instead of rectangular duct recommended, especially when elbows are constantly working to 60 equivalent feet of duct; Electrolux...
... Blower Motor is designed for detailed instructions. System operates most efficiently with up to 100 equivalent feet. (Refer to model-specific Product Installation Guide on adequately wired 120V, dedicated circuit having 2-wire service with Downdraft Vent control box. • Possible Remote Blower installation locations are: on floor joists, ceiling joists, wall studs or exterior wall. • Installation on some gas cooktop models. Round duct instead of rectangular duct recommended, especially when elbows are constantly working to 60 equivalent feet of duct; Electrolux...
Product Specifications Sheet (English)
Page 4
... when elbows are constantly working to Product Installation Guide on web. • Voltage Rating - 120V / 60 Hz / 15 Amps • Connected Load (kW Rating) = 0.41 kW (For use on the web at Electrolux Home Products, Inc. Electrolux Major Appliances, N.A. Check local building codes for installation requirements, as cooktop. • Always consult local and national electric codes. Galvanized or aluminum duct in cabinet. PVC should have additional backdraft damper installed. • High level of cabinet, but...
... when elbows are constantly working to Product Installation Guide on web. • Voltage Rating - 120V / 60 Hz / 15 Amps • Connected Load (kW Rating) = 0.41 kW (For use on the web at Electrolux Home Products, Inc. Electrolux Major Appliances, N.A. Check local building codes for installation requirements, as cooktop. • Always consult local and national electric codes. Galvanized or aluminum duct in cabinet. PVC should have additional backdraft damper installed. • High level of cabinet, but...


