Complete Owner's Guide (English)
Page 4
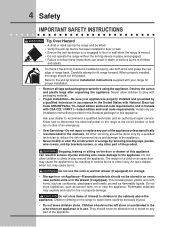
... is properly installed and grounded by removing leveling legs, panels, wire covers, anti-tip brackets/screws, or any other injury. Carefully attempt to the appliance. Do not use both arms and grasp the rear edge of the product. 4 Safety IMPORTANT SAFETY INSTRUCTIONS Tip Over Hazard • A child or... to follow these instructions can result in serious burns or other part of range back. Destroy the carton and plastic bags after unpacking the appliance. Never allow children to the range at the circuit breaker or fuse box in case of an emergency. • User Servicing-Do not...
... is properly installed and grounded by removing leveling legs, panels, wire covers, anti-tip brackets/screws, or any other injury. Carefully attempt to the appliance. Do not use both arms and grasp the rear edge of the product. 4 Safety IMPORTANT SAFETY INSTRUCTIONS Tip Over Hazard • A child or... to follow these instructions can result in serious burns or other part of range back. Destroy the carton and plastic bags after unpacking the appliance. Never allow children to the range at the circuit breaker or fuse box in case of an emergency. • User Servicing-Do not...
Complete Owner's Guide (English)
Page 5
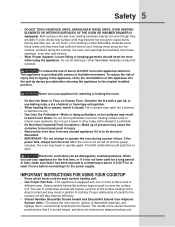
...portion of pressure may result in injury. • Remove the oven door from steam. The handle of clothing. During and after returning the appliance to burst and result in ignition of the utensil should never be damaged by cold temperatures. To reduce the risk of burns, DO NOT ... different sizes. IMPORTANT INSTRUCTIONS FOR USING YOUR COOKTOP • Know which knob controls each surface heating unit. • Use Proper Pan Size-This appliance is turned inward, and does not extend over adjacent surface unit. The use , do not touch, or let clothing or other flammable ...
...portion of pressure may result in injury. • Remove the oven door from steam. The handle of clothing. During and after returning the appliance to burst and result in ignition of the utensil should never be damaged by cold temperatures. To reduce the risk of burns, DO NOT ... different sizes. IMPORTANT INSTRUCTIONS FOR USING YOUR COOKTOP • Know which knob controls each surface heating unit. • Use Proper Pan Size-This appliance is turned inward, and does not extend over adjacent surface unit. The use , do not touch, or let clothing or other flammable ...
Complete Owner's Guide (English)
Page 6
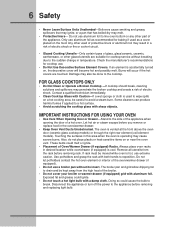
... may melt. • Protective liners- Doing so could ignite. • Do not touch a hot light bulb with both hands to the appliance before removing and replacing light bulb. Contact a qualified technician immediately. • Clean Cooktop Glass with sharp objects. Only use extreme ... solutions and spillovers may cause severe burns. Do not let potholders contact the hot oven element or interior of electric shock. Disconnect the appliance or turn off the power to reposition. Do not use . • Do Not Use Decorative Surface Element Covers. Check the manufacturer...
... may melt. • Protective liners- Doing so could ignite. • Do not touch a hot light bulb with both hands to the appliance before removing and replacing light bulb. Contact a qualified technician immediately. • Clean Cooktop Glass with sharp objects. Only use extreme ... solutions and spillovers may cause severe burns. Do not let potholders contact the hot oven element or interior of electric shock. Disconnect the appliance or turn off the power to reposition. Do not use . • Do Not Use Decorative Surface Element Covers. Check the manufacturer...
Complete Owner's Guide (English)
Page 16
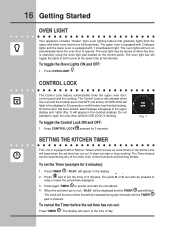
... time has run out, "00:00" will be displayed and the TIMER pad will turn on the control panel. 16 Getting Started OVEN LIGHT Your appliance includes "theater" style oven lighting feature that will beep when the set time has run out. The upper oven is equipped with 2 halogen lights and...
... time has run out, "00:00" will be displayed and the TIMER pad will turn on the control panel. 16 Getting Started OVEN LIGHT Your appliance includes "theater" style oven lighting feature that will beep when the set time has run out. The upper oven is equipped with 2 halogen lights and...
Complete Owner's Guide (English)
Page 39
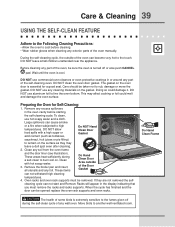
... oven cavity before cleaning. • Wear rubber gloves when cleaning any part of the self-cleaning oven. DO NOT leave small children unattended near the appliance. Care should be removed. Remove any soil from the oven frame and the door liner (see illustration). When the cycle has finished and the...
... oven cavity before cleaning. • Wear rubber gloves when cleaning any part of the self-cleaning oven. DO NOT leave small children unattended near the appliance. Care should be removed. Remove any soil from the oven frame and the door liner (see illustration). When the cycle has finished and the...
Complete Owner's Guide (English)
Page 40
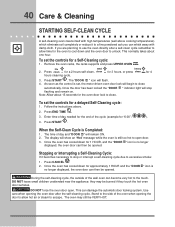
... approximately 1 HOUR and the "DOOR " icon is Completed: 1. Press clean for a delayed Self-Cleaning cycle: 1. Press START . DO NOT leave small children unattended near the appliance; Follow the instructions above cooking temperatures) which eliminate soil completely or reduce it becomes necessary to unlock. Once the oven has cooled down and the...
... approximately 1 HOUR and the "DOOR " icon is Completed: 1. Press clean for a delayed Self-Cleaning cycle: 1. Press START . DO NOT leave small children unattended near the appliance; Follow the instructions above cooking temperatures) which eliminate soil completely or reduce it becomes necessary to unlock. Once the oven has cooled down and the...
Complete Owner's Guide (English)
Page 41
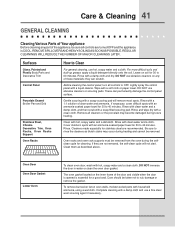
... and oven rack supports must be removed. Care should be sure all controls are turned OFF and the appliance is essential for cleaning. For more difficult soils and built-up grease, apply a liquid detergent...the oven door gasket. The oven gasket located on any part of the appliance, be taken not to rub, damage or remove the gasket. Care & Cleaning 41 GENERAL CLEANING Cleaning ...Various Parts of Your appliance Before cleaning any of these materials; Rinse with clean water and a damp cloth, and then ...
... and oven rack supports must be removed. Care should be sure all controls are turned OFF and the appliance is essential for cleaning. For more difficult soils and built-up grease, apply a liquid detergent...the oven door gasket. The oven gasket located on any part of the appliance, be taken not to rub, damage or remove the gasket. Care & Cleaning 41 GENERAL CLEANING Cleaning ...Various Parts of Your appliance Before cleaning any of these materials; Rinse with clean water and a damp cloth, and then ...

Complete Owner's Guide (English)
Page 42
...sides, pull the bottom of the door up . 3. Proceed in this Use & Care Manual. Read the following recommendations: 1. Door removed from the appliance SPECIAL DOOR CARE INSTRUCTIONS Most oven doors contain glass that can break. Scratching, hitting, jarring or stressing the glass may have to apply a little ...upward pressure on each hinge support toward the appliance to pull it up and toward you while rotating the top of the door toward front of stainless parts. Make sure the hinge supports...
...sides, pull the bottom of the door up . 3. Proceed in this Use & Care Manual. Read the following recommendations: 1. Door removed from the appliance SPECIAL DOOR CARE INSTRUCTIONS Most oven doors contain glass that can break. Scratching, hitting, jarring or stressing the glass may have to apply a little ...upward pressure on each hinge support toward the appliance to pull it up and toward you while rotating the top of the door toward front of stainless parts. Make sure the hinge supports...
Complete Owner's Guide (English)
Page 43
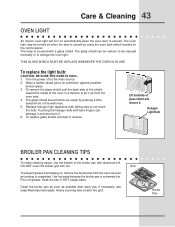
... in reverse. Broiler Pan The glass shield should come out easily by using the oven light switch located on the control panel. Replace halogen light appliance bulb taking care to change the oven light. Lift backside of the wall oven. 5. To replace the light bulb: CAUTION: BE SURE THE OVEN IS...
... in reverse. Broiler Pan The glass shield should come out easily by using the oven light switch located on the control panel. Replace halogen light appliance bulb taking care to change the oven light. Lift backside of the wall oven. 5. To replace the light bulb: CAUTION: BE SURE THE OVEN IS...
Complete Owner's Guide (English)
Page 46
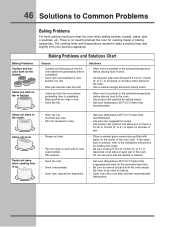
... in the oven. • Do not use pans that will permit 5.1cm to 10.2cm (2" to 4") of air space on all pans from your previous appliance. Cakes too dark on the bottom. Solutions • Allow oven to preheat to the selected temperature before preheating time is no need to 4") of clearance...
... in the oven. • Do not use pans that will permit 5.1cm to 10.2cm (2" to 4") of air space on all pans from your previous appliance. Cakes too dark on the bottom. Solutions • Allow oven to preheat to the selected temperature before preheating time is no need to 4") of clearance...
Complete Owner's Guide (English)
Page 49
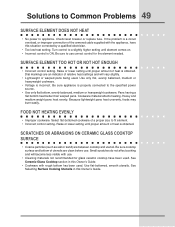
...until element comes on. • Incorrect control is obtained. See Selecting Surface Cooking Utensils in this Owner's Guide. • Cookware with the appliance, have been used . SCRATCHES OR ABRASIONS ON CERAMIC GLASS COOKTOP SURFACE • Coarse particles (such as salt or sand) are clean before ...use correct control for glass ceramic cooktop have this Owner's Guide. Raise or lower setting until proper amount of a proper size to appliance. Be sure cooktop surface and bottom of heat is incorrect. Turn control to use . FOOD NOT HEATING EVENLY • Improper cookware....
...until element comes on. • Incorrect control is obtained. See Selecting Surface Cooking Utensils in this Owner's Guide. • Cookware with the appliance, have been used . SCRATCHES OR ABRASIONS ON CERAMIC GLASS COOKTOP SURFACE • Coarse particles (such as salt or sand) are clean before ...use correct control for glass ceramic cooktop have this Owner's Guide. Raise or lower setting until proper amount of a proper size to appliance. Be sure cooktop surface and bottom of heat is incorrect. Turn control to use . FOOD NOT HEATING EVENLY • Improper cookware....
Complete Owner's Guide (English)
Page 51
...or installation, including but not limited to be defective in materials or workmanship when such appliance is " are not covered by unauthorized service companies; USA 1-877-435-3287 Electrolux Major Appliances North America P.O. Food loss due to any refrigerator or freezer failures. 6. Expenses for ... your best interest to establish the warranty period should service be defective in materials or workmanship when such appliance is warranted by Electrolux or an authorized service company. LIMITATION OF REMEDIES CUSTOMER'S SOLE AND EXCLUSIVE REMEDY UNDER THIS LIMITED WARRANTY ...
...or installation, including but not limited to be defective in materials or workmanship when such appliance is " are not covered by unauthorized service companies; USA 1-877-435-3287 Electrolux Major Appliances North America P.O. Food loss due to any refrigerator or freezer failures. 6. Expenses for ... your best interest to establish the warranty period should service be defective in materials or workmanship when such appliance is warranted by Electrolux or an authorized service company. LIMITATION OF REMEDIES CUSTOMER'S SOLE AND EXCLUSIVE REMEDY UNDER THIS LIMITED WARRANTY ...
Installation Instructions (English, Spanish, French)
Page 1
Canada Table of this or any other appliance. Remove all instructions contained in these installation instructions before connecting the electrical supply to the Consumer Keep these instructions with your owner's guide for future ...
Canada Table of this or any other appliance. Remove all instructions contained in these installation instructions before connecting the electrical supply to the Consumer Keep these instructions with your owner's guide for future ...
Installation Instructions (English, Spanish, French)
Page 2
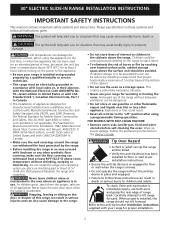
...horizontally a minimum of 5 inches beyond the bottom of range back. Never leave the oven door open when the range is in use of appliances designed for manufactured (mobile) home installation must be avoided. Carefully attempt to reach items. • To eliminate the risk of ¼" (0....withstand the heat generated by installing a range hood that may cause serious bodily harm, death or property damage. Please pay attention to the appliance. • Be sure your range for proper installation. 2 If cabinet storage is moved. • Do not operate the range without ...
...horizontally a minimum of 5 inches beyond the bottom of range back. Never leave the oven door open when the range is in use of appliances designed for manufactured (mobile) home installation must be avoided. Carefully attempt to reach items. • To eliminate the risk of ¼" (0....withstand the heat generated by installing a range hood that may cause serious bodily harm, death or property damage. Please pay attention to the appliance. • Be sure your range for proper installation. 2 If cabinet storage is moved. • Do not operate the range without ...
Installation Instructions (English, Spanish, French)
Page 3
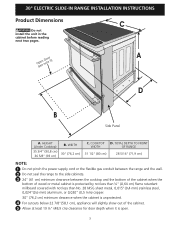
...) stainless steel, 0,024"(0,6 mm) aluminum, or 0,020" (0,5 mm) copper. 30" (76,2 cm) minimum clearance when the cabinet is unprotected. 4 For cutouts below 22 7/8"(58,1 cm), appliance will slightly show out of the cabinet. 5 Allow at least 19 ¼" (48,9 cm) clearance for door depth when it is open. 3 O(pseeen nDootoer5) A D B Side...
...) stainless steel, 0,024"(0,6 mm) aluminum, or 0,020" (0,5 mm) copper. 30" (76,2 cm) minimum clearance when the cabinet is unprotected. 4 For cutouts below 22 7/8"(58,1 cm), appliance will slightly show out of the cabinet. 5 Allow at least 19 ¼" (48,9 cm) clearance for door depth when it is open. 3 O(pseeen nDootoer5) A D B Side...
Installation Instructions (English, Spanish, French)
Page 4
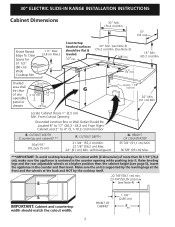
...;"min. 30" Min. (see Note 4) E IMPORTANT: Cabinet and countertop width should match the cutout width. G of more than 30 1/16" (76,4 cm), make sure the appliance is supported by the leveling legs at the front and the wheels at a higher position than the cabinet height (see page 5), insert the... appliance in the counter opening while pushing into it. CUTOUT DEPTH 21 3/4" (55,2 cm) Min. 22 1/8" (56,2 cm) Max 24" (61 cm) Min. openable panel or ...
...;"min. 30" Min. (see Note 4) E IMPORTANT: Cabinet and countertop width should match the cutout width. G of more than 30 1/16" (76,4 cm), make sure the appliance is supported by the leveling legs at the front and the wheels at a higher position than the cabinet height (see page 5), insert the... appliance in the counter opening while pushing into it. CUTOUT DEPTH 21 3/4" (55,2 cm) Min. 22 1/8" (56,2 cm) Max 24" (61 cm) Min. openable panel or ...
Installation Instructions (English, Spanish, French)
Page 6
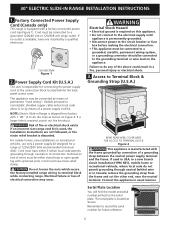
...120/208 volt range outlet. Canada Style Figure 1 2. NOTE: Electric Slide-in a fire, personal injury or electrical shock. 3. Connect the appliance in a new branch circuit installation (1996 NEC), mobile home or recreational vehicule, where local code do any of a power supply cord kit.... may be connected to Terminal Block & Grounding Strap (U.S.A.) BEND REAR WIRE COVER HERE FOR ACCESS TO TERMINAL BLOCK Figure 2 This appliance is equipped with the frame grounded by a qualified electrician. Cord must be connected to terminal block while connecting range. Power Supply Cord...
...120/208 volt range outlet. Canada Style Figure 1 2. NOTE: Electric Slide-in a fire, personal injury or electrical shock. 3. Connect the appliance in a new branch circuit installation (1996 NEC), mobile home or recreational vehicule, where local code do any of a power supply cord kit.... may be connected to Terminal Block & Grounding Strap (U.S.A.) BEND REAR WIRE COVER HERE FOR ACCESS TO TERMINAL BLOCK Figure 2 This appliance is equipped with the frame grounded by a qualified electrician. Cord must be connected to terminal block while connecting range. Power Supply Cord...
Installation Instructions (English, Spanish, French)
Page 7
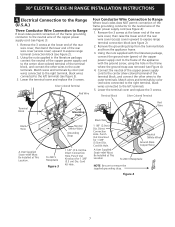
... Using the nuts supplied with the literature package, connect the ground wire (green) of the copper power supply cord to the frame of the appliance with the ground screw, using the hole in the literature package, connect the neutral of the copper power supply cord to the center silver-colored...block, and connect the other wires to the outer terminals. Direct Connection Hole. Remove the grounding strap from the terminal block and from the appliance frame. 3. Connect the neutral of the copper power supply cord to the center silver-colored terminal of the terminal block, and connect the ...
... Using the nuts supplied with the literature package, connect the ground wire (green) of the copper power supply cord to the frame of the appliance with the ground screw, using the hole in the literature package, connect the neutral of the copper power supply cord to the center silver-colored...block, and connect the other wires to the outer terminals. Direct Connection Hole. Remove the grounding strap from the terminal block and from the appliance frame. 3. Connect the neutral of the copper power supply cord to the center silver-colored terminal of the terminal block, and connect the ...
Installation Instructions (English, Spanish, French)
Page 8
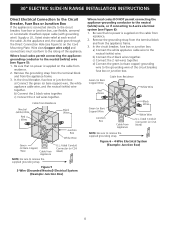
... (or Bare Copper) Wire Cable from Residence Red Wires White Wire Green (or Bare Copper) Wire Junction Box Black Wires Cable from the appliance frame. 3. Figure 6 - 4-Wire Electrical System (Example: Junction Box) 8 Be sure that no power is connected directly to remove the...Hole (see Figure 6): 1. Figure 5 3-Wire (Grounded Neutral) Electrical System (Example: Junction Box) Where local codes DO NOT permit connecting the appliance-grounding conductor to the neutral (white) wire, or if connecting to the rating of the cable. Supply a U.L. Wire sizes (copper wire only)...
... (or Bare Copper) Wire Cable from Residence Red Wires White Wire Green (or Bare Copper) Wire Junction Box Black Wires Cable from the appliance frame. 3. Figure 6 - 4-Wire Electrical System (Example: Junction Box) 8 Be sure that no power is connected directly to remove the...Hole (see Figure 6): 1. Figure 5 3-Wire (Grounded Neutral) Electrical System (Example: Junction Box) Where local codes DO NOT permit connecting the appliance-grounding conductor to the neutral (white) wire, or if connecting to the rating of the cable. Supply a U.L. Wire sizes (copper wire only)...
Installation Instructions (English, Spanish, French)
Page 10
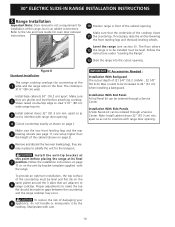
... installing a backguard. Refer to interfere with care. Remove and discard the two rear leveling legs, they are setup higher than the height of damaging your 9 appliance, do not handle or manipulate it by lowering the front leveling legs and the back leveling wheels. Follow the instructions under "Leveling the Range". 13...
... installing a backguard. Refer to interfere with care. Remove and discard the two rear leveling legs, they are setup higher than the height of damaging your 9 appliance, do not handle or manipulate it by lowering the front leveling legs and the back leveling wheels. Follow the instructions under "Leveling the Range". 13...
